7. Heatbed & PSU assembly
98
Original Prusa i3 MK3S+ kit assembly
STEP 8
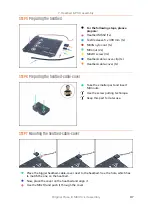
Mounting the heatbed-cable-cover
Hold the screw with your thumb
and flip the heatbed upside down.
Use M3nN nyloc nut and tighten
the screw.
Use pliers and Allen key to tighten
the nut with the screw.
STEP 9
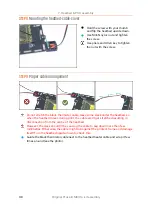
Proper cable management
Do not stretch the black thermistor cable, leave some slack under the heatbed, so
when the heatbed moves during print, the cable won't get stretched resulting in
disconnection from the centre of the heatbed.
However, the slack shouldn't be causing the cable to sag down more than few
millimetres. Otherwise, the cable might rub against the printer's frame and damage
itself! Turn the heatbed upside-down to check this.
Guide the black thermistor cable next to the heatbed heater cable and wrap it few
times around (see the photo).
Summary of Contents for i3 MK3S+
Page 6: ...6 ...
Page 7: ...Original Prusa i3 MK3S kit assembly 7 1 Introduction ...
Page 15: ...Original Prusa i3 MK3S kit assembly 15 2 Y axis assembly ...
Page 36: ...36 Original Prusa i3 MK3S kit assembly 3 X axis assembly ...
Page 44: ...44 Original Prusa i3 MK3S kit assembly 4 Z axis assembly ...
Page 51: ...Original Prusa i3 MK3S kit assembly 51 5 E axis assembly ...
Page 88: ...88 Original Prusa i3 MK3S kit assembly 6 LCD assembly ...
Page 94: ...94 Original Prusa i3 MK3S kit assembly 7 Heatbed PSU assembly ...
Page 108: ...108 Original Prusa i3 MK3S kit assembly 8 Electronics assembly ...
Page 132: ...132 Original Prusa i3 MK3S kit assembly 9 Preflight check ...
Page 137: ...137 Notes ...
Page 138: ...138 ...
Page 139: ...139 Notes ...
Page 140: ...140 ...
Page 141: ...141 Notes ...
Page 142: ...142 ...
Page 143: ...143 Notes ...
Page 144: ...144 ...

