8. Electronics assembly
Original Prusa i3 MK3S+ kit assembly
109
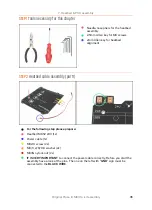
STEP 1
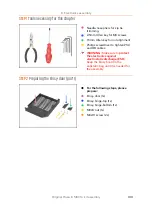
Tools necessary for this chapter
Needle-nose pliers for zip tie
trimming.
2.5mm Allen key for M3 screws
1.5mm Allen key for nut alignment
Philips screwdriver to tighten PSU
and HB cables
WARNING:
Make sure to
protect
the electronics against
electrostatic discharge (ESD
).
Keep the Einsy board in the
antistatic bag until it is needed for
the assembly.
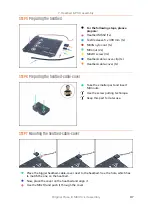
STEP 2
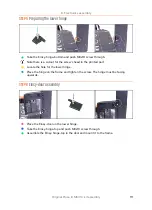
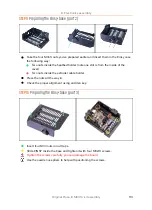
Preparing the Einsy-door (part 1)
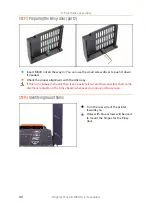
For the following steps, please
prepare:
Einsy-door (1x)
Einsy-hinge-top (1x)
Einsy-hinge-bottom (1x)
M3nS nut (1x)
M3x10 screw (2x)
Summary of Contents for i3 MK3S+
Page 6: ...6 ...
Page 7: ...Original Prusa i3 MK3S kit assembly 7 1 Introduction ...
Page 15: ...Original Prusa i3 MK3S kit assembly 15 2 Y axis assembly ...
Page 36: ...36 Original Prusa i3 MK3S kit assembly 3 X axis assembly ...
Page 44: ...44 Original Prusa i3 MK3S kit assembly 4 Z axis assembly ...
Page 51: ...Original Prusa i3 MK3S kit assembly 51 5 E axis assembly ...
Page 88: ...88 Original Prusa i3 MK3S kit assembly 6 LCD assembly ...
Page 94: ...94 Original Prusa i3 MK3S kit assembly 7 Heatbed PSU assembly ...
Page 108: ...108 Original Prusa i3 MK3S kit assembly 8 Electronics assembly ...
Page 132: ...132 Original Prusa i3 MK3S kit assembly 9 Preflight check ...
Page 137: ...137 Notes ...
Page 138: ...138 ...
Page 139: ...139 Notes ...
Page 140: ...140 ...
Page 141: ...141 Notes ...
Page 142: ...142 ...
Page 143: ...143 Notes ...
Page 144: ...144 ...

