


5. E-axis assembly
Original Prusa i3 MK3S+ kit assembly
79
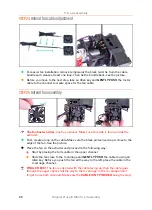
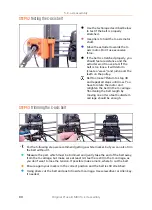
STEP 50
Tensioning the X-axis belt
Using right hand rotate the motor to its original position and hold it (tension is
applied to the belt).
Using two fingers on your left hand push the belt together. Very small force should
be needed for bending the belt, BUT the belt shouldn't be bent by its own weight
before being pressed with your fingers, it must be straight.
If you are struggling to rotate the motor back into position, the belt tension is too
high.
Depending on the belt being under or overstretched, adjust the amount of the belt
in the X-carriage.
When done, rotate the motor to its original position and tighten the M3 screws
again.
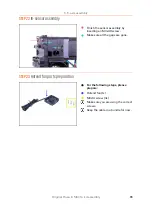
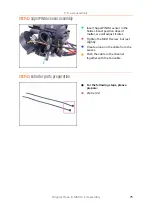
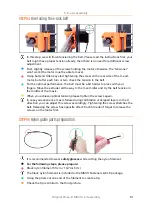
STEP 51
Aligning the X-axis belt
Both top and bottom part of the belt
should be parallel (above each
other).
To adjust the belt position, release
the screws on the pulley and move
it slightly until you reach the best
position.
Tighten both screws on the pulley.
Summary of Contents for i3 MK3S+
Page 6: ...6 ...
Page 7: ...Original Prusa i3 MK3S kit assembly 7 1 Introduction ...
Page 15: ...Original Prusa i3 MK3S kit assembly 15 2 Y axis assembly ...
Page 36: ...36 Original Prusa i3 MK3S kit assembly 3 X axis assembly ...
Page 44: ...44 Original Prusa i3 MK3S kit assembly 4 Z axis assembly ...
Page 51: ...Original Prusa i3 MK3S kit assembly 51 5 E axis assembly ...
Page 88: ...88 Original Prusa i3 MK3S kit assembly 6 LCD assembly ...
Page 94: ...94 Original Prusa i3 MK3S kit assembly 7 Heatbed PSU assembly ...
Page 108: ...108 Original Prusa i3 MK3S kit assembly 8 Electronics assembly ...
Page 132: ...132 Original Prusa i3 MK3S kit assembly 9 Preflight check ...
Page 137: ...137 Notes ...
Page 138: ...138 ...
Page 139: ...139 Notes ...
Page 140: ...140 ...
Page 141: ...141 Notes ...
Page 142: ...142 ...
Page 143: ...143 Notes ...
Page 144: ...144 ...