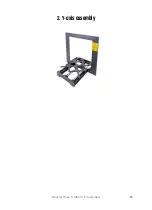
2. Y-axis assembly
Original Prusa i3 MK3S+ kit assembly
17
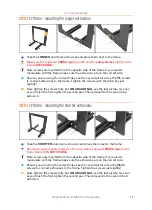
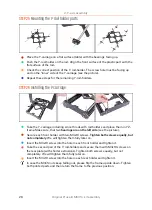
STEP 3
YZ frame - mounting the longer extrusions
Take the
LONGER
aluminum extrusions and place them next to the frame.
Make sure the engraved
PRUSA logo
(top left) and the
safety sticker
(right) on the
frame
ARE VISIBLE
!
Note: screws are inserted from the opposite side of the frame. If you need to
manipulate with the frame, make sure the extrusions are on the correct side.
Ensure you are using the correct holes, see the second picture. Use the M5 screws
to connect extrusions to the frame. Tighten the screws with the Allen key just
slightly!
Now, tighten the screws fully, but
ON A DIAGONAL
, see the last picture. As soon
as you finish the first, tighten the second pair. Then proceed to the second long
extrusion.
STEP 4
YZ frame - mounting the shorter extrusions
Take the
SHORTER
aluminum extrusions and place them next to the frame.
Short extrusions must be placed on the side, where engraved
PRUSA logo
on the
frame (top left)
IS NOT VISIBLE
.
Note: screws are inserted from the opposite side of the frame. If you need to
manipulate with the frame, make sure the extrusions are on the correct side.
Ensure you are using the correct holes, see the second picture. Use the M5x16
screws to connect extrusions to the frame. Tighten the screws just slightly!
Now, tighten the screws fully, but
ON A DIAGONAL
, see the last picture. As soon
as you finish the first, tighten the second pair. Then proceed to the second short
extrusion.
Summary of Contents for i3 MK3S+
Page 6: ...6 ...
Page 7: ...Original Prusa i3 MK3S kit assembly 7 1 Introduction ...
Page 15: ...Original Prusa i3 MK3S kit assembly 15 2 Y axis assembly ...
Page 36: ...36 Original Prusa i3 MK3S kit assembly 3 X axis assembly ...
Page 44: ...44 Original Prusa i3 MK3S kit assembly 4 Z axis assembly ...
Page 51: ...Original Prusa i3 MK3S kit assembly 51 5 E axis assembly ...
Page 88: ...88 Original Prusa i3 MK3S kit assembly 6 LCD assembly ...
Page 94: ...94 Original Prusa i3 MK3S kit assembly 7 Heatbed PSU assembly ...
Page 108: ...108 Original Prusa i3 MK3S kit assembly 8 Electronics assembly ...
Page 132: ...132 Original Prusa i3 MK3S kit assembly 9 Preflight check ...
Page 137: ...137 Notes ...
Page 138: ...138 ...
Page 139: ...139 Notes ...
Page 140: ...140 ...
Page 141: ...141 Notes ...
Page 142: ...142 ...
Page 143: ...143 Notes ...
Page 144: ...144 ...


