


7. Heatbed & PSU assembly
106
Original Prusa i3 MK3S+ kit assembly
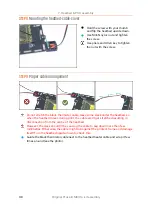
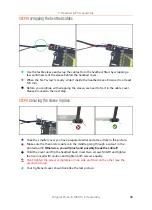
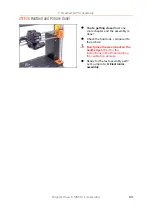
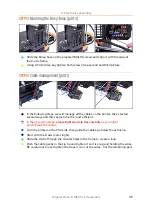
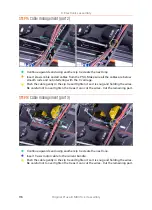
STEP 24
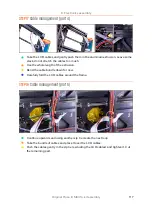
Connecting the power panic
Take the Power panic cable and connect it to the PSU. Both ends of the cable are
the same, use any.
Gently bend the Power panic cable and place it close to the power cables (PSU-
cable). Be careful as you might snap the entire connector from the board, keep that
in mind until the printer is fully assembled,
don't pull the cable.
Guide the cables to the other side of the printer. We will fix them to the frame later
on.
Don't place the cover on the PSU, wait for the next chapter.
STEP 25
Haribo time!
Slightly harder chapter, but have 10
%. We need to keep more for the
next.
Summary of Contents for i3 MK3S+
Page 6: ...6 ...
Page 7: ...Original Prusa i3 MK3S kit assembly 7 1 Introduction ...
Page 15: ...Original Prusa i3 MK3S kit assembly 15 2 Y axis assembly ...
Page 36: ...36 Original Prusa i3 MK3S kit assembly 3 X axis assembly ...
Page 44: ...44 Original Prusa i3 MK3S kit assembly 4 Z axis assembly ...
Page 51: ...Original Prusa i3 MK3S kit assembly 51 5 E axis assembly ...
Page 88: ...88 Original Prusa i3 MK3S kit assembly 6 LCD assembly ...
Page 94: ...94 Original Prusa i3 MK3S kit assembly 7 Heatbed PSU assembly ...
Page 108: ...108 Original Prusa i3 MK3S kit assembly 8 Electronics assembly ...
Page 132: ...132 Original Prusa i3 MK3S kit assembly 9 Preflight check ...
Page 137: ...137 Notes ...
Page 138: ...138 ...
Page 139: ...139 Notes ...
Page 140: ...140 ...
Page 141: ...141 Notes ...
Page 142: ...142 ...
Page 143: ...143 Notes ...
Page 144: ...144 ...