2. Y-axis assembly
30
Original Prusa i3 MK3S+ kit assembly
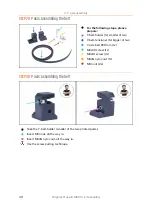
STEP 29
Y-axis: Assembling the belt
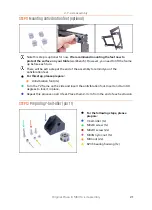
For the following steps, please
prepare:
Y-belt-holder (1x) smaller of two
Y-belt-tensioner (1x) bigger of two
Y-axis belt 650 mm (1x)
M3x30 screw (1x)
M3x10 screw (4x)
M3nN nyloc nut (1x)
M3n nut (2x)
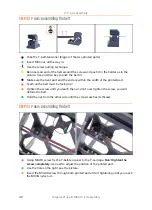
STEP 30
Y-axis: Assembling the belt
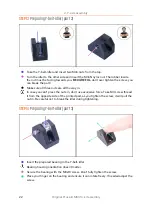
Take the Y-belt-holder (smaller of the two printed parts).
Insert M3n nut, all the way in.
Insert M3nN nyloc nut, all the way in.
Use the screw pulling technique.
Summary of Contents for i3 MK3S+
Page 6: ...6 ...
Page 7: ...Original Prusa i3 MK3S kit assembly 7 1 Introduction ...
Page 15: ...Original Prusa i3 MK3S kit assembly 15 2 Y axis assembly ...
Page 36: ...36 Original Prusa i3 MK3S kit assembly 3 X axis assembly ...
Page 44: ...44 Original Prusa i3 MK3S kit assembly 4 Z axis assembly ...
Page 51: ...Original Prusa i3 MK3S kit assembly 51 5 E axis assembly ...
Page 88: ...88 Original Prusa i3 MK3S kit assembly 6 LCD assembly ...
Page 94: ...94 Original Prusa i3 MK3S kit assembly 7 Heatbed PSU assembly ...
Page 108: ...108 Original Prusa i3 MK3S kit assembly 8 Electronics assembly ...
Page 132: ...132 Original Prusa i3 MK3S kit assembly 9 Preflight check ...
Page 137: ...137 Notes ...
Page 138: ...138 ...
Page 139: ...139 Notes ...
Page 140: ...140 ...
Page 141: ...141 Notes ...
Page 142: ...142 ...
Page 143: ...143 Notes ...
Page 144: ...144 ...

