MICRO SWITCH Maintained Cable Pull limit Switch
PK 8156 0
REQUIRED CABLE TENSION ADJUSTMENT
Step 1 - Align colored tension indicator line:
l
Tighten turnbuckle until colored tension indicator
line on switch plunger starts to appear from within
switch operating head.
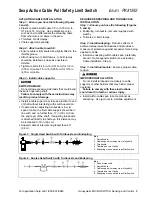
Step 2 - Ensure proper adjustment (Figure 7):
l
Ensure tension indicator line is visible and aligned
with end of guide bushing on operating head.
l
Periodically check and adjust cable tension as
necessary.
Figure 7: Cable Tension at Proper Setting
With endspring installed, switch/cable will operate
satisfactorily over a temperature range of +/-25° F
(+/-12°C), up to maximum cable length of 200 ft.
(60 m).
Adjust cable tension when ambient temperature
is near mid point of expected temperature
extremes.
OPTIONAL CORNER INSTALLATION
When changing actuating cable direction, ensure
cable runs freely through pulley or cable supports.
OTHER ADJUSTMENTS
To reposition operating head, loosen the four
captive screws, place head in desired position.
Securely tighten the four screws to 12-16 in.-lb
(1,36-1,80 N-m).
RECOMMENDED REPLACEMENT
Replace entire switch every 100,000 operations.
WARRANTY/REMEDY
Honeywell warrants goods of its manufacture as
being free of defective material and faulty
workmanship. Commencing with date of shipment,
Honeywell's warranty runs for 18 months. If
warranted goods are returned to Honeywell during
that period of coverage, Honeywell will repair or
replace without charge those items it finds
defective.
The foregoing is Buyer's sole remedy
and is in lieu of all other warranties, express or
implied, including those of merchantability and
fitness for a particular purpose.
While we provide application assistance,
personally and through our literature, it is up to the
customer to determine the suitability of the product
in the application.
Specifications may change at anytime and
without notice. The information we supply is
believed to be accurate and reliable as of this
printing. However, we assume no responsibility for
its use.
1-800-537-6945 (USA)
+44 (0) 161 251 4079 (UK)
+33 (0) 4 76 41 7200 (France)
+49 (0) 69 8064 444 (Germany)
1-800-737-3360 (Canada)
1-815-235-6847 (International)
FAX
1-815-235-6545 (USA)
INTERNET
http://www.sensing.honeywell.com
[email protected]
Honeywell
Helping You Control Your World
Summary of Contents for SYA14 Series
Page 2: ...2 107031 23 EN FR26 GLO 1199 Printed in France This page has been left intentionally blank ...
Page 6: ...6 107031 23 EN FR26 GLO 1199 Printed in France This page has been left intentionally blank ...
Page 26: ...26 107031 23 EN FR26 GLO 1199 Printed in France This page has been left intentionally blank ...
Page 62: ...62 107031 23 EN FR26 GLO 1199 Printed in France This page has been left intentionally blank ...
Page 70: ...70 107031 23 EN FR26 GLO 1199 Printed in France This page has been left intentionally blank ...
Page 76: ...76 107031 23 EN FR26 GLO 1199 Printed in France This page has been left intentionally blank ...
Page 78: ...78 107031 23 EN FR26 GLO 1199 Printed in France This page has been left intentionally blank ...
Page 79: ...107031 23 EN FR26 GLO 1199 Printed in France 79 8 CE Declaration of Conformity ...
Page 80: ...80 107031 23 EN FR26 GLO 1199 Printed in France This page has been left intentionally blank ...
Page 84: ......
Page 158: ......
Page 160: ......
Page 161: ...For application help call 1 800 537 6945 Honeywell MICRO SWITCH Sensing and Control 80 ...
Page 165: ...3 107022 14 EN FR26 GLO 0100 Printed in Germany This page has been left intentionally blank ...
Page 201: ...39 107022 14 EN FR26 GLO 0100 Printed in Germany This page has been left intentionally blank ...
Page 205: ...43 107022 14 EN FR26 GLO 0100 Printed in Germany This page has been left intentionally blank ...
Page 207: ...45 107022 14 EN FR26 GLO 0100 Printed in Germany This page has been left intentionally blank ...
Page 208: ...107022 14 EN FR26 GLO 0100 Printed in Germany 46 9 Declaration of Conformity ...
Page 219: ...11 107006 11 EN FR26 GLO 0300 Printed in Germany This page has been left intentionally blank ...
Page 229: ...21 107006 11 EN FR26 GLO 0300 Printed in Germany This page has been left intentionally blank ...
Page 257: ...49 107006 11 EN FR26 GLO 0300 Printed in Germany This page has been left intentionally blank ...
Page 260: ...107006 11 EN FR26 GLO 0300 Printed in Germany 52 9 3 Declaration of conformity ...
Page 340: ...Safety Perimeter Guarding Installation Manual FF SPS4 Series Safety Perimeter Guarding ...
Page 536: ...2 107004 15 EN FR26 ROW 0899 Printed in France This page has been left intentionally blank ...
Page 538: ...4 107004 15 EN FR26 ROW 0899 Printed in France This page has been left intentionally blank ...
Page 542: ...107004 15 EN FR26 ROW 0899 Printed in France 8 This page has been left intentionally blank ...
Page 620: ...86 107004 15 EN FR26 ROW 0899 Printed in France This page has been left intentionally blank ...
Page 624: ...90 107004 15 EN FR26 ROW 0899 Printed in France This page has been left intentionally blank ...
Page 626: ...92 107004 15 EN FR26 ROW 0899 Printed in France This page has been left intentionally blank ...
Page 627: ...107004 15 EN FR26 ROW 0899 Printed in France 93 8 CE Declaration of Conformity ...
Page 628: ...94 107004 15 EN FR26 ROW 0899 Printed in France This page has been left intentionally blank ...


