244
Displaying message logs
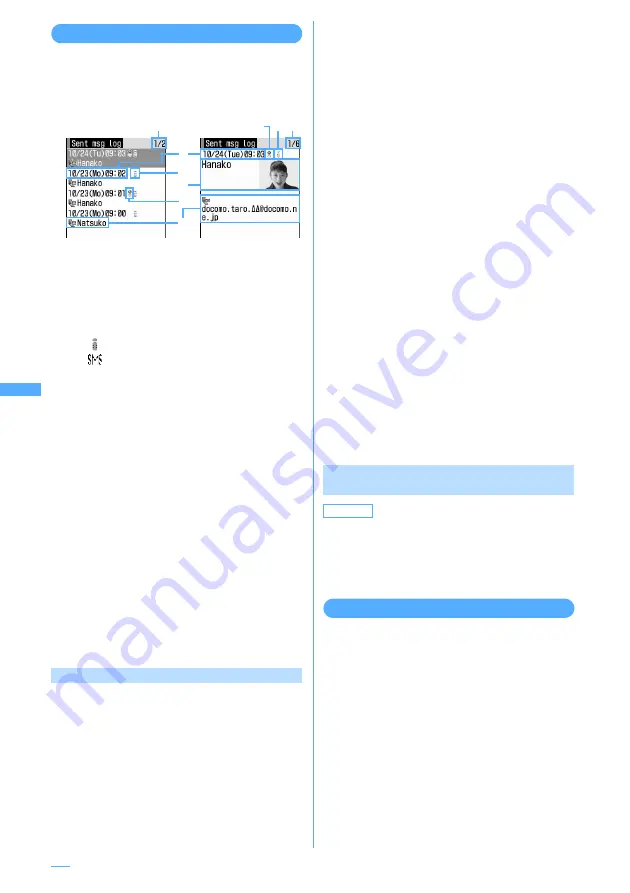
<Example> Displaying Sent msg log
1
m
e
481
・
Place the cursor on a party to display and
press
g
to display details screen.
a
Page/Total pages (list screen), Log No./
Number of items (details screen)
b
Sent/received date and time (Local date/
time when staying overseas)
c
Message log type
: i-mode mail
: SMS
d
Sent msg log recorded while staying
overseas (except GMT+09:00)
・
This does not appear when time
correction is not performed or the
sending date/time is not recorded.
e
Mail address icon in Phonebook(i-mode
mail)/phone number icon (SMS) (if saved in
Phonebook), mail address (i-mode mail)/
phone number (SMS)
・
When the mail address or phone number
is saved in the Phonebook, the name
saved in the phonebook entry is
displayed on the message log screen.
f
Name, Image
・
When the mail address or phone number
is saved in the Phonebook, the name or
image saved in the phonebook entry is
displayed.
■
Displaying received message logs :
m
e
482
Using message logs
■
Creating i-mode mail :
Place the cursor on
the log to send and
a
.
The next procedure
→
P217 Step 3 and the
following steps in "Creating and sending
i-mode mail"
・
For SMS log, a message creation screen
with a phone number set as destination
appears if no mail addresses are saved in
the phonebook and a message creation
screen with a mail address set as
destination appears if it is set in the
phonebook.
■
Creating SMS :
Place the cursor on the log
to send and
a
(1 sec. or more).
The next procedure
→
P256 Step 3 and the
following steps in "Creating and sending
SMS (Short Message)"
・
For i-mode mail log, SMS cannot be
created unless a phone number is saved
in the phonebook.
■
Adding to phonebook :
a
Place the cursor on the log to add to
Phonebook and
e
m
e
4
・
To add data to an existing phonebook
entry, press
m5
.
b
1
or
2
c
Save the name or mail address, etc.
Phonebook new entry
→
P93, P95
■
Making voice calls :
Press
n
.
■
Making videophone calls :
Press
t
.
■
Making PushTalk calls :
Press
P
.
■
Displaying redial/received call logs :
Press
p
.
Switching between message log details
screens <View preference>
1
On the sent/received msg log details
screen,
m
e
9
e
1
-
3
Setting items
→
P101 "Switching details
screen display"
Deleting message logs
<Example> Deleting one entry
1
On the List of notes, place the cursor on
the notes and
m
e
6
e
1
■
Deleting selected entries :
On the sent/
received msg log details screen,
m
e
6
e
2
e
Select message logs to delete
e
p
■
Deleting all entries :
On the sent/received
msg log details screen,
m
e
6
e
3
2
Select "Yes".
Sent msg log list
screen
Sent msg log details
screen
a
a
c
d
f
d
e
c
b
Default
Show saved image
Содержание F903i' 06.10
Страница 186: ......
Страница 301: ...299 Full Browser Viewing websites for PCs Full Browser 300 Setting for Full Browser 304 ...
Страница 412: ......
Страница 430: ......
Страница 485: ...483 INDEX Quick Reference Manual INDEX 484 Quick Reference Manual 490 ...
Страница 519: ...18 2 Select パケット通信 Packet communication and click 次へ Next 3 Select その他 Others and click 次へ Next 4 Click OK ...
Страница 563: ...Kuten Code List CA92002 4966 ...


