


Chapter 2
31
Overview of Functions
Front Panel: Names and Functions of Parts
2.
Overvie
w
of Fun
ction
s
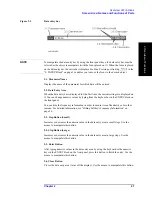
1. Standby Switch
Used for choosing between power-on ( | ) and standby (
) states of the E5070B/E5071B.
NOTE
To turn off the power for the E5070B/E5071B, be sure to follow the steps described below.
1. First, press this standby switch or send a shutdown command from the external
controller to activate the shutdown process (the processing of software and hardware
necessary to turn off the power supply). This will put the E5070B/E5071B into the
standby state.
2. Next, if necessary, turn off the power supply to the “8. Power Cable Receptacle (to
LINE)” on page 56 on the rear panel.
Under normal use, never directly interrupt the power supply to the power cable
receptacle on the rear panel when the power supply is on. Always keep the “7. Line
Switch (Always ON)” on page 55 at (|). Never turn it off (
).
If you directly interrupt the power supply to the power cable receptacle when the power
supply is on, or turn off the “7. Line Switch (Always ON)” on page 55, the shutdown
process will not work. This could damage the software and hardware of the
E5070B/E5071B and lead to device failure.
Turning on the power supply after a faulty shutdown may cause the system to start up in a
condition called “safe mode.” If this occurs, first shut down the system to put it into the
standby state and then turn on the power supply again to start up the system in normal
mode.
For more about turning the power supply on/off and putting it into the standby state, see
Chapter 1 “Installation Guide” in the
Installation and Quick Start Guide
.
2. LCD Screen
A 10.4-inch TFT color LCD used for displaying traces, scales, settings, softkeys, etc.
Either a standard color LCD or a touch screen color LCD (Option 016) is supplied. The
touch screen LCD allows you to manipulate softkeys by touching the LCD screen directly
with a finger. For more on the LCD screen, see “Screen Area: Names and Functions of
Parts” on page 40.
NOTE
Do not press the surface of the LCD screen (either standard or touch screen type)
with a sharp object (e.g., a nail, pen, or screwdriver).
Pressing the surface with a
sharp-pointed object will damage the LCD screen surface or cause the screen to fail. Be
especially careful when using a touch screen LCD.
NOTE
Occasionally, a few pixels may appear on the screen as a fixed point of blue, green or
red. Please note that this is not a failure and does not affect the performance of your
product.
Содержание E5070B
Страница 6: ......
Страница 30: ...24 Contents ...
Страница 34: ...28 Chapter1 Precautions Before contacting us ...
Страница 286: ...280 Chapter6 Data Analysis Using the Equation Editor ...
Страница 430: ...424 Chapter12 Optimizing Measurements Performing a Segment by Segment Sweep segment sweep ...
Страница 479: ...473 14 Controlling E5091A 14 Controlling E5091A This chapter explains how to control the E5091A multiport test set ...
Страница 538: ...532 Chapter15 Measurement Examples Executing Power Calibration ...
Страница 604: ...598 AppendixA Manual Changes Manual Changes Figure A 12 Two port Touchstone file Figure A 13 Three port Touchstone file ...
Страница 634: ...628 AppendixB Troubleshooting Warning Message ...
Страница 732: ...726 AppendixD Softkey Functions Trigger Menu ...
Страница 740: ...734 AppendixE General Principles of Operation Data Processing ...
Страница 760: ...754 AppendixF Replacing the 8753ES with the E5070B E5071B Comparing Functions ...


