


14-18
4. Troubleshooting
Ch
ap
ter
14
T
rou
bl
e
sh
oot
in
g
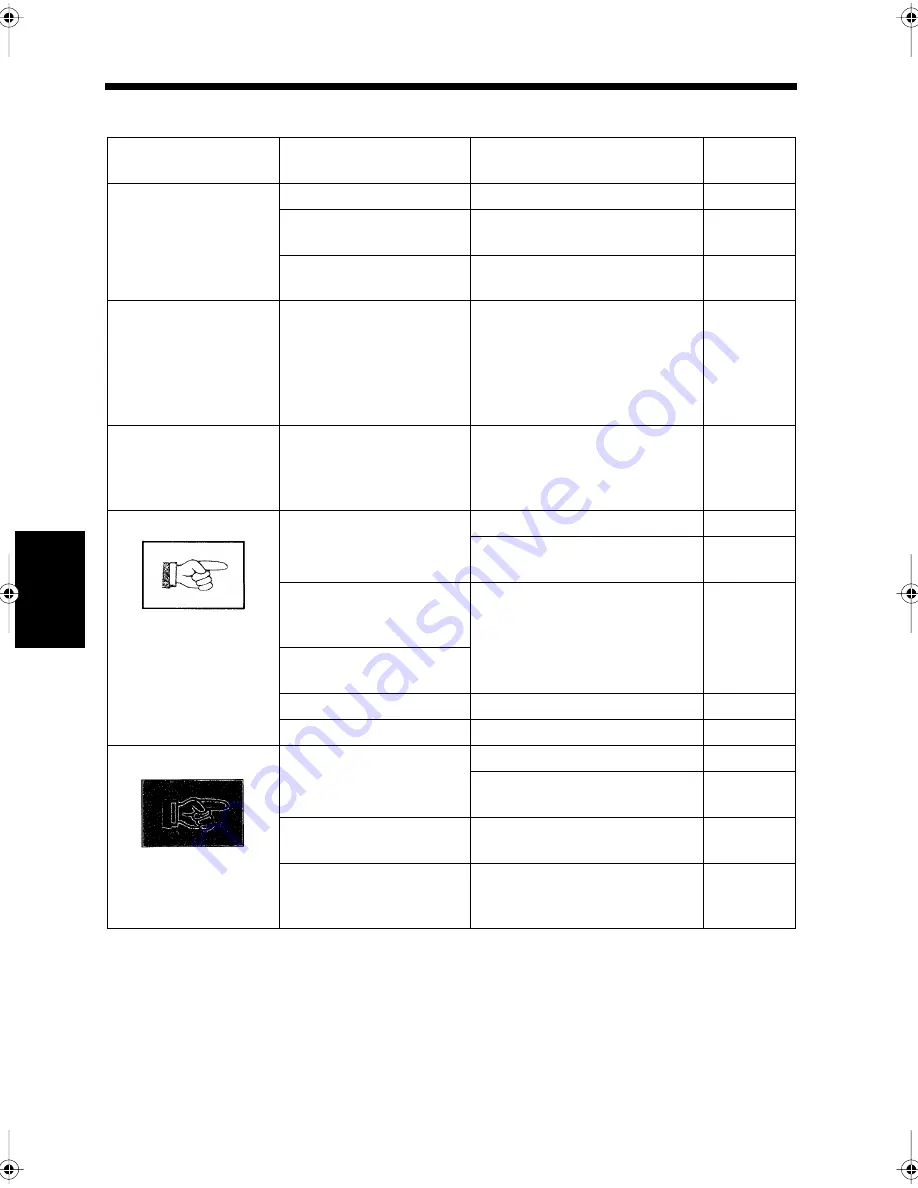
Copying
Condition
Cause
Countermeasures
Reference
page
The document is not
scanned.
The document is too thick.
Use the book scanner for copying.
2-3
The document is too thin or
too small.
Use the book scanner for copying.
2-3
Document scanning area is
dirty.
Clean the document scanning
area.
13-16
No power is supplied in
spite of turning on the
switch, or the power is
cut off during copying.
Power plug is connected to
a wall outlet that cannot
provide the rated power for
the product. (Multiple
connections to a single
outlet, etc.)
Connect the power plug to a wall
outlet that is suitably rated for the
product. Electrical installation
work is required if no such wall
outlet is available.
-
Copies are blank
The document is placed
face down (when using the
automatic document
feeder).
Place the document face up, and
retry the copy operation.
1-20
Copy is too faint.
The copy density setting is
inappropriate.
Adjust the copy density setting.
2-13
Adjust the contrast priority level
on the copy setting.
9-31
Many photos and dark
documents are copied
consecutively.
Use the toner Replenisher key to
replenish toner.
14-25
Copy immediately after
replacing the toner bottle.
Toner is running low.
Replace the toner bottle.
13-8
Paper is damp.
Replace the paper.
13-2
Copy is too dark.
The copy density setting is
inappropriate.
Adjust the copy density setting.
2-13
Adjust the density level priority
on the copy setting.
9-31
Document scanning area is
dirty.
Clean the document scanning
area.
13-16
Document is not flush with
the glass surface (when
using the book scanner).
Reset the document as close to the
glass as possible.
1-20
1074O108
1074O109
chapte14.fm Page 18 Thursday, September 16, 1999 8:33 PM
Summary of Contents for Di250f
Page 1: ...Di250f Di350f 1166 7710 02 ...
Page 2: ......
Page 6: ......
Page 28: ...xxii Terms and Definitions ...
Page 29: ...1 1 Chapter 1 Introduction Chapter 1 Introduction ...
Page 58: ...1 30 10 Confirming the Settings Chapter 1 Introduction ...
Page 59: ...2 1 Chapter 2 Copying a Document Chapter 2 Copying a Document ...
Page 74: ...2 16 5 Copying Figures and Photos Chapter 2 Copying a Document ...
Page 75: ...3 1 Chapter 3 Sending and Receiving Documents Chapter 3 Sending and Receiving Documents ...
Page 98: ...3 24 11 Making and Receiving a Telephone Call Chapter 3 Sending and Receiving Documents ...
Page 99: ...4 1 Chapter 4 Advanced Copying Procedures Chapter 4 Advanced Copying Procedures ...
Page 137: ...5 1 Chapter 5 Transmission Methods Chapter 5 Transmission Methods ...
Page 169: ...6 1 Chapter 6 Reception Methods Chapter 6 Reception Methods ...
Page 175: ...7 1 Chapter 7 Before Registration and Setting Chapter 7 Before Registration and Setting ...
Page 187: ...8 1 Chapter 8 Basic Settings Chapter 8 Basic Settings ...
Page 190: ...8 4 2 Setting the Monitor Speaker and the Buzzer Volume Chapter 8 Basic Settings ...
Page 267: ...12 1 Chapter 12 Reports and Lists Chapter 12 Reports and Lists ...
Page 279: ...13 1 KDSWHU Routine Care Chapter 13 Routine Care ...
Page 295: ...14 1 Chapter 14 Troubleshooting Chapter 14 Troubleshooting ...
Page 320: ...14 26 7 When the Print is Faint Chapter 14 Troubleshooting ...
Page 321: ...15 1 Chapter 15 Miscellaneous Chapter 15 Miscellaneous ...
Page 332: ...15 12 Index Chapter 15 Miscellaneous ...
Page 333: ...MEMO ...
Page 334: ...MEMO ...
Page 335: ...MEMO ...
Page 336: ...MEMO ...
Page 337: ...MEMO ...
Page 338: ...MEMO ...


