11-2
Ch
ap
ter
1
1
Re
gis
tr
a
ti
on
s
an
d
S
et
ti
n
gs
f
o
r
Co
n
ve
n
ie
n
t Us
ag
e
1. Registering a Number for One-Touch Key
One-touch Dialing
If a destination's number is registered in a One-touch key in advance, the document can be transmitted
easily and correctly without using the 10-key Pad to enter the facsimile number.
The following three items should be registered.
• Name:
The name can be registered using up to 12 characters.
• Abbreviated number:
Three digits (000 to 499).
• Destination's number:
Facsimile number (Up to 40 digits), communications mode, within country/abroad, F CODE.
Useful Tips
• There are 20 One-touch dial screens, and up to 300 destinations can be registered (15 destinations
per screen
×
20 screens).
• It is easier to retrieve the destinations by making an index to classify them when they are registered.
“Registering an Index for One-Touch Keys”
☞
p. 11-11
• Make sure the facsimile number of the destination is registered correctly to avoid erroneous
telephone calls and transmission.
• The registered details can be modified and deleted and the display position of the one-touch key can
also be modified.
• Print out the One-Touch List. “Confirming the Registered Details in One-Touch Dialing”
☞
p. 12-9
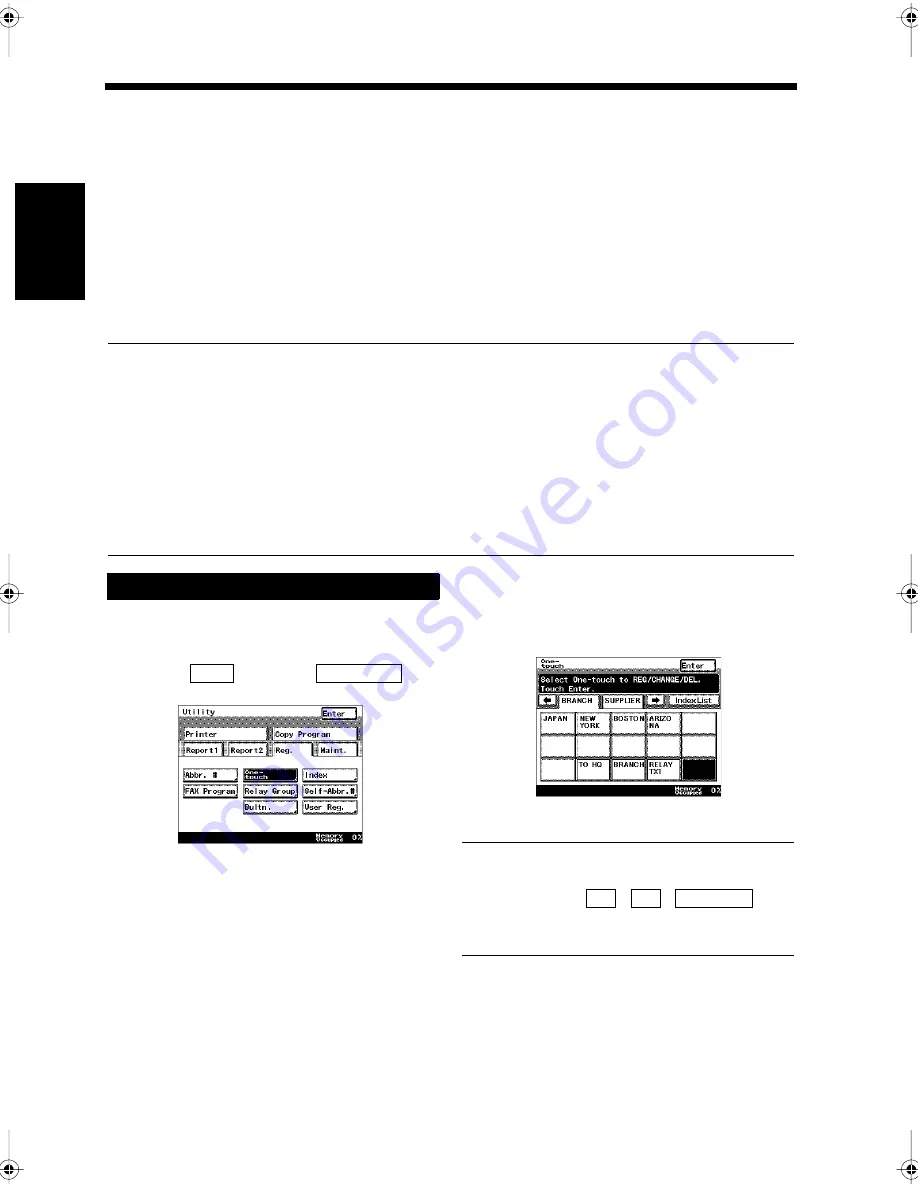
Press the Utility key.
Select
, and touch
.
Select the desired One-touch key to be
registered.
Useful Tip
The initial screen for the index is automatically
displayed. Touch
,
,
, or
the tab for the index to search for the desired
one-touch key.
Registering
1
2
Reg.
One-touch
1171P376EB
3
1171P304EA
←
→
Index List
Chapter11.fm Page 2 Thursday, September 16, 1999 8:16 PM
Summary of Contents for Di250f
Page 1: ...Di250f Di350f 1166 7710 02 ...
Page 2: ......
Page 6: ......
Page 28: ...xxii Terms and Definitions ...
Page 29: ...1 1 Chapter 1 Introduction Chapter 1 Introduction ...
Page 58: ...1 30 10 Confirming the Settings Chapter 1 Introduction ...
Page 59: ...2 1 Chapter 2 Copying a Document Chapter 2 Copying a Document ...
Page 74: ...2 16 5 Copying Figures and Photos Chapter 2 Copying a Document ...
Page 75: ...3 1 Chapter 3 Sending and Receiving Documents Chapter 3 Sending and Receiving Documents ...
Page 98: ...3 24 11 Making and Receiving a Telephone Call Chapter 3 Sending and Receiving Documents ...
Page 99: ...4 1 Chapter 4 Advanced Copying Procedures Chapter 4 Advanced Copying Procedures ...
Page 137: ...5 1 Chapter 5 Transmission Methods Chapter 5 Transmission Methods ...
Page 169: ...6 1 Chapter 6 Reception Methods Chapter 6 Reception Methods ...
Page 175: ...7 1 Chapter 7 Before Registration and Setting Chapter 7 Before Registration and Setting ...
Page 187: ...8 1 Chapter 8 Basic Settings Chapter 8 Basic Settings ...
Page 190: ...8 4 2 Setting the Monitor Speaker and the Buzzer Volume Chapter 8 Basic Settings ...
Page 267: ...12 1 Chapter 12 Reports and Lists Chapter 12 Reports and Lists ...
Page 279: ...13 1 KDSWHU Routine Care Chapter 13 Routine Care ...
Page 295: ...14 1 Chapter 14 Troubleshooting Chapter 14 Troubleshooting ...
Page 320: ...14 26 7 When the Print is Faint Chapter 14 Troubleshooting ...
Page 321: ...15 1 Chapter 15 Miscellaneous Chapter 15 Miscellaneous ...
Page 332: ...15 12 Index Chapter 15 Miscellaneous ...
Page 333: ...MEMO ...
Page 334: ...MEMO ...
Page 335: ...MEMO ...
Page 336: ...MEMO ...
Page 337: ...MEMO ...
Page 338: ...MEMO ...


