


13-2
&
KDS
WH
U
Ro
u
tin
e Ca
re
1. Loading Paper
This section describes the procedure for putting paper in the paper drawer and changing the paper size.
Useful Tips
• Up to five paper drawers can be installed using additional drawers (optional).
• The following print sizes can be set.
❍
=Available -=Not Available
• If there is no paper left for printing, the message “Add paper” is displayed on the touch panel. When
the 1st Drawer, Paper feed unit PF-110, or Paper feed unit PF-108 is installed, and the paper runs
out, a red lamp on the paper drawer tray lights. (When the paper is running low, the light flashes
red.)
• Use only the recommended paper.
• Do not use wrinkled, folded, or damp paper or the reverse side of used paper as this may cause a
paper misfeed.
• When the paper size of the drawer is changed, be sure to enter the new paper size through the Touch
panel. (To change the paper size in Paper feed unit PF-108, contact your service center.)
• If the paper size is changed while the power is turned off, reset the paper size on the copy screen after
turning the power on.
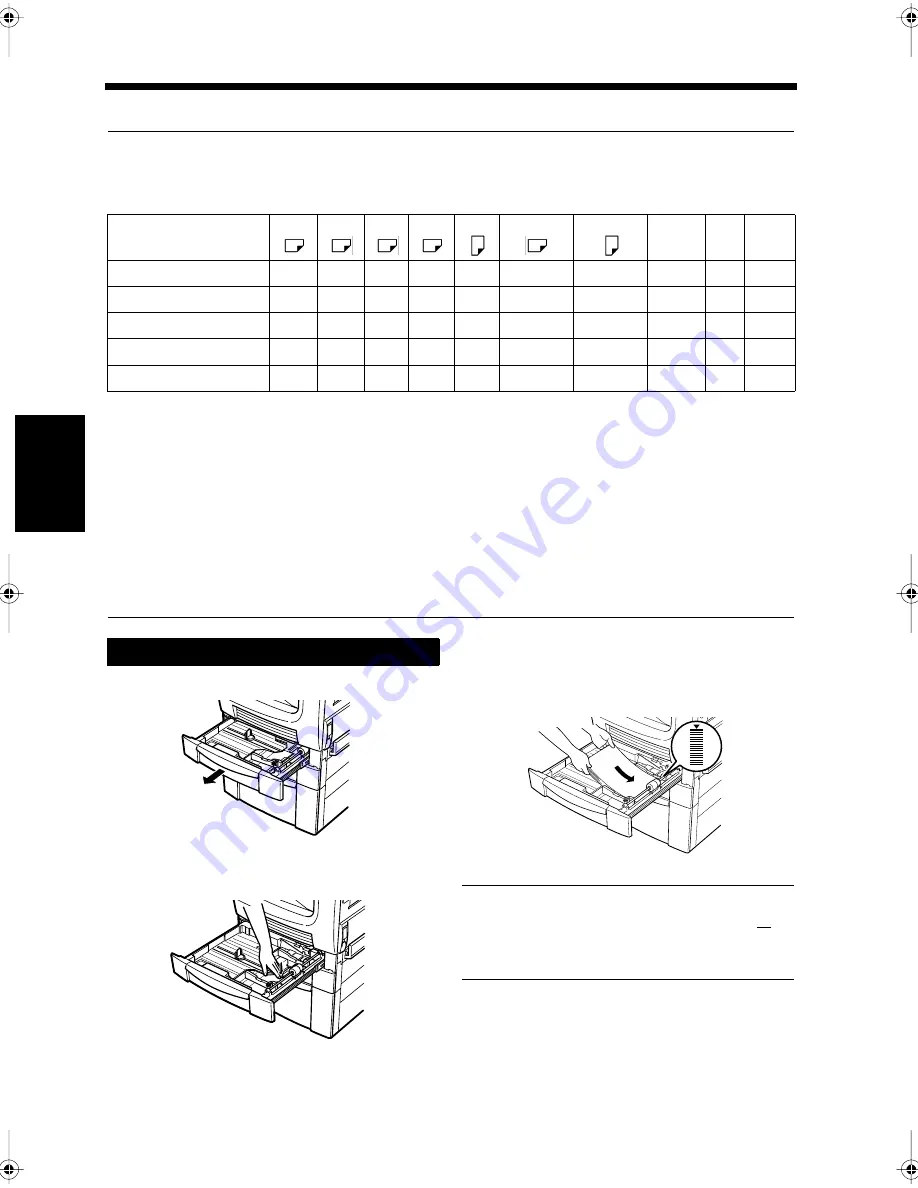
Pull out the paper drawer.
Push down the paper support until it locks.
Load a neat sheaf of paper in the drawer,
aligning with the guide.
NOTE
Ensure the paper stack does not exceed the
▼
mark, which indicates the maximum paper
load.
11x17 11x14 Legal Letter Letter 51/2x81/2 51/2x81/2
User
set
OHP Metric
Multi-purpose cassette
❍
❍
❍
❍
❍
❍
❍
❍
❍
❍
Universal cassette
❍
❍
❍
❍
❍
-
❍
❍
-
-
500-sheet cassette
❍
❍
❍
❍
❍
-
-
-
-
❍
Large Capacity Cabinet
-
-
-
-
❍
-
-
-
-
-
Manual Bypass
❍
❍
❍
❍
❍
❍
❍
❍
❍
❍
Loading paper (1st Drawer)
1
2$$
2
2$$
3
2$$
Chapter13.fm Page 2 Friday, September 17, 1999 2:18 PM
Summary of Contents for Di250f
Page 1: ...Di250f Di350f 1166 7710 02 ...
Page 2: ......
Page 6: ......
Page 28: ...xxii Terms and Definitions ...
Page 29: ...1 1 Chapter 1 Introduction Chapter 1 Introduction ...
Page 58: ...1 30 10 Confirming the Settings Chapter 1 Introduction ...
Page 59: ...2 1 Chapter 2 Copying a Document Chapter 2 Copying a Document ...
Page 74: ...2 16 5 Copying Figures and Photos Chapter 2 Copying a Document ...
Page 75: ...3 1 Chapter 3 Sending and Receiving Documents Chapter 3 Sending and Receiving Documents ...
Page 98: ...3 24 11 Making and Receiving a Telephone Call Chapter 3 Sending and Receiving Documents ...
Page 99: ...4 1 Chapter 4 Advanced Copying Procedures Chapter 4 Advanced Copying Procedures ...
Page 137: ...5 1 Chapter 5 Transmission Methods Chapter 5 Transmission Methods ...
Page 169: ...6 1 Chapter 6 Reception Methods Chapter 6 Reception Methods ...
Page 175: ...7 1 Chapter 7 Before Registration and Setting Chapter 7 Before Registration and Setting ...
Page 187: ...8 1 Chapter 8 Basic Settings Chapter 8 Basic Settings ...
Page 190: ...8 4 2 Setting the Monitor Speaker and the Buzzer Volume Chapter 8 Basic Settings ...
Page 267: ...12 1 Chapter 12 Reports and Lists Chapter 12 Reports and Lists ...
Page 279: ...13 1 KDSWHU Routine Care Chapter 13 Routine Care ...
Page 295: ...14 1 Chapter 14 Troubleshooting Chapter 14 Troubleshooting ...
Page 320: ...14 26 7 When the Print is Faint Chapter 14 Troubleshooting ...
Page 321: ...15 1 Chapter 15 Miscellaneous Chapter 15 Miscellaneous ...
Page 332: ...15 12 Index Chapter 15 Miscellaneous ...
Page 333: ...MEMO ...
Page 334: ...MEMO ...
Page 335: ...MEMO ...
Page 336: ...MEMO ...
Page 337: ...MEMO ...
Page 338: ...MEMO ...


