


11-20
Ch
ap
ter
1
1
Re
gis
tr
a
ti
on
s
an
d
S
et
ti
n
gs
f
o
r
Co
n
ve
n
ie
n
t Us
ag
e
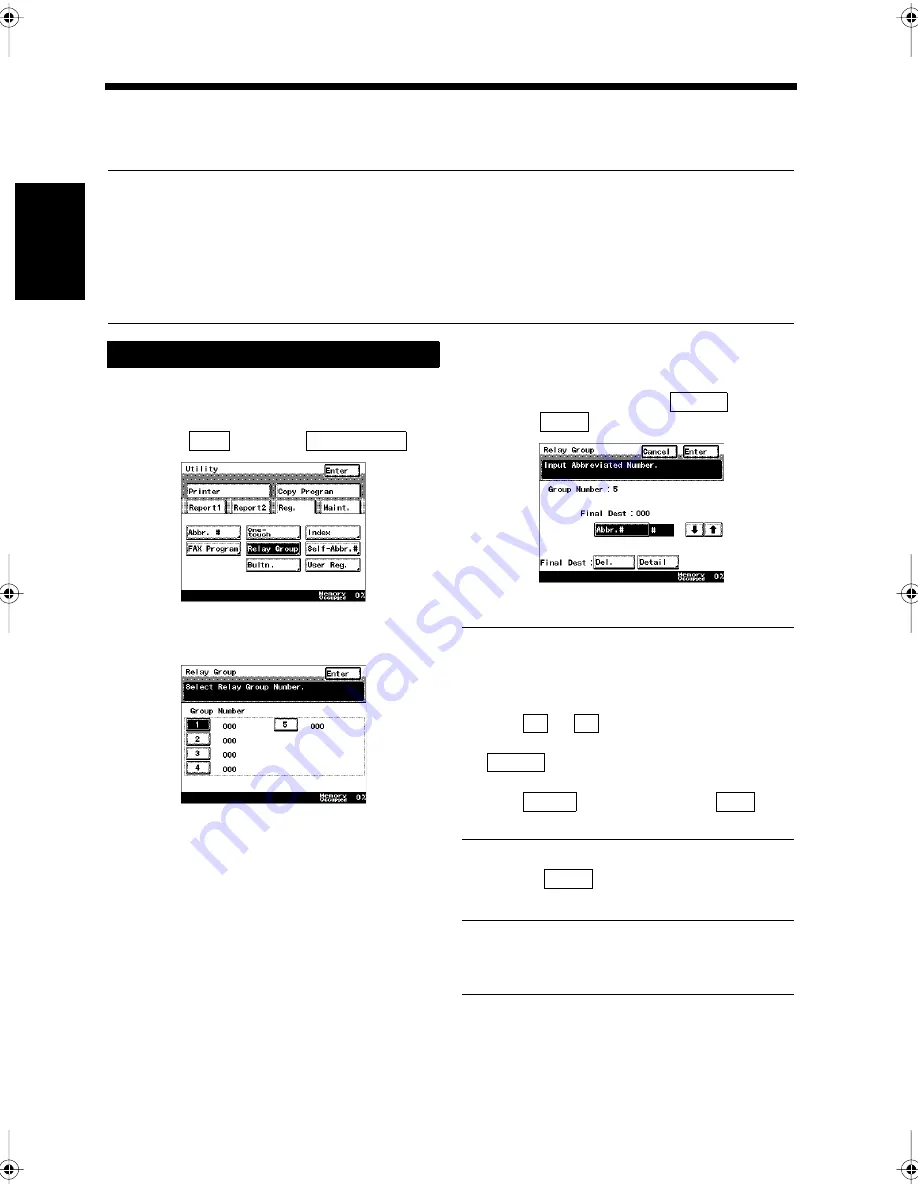
5. Registering Relay Groups
Registering the receiving station (final destination) as a relay group is convenient when this facsimile is
used as a relay station for relay transmissions. Instructions on registration of relay groups and how to
modify them are described in this section.
Useful Tips
• Up to 5 relay groups can be registered. The group number can be selected as 1 to 5.
• Up to 200 receiving stations can be registered per group.
• Use abbreviated numbers to select destinations registered in a relay group. The destination to be
registered as a relay group must be pre-registered as abbreviated dialing or in a one-touch key.
• The registered details can be modified or deleted.
• Print out the Relay Group List. “Confirming the Registered Details in the Relay Group”
☞
p. 12-12
Press the Utility key.
Select
and touch
.
Touch the group key to be registered.
Enter the abbreviated number of the
destination after touching
, and
touch
.
Useful Tips
• Use the 10-key Pad to enter the abbreviated
number registered as abbreviated dialing. If it
is done, the final destination can be confirmed
using
or
.
• Select the destination, and then touch
to select the next one.
• To confirm the selected final destination,
touch
and confirm. Touch
to
delete the displayed destination.
Touch
repeatedly until the screen
returns to the initial screen.
Useful Tip
To register consecutively, repeat the steps from
3.
Registering
1
2
Reg.
Relay Group
1171P353EB
3
1171P354EA
4
Abbr.#
Enter
1171P355EA
↑
↓
Abbr.#
Detail
Del.
5
Enter
Chapter11.fm Page 20 Thursday, September 16, 1999 8:16 PM
Summary of Contents for Di250f
Page 1: ...Di250f Di350f 1166 7710 02 ...
Page 2: ......
Page 6: ......
Page 28: ...xxii Terms and Definitions ...
Page 29: ...1 1 Chapter 1 Introduction Chapter 1 Introduction ...
Page 58: ...1 30 10 Confirming the Settings Chapter 1 Introduction ...
Page 59: ...2 1 Chapter 2 Copying a Document Chapter 2 Copying a Document ...
Page 74: ...2 16 5 Copying Figures and Photos Chapter 2 Copying a Document ...
Page 75: ...3 1 Chapter 3 Sending and Receiving Documents Chapter 3 Sending and Receiving Documents ...
Page 98: ...3 24 11 Making and Receiving a Telephone Call Chapter 3 Sending and Receiving Documents ...
Page 99: ...4 1 Chapter 4 Advanced Copying Procedures Chapter 4 Advanced Copying Procedures ...
Page 137: ...5 1 Chapter 5 Transmission Methods Chapter 5 Transmission Methods ...
Page 169: ...6 1 Chapter 6 Reception Methods Chapter 6 Reception Methods ...
Page 175: ...7 1 Chapter 7 Before Registration and Setting Chapter 7 Before Registration and Setting ...
Page 187: ...8 1 Chapter 8 Basic Settings Chapter 8 Basic Settings ...
Page 190: ...8 4 2 Setting the Monitor Speaker and the Buzzer Volume Chapter 8 Basic Settings ...
Page 267: ...12 1 Chapter 12 Reports and Lists Chapter 12 Reports and Lists ...
Page 279: ...13 1 KDSWHU Routine Care Chapter 13 Routine Care ...
Page 295: ...14 1 Chapter 14 Troubleshooting Chapter 14 Troubleshooting ...
Page 320: ...14 26 7 When the Print is Faint Chapter 14 Troubleshooting ...
Page 321: ...15 1 Chapter 15 Miscellaneous Chapter 15 Miscellaneous ...
Page 332: ...15 12 Index Chapter 15 Miscellaneous ...
Page 333: ...MEMO ...
Page 334: ...MEMO ...
Page 335: ...MEMO ...
Page 336: ...MEMO ...
Page 337: ...MEMO ...
Page 338: ...MEMO ...


