


install - concepts - PixMaster - switcher - CG - clips - controls - team - appendix
FLINT
V1.1
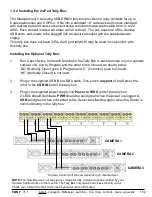
1.5.3
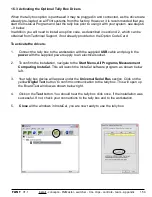
1.5.3 Activating the Optional Tally Box Drivers
When the tally box option is purchased it may be plugged in and connected, as the drivers are
already pre-loaded on all Flint systems from the factory. However, it is recommended that you
start the InstaCal Program and test the tally box prior to using it with your system, see steps 6
– 9 below.
In addition you will need to install an option code, as described in section A.2, which can be
obtained from Technical Support, if not already provided on the Option Code Card.
To activate the drivers:
1.
Connect the tally box to the workstation with the supplied
USB
cable and plug-in the
power
with the supplied power supply to an electrical socket.
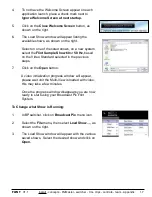
2.
To confirm the installation, navigate to the
Start Menu, All Programs, Measurement
Computing, InstaCal.
This will launch the InstaCal software program, as shown below
left.
3.
Your tally box device will appear under the
Universal Serial Bus
section. Click on the
yellow
Digital Test
button, to confirm communication to the tally box. This will open up
the Board Test window, as shown below right.
4.
Click on the
Test
button. You should hear the tally box click once, if the installation was
successful. If not, check your connections to the tally box and to the workstation.
5.
Close
all the windows in InstaCal, you are now ready to use the tally box.


