background image

Conversion procedure

Use the following steps to convert a stored ID-4000
image to another format:

1

Retrieve the text record associated with the image you
wish to convert. (See 

Retrieving an existing text record

on page 4-8.)

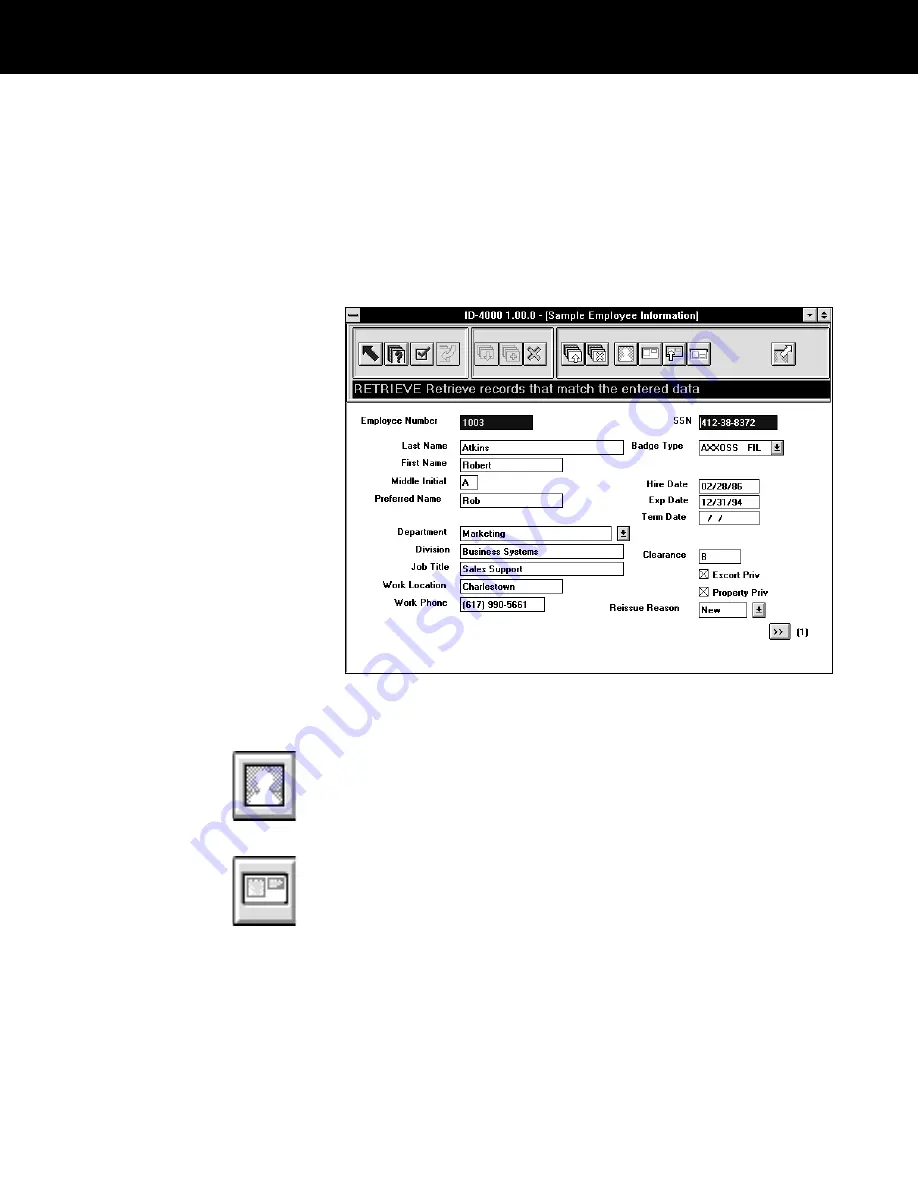
After you retrieve the record, it is displayed in the Data
Entry window.

This is a typical Data Entry window; yours may be
different.

2

If the image to be converted is a portrait and you wish to
view it before converting, choose the Display button.
When you finish viewing the portrait, press the ESC key
to return to the Data Entry window.

If the image to be converted is a signature or another
image usually printed on the badge and you wish to
view it before converting, choose the Preview button to
display a badge. When you finish viewing the badge,
press the ESC key to return to the Data Entry window.

ID-4000 operation 4-39

Summary of Contents for ID-4000

Page 1: ...ID 4000 User Guide ID 4000 for Windows Copyright Polaroid Corporation 1993 1995 All rights reserved...

Page 2: ...ogies Inc Dr Halo is a registered trademark of Media Cybernetics Inc CompuServe is a registered trademark of CompuServe Inc GEM is a registered trademark of Novell Inc PC Paintbrush is a trademark of...

Page 3: ...guide 1 1 Other ID 4000 instructions 1 2 Print conventions 1 3 Obtaining assistance 1 3 FCC notice 1 4 2 ID 4000 description ID 4000 application templates 2 3 Features 2 4 System components 2 5 ID 40...

Page 4: ...4 1 Typical operational sequences 4 1 Working with text records 4 4 Creating a new text record 4 4 Retrieving an existing text record 4 8 Editing an existing text record 4 10 Deleting a text record 4...

Page 5: ...Identifying your database files 5 7 Database management 5 9 Database management overview 5 9 Importing text data 5 9 Importing text and images 5 18 Exporting text data 5 19 Exporting text and images 5...

Page 6: ...or updating ID 4000 software 5 85 Installing ID 4000 for Windows for the first time 5 85 Upgrading from a previous version of ID 4000 for Windows 5 85 Setting Windows for leading zeros 5 87 Renaming O...

Page 7: ...ditional printer instructions 7 14 Turning the printer on and off 7 14 Loading paper and ink cartridges 7 15 Printing badge images 7 15 Cleaning the printer 7 15 Troubleshooting 7 15 Black and white t...

Page 8: ...agnetic stripe encoder 7 24 Turning the encoder on and off 7 24 Encoding badges 7 24 Fax modem 7 27 Using remote diagnostics 7 27 Faxing badge images and dossiers 7 27 Receiving faxes 7 28 Diecutting...

Page 9: ...r or computer terminal at the same time 2 COPYRIGHT The SOFTWARE is owned by Polaroid or its suppliers and is protected by United States copyright laws and international treaty provisions Therefore yo...

Page 10: ...nd which is returned to Polaroid with a copy of your receipt This Limited Warranty is void if failure of the SOFTWARE has resulted from accident abuse or misapplication Any replacement SOFTWARE will b...

Page 11: ...eason please write Polaroid Resource Center 784 Memorial Drive Cambridge Massachusetts 02139 License agreement Outside U S A and Canada single user products An additional Distribution License is requi...

Page 12: ...de the update and all prior versions 4 DUAL MEDIA SOFTWARE If the SOFTWARE package contains both 31 2 inch and 51 4 inch disks then you may use only the disks appropriate for your single user computer...

Page 13: ...S This Agreement is governed by the laws of the Commonwealth of Massachusetts U S A Should you have any questions concerning this Agreement or if you wish to contact Polaroid for any reason please wri...

Page 14: ...conventions 2 ID 4000 description Description of ID 4000 for Windows hardware and software 3 Getting started Basic information for running ID 4000 for Windows along with specific instructions for powe...

Page 15: ...basics of operating in the Microsoft Windows environment and using the Windows applications provided on ID 4000 systems Report writer instructions Contains procedures for extracting data from ID 4000...

Page 16: ...ust supply If instructed to type filename for example type the name of the file requested in place of filename ALL CAPITALS Indicates directory names filenames or acronyms Obtaining assistance For tec...

Page 17: ...of Part 15 of FCC Rules which are designed to provide reasonable protection against such interference when operated in a commercial environment Operation of this equipment in a residential area is li...

Page 18: ...other identification images for viewing on the system display or for reissuing badges In its full featured configuration ID 4000 for Windows captures and stores text data and high quality images portr...

Page 19: ...des on badges The report writing and dossier printing modules print text data and images on plain paper ID 4000 for Windows exports text and images for use by other applications and systems It also im...

Page 20: ...able of the full ID 4000 functionality described in this guide Other templates have only selected functionality The ID 4000 Security Verification Station template for example only retrieves and displa...

Page 21: ...t batch issue Easy yet flexible customization of hardware configuration databases data entry windows and badge designs with the ID 4000 Application Builder Compatibility with a variety of input and ou...

Page 22: ...mation for guiding the operator through data and image capture processes badge printing and other ID 4000 functions It also displays images such as portraits and badges for viewing by the operator App...

Page 23: ...scanner The Polaroid color scanner digitizes portraits for incorporation in photo identification badges printed by the ID 4000 Portraits captured with the scanner are also stored on the ID 4000 for r...

Page 24: ...vice must be diecut and laminated with the badge finishing equipment described on page 2 11 Polaroid color thermal printer The optional color thermal printer provided with the ID 4000 prints full colo...

Page 25: ...s Black and white PVC printer The black and white PVC printer prints a black and white portrait other identification images and text directly on a vinyl PVC card The card requires no diecutting or lam...

Page 26: ...abel can be applied to the front or back of the badge for reading by automated access control systems and other devices Magnetic stripe encoder Several different magnetic stripe encoders similar to th...

Page 27: ...odem provided as an option with the ID 4000 system is used with the optional remote diagnostics software or the optional facsimile software see Optional software on page 2 13 With the fax modem and th...

Page 28: ...he color thermal printers available with the ID 4000 Diecutter The diecutter trims the badge image printed by the color film recorder or color thermal printer to the precise size required for laminati...

Page 29: ...requires appropriate hardware options Portrait display After capture and storage applicant portraits can be retrieved and viewed on the ID 4000 display for verification purposes Badge preview The full...

Page 30: ...es are created with the ID 4000 Application Builder and provide lists for choosing the entries in ID 4000 data entry fields If necessary these reference tables can be edited or maintained from within...

Page 31: ...rinter described on page 2 9 Also encodes magnetic stripes incorporated in the badge laminating material requires a magnetic stripe encoder described on page 2 9 Image conversion Converts ID 4000 port...

Page 32: ...pters 1 and 2 in Microsoft Windows User s Guide provided with your system before continuing Mouse and keyboard operation With the ID 4000 system you can use either the keyboard or the mouse for most o...

Page 33: ...end of this guide to identify an icon button s function You can also use the mouse to position the pointer on the button Do not click the mouse When the pointer is on the button the name and descript...

Page 34: ...Retrieve CTRL a Add Record to Database CTRL x Clear Data Entry Window CTRL u Update Database CTRL y Delete Record CTRL d Display Portrait CTRL v Preview Badge CTRL c Capture Only CTRL p Print Issue o...

Page 35: ...to step 2 If your ID 4000 components are not connected to a power strip turn on the components in the following order a All input devices connected to your ID 4000 system if necessary see Chapter 6 f...

Page 36: ...hoose the ID 4000 program item Note The program item shown appears on ID 4000 systems with the Security Identification and Badging Station template If your ID 4000 uses a different application templat...

Page 37: ...vities Note To log in you must use the user ID and password provided by your supervisor If you do not know your user ID and password see your supervisor before proceeding How to log in 1 Type your Use...

Page 38: ...rifying operations described in Chapter 4 You can also start any of the administrative procedures described in Chapter 5 Note If instead of the Data Entry window a message appears indicating that you...

Page 39: ...nly associated with your username in the ID 4000 audit log The audit log maintains a record of all ID 4000 operations including the user performing them How to log out Log out by choosing the Exit but...

Page 40: ...the Log In dialog box 2 Choose the Quit button from the Log In dialog box to close the ID 4000 application 3 Exit from Windows with one of these methods Double click on the Control menu box in the up...

Page 41: ...ts are not connected to a power strip turn them off in the following order a ID 4000 computer A b ID 4000 display B c All output devices connected to the ID 4000 computer see Chapter 7 Output devices...

Page 42: ...ter 5 Note ID 4000 for Windows is available in a variety of different application templates as described in Chapter 2 Some application templates may not have all the capabilities described in this cha...

Page 43: ...is reissuing a badge Reissuing is defined as printing a badge with a portrait and other images stored earlier Text data is either data stored earlier or an edited version of it With the ID 4000 the t...

Page 44: ...immediately as in the procedure for issuing a badge If desired however the badge can be printed at a later time to minimize the applicant s waiting time Note If your applicant text data is available a...

Page 45: ...ord Use the steps below to create a text record for an applicant who does not have a record stored on the system If the current applicant already has a record on the system or if you do not know wheth...

Page 46: ...try window Note These are sample applicant categories only yours may be different If your system has more than six applicant categories they appear in a list box 3 If the cursor A is not in the first...

Page 47: ...data entry faster and more accurate If you are unfamiliar with these items see Completing data entry fields on page 4 11 for more information If your ID 4000 has more than one page of data to be ente...

Page 48: ...display the text processing buttons You can then edit the data and reattempt adding it to the database as a new record You can also choose the Retrieve button to view the corresponding record already...

Page 49: ...een start the ID 4000 and log in or choose the Exit button until the window appears Note This is a typical data entry window yours may be different 2 Indicate an applicant category Employee Visitor et...

Page 50: ...ieve button to display the record If the record appears go to step 6 If the message Record not found appears the ID number you typed is not in the database In this case choose OK to remove the message...

Page 51: ...ance to the next window by choosing the Next Page button in the lower right corner of the window or by pressing the PAGE DOWN key Note The primary key field usually named Employee Number Employee ID o...

Page 52: ...trieved and displayed an existing text record as described on page 4 8 you can delete it from the database by choosing the Delete button Completing data entry fields Note If you are unfamiliar with ID...

Page 53: ...edit boxes use two digits for days months hours and minutes For example enter January 5 1995 as 01 05 95 and 8 17 a m as 08 17 a m Drop down list boxes A drop down list box is similar in appearance t...

Page 54: ...d number of mutually exclusive choices you must choose one but you can choose only one To choose the option next to the button click the mouse on the button or the option A dark center in the button i...

Page 55: ...entered from look up tables in this example the address city state and Zip code cannot be edited by the operator Field validation Some fields in your data entry window may be set up for validation Fie...

Page 56: ...You can also use this procedure for locating all records with Smith in the Last Name field Searching single fields To search for records based on the value of one field type the data to be matched in...

Page 57: ...r printer To display one of the records from the list in the Data Entry window click on the desired record then choose the Select button After viewing the complete record in the Data Entry window you...

Page 58: ...trieve records for Smith Smithson Smallwood Smart etc type Sm in the Last Name field and choose the Retrieve button You can also type Sm without the percent symbol to perform the same search The ID 40...

Page 59: ...With fields containing values less than the specified values With fields containing values less than or equal to the specified values With fields matching wildcard specifications Without data in speci...

Page 60: ...r system has more than six applicant categories they appear in a list box 2 Choose the Advanced Search button to display the Advanced Search window 3 Choose a field to be matched during the search fro...

Page 61: ...e Selection dialog box opens when you choose the operator Use this box to specify the current date tomorrow s date yesterday s date or a specific date Then choose OK to display the specified date in t...

Page 62: ...atement examples To remove the entire statement and start again choose Clear and return to step 3 To remove only the most recently chosen operator or value choose Undo 7 After the logic statement is s...

Page 63: ...appears immediately in the Data Entry window Sample search statements The search statements below illustrate typical advanced searches These are samples only the field names on your ID 4000 system ma...

Page 64: ...t field Example 4 ID No BETWEEN 123450 AND 123475 Retrieves records with ID numbers between 123450 and 123475 Example 5 Last Name NOT Smith AND Dept Mfg Retrieves all records except those with Smith i...

Page 65: ...the right end of the edit box to display the names of all saved searches then click on the desired search You can also press the UP ARROW and DOWN ARROW keys to display the names of the saved searche...

Page 66: ...ons Issuing a new badge page 4 26 Capture im ages and print a badge for an applicant who has no images stored in the system and who has not had a badge issued to them before Reissuing a badge page 4 2...

Page 67: ...o make a badge for an applicant who has no images stored on the system and who has not had a badge issued to them previously Step by step procedure 1 If you have not already done so create a new text...

Page 68: ...e for the image capture devices you are using If necessary see Chapter 6 Input devices for detailed instructions for each capture device connected to your ID 4000 4 Wait for the badge to print on the...

Page 69: ...indow to appear Reissuing a badge When to use this procedure Use this procedure to print a badge for an applicant who already has a text record and a portrait stored on the ID 4000 system If necessary...

Page 70: ...one shown its appearance depends on the capture device being used Note If your system has more than one portrait capture device a portrait camera and a color scanner for example and the device has no...

Page 71: ...000 output devices for information about the badge printer you are using and any post print operations such as diecutting and laminating 7 If your system encodes magnetic stripes on the badges choose...

Page 72: ...new record for the applicant or retrieve the applicant s text record and edit it if necessary Leave the data displayed in the Data Entry window For detailed instructions see Creating a new text record...

Page 73: ...may be different from the one shown If the device selection dialog box appears choose the desired capture device to display a portrait capture dialog box 3 Capture one or more images from the portrait...

Page 74: ...data advance to the next window by choosing the Next Page button in the lower right corner of the window or by pressing the PAGE DOWN key If the data requires updating or correction see Editing an ex...

Page 75: ...inted on a standard 81 2 11 inch sheet of paper This is a sample dossier only Dossiers are custom designed for each ID 4000 system with the Badge Designer module of the ID 4000 Application Builder See...

Page 76: ...choosing the Print button locate the data field with the name Badge Type or a similar name Change this field from its current setting to Dossier Then continue with the reissuing procedure by choosing...

Page 77: ...the replacement printer Changing the dossier printer driver 1 Log out of the ID 4000 system by choosing the Exit button until the Log In dialog box appears then choosing Quit The Windows Program Manag...

Page 78: ...e Dossier Selection dialog box displays all printers installed on the ID 4000 dossiers can be printed only on a laser printer Choosing a non laser printer from the list disables dossier printing 6 Sta...

Page 79: ...portraits signatures and other stored images fingerprints for example to the following formats Windows or OS2 bitmap BMP Dr Halo format CUT CompuServe format GIF GEM paint IMG JPEG JPG PC Paintbrush P...

Page 80: ...window yours may be different 2 If the image to be converted is a portrait and you wish to view it before converting choose the Display button When you finish viewing the portrait press the ESC key t...

Page 81: ...TIF PCX etc of the converted image by choosing the appropriate button 6 Choose the Save As button to display the Save As dialog box 7 Enter or select a path and file name for the converted image then...

Page 82: ...the verification of data For example procedures such as managing system security creating reports managing databases viewing audit logs and card histories and adjusting system components are consider...

Page 83: ...d image import Multiple record deletion Database packing Database log in data editing System management Audit log operations Error log operations Access privilege assignment Access requirement editing...

Page 84: ...emembered but are not likely to occur to a person attempting unauthorized use of the system The name of a pet may be a good password for example but your own name nickname or your company s name is pr...

Page 85: ...Entry window is not on the screen start the ID 4000 and log in or choose the Exit button until the window appears 2 Choose the Administration button to display the Administration window 5 4 ID 4000 a...

Page 86: ...each password character appears as an asterisk as you type it 5 Type a new password then choose OK An empty password confirmation field appears 6 Type the new password again in the password confirmat...

Page 87: ...es not alter the data in the databases The report writer allows you to create the following types of output from your ID 4000 databases Lists of selected data records Mailing lists and labels Form let...

Page 88: ...r creating reports require that you select the ID 4000 database file or files that will be the source of your report data Most ID 4000 systems use either dBase or SQL database format The file names an...

Page 89: ...directory as its corresponding applicant database SQL database files If your ID 4000 uses an SQL database the database file has the extension DBS Your database file name and its directory were determi...

Page 90: ...other applications Export complete text records and images for use by other ID 4000 stations Batch delete records from an ID 4000 database Pack and reindex databases necessary for some ID 4000 statio...

Page 91: ...le can contain only ASCII characters from hexadecimal 20 through hexadecimal 7e decimal 32 through decimal 126 carriage returns line feeds and horizontal tabs All records must have the same number of...

Page 92: ...xt data Follow these steps to select and import data from a text file 1 If the Data Entry window is not on the screen start the ID 4000 and log in or choose the Exit button until the window appears ID...

Page 93: ...tton to display the Import Selection dialog box 4 Choose Import Text Data Only 5 In the list at the bottom left of the dialog box highlight the destination database the database receiving the imported...

Page 94: ...plays the File Browse dialog box to help you locate and select the source file 8 With the source file displayed in the Data Source Selection dialog box choose OK to display the Import Tool window The...

Page 95: ...pears over the group The number serves as a field identifier which you will use later in this process If the source record does not have field separators a In the File Format window choose Fixed Width...

Page 96: ...order of months days and years month day year or day month year in the source dates d Use the popup list in the Date Separator field to indicate whether month day and year are separated by slashes or...

Page 97: ...corresponding source field and drag it to the highlighted Destination field c Repeat steps a and b until all fields being imported are properly mapped to a destination field d Identify the source fie...

Page 98: ...Tool window to display the Import Template window This template window contains all the specifications for the import process you just completed Choose OK to save it or Cancel to quit the window witho...

Page 99: ...n With the procedure below you must import all the records in the file and all the fields in each record To import text data from other applications see Importing text data on page 5 9 instead 1 Start...

Page 100: ...choose Exit Exporting text data The ID 4000 lets you export text data from the ID 4000 for use in other applications You can choose the fields to be exported from each record and you can customize the...

Page 101: ...steps 1 If the Data Entry window is not on the screen start the ID 4000 and log in or choose the Exit button until the window appears 2 Choose the Administration button to display the Administration w...

Page 102: ...more than six applicant categories they appear in a list box 5 Do one of the following to generate a list of records from which you can select for export Type in the Last Name field or any other non...

Page 103: ...You can tag all records in the browse list at once by choosing the Tag All button All records you tag individually appear in the bottom pane of the window If you tag all records in the browse list th...

Page 104: ...as follows If you are exporting to tape choose Tape If you are exporting data to a file on a disk or hard drive type the full path and file name or choose Browse to select an existing file to overwrit...

Page 105: ...database for exporting Click on individual fields one at a time for exporting Each time you select a source field a number appears to the left of it To deselect a field click on it a second time Note...

Page 106: ...93 rather than as 1 6 93 for example choose Leading Zeroes in Dates c Use the popup list in the MYD Order field to indicate the order of months days and years in the exported records month day year or...

Page 107: ...indow to display the Export Template window This template window contains all the specifications for the export process you just completed Choose OK to save it or Cancel to quit the window without sav...

Page 108: ...se by other ID 4000 stations Although you can choose the records exported by this process all the fields in each record and all associated images are exported You cannot select individual fields for e...

Page 109: ...oose the Database Management button to display the Database Management Data Entry window 4 Indicate the applicant category employee visitor etc from which you wish to select records by choosing the ap...

Page 110: ...Perform a simple or advanced search as described in Chapter 4 to display a list of some of the applicant records in the chosen category Either option produces a list of records in a browse window 6 T...

Page 111: ...rint button Your system must be connected to a laser printer 8 After all the desired records are tagged choose the OK button to display a Batch Processing window 9 Choose the Export Text and Images bu...

Page 112: ...choose Exit instead Batch deleting records Use the following procedure to select and delete multiple ID 4000 records from a database 1 If the Data Entry window is not on the screen start the ID 4000...

Page 113: ...oose the Database Management button to display the Database Management Data Entry window 4 Indicate the applicant category employee visitor etc from which you wish to select records by choosing the ap...

Page 114: ...play a list of some of the applicant records in the chosen category Either option produces a list of records in a browse window 6 Tag one record for deletion by clicking on it to highlight it then cho...

Page 115: ...bases Certain types of ID 4000 databases require that you pack them periodically Systems requiring database packing display the Pack Database button in the Administration window Packing reformats and...

Page 116: ...u should also pack the databases after you delete a large number of applicant records or experience frequent database errors Packing procedure 1 If the Data Entry window is not on the screen start the...

Page 117: ...g has been successful 6 Repeat steps 3 4 and 5 as necessary to pack any additional databases on your system Changing database log in data Some ID 4000 databases require log in data to give the ID 4000...

Page 118: ...changed outside the ID 4000 program Caution Entering invalid log in data may make the ID 4000 system inoperable for all users Before proceeding be sure you have the correct database log in data 1 If t...

Page 119: ...he Administration window 3 Choose the Change Database Login button to display the Database Log In Data dialog box 4 Enter or edit the database log in data as necessary 5 Choose OK to return to the Adm...

Page 120: ...ts for the ID 4000 Backing up and restoring files Viewing statistics Calibrating ID 4000 components Displaying the System Management window All system management functions are accessible through the S...

Page 121: ...he Administration window 3 Choose the System Management button to display the System Management window With the System Management window displayed you can proceed to any of the administrative operatio...

Page 122: ...istory access Import access Calibration access Anyone with the appropriate access privileges can view the audit log to monitor user activity or trace a sequence of transactions The audit log continues...

Page 123: ...the audit log information as a text file After you create the text file containing the audit log information you can edit or print it with a word processor such as Microsoft Windows Write provided wi...

Page 124: ...u should delete the audit log records to create more disk space Warning If you want to keep the audit log records store them in a text file before you use the steps below to delete them from the audit...

Page 125: ...all records do not fit in the window you can scroll down to view more As a troubleshooting aid the top of the Error Log window displays the dialog box that appeared to the user when the currently hig...

Page 126: ...arning The error log records are always stored as E_REPORT TXT If you have stored earlier error log records be sure to rename the earlier E_REPORT TXT file to prevent it from being overwritten 1 View...

Page 127: ...ser access requirements for each ID 4000 function User access requirements are the access privileges keys required to make the function available to a user As described in Setting user access privileg...

Page 128: ...ve at least one of the specified keys ID 4000 function lRequired access keys OP1 OP2 OP3 ADM SUP MGR Administration Administration Advanced Query Advanced Search Advanced Query Advanced Search from Da...

Page 129: ...Text and Images Export Text and Images Delete Record Delete Error Log Exit Administration Exit Batch Creation Exit Batch Output Exit Card History Exit Database Management Exit System Management Expor...

Page 130: ...Tag List Screen 1 Data Entry page 1 Screen 2 Data Entry page 2 Screen 3 Data Entry page 3 Screen 4 Data Entry page 4 Screen 5 Data Entry page 5 Screen 6 Data Entry page 6 Screen 7 Data Entry page 7 S...

Page 131: ...isplay the Lock Edit window Viewing the Current Lock Settings If you are about to assign keys to a user according to Setting user access privileges on page 5 52 it may be useful to identify the keys r...

Page 132: ...ight end of the box to display a list then click on the desired function to display its name in the Name box You can also press the TAB key until the Name box changes to a blue background then use the...

Page 133: ...quired for deleting records The data export function may be available to any user with either the Op3 or the Sup key You can set the requirements for each function according to Setting access requirem...

Page 134: ...ndow Adding a new user Use this procedure to give access privileges to a user who has no record on the system Note It may be useful to review the functions accessible by each key before you start this...

Page 135: ...rals and spaces Symbols and punctuation marks are valid 5 Assign one or more keys to the new user by choosing the appropriate Default Keys checkboxes The keys you assign determine the ID 4000 function...

Page 136: ...eir access privileges with the same procedure Note It may be useful to review the functions accessible by each key before you start this procedure See Viewing the current lock settings on page 5 50 1...

Page 137: ...requirements on page 5 46 You can change the accessible functions for any of the six keys 7 If you wish enable or disable the user s access privileges by choosing the Enabled or Disabled button as ap...

Page 138: ...the User ID of the user to be changed by clicking on it with the mouse or using the ARROW keys to highlight it 4 Choose the Delete User button 5 Answer Yes at the confirmation dialog box to delete th...

Page 139: ...y assigned to them appear in the Users ID List 4 To see other keys assigned to any user in the list click on the desired User ID or use the Arrow keys to highlight the User ID The keys assigned to the...

Page 140: ...out by choosing the Exit button until the ID 4000 Log In dialog box appears 2 Choose the Quit button in the Log In dialog box to close the ID 4000 application 3 Exit from Windows using one of these me...

Page 141: ...uration On a daily or weekly basis however you should back up database and image files These files are updated frequently and would be difficult to reconstruct if they were damaged or deleted accident...

Page 142: ...indow choose the Exit button Calibrating system components The ID 4000 System Management window has a Calibrate button for adjusting system components You can use this button to calibrate the portrait...

Page 143: ...e encoding Dossier printing Batch operations consist of two major steps 1 selecting the records for the batch operation and 2 executing the batch operation Selecting records for batch processing All I...

Page 144: ...Batch button to display the Batch Data Entry window 4 Indicate an applicant category Employee Visitor etc by choosing the appropriate button at the top of the data entry window If your system has more...

Page 145: ...ecords in the chosen category Either option produces a list of records in a browse window 6 Tag one record for batch processing by clicking on it to highlight it then choosing the Tag button Tip You c...

Page 146: ...ow With the batch processing window visible proceed to any of the batch processing procedures below Batch printing badges Use the following procedure to print several badges at once Note Text data and...

Page 147: ...ield set to Dossier will not print An on screen message identifies those records so you can process them separately To print the records as badges you must change the Badge Type field for each record...

Page 148: ...It is not necessary to use this procedure to print labels for batch printed badges because label printing takes place during the batch printing procedure on page 5 65 1 Select the records for which ba...

Page 149: ...ur ID 4000 system must be set up for encoding magnetic stripes and it must be connected to a magnetic stripe encoder The badges to be encoded must also have a magnetic stripe Note Use this procedure t...

Page 150: ...tch operation with the same tagged records by choosing the Clear button Exit batch operations and return to the Administration window by choosing the Exit button Batch printing dossiers To print dossi...

Page 151: ...rd 4 When the window indicates that all dossiers have been processed take one of the following actions To return to the Batch Processing window to perform another batch operation with the same tagged...

Page 152: ...ke applicant records card history records also contain data about the type of transaction the date and time of the transaction and the user who was logged onto the system during the transaction If you...

Page 153: ...Data Entry window This window resembles the applicant Data Entry window Use the following steps to display the Card History Data Entry window 1 If the Data Entry window is not on the screen start the...

Page 154: ...specific records or groups of records see Searching the card history database on page 5 74 1 Display the Card History Data Entry window see page 5 72 2 Choose the desired applicant category button at...

Page 155: ...ose the Return button To print or delete some or all of the displayed card history records see Printing card history records page 5 82 or Deleting card history records page 5 80 To return to the Card...

Page 156: ...by itself Valid uses are S Smi h and S h Note You cannot use the wildcard in a numeric field such as ID number Entering the wildcard alone in a single field and choosing the Retrieve button retrieves...

Page 157: ...light it You can select more than one activity by holding the CTRL key while you click on activities If you select two activities for example card history records with either one or both activities ar...

Page 158: ...window to display all the retrieved records in a browse window 8 To browse through the records use the scroll bar at the side of the window To scroll right or left for viewing all fields in a record u...

Page 159: ...d history action codes in the following list Action Code Create record A View record L Delete record Y Update record U Preview badge V Capture image C View image D Print badge P Encode magnetic stripe...

Page 160: ...ta Entry window choose the Return button To print or delete some or all of the displayed card history records see Printing card history records page 5 82 or Deleting card history records page 5 80 To...

Page 161: ...desired search criteria name highlighted choose the Execute button to perform the search Deleting search criteria Use these steps to delete search criteria saved earlier 1 Choose the Advanced Search b...

Page 162: ...ing on it with the mouse 3 Repeat step 2 until you have tagged all the records you want to delete You can tag all records in the browse list at once by choosing the Tag All button All records you tag...

Page 163: ...turn to the Administration window choose the Exit button Printing card history records You can print ID 4000 card history records with either of two methods Printing directly from a browse list Printi...

Page 164: ...wing all the fields in a record use the scroll bar at the bottom 2 Tag one record for printing by clicking on it to highlight it then choosing the Tag button You can also tag a record by double clicki...

Page 165: ...ding on how they were set up The database file names and structure of your database depend on the format your system uses If you do not know the format that has been selected for your system see your...

Page 166: ...ndows setup disk 1 in drive A 5 From the File menu in Program Manager choose Run 6 Type a setup and press ENTER 7 Follow instructions on the screen for inserting the remaining setup diskettes into the...

Page 167: ...p disk 1 in drive A 4 From the File menu in Program Manager choose Run 5 Type a setup and press ENTER 6 Follow instructions on the screen for inserting the remaining setup diskettes into the A drive 7...

Page 168: ...ndows for using leading zeros in dates and times January 5 1995 is entered as 01 05 95 and 8 22 a m is entered as 08 22 a m 1 In the Windows Program Manager double click on the Main icon to display th...

Page 169: ...k click on Change to display the Date Format dialog box 5 Place an X in the Day Leading Zero and the Month Leading Zero checkboxes by clicking on them 6 In the Long Date Format block click on the arro...

Page 170: ...l by double clicking on the Control menu box in the upper left corner of the Control Panel window 12 Close the Main program group by double clicking on the Control menu box in the upper left corner of...

Page 171: ...ame dialog box 6 In the To box type ora7win bak and click on OK to rename the file 7 In the right pane of the File Manager window click on COREWIN DLL to highlight it 8 Click on the File menu then cli...

Page 172: ...ons in your company During data entry the operator can simply choose from the list rather than typing the building name or code If you have the necessary access privileges you can edit a cross referen...

Page 173: ...2 Choose the Administration button to display the Administration window 3 Choose the Cross Reference Maintenance button to display the Cross Reference Data window 5 92 ID 4000 administration...

Page 174: ...he bottom of the window to scroll right or left To edit or delete a record in the table go to Editing a table record on page 5 94 or Deleting a table record on page 5 94 To return to the Cross Referen...

Page 175: ...e the Return button to display all the table records Then repeat steps 2 3 and 4 To return to the Administration window choose the Exit button Deleting a table record Follow this procedure to delete a...

Page 176: ...ime as an applicant s portrait on appropriately equipped ID 4000 systems While an applicant signature can also be printed on the badge it is different for every badge and is used to help verify the ba...

Page 177: ...capture a new authorizing signature 1 If the Data Entry window is not on the screen start the ID 4000 and log in or choose the Exit button until the window appears 2 Choose the Administration button t...

Page 178: ...s authorizing signature If this signature is not satisfactory choose Restart to clear the signature from the dialog box Then return to step 4 Setting up for remote diagnostics If your ID 4000 system h...

Page 179: ...ne of these methods Double click on the Control menu box in the upper left corner of the Program Manager window then choose the OK button in the Exit Windows dialog box Press ALT F4 then choose the OK...

Page 180: ...give it to the technician 7 Start the remote diagnostics software as follows a Type cd and press Enter b Type cd closeup and press Enter c Type chost and press Enter After taking these steps call the...

Page 181: ...e tablet A typical ID 4000 system has one or more of these input devices ID 4000 stations used only for verification purposes may have no input devices Note Additional devices are likely to become ava...

Page 182: ...he camera includes an electronic flash for optimum portrait quality image consistency and color accuracy Turning the camera on and off If a power strip is installed the camera turns on and off with th...

Page 183: ...the applicant in front of the camera and help them obtain a pleasing pose in the Capture window If the applicant has a dark complexion brighten the portrait by choosing the Brighten checkbox 4 When t...

Page 184: ...on or if the brightness or color of the room lighting changes for any reason Setting up for calibration To prepare for portrait camera calibration you must display the camera Calibration dialog box an...

Page 185: ...2 Choose the Administration button to display the Administration window 3 Choose System Management button to display the System Management window ID 4000 input devices 6 5...

Page 186: ...mage Capture to display the camera Calibrate dialog box 6 If the Live Settings box is not checked click on it to display a live image on the ID 4000 display 7 Position the blue backdrop A supplied wit...

Page 187: ...bration target oriented as shown on the portrait backdrop in the same position as the typical applicant s head The top of the target should be at the same height as the top of an applicant s head If n...

Page 188: ...To calibrate the captured image proceed to the following section Calibrating the captured image To discontinue calibration and return to the System Management window choose the OK button and choose Ye...

Page 189: ...t or left and press Freeze to make another test exposure If this message appears skip to step 7 Actual value is close to the goal Press OK to accept the current setting 5 Using a small screwdriver tur...

Page 190: ...sh fires several times during the process 8 Choose the OK button to return to the Calibration dialog box 9 To calibrate the live image go to Calibrating the live image on page 6 8 To discontinue calib...

Page 191: ...ely with instant or conventional cameras for photo identification badges The scanner accepts photographs and other documents up to 4 6 inches in color or black and white During the scanning procedure...

Page 192: ...or the scanner Control Panel to appear 3 Insert the portrait face up and bottom edge first against the inner wall of the feeder tray 4 Guide the portrait into the feed slot until it is engaged by the...

Page 193: ...sequence choose the Scan button To abandon the scanning operation instead choose the Done button Tonescale color or sharpness adjustment If necessary you can adjust the tonescale color or sharpness o...

Page 194: ...on and environment the scanner may require occasional cleaning to eliminate colored streaks in the scanned image resulting from dust Detailed cleaning instructions and a special cleaning brush are inc...

Page 195: ...e is then stored instantly as an image file on the ID 4000 Turning the tablet on and off If your system has a power strip installed the signature tablet turns on and off with the other ID 4000 compone...

Page 196: ...ture pad stylus and normal pen pressure to write his or her signature on the signature pad writing surface As the writing surface is signed the signature appears in the Signature Capture window 2 If t...

Page 197: ...300 A Printer Black and white thermal printer Black and white PVC printer Laser printer Bar code label printer Magnetic stripe encoder Fax modem Note Additional devices are likely to become available...

Page 198: ...mages on each film sheet The number of badges per sheet depends on system configuration Additional film recorder instructions When appropriate this section refers you to separate instructions provided...

Page 199: ...the warmup period to elapse before printing badges When turning the ID 4000 system off turn the computer power switch to Off before turning the film recorder power switch to Off 0 Loading film The col...

Page 200: ...nd open it 2 Remove the empty film pack 3 Insert the new film pack holding it by the edges only Slide the pack in at an angle then push it into place 4 Check that the white tabs are not caught between...

Page 201: ...en close and latch the door with the white tab outside Printing badge photographs After you have chosen the Print button from the ID 4000 Data Entry window and performed any appropriate image capture...

Page 202: ...b slot Note If no processing tab appears when you pull the white tab do not pull another white tab Instead do the following in dim light Carefully open the film door without moving the film pack Holdi...

Page 203: ...pment of the picture 3 Wait for the standard 60 second processing time to elapse see Film processing time on page 7 8 when the film recorder produces an audible signal and a green LED flashes When you...

Page 204: ...tabs firmly pull them both out together and discard both pieces of film This may cause the developer to be spread around the inside of the film holder Open the door and without disturbing the film pa...

Page 205: ...ecessary you can replace the roller assembly Contact Polaroid as described in Obtaining assistance in Chapter 1 for more information Dirt in the tab slot may also keep the film from exiting Cleaning t...

Page 206: ...ton swab 4 Reinstall the camera back Cleaning the camera lens and mirror The lens incorporated in the camera back may become dusty in some operating environments Periodically clean it as follows 1 Rem...

Page 207: ...solutions or abrasives of any kind 6 Reinstall the camera back on the film recorder Using a different film type The ID 4000 color film recorder is usually set up for Polaroid Polacolor EID Ultraviolet...

Page 208: ...n the Control Panel icon to display the Control Panel 4 Double click on Printers to display the Printers dialog box 5 Click on CI 5000 in the Installed Printers list to highlight it then click on the...

Page 209: ...the Printers dialog box 10 Double click on the Contol menu box in the upper left of the Control Panel window to close the Control Panel 11 Start the ID 4000 application template by displaying the Log...

Page 210: ...ls and control locations They also have different procedures for replenishing paper and ink cartridges Additional printer instructions When appropriate this section refers you to separate instructions...

Page 211: ...y prompts you to print a badge When you choose OK the ID 4000 computer transmits the image to the color thermal printer and prints the badge without any intervention from you This requires a few secon...

Page 212: ...pply when the printer is used with the ID 4000 Turning the printer on and off Before turning on the color thermal printer make sure the ID 4000 computer is off Then turn on the black and white thermal...

Page 213: ...badge When you choose OK the ID 4000 computer transmits the image to the thermal printer To print the black and white badge press the print button on the front of the printer See the operating instruc...

Page 214: ...ion images and text directly on a vinyl PVC card The card requires no diecutting or laminating Additional printer instructions When appropriate this section refers you to separate instructions provide...

Page 215: ...es an inked ribbon to print images on the blank PVC cards This ribbon must be replaced periodically See the instructions provided with the printer for ribbon specifications ordering instructions and t...

Page 216: ...rinted card or badge is ready for issue without diecutting or laminating Cleaning the printer The PVC printer must be cleaned each time it is turned on and after a predetermined number of badges usual...

Page 217: ...tions provided with the printer for the location of the power switch Turn the printer on before turning on the computer When turning the ID 4000 off turn the computer off before turning off the printe...

Page 218: ...rate instructions may not apply to the printer when it is used with the ID 4000 Turning the printer on and off Refer to the instructions provided with the printer for the location of the power switch...

Page 219: ...of ID 4000 Application Builder Guide for more information Batch printing bar code labels You can also batch print bar code labels for selected database records To do so use the procedure in Batch prin...

Page 220: ...urning the encoder on and off Before turning on the magnetic stripe encoder make sure the ID 4000computerisoff Thenturnontheencoder accordingtotheinstructionsprovidedwithit Note You can turn on the ID...

Page 221: ...encoders provide this confirmation Batch encoding recently printed badges Because magnetic stripe encoding usually takes place after diecutting and laminating it is sometimes more efficient to diecut...

Page 222: ...he laminated badges associated with the selected records on hand for encoding To batch encode the badges you select Batch Encode from the batch processing window and follow on screen instructions 7 26...

Page 223: ...ics in Chapter 5 Faxing badge images and dossiers Use the following steps to transmit a facsimile fax of a badge or an ID 4000 dossier Note Before you can fax a badge image or dossier with this proced...

Page 224: ...B key until Program Manager appears in the center of the current window Then release the ALT key to display the Program Manager window Refer to the instructions provided with the facsimile software to...

Page 225: ...e color film recorder should be diecut and laminated while they are still damp Diecutting Use the following steps to diecut badge photographs to the proper size for laminating 1 Insert the photograph...

Page 226: ...er After diecutting proceed to Laminating below Laminating After diecutting a badge photograph as described above use the steps below to laminate it 1 Place the diecut badge photograph into a PolaSeal...

Page 227: ...it from the laminator slot 5 Remove the laminated badge from the carrier and present it to the applicant Note To prevent warping handle the card carefully until it cools completely Adjusting laminato...

Page 228: ...thermometer and adjust again if necessary Adjusting printed image position and size If your ID 4000 system is new or you started using a different diecutter you may need to adjust the position or siz...

Page 229: ...ront and back of the badge on the same sheet click on the Side 1 button to activate the position and size controls for one of the images If your system prints only one badge per sheet the Side 1 and S...

Page 230: ...ppears release the ALT key 10 Print a badge and check the alignment of the images with the diecutter openings 11 Return to the Diecut Adjustment window Hold ALT press TAB until Diecut Area Adjustment...

Page 231: ...of calibration If portraits appear to have incorrect color balance on the ID 4000 display calibrate the portrait capture device according to the appropriate procedure in Chapter 6 instead of adjusting...

Page 232: ...alance values shown in the following tables No Red Change 1 No color change 2 Green 3 Green 4 Blue 5 Blue 6 Green Blue 7 Green Blue 8 Green Blue 9 Green Blue More Red 10 Red 11 Red Green 12 Red Green...

Page 233: ...he most satisfactory portrait from among them The ID 4000 then stores the color correction values necessary to achieve the appearance of the portrait you selected If necessary you can also change the...

Page 234: ...he Data Entry window is not on the screen start the ID 4000 and log in or choose the Exit button until the Data Entry window appears 2 Choose the Administration button to display the Administration wi...

Page 235: ...oose the System Management button to display the System Management window 4 Choose the Calibration button from the System Management window to display the Calibrate dialog box ID 4000 output devices 7...

Page 236: ...in calibration by choosing the Capture button then capturing a portrait of a typical subject 8 After determining whether the amount of red in the printed portraits should be changed select the approp...

Page 237: ...in the Output Device Calibration dialog box This calibrates the system and returns you to the System Management window If none of the images is satisfactory choose the Back button Then print and eval...

Page 238: ...evice according to the appropriate procedure in Chapter 6 instead of adjusting the portrait printing This procedure applies to all ID 4000 output devices used for printing portraits You select the dev...

Page 239: ...e 1 If the Data Entry window is not on the screen start the ID 4000 and log in or choose the Exit button until the window appears 2 Choose the Administration button to display the Administration windo...

Page 240: ...3 Choose the System Management button to display the System Management window 4 Choose the Calibration button to display the Calibrate dialog box 7 44 ID 4000 output devices...

Page 241: ...Color to display the Color Correction dialog box 6 Choose the Color Brightness button to display the Brightness Adjustment dialog box 7 Choose the printer to be calibrated from the Output Devices menu...

Page 242: ...any buttons until the image prints 10 If the printed sample group contains a satisfactory image select it by choosing its position in the Output Device Calibration dialog box This calibrates the syst...

Page 243: ...e the Print Set menu Then choose the desired print set from the menu The number of the print set on the menu corresponds to the number on the printed sample sheet To calibrate additional printers rest...

Page 244: ...database and system management tasks Advanced Search Set criteria for searching the database Audit Log View print or delete the audit log Bar Code Label Print another bar code label for the current a...

Page 245: ...d store it in the ID 4000 database Card History View or print history of applicant transactions Change Database Login Change the database log in information Change Password Replace your current passwo...

Page 246: ...t and images for use by other ID 4000 systems Import Import data to the database from external files Pack Database Pack and reindex the database Preview Display the current applicant s badge on the sc...

Page 247: ...ieves all records in the database _ The _ underscore wildcard character acts as a place holder and means any character For example you can use this wildcard character to find the records of all employ...

Page 248: ...ARROW LEFT ARROW and RIGHT ARROW keys collectively referred to as the arrow keys You can use these keys to navigate from field to field in a window ASCII file A standard text file format recognizable...

Page 249: ...lection of the check box A check box is selected when an X appears in the box A check box is unselected when there is no X in the box choose To use the mouse or keyboard to select an item that begins...

Page 250: ...indow that appears temporarily to give or request information dimmed Grayed out unavailable or disabled You cannot choose dimmed buttons menu items check boxes option buttons drop down list items or o...

Page 251: ...log file is A_REPORT TXT icon button An on screen button with a picture that represents its function To identify an icon button s function you position the mouse pointer over the button and the name a...

Page 252: ...means both expressions must be true to retrieve the record The operator OR means either of the expressions can be true to retrieve the record The operator NOT means the expression cannot be true to r...

Page 253: ...nly one option button within a group at one time output device A device such as a printer or a magnetic stripe encoder that you use for outputting ID 4000 data onto badges or other media output device...

Page 254: ...tical or numerical order according to one or more common fields For example you can sort a group of applicant records by last name and department number table A collection of data records template A c...

Page 255: ...ters numerals and or spaces but not including symbols and punctuation marks that identifies you as a user of the ID 4000 system You must enter your user name user ID and password to successfully log i...

Page 256: ...lication templates 2 3 assistance obtaining 1 3 audit log 5 41 authorizing signature capturing 5 95 B backing up and restoring files 5 59 Badge Type field 4 13 badge finishing equipment 2 11 bar code...

Page 257: ...rinting with 7 15 color thermal printer turning on and off 7 14 color adjusting in printed portraits 7 35 components ID 4000 2 5 converting images 4 38 cross reference tables maintaining 5 91 D data e...

Page 258: ...se and keyboard operation 3 1 O Obtaining assistance 1 3 on line help 3 3 operation overview 4 1 optional software 2 13 Oracle DLL files renaming 5 89 Other instructions 1 2 P packing databases 5 34 p...

Page 259: ...installing or updating 5 85 starting up 3 4 statistics viewing 5 60 system management overview 5 39 System Management window displaying 5 39 T tape drive 2 10 technical support 1 3 templates applicati...

Reviews: