311
Analog Output Slave Units
Section 6-5
Indicator Section
Communications
Indicators
Refer to
4-1-3 Communications Indicators
.
Switch Settings
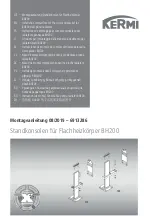
Setting the Node Address
The node address is set as a decimal number with the 10s digit set on the left
rotary switch and the 1s digit set on the right rotary switch. (The maximum
node address is 63.)
The setting on the rotary switches is read when power is turned ON.
Setting the Output Ranges
Each pin is set according to the following table.
Note
(1) Always use the default setting (OFF) for pin 7.
(2) Always set pin 8 to ON if the DIP switch is used to set the range. If this
pin is OFF, the DIP switch settings will not be enabled.
(3) The DIP switch settings are read when the power is turned ON.
0
1
2
3
4
5
6
7
8
9
0
1
2
3
4
5
6
7
8
9
1s digit of node address
10s digit of node address
Pin No.
Setting
Specification
1
Sets output range for Out-
put 0
Default setting: All pins OFF
2
3
4
Sets output range for Out-
put 1
Default setting: All pins OFF
5
6
7
Always OFF.
Always set this pin to OFF. Unexpected oper-
ation may result if it is turned ON.
8
Range setting method
OFF: Use CompoNet Support Software.
ON: Use DIP switch.
1 2 3 4
5
6
7
8
ON
Summary of Contents for CRT1 - 10-2008
Page 2: ...CRT1 Series CompoNet Slave Units and Repeater Unit Operation Manual Revised October 2008...
Page 3: ...iv...
Page 5: ...vi...
Page 9: ...x...
Page 15: ...xvi...
Page 23: ...xxiv Conformance to EC Directives 6...
Page 51: ...28 Slave Unit Models Section 1 2...
Page 123: ...100 Connecting External I O for Slave Units Section 3 6...
Page 365: ...342 Temperature Input Units Section 7 5...
Page 381: ...358 Expansion Unit Specifications Section 8 2...
Page 418: ...395 Repeater Unit Section 10 2 Dimensions 42 3 50 3 1 27 5 95 mm...
Page 419: ...396 Repeater Unit Section 10 2...
Page 424: ...401 CX Integrator Section 11 1...
Page 575: ...552 Current Consumption Summary Appendix D 552...
Page 581: ...558 Index...
Page 583: ...560 Revision History...