STEERING AND FRONT SUSPENSION
Front Suspension Components
7
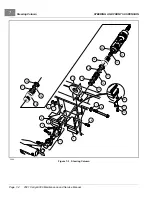
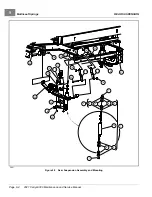
FRONT SUSPENSION COMPONENTS
See General Warnings on page 1-1.
LEAF SPRING REMOVAL
1.
Disconnect the battery cables and either discharge the controller or disconnect the spark plug wire.
Disconnect the Batteries – Electric Vehicles, Section 1, Page 1-5.
See Disconnect the Battery- Gasoline Vehicles on page 1-4.
2.
Remove both front wheels.
See Wheel Removal, Section 8, Page 8-1.
3.
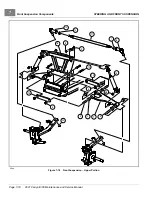
Remove the nuts (14) and bolts (25) from the bottom of each king pin (26)
4.
Remove the four bolts (30), four nuts (32), four lock washers (31), and bottom spring plate (29).
5.
Remove leaf spring (6).
6.
Check the condition of the urethane bushings (27) and steel sleeves (28). Replace any that are worn or damaged.
LEAF SPRING INSTALLATION
1.
Install urethane bushings (27) and steel sleeves (28) into leaf spring eyes
.
2.
Install tapered leaf spring (6), bottom spring plate (29), four bolts (30), four lock washers (31), and four nuts (32).
Using a crisscross pattern sequence, tighten bolts to 23 ft·lb (31 N·m).
3.
Install spring in king pins (26) with bolts (25) and nuts (14). Tighten to 17 ft·lb (23 N·m).
4.
Install the wheels and lower the vehicle.
See Wheel Installation, Section 8, Page 8-1.
5.
Adjust camber and toe-in.
See Camber Adjustment on page 7-15 and Toe-in Adjustment on page 7-16.
KINGPIN AND STEERING SPINDLE REMOVAL – MAINTENANCE-FREE BALL JOINTS
1.
Remove the front hub.
See Front Hub Removal on page 7-21.
2.
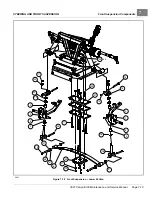
Remove nuts (20) and remove ball joints from spindles
. Remove drag link ball joint.
See also Tie Rod and Drag Link Removal – Maintenance-Free Ball Joints on page 7-14.
3.
Remove the lock nut (17) and conical washer (34) from the top of the kingpin (26)
4.
Raise the upper clevis (16) from the kingpin.
5.
Remove the flat washer (33) and thrust washer (19).
6.
Slide the spindle (1 or 2) off the kingpin (26).
7.
Remove the wave washer (35) and inspect it. If the washer is broken or has a wave bottom to wave crest height
dimension of less than 0.040 inch (0.10 cm), it must be replaced.
8.
Remove bolt (25) and nut (14) from bottom of kingpin (26) and remove kingpin.
9.
Inspect the kingpin and spindle. If either is worn or damaged, it must be replaced.
10.
Inspect the bushings (3 and 4). If the bushings are worn or damaged, remove them and press in new ones.
See following NOTE.
NOTE:
If the bushings are replaced, ream new bushings from 0.750 to 0.752 (19.05 to 19.10 mm) in diameter. The
reamer should be long enough to ream both bushings from one direction.
2021 Carryall 300 Maintenance and Service Manual
Page 7-17
Summary of Contents for Carryall 300 2021
Page 2: ......
Page 16: ......
Page 551: ...80 2018 by Kohler Co All rights reserved KohlerEngines com 17 690 15 Rev...
Page 565: ...GASOLINE ENGINE HARNESS Wiring Diagrams Gasoline Engine Harness 26...
Page 566: ...Page intentionally left blank...
Page 567: ...GASOLINE KEY START MAIN HARNESS Wiring Diagrams Gasoline Key Start Main Harness 26...
Page 568: ...Page intentionally left blank...
Page 569: ...GASOLINE PEDAL START MAIN HARNESS Wiring Diagrams Gasoline Pedal Start Main Harness 26...
Page 570: ...Page intentionally left blank...
Page 571: ...GASOLINE INSTRUMENT PANEL HARNESS Wiring Diagrams Gasoline Instrument Panel Harness 26...
Page 572: ...Page intentionally left blank...
Page 573: ...GASOLINE FNR HARNESS Wiring Diagrams Gasoline FNR Harness 26...
Page 574: ...Page intentionally left blank...
Page 575: ...ELECTRIC MAIN HARNESS Wiring Diagrams Electric Main Harness 26...
Page 576: ...Page intentionally left blank...
Page 577: ...ELECTRIC INSTRUMENT PANEL HARNESS Wiring Diagrams Electric Instrument Panel Harness 26...
Page 578: ...Page intentionally left blank...
Page 579: ...ELECTRIC ACCESSORIES HARNESS Wiring Diagrams Electric Accessories Harness 26...
Page 580: ...Page intentionally left blank...
Page 588: ...NOTES...
Page 589: ...NOTES...
Page 590: ...NOTES...
Page 591: ...NOTES...
Page 592: ...NOTES...
Page 593: ...NOTES...
Page 594: ...NOTES...
Page 595: ......
Page 596: ......


