7
Tie Rod and Drag Link
STEERING AND FRONT SUSPENSION
TIE ROD AND DRAG LINK
See General Warnings on page 1-1.
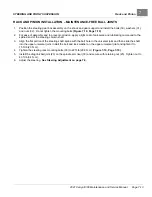
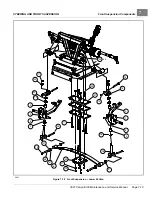
TIE ROD AND DRAG LINK REMOVAL – MAINTENANCE-FREE BALL JOINTS
1.
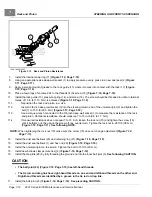
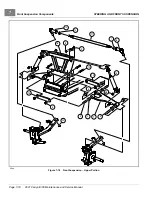
Using locking pliers to hold tie rod and drag link, loosen jam nuts (7 and 12) on tie rod ball joints
and loosen jam nuts (27 and 29) on the drag link
.
2.
Remove the ball joint retaining nuts (20)
.
3.
Remove ball joints (6 and 13)
and (23)
from the spindles.
4.
Remove the ball joints from the tie rod (11)
.
5.
Remove drag link (28) from inner ball joint assembly (3) and drag link ball joint (23)
.
TIE ROD AND DRAG LINK INSTALLATION – MAINTENANCE-FREE BALL JOINTS
1.
Thread ball joints (6 and 13) into tie rod (11) to a depth of 1/2-inch (12.5 mm)
See
following WARNING and CAUTION.
WARNING
• The ball joints must be threaded into the rod at least 5/16 of an inch (8 mm). Failure to thread ball
joints in deep enough may cause a ball joint to separate from the rod during adjustment or while being
operated, possibly resulting in loss of vehicle control and severe personal injury.
CAUTION
• The tie rod and drag link have right-hand threads on one end and left-hand threads on the other end.
Right-hand threads are identified by a groove in the tie rod or drag link.
2.
Attach the tie rod ball joints (6 and 13) to the spindle tabs (23), then install and tighten the nuts (20) to 40
ft·lb (54 N·m)
3.
Thread the drag link rod (28) all the way onto the threaded stud of the inner ball joint assembly (3) (right-hand
threads)
4.
Thread the ball joint (23) into the drag link rod (28) (left-hand threads) to full thread depth
.
5.
Install the drag link ball joint (23) on the spindle arm riser (33) and secure with retaining nut (25)
. Tighten nut to 40 ft·lb (54 N·m).
6.
Adjust camber and toe-in.
See Camber Adjustment on page 7-15 and Toe-in Adjustment on page 7-16.
7.
Adjust steering.
See Steering Adjustment on page 7-6.
Page 7-14
2021 Carryall 300 Maintenance and Service Manual
Summary of Contents for Carryall 300 2021
Page 2: ......
Page 16: ......
Page 551: ...80 2018 by Kohler Co All rights reserved KohlerEngines com 17 690 15 Rev...
Page 565: ...GASOLINE ENGINE HARNESS Wiring Diagrams Gasoline Engine Harness 26...
Page 566: ...Page intentionally left blank...
Page 567: ...GASOLINE KEY START MAIN HARNESS Wiring Diagrams Gasoline Key Start Main Harness 26...
Page 568: ...Page intentionally left blank...
Page 569: ...GASOLINE PEDAL START MAIN HARNESS Wiring Diagrams Gasoline Pedal Start Main Harness 26...
Page 570: ...Page intentionally left blank...
Page 571: ...GASOLINE INSTRUMENT PANEL HARNESS Wiring Diagrams Gasoline Instrument Panel Harness 26...
Page 572: ...Page intentionally left blank...
Page 573: ...GASOLINE FNR HARNESS Wiring Diagrams Gasoline FNR Harness 26...
Page 574: ...Page intentionally left blank...
Page 575: ...ELECTRIC MAIN HARNESS Wiring Diagrams Electric Main Harness 26...
Page 576: ...Page intentionally left blank...
Page 577: ...ELECTRIC INSTRUMENT PANEL HARNESS Wiring Diagrams Electric Instrument Panel Harness 26...
Page 578: ...Page intentionally left blank...
Page 579: ...ELECTRIC ACCESSORIES HARNESS Wiring Diagrams Electric Accessories Harness 26...
Page 580: ...Page intentionally left blank...
Page 588: ...NOTES...
Page 589: ...NOTES...
Page 590: ...NOTES...
Page 591: ...NOTES...
Page 592: ...NOTES...
Page 593: ...NOTES...
Page 594: ...NOTES...
Page 595: ......
Page 596: ......


