background image

4

Front Body

BODY AND TRIM

DASH REMOVAL

1.

Disconnect the batteries.

See Disconnect the Batteries – Electric Vehicles, Section 1, Page 1-5.

See Disconnect the Battery- Gasoline Vehicles on page 1-4.

2.

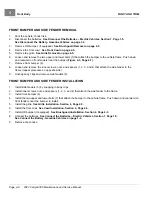
Remove cowl.

See Cowl Removal on page 4-4.

3.

Remove steering wheel.

See Steering Wheel Removal, Section 7, Page 7-1.

4.

Disconnect instrument panel wiring.

5.

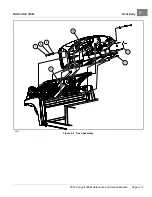
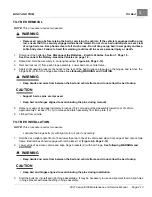
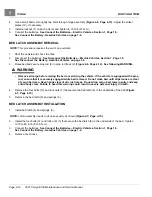
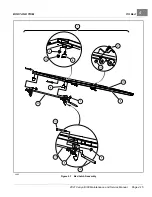
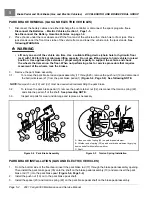
Remove the bolts, and washers (5, 6, 7, 8, and 9) from the top, sides and bottom of the dash (10).

(Figure

4-5, Page 4-11)

.

6.

Remove dash assembly.

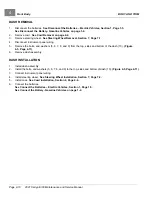
DASH INSTALLATION

1.

Install dash assembly.

2.

Install the bolts, and washers (5, 6, 7, 8, and 9) to the top, sides and bottom of dash (10).

(Figure 4-5, Page 4-11)

3.

Connect instrument panel wiring.

4.

Install steering wheel.

See Steering Wheel Installation, Section 7, Page 7-2.

5.

Install cowl.

See Cowl Installation, Section 4, Page 4-4.

6.

Connect the batteries.

See Connect the Batteries – Electric Vehicles, Section 1, Page 1-5.
See 
Connect the Battery- Gasoline Vehicles on page 1-4.

Page 4-10

2021 Carryall 300 Maintenance and Service Manual

Summary of Contents for Carryall 300 2021

Page 1: ...2021 Carryall 300 Maintenance and Service Manual Gasoline Vehicle with Kohler ECH440 Engine Electric Vehicle with ERIC Charging System Manual Number 86753090054 Edition Code A...

Page 2: ......

Page 3: ...ional technical representatives vehicle service seminars periodic service bulletins maintenance and service manuals and other service publications also represent Club Car s continuing commitment to cu...

Page 4: ...le read complete section s and any referenced information that may be relevant to the service or repair to be performed NOTE This manual represents the most current information at the time of publicat...

Page 5: ...ing the Stored Electric Vehicle to Service 3 3 Storage Gasoline Vehicles 3 4 Preparing the Gasoline Vehicle for Extended Storage 3 4 Returning the Stored Gasoline Vehicle to Service 3 5 SECTION 4 Body...

Page 6: ...oe Removal 6 1 Brake Assembly Cleaning 6 5 Brake Shoe Installation 6 7 Brake Adjustment 6 9 Brake Assembly Removal and Installation 6 10 Brake Assembly Removal 6 10 Brake Assembly Installation 6 10 Br...

Page 7: ...2 Multi Leaf Spring Removal 9 2 Multi Leaf Spring Installation 9 5 Jounce Bumpers 9 5 Jounce Bumper Removal 9 5 Jounce Bumper Installation 9 5 SECTION 10 Periodic Maintenance 10 1 General Information...

Page 8: ...11 10 Field Current 11 10 Armature PWM 11 10 Field PWM 11 11 Speed Pulses 11 11 Foot Input 11 11 Key Input 11 11 Forward Input 11 11 Reverse Input 11 11 Mode Switch Input 11 11 Charger Inhibit 11 11 M...

Page 9: ...f the Excel System 12 1 Key Differences Excel with ERIC Charging System vs PowerDrive Chargers 12 2 Features 12 2 Sonic Weld Diode and 10k Ohm Resistor Locations 12 4 Troubleshooting 12 5 Troubleshoot...

Page 10: ...on 13 12 Headlights 13 12 Headlight Bezel Removal 13 12 Headlight Bezel Installation 13 12 Headlight Bulb Removal Halogen 13 13 Headlight Bulb Installation Halogen 13 13 Headlight Bulb Removal LED 13...

Page 11: ...ing Vehicles and Chargers 15 23 USB Service Port 15 23 Incoming AC Service 15 23 Terminal Block Cover 15 24 Resetting Power External Charger 15 24 Resetting Power Onboard Charger 15 24 External Charge...

Page 12: ...Brush Spring Inspection and Replacement 19 3 Starter Generator Assembly 19 4 Disassembly of the Starter Generator to Service the Armature Commutator 19 5 Bearing Cleaning and Inspection 19 6 Bearing...

Page 13: ...36 Fuel Level Sending Unit 19 36 Voltage Limiter 19 37 Voltage Limiter Removal 19 37 Voltage Limiter Installation 19 37 Headlight Switch 19 38 Headlight Switch Removal 19 38 Headlight Switch installat...

Page 14: ...ion 21 13 Relieving Fuel Pressure 21 14 To Relieve Fuel Pressure 21 14 Fuel Line 21 14 Fuel Line Removal 21 15 Fuel Line Installation 21 16 Fuel Pump Module 21 18 General Information 21 18 Fuel Pump M...

Page 15: ...eel Bearings 24 6 Differential Guard Removal 24 6 Differential Guard Installation 24 6 Axle Tube and Axle Shaft Removal 24 7 Axle Tube and Axle Shaft Installation 24 8 Rear Wheel Bearing Removal 24 8...

Page 16: ......

Page 17: ...l injury or death The color associated with Warning is ORANGE CAUTION A CAUTION with the safety alert symbol indicates a hazard or unsafe practice that could result in minor personal injury The color...

Page 18: ...rformance severe personal injury or death Any modification or change to the vehicle that affects the electrical system stability or handling of the vehicle or increases maximum vehicle speed beyond fa...

Page 19: ...ar a full face shield and rubber gloves when working on or near batteries Do not wear loose clothing or jewelry such as rings watches chains etc when servicing the vehicle or battery charger Use insul...

Page 20: ...Gasoline Vehicles 4 Disconnect the positive cable 2 CONNECT THE BATTERY GASOLINE VEHICLES 1 Connect the positive cable 2 Figure 1 1 Page 1 4 2 Connect the negative cable 1 3 Tighten the battery termin...

Page 21: ...C VEHICLES WARNING Place Run Tow switch in the TOW position before disconnecting or connecting the batteries Failure to heed this warning can result in a battery explosion or severe personal injury 1...

Page 22: ...for information on how to properly recycle your batteries 1403 Figure 1 3 Dispose of Lead acid Batteries Properly INTERNATIONAL SAFETY SYMBOLS ON BATTERIES Anyone using repairing or servicing the veh...

Page 23: ...Multi latch ratchet and pawl BODY CHASSIS Frame chassis Twin I Beam welded aluminum Side and rear body Aluminum Front body ArmorFlex Front body finish Automotive grade paint with clear coat finish Ti...

Page 24: ...size Flat bed inside dimensions 36 5 x 48 8 in 92 7 x 123 9 cm Vehicle rated capacity Level surface only 800 lb 363 kg Standard seating capacity 2 LIQUID CAPACITIES Transaxle 22 fl oz 0 67 L TIRE PRES...

Page 25: ...ge VDC 48 Maximum DC voltage VDC 72 Maximum DC output current amps 13 5 DIMENSIONS WEIGHT Case overall length 9 9 in 25 2 cm Case overall width 7 3 in 18 6 cm Case overall height 3 1 in 8 cm AC cord l...

Page 26: ...erve capacity Gasoline Vehicle Electrical Charging System 23 amps at max RPM Torque converter Automatic variable speed dry type STEERING SUSPENSION BRAKES Steering Self adjusting rack and pinion Suspe...

Page 27: ...74 9 cm Load bed size Box bed inside dimensions 36 2 x 47 5 x 10 5 in 91 9 x 120 6 x 26 6 cm Load bed size Flat bed inside dimensions 36 5 x 48 8 in 92 7 x 123 9 cm Vehicle rated capacity Level surfac...

Page 28: ...Pagination Page 2 Vehicle Specifications VEHICLE SPECIFICATIONS Page 2 6 2021 Carryall 300 Maintenance and Service Manual...

Page 29: ...Bed Latch Prop Rod Loading and Unloading Towing with a Vehicle Transporting on a Trailer Subsequent Owner Registration Warranties MODEL IDENTIFICATION The serial number of each vehicle is printed on...

Page 30: ...E Check Battery Water Levels Two Weeks Prior to Storage Check water levels at least two weeks prior to winter storage to ensure proper mixing of water and electrolyte Note that it takes approximately...

Page 31: ...ge the park brake Chock the wheels to prevent the vehicle from rolling NOTE It is recommended that the vehicles be plugged in and the electrolyte level maintained throughout the storage period If any...

Page 32: ...e OFF position remove the key and leave the Forward Neutral Reverse control FNR in the NEUTRAL position during storage This is to prevent unintentionally starting the vehicle or a fire hazard Do not a...

Page 33: ...protect the engine remove spark plug and pour 0 5 fl oz 14 2 mL of SAE 10 weight oil into the engine through the spark plug hole Rotate engine crankshaft by hand several times and then install the sp...

Page 34: ...the engine until the engine starts Turn the engine off and return the Maintenance Operate switch to the OPERATE position See following NOTE NOTE Due to the oil added to the engine in preparation for s...

Page 35: ...otive cleaning solutions with a sponge or soft cloth The painted finish is the same paint used in automotive applications Automotive cleaning polishing products are available at automotive specialty a...

Page 36: ...tic Buff sanded area until all sanding scratches have disappeared Use as much buffing compound as necessary to achieve this step If at any time original scratches can be seen repeat steps 2 and 3 as n...

Page 37: ...ove the screws 2 and washers 3 4 Remove the brushguard 4 BRUSHGUARD INSTALLATION 1 Position the brushguard 4 onto the vehicle Figure 4 1 Page 4 3 2 Install the washers 3 screws 2 and bolts 1 Tighten t...

Page 38: ...ree tabs 2 on cowl install under lip of dash 4 Figure 4 2 Page 4 5 3 Ensure sides of cowl 1 assemble between the two ribs on side of dash 4 Ensure center tab on cowl assembles beneath the rib in the g...

Page 39: ...4 3 Page 4 7 6 Loosen and remove the two lower left and right side bolts 1 and 7 that attach the grille and plastic bumper 6 7 Remove charger receptacle if equipped by removing the three screws that...

Page 40: ...then lower right and left side bolts Tighten to 44 in lb 5 N m 6 Connect the batteries See Connect the Batteries Electric Vehicles Section 1 Page 1 5 See Connect the Battery Gasoline Vehicles on page...

Page 41: ...BODY AND TRIM Front Body 4 6 7 2 3 4 5 6 9 8 1 1 2844 Figure 4 3 Front Grille Bumper and Side Fenders 2021 Carryall 300 Maintenance and Service Manual Page 4 7...

Page 42: ...e fender to the frame repeat procedure on opposite side 9 Unsnap body clips and remove side fenders 5 FRONT BUMPER AND SIDE FENDER INSTALLATION 1 Install side fenders 5 by snapping in body clips 2 Ins...

Page 43: ...pop out the lower body clips be careful not to pry the lower clips off 5 Pull instrument panel out from the dash panel 2 1 2 1 2946 Figure 4 4 Instrument Panel INSTRUMENT PANEL INSTALLATION 1 Place u...

Page 44: ...top sides and bottom of the dash 10 Figure 4 5 Page 4 11 6 Remove dash assembly DASH INSTALLATION 1 Install dash assembly 2 Install the bolts and washers 5 6 7 8 and 9 to the top sides and bottom of d...

Page 45: ...BODY AND TRIM Front Body 4 2863 Figure 4 5 Dash Assembly 2021 Carryall 300 Maintenance and Service Manual Page 4 11...

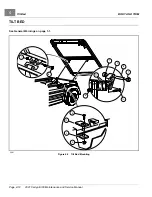
Page 46: ...4 Tilt Bed BODY AND TRIM TILT BED See General Warnings on page 1 1 6 7 11 5 1 9 8 1 10 12 2 4 3 2981 Figure 4 6 Tilt Bed Mounting Page 4 12 2021 Carryall 300 Maintenance and Service Manual...

Page 47: ...the bed and vehicle frame and do not allow the bed to drop CAUTION Support bed as pins are removed Keep bed and hinges aligned to avoid binding the pins during removal 5 Raise rear edge of bed approxi...

Page 48: ...e If the vehicle is equipped with a prop rod ensure that it is securely engaged while bed is raised Do not close bed until all persons are clear of cargo bed area Keep hands clear of all crush areas D...

Page 49: ...BODY AND TRIM Tilt Bed 4 2982 Figure 4 7 Bed Latch Assembly 2021 Carryall 300 Maintenance and Service Manual Page 4 15...

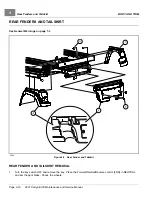
Page 50: ...on page 1 1 2984 Figure 4 8 Rear Fender and Tailskirt REAR FENDER AND TAILSKIRT REMOVAL 1 Turn the key switch OFF and remove the key Place the Forward Neutral Reverse control FNR in NEUTRAL and set t...

Page 51: ...icle frame 7 Remove fenders and tailskirt REAR FENDER AND TAILSKIRT INSTALLATION 1 Using a 10 mm socket install the two screws 2 that attach the tailskirt 3 to the vehicle frame Figure 4 8 Page 4 16 T...

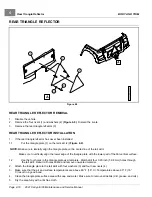
Page 52: ...tically align the lower edge of the triangle plate with the lower part of the flat vertical surface 1 2 Use the four holes in the triangle plate as a template Match drill four 0 20 inch 5 08 mm holes...

Page 53: ...page 1 1 FLOOR MAT REMOVAL 1 Remove the brake and accelerator pedals See Accelerator and Brake Pedal Group Section 5 Page 5 1 2 Remove the top edge of the floor mat from the overlapping flange under...

Page 54: ...Pagination Page 4 Floor Mat BODY AND TRIM Page 4 20 2021 Carryall 300 Maintenance and Service Manual...

Page 55: ...oved jack stands of proper weight capacity to support the vehicle and chock the wheels that remain on the floor When not performing a test or service procedure that requires movement of the wheels loc...

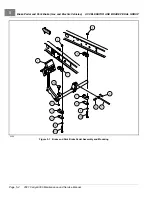
Page 56: ...e Pedal and Park Brake Gas and Electric Vehicles ACCELERATOR AND BRAKE PEDAL GROUP 3206 Figure 5 1 Brake and Park Brake Pedal Assembly and Mounting Page 5 2 2021 Carryall 300 Maintenance and Service M...

Page 57: ...See following NOTE NOTE Brake pedal free play is the distance the brake pedal can be pressed before the brake actuator arm moves 5 Tighten the jam nut 3 while holding the adjustment nut 2 in the corr...

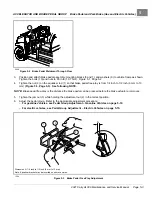
Page 58: ...brake rod and pawl assembly 17 through 20 remove the push nut 19 and disconnect the ball joint sleeve 21 from the park brake pedal 1 Figure 5 4 Page 5 4 See following NOTE NOTE New push nuts 19 and 32...

Page 59: ...tion Use approved jack stands of proper weight capacity to support the vehicle and chock the wheels that remain on the floor When not performing a test or service procedure that requires movement of t...

Page 60: ...celerator pedal 1 from the vehicle 14 Inspect all parts for wear and damage Replace as necessary 24 4 5 1 25 17 8 9 13 12 11 7 6 5 14 15 16 GO 24 25 17 10 26 22 21 21 19 18 20 23 3000 Figure 5 6 Accel...

Page 61: ...e ball stud Secure these parts with the nut 10 Tighten the nut to 50 in lb 5 7 N m 8 Press the brake pedal slightly and with the park brake ratchet oriented so that the tip of the ratchet is pointed t...

Page 62: ...nch to remove the nut 7 two washers 5 and bolt 4 securing the accelerator pedal 1 to the pivot rod 6 Figure 5 8 Page 5 9 5 Remove the nut 10 and bolt 8 from the accelerator pivot rod assembly 6 6 Slid...

Page 63: ...ACCELERATOR AND BRAKE PEDAL GROUP Accelerator Pedal Electric Vehicles 5 2642 Figure 5 8 Accelerator Pedal Electric Vehicle with MCOR 2021 Carryall 300 Maintenance and Service Manual Page 5 9...

Page 64: ...icle slide the ratchet onto the pivot rod do not slide the ratchet onto the pivot rod splines Release the brake pedal and allow the ratchet to rotate until its tip is pointed downward Figure 5 7 Page...

Page 65: ...Tighten the jam nut 31 to 8 ft lb 9 5 N m Figure 5 10 Page 5 11 22 31 PARK STO P 1 2 3 4 5 6 7 8 9 10 11 12 Correct pedal position is 6 inches 15 2 cm from floormat to back of brake pedal Figure 5 10...

Page 66: ...lerator pivot rod supports and adjust the supports If the gap becomes smaller as the park brake pedal is pressed move the pivot rod supports slightly rearward until the gap is consistent If the gap be...

Page 67: ...ement Reconnect ball joint Figure 5 15 Page 5 13 4 7 If the accelerator push rod was disconnected from the accelerator pedal reconnect it 4 8 Check for proper brake operation prior to driving the vehi...

Page 68: ...ehicle disconnect the battery cables as instructed See Disconnect the Battery Gasoline Vehicles Section 1 Page 1 4 This will prevent the possibility of the vehicle running over you when you are adjust...

Page 69: ...cur as they should hold the ball joint at each end of the accelerator rod with pliers and tighten the accelerator rod jam nut against it 6 6 Ensure that the events occur as described in the table abov...

Page 70: ...stance between pedal and floorboard Proper brake pedal height is 6 inches 15 2 cm Figure 5 21 Page 5 16 2 4 Tighten the jam nut 31 to 8 ft lb 9 5 N m Figure 5 20 Page 5 16 22 31 PARK STO P 1 2 3 4 5 6...

Page 71: ...d the tips of the ratchet teeth Use a feeler gauge to verify the gap Figure 5 22 Page 5 17 The gap should be consistent through range of pawl movement If the gap is not consistent loosen the four bolt...

Page 72: ...agement or counterclockwise to decrease engagement Reconnect ball joint Figure 5 25 Page 5 18 4 7 Check for proper brake operation prior to driving the vehicle 5 Adjust accelerator pedal height 5 1 Lo...

Page 73: ...BREAK POINT 1 2 1 Accelerator Pedal Adjustment Tool 2 Rubber Strap Figure 5 27 Accelerator Pedal Height Adjustment 6 Adjust the brakes See Brake Adjustment Section 6 Page 6 9 7 Connect the battery ca...

Page 74: ...Pagination Page 5 Pedal Group Adjustment Electric Vehicles ACCELERATOR AND BRAKE PEDAL GROUP Page 5 20 2021 Carryall 300 Maintenance and Service Manual...

Page 75: ...Disconnect the Batteries Electric Vehicles Section 1 Page 1 5 See Disconnect the Battery Gasoline Vehicles on page 1 4 2 Place chocks at the front wheels Loosen but do not remove lug nuts on rear whe...

Page 76: ...t is not imperative to do so in order to remove the brake shoes 6 For electric vehicles Remove the axle shaft See Axle Shaft and Oil Seal Removal Section 17 Page 17 1 For gasoline vehicles Remove the...

Page 77: ...100 10222 Figure 6 3 Remove Shoe Retainer Clip 1400 17700 10225 Figure 6 4 Remove Brake Shoes 1 2 3 1 1 Slide 638 Figure 6 5 Remove Adjuster Wheel 639 Figure 6 6 Lubricate Slide and Slide Plate 2021 C...

Page 78: ...WHEEL BRAKE ASSEMBLIES 10 1 8 6 9 4 3 2 13 12 6 5 7 7 11 16 14 15 14 A B A Electric Vehicle B Gasoline Vehicle 2902 Figure 6 7 Self adjusting Wheel Brake Assembly Page 6 4 2021 Carryall 300 Maintenanc...

Page 79: ...ce possibly resulting in property damage or severe personal injury 5 Use a small brush to carefully apply a light coat of white lithium NLGI 2 grease Dow Corning BR2 Plus or equivalent on each of the...

Page 80: ...e Assembly Cleaning WHEEL BRAKE ASSEMBLIES 1 7 T 642 Figure 6 10 Apply Grease To Brake Adjuster 643 Figure 6 11 Install Adjuster Wheel Trailing Shoe Page 6 6 2021 Carryall 300 Maintenance and Service...

Page 81: ...riented toward the rear of the vehicle 2 Install the shoe retainer clip using pliers to compress the clip 1 while turning the retainer pin 2 into a horizontal position Figure 6 12 Page 6 7 3 Attach th...

Page 82: ...and Oil Seal Installation Section 17 Page 17 4 For gasoline vehicles Install the wheel hub assembly See Rear Hub Installation Section 24 Page 24 4 8 Install the brake drum and make sure that it is pro...

Page 83: ...er the vehicle to the floor 2 Make the brake shoe and drum adjustment by pressing and releasing the brake pedal repeatedly until an audible clicking can no longer be heard 3 Adjust brake pedal free pl...

Page 84: ...e bow tie locking pin 13 and clevis pin 12 from brake cable Figure 6 7 Page 6 4 6 Remove four bolts 11 and lock nuts 10 that mount the brake assembly to the transaxle Figure 6 7 Page 6 4 7 Remove brak...

Page 85: ...d pull cable from crossmember 6 Remove bow tie pin 1 and the clevis pin 2 from the brake lever on each wheel and pull the clevis 4 away from the lever Figure 6 17 Page 6 11 7 Remove E clip 3 from cabl...

Page 86: ...Pagination Page 6 Brake Cable Removal and Installation WHEEL BRAKE ASSEMBLIES Page 6 12 2021 Carryall 300 Maintenance and Service Manual...

Page 87: ...ge 7 2 3 Match mark the steering wheel 3 and steering column shaft 4 so when the steering wheel is removed it can be placed back in exactly the same position on steering column shaft 4 Loosen the stee...

Page 88: ...steering wheel 1 Install the steering wheel 3 on the splines of the steering shaft 4 Be sure to align the match marks placed on the wheel and steering column shaft in step 3 above Figure 7 1 Page 7 2...

Page 89: ...embly STEERING COLUMN ASSEMBLY 1 Insert bearing seat 18 into both ends of steering tube 20 Place a block of wood on bearing seat and tap lightly on block until bearing seat 18 is fully seated in steer...

Page 90: ...eering Column STEERING AND FRONT SUSPENSION 22 17 16 18 20 18 16 14 12 21 19 17 15 13 11 10 7 8 6 4 1 9 7 5 2 3 35 2609 Figure 7 3 Steering Column Page 7 4 2021 Carryall 300 Maintenance and Service Ma...

Page 91: ...g the steering column in place attach it to the frame using bolts 8 washers 7 and nuts 9 Figure 7 3 Page 7 4 Thread the nuts onto the bolts but do not tighten them 4 Install wide washer 35 washer 11 a...

Page 92: ...See following CAUTION CAUTION The drag link has both left and right hand threads The end of the drag link toward the spindle has left hand threads and the end toward the rack has right hand threads T...

Page 93: ...for any binding clunking or tight loose spots Listen for unusual noises Replace the rack and pinion as an assembly if any is found 4 In the event of an known impact and obvious visible damage is not f...

Page 94: ...Page 7 10 3 Remove both bellows clamps 2 plastic wire ties 4 Remove the hex nut 29 and slide off the dust seal bellows 1 5 Remove the retaining ring 21 then slide off dust seal bellows 20 6 Remove th...

Page 95: ...ball bearing 9 has been damaged remove the external snap ring 10 Figure 7 10 Page 7 10 and press the bearing off Figure 7 8 Page 7 9 12 Remove retaining ring 19 and stop washer 18 then remove rack 17...

Page 96: ...Install a new tab washer 4 and an inner ball joint 3 Figure 7 9 Page 7 9 Install the ball joint onto the rack by securing the rack in a vise using wood blocks between the rack and the jaws of the vise...

Page 97: ...age 7 10 See preceding CAUTION 5 If the needle bearing 7 is damaged the steering box assembly must be replaced Figure 7 10 Page 7 10 6 Install pinion 8 and bearing 9 assembly into the housing 6 Figure...

Page 98: ...tional resistance should measure 7 to 15 in lb 0 8 to 1 7 N m 11 4 If measured resistance does not equal 7 to 15 in lb loosen the lock nut 15 and tighten the screw 16 until it bottoms out then back th...

Page 99: ...the steering column shaft 3 Align the flat portion of the steering shaft spline with the bolt hole in the universal joint and then slide the shaft into the upper universal joint Install the bolt and l...

Page 100: ...an inch 8 mm Failure to thread ball joints in deep enough may cause a ball joint to separate from the rod during adjustment or while being operated possibly resulting in loss of vehicle control and se...

Page 101: ...a framing square At the floor or ground there should be an equal amount of space between each tire and the framing square Figure 7 14 Page 7 15 2 Loosen but do not remove the four nuts 32 that secure...

Page 102: ...between the marks on the forward facing surfaces of the tires See following NOTE NOTE The front measurement must be less than the rear measurement 5 Subtract the measurement on the front of the tires...

Page 103: ...e Wheel Installation Section 8 Page 8 1 5 Adjust camber and toe in See Camber Adjustment on page 7 15 and Toe in Adjustment on page 7 16 KINGPIN AND STEERING SPINDLE REMOVAL MAINTENANCE FREE BALL JOIN...

Page 104: ...Suspension Components STEERING AND FRONT SUSPENSION 15 5 5 9 18 8 4 2 1 4 38 12 13 11 7 6 10 14 14 20 2849 Figure 7 18 Front Suspension Upper Portion Page 7 18 2021 Carryall 300 Maintenance and Servic...

Page 105: ...ON Front Suspension Components 7 33 35 16 17 26 27 27 14 28 6 29 32 31 30 25 32 x 4 19 37 15 14 2 3 5 4 1 3 5 4 27 17 34 2847 Figure 7 19 Front Suspension Lower Portion 2021 Carryall 300 Maintenance a...

Page 106: ...nut 38 then slide the shock absorber 15 free of the Delta A Plate 1 4 Remove the Delta A Plate 1 5 Inspect the bushings 2 and sleeves 3 and 4 in the Delta A Plate and replace them if necessary DELTA...

Page 107: ...haft 3 4 Lightly sand spindle shaft to clean away any light rust 5 Inspect the surface of the spindle shaft for surface damage It should be clean and smooth If severe pitting from rust or corrosion ha...

Page 108: ...Pagination Page 7 Front Wheel Bearings and Hubs STEERING AND FRONT SUSPENSION Page 7 22 2021 Carryall 300 Maintenance and Service Manual...

Page 109: ...erly aligned and adjusted WHEELS See General Warnings on page 1 1 WHEEL REMOVAL 1 Slightly loosen the lug nuts on the wheel to be removed 2 Raise the end of the vehicle from which the wheel is to be r...

Page 110: ...oid damage to the tire do not use excessive force when starting the bead over the edge of the rim 3 3 When top bead is free of the rim pull the bead from the bottom side of the rim up into the upper p...

Page 111: ...e rim from the valve stem side If there is no tire machine available use a rubber mallet and tire iron 5 Remove the valve core and position the tire so that both beads are on the rim flange narrow bea...

Page 112: ...8 Tires WHEELS AND TIRES Figure 8 2 Inflate Tire Page 8 4 2021 Carryall 300 Maintenance and Service Manual...

Page 113: ...the front of the mounting plate a snubber limits the mounting plate motion SHOCK ABSORBERS See General Warnings on page 1 1 SHOCK ABSORBER INSPECTION AND REMOVAL 1 Check shock absorbers 10 for damage...

Page 114: ...nnect the Batteries Electric Vehicles Section 1 Page 1 5 See Disconnect the Battery Gasoline Vehicles on page 1 4 2 Loosen but do not remove lug nuts on tire and wheel assembly on the side from which...

Page 115: ...bumper mount 17 and spacer 11 8 Allow shock mount bracket 6 to rotate downward and remove spring retainer 13 Do not disconnect brake cable from bracket Figure 9 5 Page 9 4 9 Raise axle with floor jack...

Page 116: ...ings REAR SUSPENSION 22 22 15 11 17 10 18 5 20 6 1 8 1 12 18 23 9 7 8 9 2 23 3 4 16 19 13 22 14 18 16 21 2861 Figure 9 5 Rear Suspension Assembly and Mounting Page 9 4 2021 Carryall 300 Maintenance an...

Page 117: ...be sure to position locating bolt on the spring in the locating hole in the transaxle saddle 3 Tighten the nuts 1 until the rubber bushing 8 expands to the size of the cup washer 9 4 Install spring r...

Page 118: ...Pagination Page 9 Jounce Bumpers REAR SUSPENSION Page 9 6 2021 Carryall 300 Maintenance and Service Manual...

Page 119: ...s Any problems should be corrected by a Club Car distributor dealer or a trained technician General All the parts should be in place and properly installed Be sure that all nuts bolts and screws are t...

Page 120: ...ng below Walk Away Braking With the vehicle parked on level ground and the park brake disengaged place the Run Tow switch in the RUN position and attempt to push the vehicle Motor braking should engag...

Page 121: ...pt to service hot motor Attempting to do so can cause severe burns To avoid unintentionally starting the vehicle disconnect the batteries and discharge the controller Gasoline vehicles only Moving par...

Page 122: ...de of vehicle Initial one time inspection by owner or trained technician after six weeks of use Batteries For vehicles newly equipped with the SPWS For vehicles newly equipped with the SPWS manually c...

Page 123: ...e by owner or trained technician General vehicle Wash engine compartment and underside of vehicle Do not wash engine when hot Battery Clean terminals and wash dirt from casing Front wheel alignment an...

Page 124: ...ent clean or replace if necessary Engine air intake system Check clamps for tightness check hose for cracks General vehicle Check for loose hardware and tighten if necessary Check the vehicle top spee...

Page 125: ...WD 40 Brake slides Dry Moly Lube Semiannually by owner or trained technician or every 50 hours of operation whichever comes first Front suspension Chassis Lube EP NLGI Grade 2 Transaxle Check fill to...

Page 126: ...hnician or every 50 hours of operation whichever comes first Brake slides Dry Moly Lube Transaxle Check fill to plug level 67 6 fl oz 2 L SAE 80W 90 API Class GL 5 Annually by trained technician only...

Page 127: ...may be required in extremely dirty operating environments In the event of a loss of power sluggish acceleration or a roughly running engine service the air filter immediately Figure 10 3 Air Filter AI...

Page 128: ...SITY Select the engine oil viscosity for your environmental conditions Figure 10 4 Engine Oil Viscosity ENGINE OIL LEVEL INSPECTION Before the engine oil is examined Disable the vehicle To examine the...

Page 129: ...ne oil 4 Install the dipstick NOTE Make sure that the arrow points towards the engine ENGINE OIL REPLACEMENT CAUTION Hot engine oil will cause skin burns Do not change the engine oil when the engine i...

Page 130: ...sable the vehicle Disconnect the battery To replace the engine oil 1 Remove the dipstick 1 Figure 10 7 Page 10 12 Figure 10 7 Dipstick Location 2 Clean the area around the oil drain plug 2 Figure 10 8...

Page 131: ...rain plug 5 Drain the oil fully 6 Clean the oil drain plug 7 Examine the gasket on the oil drain plug for damage Replace if necessary 8 Install the oil drain plug and tighten to 13 lb ft 18 N m 9 Add...

Page 132: ...t change the engine oil when the engine is hot Let the engine temperature decrease before the oil is changed CAUTION Too much engine oil can decrease engine performance and damage the engine Do not ex...

Page 133: ...inimum 2 indicators Figure 10 11 Page 10 15 Figure 10 11 Dipstick Indicators 3 Install the dipstick REFUEL DANGER Fuel is flammable and explosive Do not add fuel with the key switch set to ON Before f...

Page 134: ...ing device must be grounded If the pump is not grounded the vehicle must be grounded to the pump before and during the fueling operation CAUTION A fuel with an alcohol content that exceeds 10 by volum...

Page 135: ...frame rails 4 Lower the vehicle onto the jack stands LIFT THE REAR OF THE VEHICLE WARNING Lifting the vehicle with cargo can cause property damage serious personal injury or death Remove all cargo fr...

Page 136: ...ft point 2 Lift the rear of the vehicle 3 Put jack stands under the frame rails 4 Lower the vehicle onto the jack stands LOWER THE FRONT OF THE VEHICLE Before the vehicle is lowered Use a jack rated f...

Page 137: ...nter of the lift point 2 Lift the vehicle off of the jack stands 3 Remove the jack stands 4 Lower the vehicle LOWER THE REAR OF THE VEHICLE Before the vehicle is lowered Use a jack rated for the vehic...

Page 138: ...the jack stands 3 Remove the jack stands 4 Lower the vehicle SPARK PLUG SPARK PLUG REMOVAL Before the spark plug is removed Disable the vehicle Disconnect the battery To remove the spark plug 1 Clean...

Page 139: ...park Plug Inspection 2 Examine the spark plug electrodes for corrosion and damage 3 Examine the spark plug insulator 2 for cracks 4 Replace the spark plug if corrosion damage or cracks are found SPARK...

Page 140: ...lubricant to the spark plug threads 2 Use a spark plug socket to install and tighten the spark plug to 20 lb ft 27 N m 3 Connect the spark plug wire 1 Figure 10 19 Page 10 22 Figure 10 19 Spark Plug...

Page 141: ...use the CDT to troubleshoot the vehicle and to adjust controller parameters that affect vehicle behavior The Excel controller with OS version 34 or version 35 The OS version can be viewed in the Syste...

Page 142: ...ch fault are also provided Help function Help screens give descriptions of adjustable parameters monitored variables and faults PC interface Files can be downloaded from a PC onto an Secure Digital SD...

Page 143: ...LAY Immediately after the CDT is connected to the vehicle it begins loading controller information During this time the loading status is shown as a percentage the CDT s software version is given and...

Page 144: ...ator error Lockout Fault This is a symptom not a cause Inspect and test the charger interlock circuit If no problems are found in the charger interlock circuit replace the controller Overvoltage Contr...

Page 145: ...COL VERSION Displays the controller protocol version PARAM BLOCK VERSION Displays a number that represents the default parameter settings at time of manufacture MFG DATE CODE Displays the date the con...

Page 146: ...f speed 11 4 mph 18 3 km h 3 Normal golf speed Typical 14 8 mph 23 8 km h See S3 FWD Speed on page 11 7 4 Private speed mode 19 2 mph 30 9 km h NOTE Present speed values for each speed setting may be...

Page 147: ...tting menu with the navigation keys 2 Select Speed Setting 3 with the change value buttons 3 Access the program menu and the s3 fwd speed menu with the navigation keys 4 Use the change value buttons t...

Page 148: ...nu item is intended to be used with Guardian Visage so that the type of battery could be determined and displayed when remotely monitoring vehicles Charger Control Beep Option The Beep Option controls...

Page 149: ...ing from 0 to 999 and programmed by vehicle manufacturer MONITOR MENU The Monitor menu is accessed by using the arrow keys to highlight Monitor and pressing the Select softkey to activate the menu All...

Page 150: ...te of charge as a percent It is based on several parameters monitored by the controller SPEED Vehicle speed in mph THROTTLE Indicates the position of the accelerator pedal from 0 pedal not pressed to...

Page 151: ...the forward input is on REVERSE INPUT With the Forward Neutral Reverse control FNR in the NEUTRAL or F position the handset should indicate that the reverse input is off When the Forward Neutral Rever...

Page 152: ...of charge and the Load Line SOC Open Circuit Voltage Start Open Circuit Voltage Start is the voltage as determined by the controller following a cycle of the Run Tow switch or coming out of sleep mode...

Page 153: ...splays amp hours removed from batteries since trip amp hours was reset See Reset Trip Amp Hours on page 11 8 Trip Regen Amp Hours Displays amp hours returned to the batteries from regenerative braking...

Page 154: ...ditions or locations where a problem with vehicle performance has been reported See following WARNING WARNING The vehicle operator should not monitor the handset while the vehicle is in motion A techn...

Page 155: ...fault is detected the controller responds to the fault by limiting the vehicle speed to 1 2 of its normal top speed If the technician reaches the conclusion that the vehicle is running slowly because...

Page 156: ...mes to a stop OVERVOLTAGE A B G Vehicle slows and beeps LOW BATTERY VOLTAGE E Top speed is reduced THERMAL CUTBACK E Top speed is reduced MOTOR STALL J None MAIN DROPOUT 1 and 2 A C Vehicle comes to a...

Page 157: ...When condition clears SPEED SENSOR When condition clears MAIN WELDED When condition clears MAIN DRIVER ON When condition clears MAIN DRIVER OFF When accel pedal is cycled MAIN COIL OPEN When accel ped...

Page 158: ...e fault What it means If the voltage seen by the controller coming out of the MCOR is not within specified limits this fault occurs and the controller de energizes the solenoid coil Perform additional...

Page 159: ...or the FNR is switched on This is a safety control and the controller must see the pedal engaged last in the following sequence key switch first FNR second and then pedal last What to do Check thrott...

Page 160: ...PWM to the motor a speed sensor fault is detected What it means Speed sensor is not working Check connection What to do Replace speed sensor MAIN DRIVER ON If the field effect transistor FET that con...

Page 161: ...ture is registered What to do In most cases this is an operator issue holding the vehicle on an incline with the accelerator pedal not the brake pedal See following NOTE NOTE In rare cases it could be...

Page 162: ...appears in the fault history menu the trained technician should attempt to determine when and where the fault has occurred For example if the motor stall fault is present in the fault history the trai...

Page 163: ...avorites Once added it can be renamed if desired When you add a ready made folder from the Parameters or Monitor menu the folder icon will appear in the Favorites menu with a star on it Although you c...

Page 164: ...d except as a warning when the battery is empty set this to Yes Text for save as When you create a new cpf file the field at the top of the keyboard screen is either blank No text or is automatically...

Page 165: ...ic colors for specific variables use the Move Down and Move Up softkeys to achieve the desired combinations Use the left arrow key to return to the Plot Log menu To open the plotting program highlight...

Page 166: ...e Backlight under HHP Settings menu Controller is in power down mode vehicle unused and not charged for 72 hours Connect charger or drive the vehicle a short distance and reconnect the handset to the...

Page 167: ...g could result in vehicle malfunction property damage personal injury or death Index of Test Procedures 1 Handset Cord 2 Handset Cord Adaptor 3 CDT Ports TEST PROCEDURE 1 Handset Cord See General Warn...

Page 168: ...damage and corrosion Inspect the CDT port mounted to the bottom of the dash panel Repair and replace parts as necessary 3 3 If no problem is found connect the four pin connector and install the cente...

Page 169: ...CONTROLLER DIAGNOSTIC TOOL CDT Connection Tests 11 4 3 2 701 Figure 11 3 Disconnect Four pin Connector 2021 Carryall 300 Maintenance and Service Manual Page 11 29...

Page 170: ...Pagination Page 11 Connection Tests CONTROLLER DIAGNOSTIC TOOL CDT Page 11 30 2021 Carryall 300 Maintenance and Service Manual...

Page 171: ...hicles with ERIC Charging system feature a dash mounted charge indicator light below the steering column that serves two functions 1 Battery low state of charge warning and 2 Charging confirmation The...

Page 172: ...t compatible with vehicles using PowerDrive chargers A new controller is used that has data collecting functions previously performed by the OBC Pin 11 in the 16 pin connector is now utilized to opera...

Page 173: ...rge the batteries Run Tow Switch When the Run Tow switch is in the RUN position the vehicle will function normally When the switch is in the TOW position power to the controller is shut off disabling...

Page 174: ...TRIC VEHICLE ELECTRICAL SYSTEM TROUBLESHOOTING SONIC WELD DIODE AND 10K OHM RESISTOR LOCATIONS 3119 Figure 12 1 Sonic Weld Diode and 10k Ohm Resistor Locations Approximate CA300 with ERIC Charging Pag...

Page 175: ...ld programmer is unavailable the technician should go to Troubleshooting Guide 2 TROUBLESHOOTING GUIDE 1 The following troubleshooting guide is intended for use with a CDT handheld programmer See foll...

Page 176: ...rness Loose or disconnected 16 pin connector at speed controller or broken wire Repair and or connect the 16 pin connector to the speed controller Monitor Menu FORWARD INPUT and or REVERSE INPUT does...

Page 177: ...nect the batteries and see if the symptom returns Diagnostic Menu MAIN DRIVER ON or MAIN DRIVER OFF fault code Failure of the FET that controls the solenoid coil Replace the speed controller See Speed...

Page 178: ...ESHOOTING GUIDE 2 In the event that the vehicle is not functioning properly after completing Troubleshooting Guide 1 use Troubleshooting Guide 2 If a CDT handheld programmer is unavailable use Trouble...

Page 179: ...on page 12 25 Forward Neutral Reverse control FNR Test Procedure 6 Forward Neutral Reverse control FNR on page 12 20 Solenoid loose wires Test Procedure 7 Solenoid Activating Coil on page 12 22 Solen...

Page 180: ...ted or flat tires Section 8 Wheels and Tires Vehicle operates but has points in pedal travel where it does not maintain speed nor accelerate MCOR malfunction Test Procedure 11 MCOR Voltage on page 12...

Page 181: ...re Test Procedure 10 Charger Interlock on page 12 24 Battery charger connections loose plug or wires at charger receptacle or batteries Check wire connections and tighten if necessary Vehicle operates...

Page 182: ...roperly installed Do not direct a water stream in area of the cover TESTING BASICS To use the CDT handheld programmer the Run Tow switch must be in the RUN position The Run Tow switch provides power t...

Page 183: ...er functions the Run Tow switch must be in the RUN position The TOW position removes power to the controller Index of Test Procedures 1 Batteries Voltage Check BPV 2 48 Volt Battery Pack Voltage Under...

Page 184: ...ther details on battery testing NOTE The voltage displayed through the CDT shows what the controller thinks it sees If the controller is not operating properly it may display a different voltage from...

Page 185: ...ries Each battery should be checked with a multimeter while under load See following NOTE NOTE If a 48 volt set of batteries is down in the 32 to 38 volt range the discharge machine will activate but...

Page 186: ...hout the CDT Handset WARNING The key switch should be placed in the OFF position and left in the OFF position for the duration of this test 1 If necessary see Testing Basics on page 12 12 2 Access the...

Page 187: ...r Receptacle Fuse With the batteries connected and the Run Tow switch in the RUN position 3 1 Probe the two small metal contacts on the top of the fuse Figure 12 4 Page 12 17 3 2 Each contact should s...

Page 188: ...e Figure 12 4 Page 12 17 5 2 Each contact should show approximately 12 5 to 13 5 volts 5 3 If only one side shows 12 5 to 13 5 volts replace fuse 5 4 If neither side of fuse shows 12 5 to 13 5 volts d...

Page 189: ...tion properly in order to test the MCOR limit switch with the CDT handset 5 Test the MCOR limit switch 5 1 Select FOOT INPUT on the Monitor menu by using the SCROLL DISPLAY buttons on the CDT 5 2 The...

Page 190: ...r side 6 1 With the key switch in the ON position With an insulation piercing probe check voltage of the blue wire in the MCOR 2 pin connector It should show BPV coming to the MCOR If not check wiring...

Page 191: ...rol FNR in the NEUTRAL position 3 Remove Forward Neutral Reverse control FNR from its housing by carefully prying up each side with a small flat tip screwdriver 4 Back probe the following three wires...

Page 192: ...the other small solenoid terminal A reading of 180 to 190 ohms should be obtained for service replacement solenoids Figure 12 5 Page 12 22 If not replace the solenoid 2m 20 m 200 m 2k 200 200 200 200...

Page 193: ...ity Test without the CDT Handset Solenoid Continuity Test without the CDT Handset 1 If necessary see Testing Basics on page 12 12 2 Place chocks at the front wheels and lift the rear of the vehicle wi...

Page 194: ...the black wire and blue wire are crimped together in the same fork terminal This closes the circuit once the DC cord plug is inserted into the charger receptacle 1 With batteries connected place the...

Page 195: ...lso following WARNING WARNING The key switch should be placed in the OFF position and left in the OFF position for the duration of this test 2 Connect the CDT to the vehicle 3 Access the Monitor menu...

Page 196: ...t close to the three pin connector at the MCOR The reading should be approximately 4 65 volts 5 If reading is zero volts check the white wire continuity from the three pin connector at the MCOR to the...

Page 197: ...tral Reverse control FNR in the NEUTRAL position 2 Connect the CDT to the vehicle 3 Access the Monitor menu and select SPEED PULSES by using the SCROLL DISPLAY buttons The CDT should indicate OFF when...

Page 198: ...ery no 6 6 x 8 Volt battery set negative post and place the red probe with insulation piercing probe on the green wire between the three pin connector and the motor speed sensor 6 1 Raise one rear whe...

Page 199: ...4 3 Check continuity on A1 and A2 motor terminal posts and continuity of the F1 and F2 motor terminal posts Also check continuity of all motor wires Section 16 Electric Vehicle Motor TEST PROCEDURE 1...

Page 200: ...he terminals until they are firmly seated in the 16 pin connector After each terminal has been pushed into the housing gently pull on the wire to ensure it is locked into place 3 Check wires in the pl...

Page 201: ...ns the following information What function the wire performs Whether or not the 16 pin connector must remain connected during the test The appropriate test result for each pin If results differ from t...

Page 202: ...O CONTROLLER IF YES BACK PROBE TO TEST TEST PROCEDURE THROTTLE OUTPUT Pin 1 White Supplies approximately 5 volts in MCOR 3 pin circuit Yes 4 to 5 volts measured between pin 1 and B terminal on control...

Page 203: ...tery voltage 8 1 If the voltage reading is correct replace the reverse buzzer 8 2 If reading is zero volts check orange white wire continuity and connection at Pin 7 in 16 Pin connector 8 3 If there i...

Page 204: ...ure 12 7 Page 12 34 and pin 3 purple white wire of the 16 pin connector It should indicate continuity If not check sonic welds no 1 and no 2 3 Probe pin 2 red white wire It should show BPV If not chec...

Page 205: ...nstrument panel push down on the retaining tabs surrounding the key switch 4 and remove the key switch cap 8 Using a 1 inch socket hold the key switch and remove the switch retaining nut 6 from the ou...

Page 206: ...the rocker switch 4 Press in on the locking tabs on each side of switch 11 and push switch out of instrument panel FORWARD NEUTRAL REVERSE CONTROL FNR INSTALLATION 1 Press the locking tabs 11 on each...

Page 207: ...ings on page 1 1 TESTING THE RUN TOW SWITCH See Test Procedure 3 Run Tow Switch on page 12 15 RUN TOW SWITCH REMOVAL 1 Disconnect the batteries and discharge the controller See Disconnect the Batterie...

Page 208: ...3 securing the MCOR 2 to the plastic housing 4 on the chassis 5 Detach the two tabs from the plastic housing 4 and remove the MCOR 2 from vehicle 2646 Figure 13 3 MCOR Mounting MCOR INSTALLATION 1 Ali...

Page 209: ...Panel Removal on page 4 9 3 Disconnect the 18 gauge pink wire and orange white wires from reverse buzzer 4 Remove the two screws from the reverse buzzer Remove the reverse buzzer from the center dash...

Page 210: ...3 6 4 Slide solenoid 3 up to disengage the mounting tabs and remove from component mounting plate 9 7 8 3 2971 Figure 13 4 Solenoid SOLENOID INSTALLATION 1 Mount solenoid 3 onto component mounting pla...

Page 211: ...screws 5 from controller cover 1 and remove cover Figure 13 6 Page 13 8 3 Disconnect the heavy gauge wires from the controller by removing the three screws 1 Figure 13 6 Page 13 8 4 Disconnect the 16...

Page 212: ...h in the RUN position 6 If vehicle is equipped with the Guardian SVC system perform the following additional steps for proper setup 6 1 Connect a CDT to the CDT port on the vehicle 6 2 Select Program...

Page 213: ...or remove the receptacle contacts and plug terminals should be cleaned with a good electrical contact cleaner or lightly sprayed with WD 40 brand spray lubricant The plug should then be inserted and...

Page 214: ...Removal on page 4 9 3 Disconnect the wires at the warning light 4 Press the two retaining tabs and remove the light from the instrument panel CHARGE INDICATOR LIGHT INSTALLATION 1 Install light into i...

Page 215: ...ect the Batteries Electric Vehicles on page 1 5 3 Using a 3 8 inch socket remove the upper and lower bolts that attach the fuse block cover 4 Remove fuse block cover 5 Remove nut and washers 6 Using a...

Page 216: ...ument panel is properly seated and snapped in place 4 Connect the batteries See Connect the Batteries Electric Vehicles Section 1 Page 1 5 HEADLIGHTS HEADLIGHT BEZEL REMOVAL 1 Disconnect the batteries...

Page 217: ...nt fenders See Front Bumper and Side Fender Installation Section 4 Page 4 8 4 Install cowl See Cowl Installation Section 4 Page 4 4 HEADLIGHT BULB REMOVAL LED 1 Disconnect the batteries 2 Remove cowl...

Page 218: ...13 Headlights ELECTRIC VEHICLE ELECTRICAL COMPONENTS 2993 Figure 13 7 Headlight Assembly Page 13 14 2021 Carryall 300 Maintenance and Service Manual...

Page 219: ...RECEPTACLE REMOVAL 1 Disable the vehicle 2 Disconnect the batteries and discharge the controller 3 Remove the cowl 4 Disconnect the USB red wire from the 12V power point 1 and the main harness red wir...

Page 220: ...OMPONENTS 4 Connect the USB black wire to the jumper wire 3 5 Connect the USB red wire to the main harness red wire 2 and the 12V power point 1 6 Install the cowl 7 Connect the batteries Page 13 16 20...

Page 221: ...s Call a physician immediately WARNING Wear safety glasses or approved eye protection when servicing the vehicle or battery charger Wear a full face shield and rubber gloves when working on or near ba...

Page 222: ...tion of batteries i e terminal posts Poor fair or proper cleanliness of batteries Added electric accessories Use of a single point watering system SPWS MEASURING VOLTAGE OF BATTERY SET Set the multime...

Page 223: ...thm specific to the battery installed Regrouping is now Club Car s standard battery replacement method Regrouping is the practice of placing batteries of similar condition together in one vehicle For...

Page 224: ...14 Battery Regrouping ELECTRIC VEHICLE BATTERIES 3104 Figure 14 2 Battery Regrouping Process Flow Page 14 4 2021 Carryall 300 Maintenance and Service Manual...

Page 225: ...capabilities until they have been discharged and recharged 50 to 70 times To obtain the maximum service life from new batteries restrict vehicles with new batteries to one hour of operation between ch...

Page 226: ...hicles equipped with the Single Point Watering System SPWS and one for vehicles without SPWS used in combination with the Battery Watering Nozzle Gun Alternate Methods Reverse Osmosis Reverse osmosis...

Page 227: ...on all supply hoses Be sure to replace the deionizer filter cartridge as indicated by the water quality light The Deionizer system has a battery powered water quality light Deionizer filters have a li...

Page 228: ...uter hold downs to 55 in lb 6 2 N m The terminal connections should be clean and tight and any worn insulation or frayed wires should be replaced Tighten battery terminals to proper torque See Connect...

Page 229: ...ctor Spray See following NOTE NOTE Dispose of waste water properly 2 Check the electrolyte level weekly Figure 14 3 Add water only after charging unless the electrolyte level is below the top of the p...

Page 230: ...discharge batteries should always be kept clean Hot weather also has an effect on a battery s self discharge rate The higher the temperature the quicker a set of batteries will discharge In hotter cli...

Page 231: ...ntly inactive For best results use a battery watering gun to add water to batteries Check the electrolyte level more frequently in hot weather or when batteries are old VIBRATION DAMAGE The battery ho...

Page 232: ...verflowing during routine watering Either failure scenario is rare but should be monitored in the initial inspection and during routine watering sessions Replace malfunctioning valves to ensure maximu...

Page 233: ...make sure the light is green in color indicating acceptable water quality If the light indicates unacceptable water quality the cartridge must be replaced 6 After ensuring adequate water flow rate an...

Page 234: ...n vehicles are being rotated the CDT Controller Diagnostic Tool can be a very helpful service tool Monitoring the value of the Odometer or Amp Hours with the CDT simplifies vehicle usage scheduling Se...

Page 235: ...trical connection Fire or personal injury can result Have a qualified technician replace the damaged parts Do not use near fuels grain dust solvents thinners or other flammables Chargers can ignite fl...

Page 236: ...g and service procedures pertaining to the external high frequency battery charger model number IC0650 048 CC Do not attempt to service a battery charger that has not been properly identified If a cha...

Page 237: ...n or the plug is difficult to insert or remove check for bent pins then clean the receptacle contacts and plug terminals with a good electrical contact cleaner or light coating of WD 40 brand spray lu...

Page 238: ...th ERIC Charging system feature a dash mounted charge indicator light below the steering column that serves two functions 1 Battery low state of charge warning and 2 Charging confirmation The charge i...

Page 239: ...charge Solid blue AC power to charger is present ONBOARD CHARGER STATUS INDICATORS The indicator lights on the onboard charger provides information concerning charger status _ LIGHT STATUS STATUS EXPL...

Page 240: ...potential risk of electric shock F code Internal fault condition has caused the charging to stop See the charger fault codes for more information E code External error condition has caused the chargin...

Page 241: ...er Figure 15 2 Position the charger so that is has adequate ventilation and the charger status indicator panel is visible The charger can be mounted in any orientation right side up upside down etc pr...

Page 242: ...hould be a dedicated 15 or 20 ampere separately protected circuit breaker or fuse single phase branch circuit that complies with all applicable electrical codes for the location Connect the charger AC...

Page 243: ...ate To reduce the risk of electric shock the battery charger must be grounded The charger is equipped with an AC electric cord having an equipment grounding conductor and a grounding type plug The AC...

Page 244: ...concentration Keep batteries away from sparks and open flames Charging batteries emit hydrogen gas that is explosive above 2 air concentration Individual vehicles require one air exchange per hour Fle...

Page 245: ...al injury or death CAUTION On all vehicles turn off all accessories before charging batteries The battery charger provided with this vehicle is approved for use only with the battery type originally s...

Page 246: ...onds The charge indicator light will flash and the multi purpose buzzer will operate when the vehicle starts to charge Figure 15 6 Vehicle Charger Receptacle DANGER If the DC cord is removed too fast...

Page 247: ...BATTERY CHARGER Battery Charging 15 Figure 15 7 AC Cord 4 Before vehicle operation 4 1 Disconnect the AC cord from the power source 4 2 Retract the AC cord 2021 Carryall 300 Maintenance and Service M...

Page 248: ...y or algorithm updates EXTERNAL BATTERY CHARGER How To View Algorithm External Battery Charger 1 Format a USB 2 0 flash drive as FAT16 or FAT32 Make sure the USB is blank 2 Connect the AC cord to the...

Page 249: ...n 13 Open the Setting txt file Figure 15 10 G 130898 000052 Figure 15 10 Setting txt File The Active Charging Profile 1 displays the active algorithm The Available Charging Profile s 2 displays the al...

Page 250: ...tteries For all other battery algorithms see Update Battery Charger With USB 1 Format a USB 2 0 flash drive as FAT16 or FAT32 Make sure the USB is blank 2 Login to Club Car Links via https www clubcar...

Page 251: ...ojan ERIC Shelf Charger Algorithm zip file 7 Copy the CHARGER folder to the USB flash drive Figure 15 13 G 130898 000049 Figure 15 13 CHARGER Folder 8 Safely eject the USB flash drive from the compute...

Page 252: ...USB dust cover 2 14 Connect the USB flash drive to the battery charger The blue light and green triangle light 3 will turn off and on for approximately three minutes 15 When the blue light and green t...

Page 253: ...lt Indicator 2 illuminates amber and the Battery Charging Indicator 3 is flashing green NOTE Wait approximately 25 seconds 5 Release the Select Charge Profile button 6 Push and release the Select Char...

Page 254: ...6 Push and release the Select Charge Profile button to advance through the charging algorithms NOTE The selected charging profile will be displayed up to three times P 0 3 1 for Profile 31 _ BATTERIES...

Page 255: ...tery charger 4 Connect the AC cord to the power source 5 Disconnect the DC cord from the vehicle 6 Wait until only the blue light 1 is on Figure 15 14 Figure 15 17 USB Dust Cover 7 Remove the USB dust...

Page 256: ...ions and the USB port clean and dry Keep all cooling fins clean If the detachable input power supply cord set is damaged replace with a cord that meets the following criteria _ For North America UL or...

Page 257: ...y reduce the amount of time spent troubleshooting a problem USB SERVICE PORT NOTE The triangular charge status light doubles as the USB light Flashing green means data transfer from the USB is occurri...

Page 258: ...e DC cord to the vehicle 5 If the triangular status indicator light comes on contact your Club Car dealer If the light does not come back on attempt to charge the car as usual RESETTING POWER ONBOARD...

Page 259: ...Reconnect and attempt to charge again 2 AC power supply was shut off Verify AC power is present and charge again See AC Power and Continuity Test of AC Circuit on page 15 30 3 AC circuit breaker is tr...

Page 260: ...r and Continuity Test of AC Circuit on page 15 30 7 Ambient temperature too hot above 104 F 40 C Check for dirty obstructed or damaged cooling fins Clean if necessary and ensure sufficient cooling air...

Page 261: ...aching required voltage within safe time limit Possible causes Charger output reduced due to high temperatures poor battery health discharged battery and or the battery is not connected correctly Oper...

Page 262: ...he charger and the bat tery which passes through voltage but not current Make sure that the vehicle has original factory set up E 0 2 3 E 0 2 5 AC voltage out of range AC voltage is out of range Conne...

Page 263: ...e 3 Battery Condition Using Charger 4 On Charge Battery Voltage Using Charger And Multimeter 5 AC Power and Continuity Test of AC Circuit 6 Charger DC Circuit Continuity Test 7 Charger Output Test TES...

Page 264: ...charged batteries See External Charger Status Indicators on page 15 4 NOTE Batteries near the end of their useful lives may not allow the battery charge current to taper and the upper half of the batt...

Page 265: ...nished attach DC cord white wire to positive terminal and black wire to negative terminal with torx screws See following NOTE Tighten torx screws to 39 8 in lb 4 5 N m NOTE The positive symbol and neg...

Page 266: ...the AC cord from the AC outlet NOTE This charger has no internals to service or repair It only has a few external repairs that can be performed If an internal component needs repair the charger must b...

Page 267: ...relief 6 to charger 4 Remove terminal block cover 3 See Terminal Block Cover Removal on page 15 32 5 Remove torx screw 7 securing each DC cord wire to terminal block 4 DC CORD AND STRAIN RELIEF INSTA...

Page 268: ...FOOT REMOVAL 1 Disconnect DC cord 1 from vehicle 2 Disconnect AC cord 2 from AC outlet 3 If mounted detach charger from shelf or wall 4 Squeeze barbs on back side of foot 10 and push foot out of char...

Page 269: ...ing tests can be performed without disassembling the motor using a multimeter or continuity tester NOTE Observe the following before testing the motor This is only testing continuity Tag the motor wir...

Page 270: ...ection 1 Page 1 5 3 Disconnect wires from terminals on motor using two wrenches to prevent posts from turning 4 With a multimeter set to 200 ohms place black probe on motor housing Scratch through pai...

Page 271: ...on on page 16 15 4 Connect the batteries See Connect the Batteries Electric Vehicles Section 1 Page 1 5 TEST PROCEDURE 4 Field Circuit Open See General Warnings on page 1 1 1 Disconnect the batteries...

Page 272: ...e chain hoist or hydraulic floor jack with 1000 lb 454 kg minimum lifting capacity Do not use lifting device to hold vehicle in raised position Use approved jack stands of proper weight capacity to su...

Page 273: ...Do not position fingers under motor when sliding motor off of the input shaft in step 9 Fingers may get pinched when motor disengages 10 Carefully slide the motor away from the transaxle until the mo...

Page 274: ...loose where it connects to the motor frame go to step 6 otherwise disengage the end cap from the motor frame using the following procedure 5 1 With the end cap bolts loose about 1 4 inch 6 3 mm betwee...

Page 275: ...nspect the armature for wear and damage See Armature Inspection and Testing on page 16 8 11 Inspect the motor frame and field windings See Motor Frame and Field Windings Inspection on page 16 10 12 Re...

Page 276: ...6 6 Visual Inspection Burned charred or cracked insulation Improperly cured varnish Thrown solder Flared armature windings Damaged armature core laminations Worn burned or glazed commutators Dirty or...

Page 277: ...l Armature Ground Test CAUTION Do not submerge the armature in solvent NOTE Before testing the armature wipe it clean with a clean cloth Remove any carbon dust and metal particles from between the com...

Page 278: ...tension do not over extend the spring Using excessive force will damage the spring 4 4 Replace springs which require a force of less than 35 ozf 0 99 kgf Figure 16 13 Page 16 11 See following NOTE NOT...

Page 279: ...to wipe the carbon dust off of the bearing Inspect the bearing by spinning it by hand and checking for both axial A and radial B play Figure 16 14 Page 16 11 4 Replace the bearing if it is noisy does...

Page 280: ...nent Testing and Inspection ELECTRIC VEHICLE MOTOR 10 24 23 25 4 5 6 7 9 12 8 14 13 15 16 16 11 1 2 17 18 3 30 2613 Figure 16 15 Electric Motor EJ8 4001A Page 16 12 2021 Carryall 300 Maintenance and S...

Page 281: ...ll the retaining ring to secure the bearing Figure 16 11 Page 16 8 2 Install the brushes and brush rigging See following NOTE NOTE When installing new brushes remove and replace brushes one at a time...

Page 282: ...to support the weight of the commutator The brushes can be easily damaged by this weight 4 Gently press each brush with a small screwdriver until the spring rests on the end of each brush as shown Fig...

Page 283: ...ct the grooves of the input shaft and remove any remaining debris 1 4 Repeat steps 1 1 through 1 3 until input shaft is clean 2 Lubricate the transaxle input shaft 2 1 Squeeze approximately 1 2 inch 1...

Page 284: ...gure 16 15 Page 16 12 See following NOTE NOTE The motor coupling and the new molded bumper must be free of grease and debris 3 2 Ensure that the installed bumper is seated at the bottom of the couplin...

Page 285: ...the left and right bolts 1 and 2 to 100 in lb 11 3 N m 4 6 Retighten all three bolts 1 2 and 3 to 100 in lb 11 3 N m 4 7 Install the motor wires making sure they are connected to the correct motor ter...

Page 286: ...nnect the Batteries Electric Vehicles Section 1 Page 1 5 11 Place the Run Tow switch in the RUN position 12 Inspect the vehicle for proper operation See following WARNING WARNING Make sure that the ve...

Page 287: ...roller See Disconnect the Batteries Electric Vehicles Section 1 Page 1 5 2 Place chocks at the front wheels Loosen lug nuts on rear wheels and lift the rear of the vehicle with a chain hoist or floor...

Page 288: ...and are still seated against the shoulder on the axle shaft 8 Inspect bearing 5 Figure 17 5 Page 17 3 If the bearing in a Type G transaxle is worn or damaged the entire axle shaft assembly 1 or 2 must...

Page 289: ...e Bearing and Shaft 17 1 3 6 5 14 15 24 26 13 33 36 32 8 10 11 12 20 18 19 16 16 16 17 23 21 25 36 22 35 13 27 30 31 29 2 5 3 8 36 15 27 30 28 Figure 17 5 Transaxle Type G 2021 Carryall 300 Maintenanc...

Page 290: ...o align the shaft splines with the splined bore of the differential side gear 27 Figure 17 5 Page 17 3 Continue advancing the shaft until the bearing on the axle is firmly seated within the axle tube...

Page 291: ...e spring mount and the side stringer just forward of each rear wheel Lower the vehicle to let the jack stands support the vehicle Figure 17 6 Page 17 5 See WARNING Lift only one end of the vehicle in...

Page 292: ...was used to raise the vehicle lift the vehicle high enough to permit easy access and clearance for removal of the motor If a floor jack was used to raise the vehicle lower the transaxle enough to per...

Page 293: ...gs to rest on the floor 13 Remove the U bolts attaching the transaxle to the leaf springs Figure 17 10 Page 17 7 14 Carefully lift each end of the transaxle off its positioning pin on the leaf spring...

Page 294: ...gear assembly 19 Lift intermediate gear assembly and differential gear case unit out simultaneously Figure 17 5 Page 17 3 See following CAUTION CAUTION Do not damage gears Use extreme care when handli...

Page 295: ...ferential pin 31 by pushing pin through differential gear case from one side Figure 17 5 Page 17 3 See also Figure 17 15 Page 17 9 8 5 Remove the idler gears 1 and 2 and thrust plates 3 and 4 Figure 1...

Page 296: ...ating surface of housing 8 2 Install left half of transaxle housing 20 Figure 17 5 Page 17 3 8 3 Install eleven bolts 24 in the case housing and tighten to 19 ft lb 25 7 N m Type G transaxles have no...

Page 297: ...ly and other components Loss of vehicle control could result in severe personal injury or death 12 Make sure the drain plug 22 is installed in the transaxle and tightened to 23 ft lb 31 N m Fill the t...

Page 298: ...to the wiring diagram for proper connection See Sonic Weld Diode and 10k Ohm Resistor Locations Section 12 Page 12 4 7 Insert bolts through the spring shackles and bushings in the leaf spring eyes Sec...

Page 299: ...nly way to start and shut off the engine Accelerator Pedal Is not linked to the accelerator pedal limit switch and kill limit switch in the electrical component box because these switches are omitted...

Page 300: ...r until the low oil warning light is off ON When possible 1 Stop the vehicle 2 Turn the key to OFF 3 Examine the engine oil level 4 Add engine oil as necessary 5 If the low oil level warning light sta...

Page 301: ...tery In Front of Engine The engine is grounded to the chassis cross member with an un insulated braided wire Top of Fuel Tank The fuel tank is grounded to the chassis through the main wire harness FEA...

Page 302: ...imit switch failed See the Accelerator Pedal Limit Switch Pedal Start Test Procedure Key switch failed Pedal Start See the Key Switch Start Circuit Test Procedure Key Start See the Key Switch Test Pro...

Page 303: ...s Section Damaged drive clutch See the Clutches Gasoline Vehicles Section Damaged starter generator pulley See Starter Generator in the Electrical Components Section Excessive vehicle vibration RPM se...

Page 304: ...ll Circuit Reverse Buzzer Circuit Low Oil Warning Light Circuit Neutral Lockout Circuit Fuel Pump Circuit Fuel Gauge and Sending Unit Circuit Hour Meter Circuit Lighting Circuit Recognizing and unders...

Page 305: ...ery voltage is accessed in the Battery test procedure The Maintenace Operate switch in the MAINTENANCE position grounds and kills the ignition if the Forward Neutral Reverse control FNR is placed in F...

Page 306: ...Starter Generator Starter Function 13 Voltage Regulator 14 Ignition Spark 15 Reverse Buzzer and Reverse Buzzer Limit Switch 16 Malfunction Indicator Light MIL 17 Low Oil Warning Light LED 18 Battery T...

Page 307: ...rform the following test procedures Battery maintenance procedures can be found in the Electrical Components Pedal Start Gas Vehicle section 1 Disable the vehicle 2 Set the Maintenance Operate switch...

Page 308: ...V 30 F 1 C 9 1 V 20 F 7 C 8 9 V 10 F 12 C 8 7 V 0 F 18 C 8 5 V 5 If the battery voltage is less than the minimum cranking voltage replace the battery Go to next step 5 1 If the electrical problem cont...

Page 309: ...inspect or check using a continuity test ATC style blade fuses are located inside the electrical component box near the battery ATM style blade fuses are located on the main wire harness in front of...

Page 310: ...oltage inspect the following locations 12 pin dash wire harness connector key switch and sonic weld 3 5 2 amp ABC Glass Fuse Only With the key switch in the ON position 5 1 Probe the wire on each side...

Page 311: ...ator ground cable black wire from A1 terminal to chassis Check the battery ground cable from the disconnected terminal to chassis Check the engine ground cable from engine block to chassis 4 The readi...

Page 312: ...strument panel Do not disconnect the wires 3 With the key switch in the OFF position The green wire should show battery voltage coming to the switch The brown white wire should show zero 0 volts If it...

Page 313: ...m 2k 200 200 200 200 20 2 200 m 500 20k 200k 2000 k 1000 OFF WAVETEK 5XL V V V A COM 200nA MAX 1000 750V FUSED 1 M 2 M 1 1 200 Ohm Setting 1337 Figure 18 4 Key Switch Test Engine Kill Circuit 7 Put th...

Page 314: ...proper wiring and tight connections See Wiring Diagrams 3 Disconnect the battery 4 Set the key switch to OFF 5 Set the Forward Neutral Reverse control FNR to N 6 Make sure the accelerator pedal is in...

Page 315: ...ly and are tight If they are not rewire or tighten as necessary 4 Coil Side Check the resistance across the small posts 2 of the solenoid 3 The reading should be 14 to 16 ohms If the reading is not wi...

Page 316: ...1000 OFF WAVETEK 5XL V V V A COM 200nA MAX 1000 750V FUSED 1 3027B Figure 18 7 Solenoid Voltage Test 10 With accelerator pedal in the UP position The meter should read no voltage 10 1 If there is volt...

Page 317: ...perate Switch Test for Pedal Start Vehicles 3 Set the switch to MAINTENANCE 1 Figure 18 8 3 1 Check for no continuity between terminals T1 and T2 If there is continuity replace the switch 3 2 Check fo...

Page 318: ...d Neutral Reverse control FNR is being shifted 4 1 If the neutral lockout switch does not make an audible click as it is pressed check for wear on the cam lobe and replace shift lever if necessary 5 C...

Page 319: ...8C Figure 18 10 Kill Limit Switch 1 If necessary see Testing Basics 2 Disconnect the battery and spark plug wire 3 Remove the electrical component box cover 4 Check for proper wiring and tight connect...

Page 320: ...ity the kill limit switch is good 9 2 If there is no continuity replace the kill limit switch 10 Connect the wires to kill limit switch TEST PROCEDURE 11 Starter Generator Generator Function See Gener...

Page 321: ...f the starter generator 12 Remove the jumper wire 13 Reconnect the yellow wire to the DF terminal on starter generator TEST PROCEDURE 12 Starter Generator Starter Function See General Warnings on page...

Page 322: ...20 m 200 m 2k 200 200 200 200 20 2 200 m 500 20k 200k 2000 k 1000 OFF WAVETEK 5XL V V V A COM 200nA MAX 1000 750V FUSED F1 DF F2 3030B Figure 18 13 Check Starter Terminal Continuity 6 Put the red pro...

Page 323: ...a qualified technician Possible causes A grounded F1 or F2 terminal or a grounded field coil 9 Put the red probe on the DF terminal and the black probe on the F1 terminal The reading should be between...

Page 324: ...ke sure that the red wire from the voltage regulator 1 is connected to the solenoid 2 R ED 2m 20 m 200 m 2k 200 200 200 200 20 2 200 m 500 20k 200k 2000 k 1000 OFF WAVETEK 5XL V V V A COM 200nA MAX 10...

Page 325: ...8 15 Page 18 27 5 3 1 2 4 464B Figure 18 15 Ignition Spark Test 5 Adjust the spark gap test tool 3 probes to approximately 18 000 volts 18 kV setting SE Small Engine Setting on the Thexton 404 tool 6...

Page 326: ...ttery voltage check the 10 amp ATM fuse 6 Set the Forward Neutral Reverse control FNR to R 6 1 If the reverse buzzer does not sound check the reverse buzzer limit switch 7 Turn the key switch to OFF N...

Page 327: ...wires are connected correctly and are tight If they are not rewire or tighten as necessary 4 Turn the key switch to ON 5 Check for battery voltage at yellow wire to low oil warning light 5 1 If there...

Page 328: ...starter generator 9 2 If the reading is below 9 6 volts with an electrolyte temperature of 70 F 21 C check the battery 9 3 If the reading is zero there may be no continuity across the large posts of...

Page 329: ...NTENANCE 5 Put chocks against the wheels 6 While the engine is running check for battery voltage between ground and the pin 5 of the fuel pump connector Pin Wire Color Description 1 Open Open 2 Orange...

Page 330: ...IRE COLOR 1 Fuel Pump Positive Red White 2 Fuel Pump Negative Black White 3 Sending Unit Positive Orange Black 4 Sending Unit Negative Black Wire Black 3031 Figure 18 18 Fuel Pump Module Terminals 5 1...

Page 331: ...Color Description A Red Switched 12V Power B Red Constant 12V Power C Open NA D Tan Malfunction Indicator Light MIL E White Ground Kill Wire F Green Low Oil Light G Black White Fuel Pump H Open NA Fig...

Page 332: ...in 3 and pin 4 terminals in module 2 4 3 1 Description Wire Color 1 Fuel Pump Positive Red White 2 Fuel Pump Negative Black White 3 Sending Unit Positive Orange Black 4 Sending Unit Negative Black Wir...

Page 333: ...does not function correctly go to the next steps Leave the battery disconnected while checking continuity 5 3 1 Check the continuity of the orange black wire from the fuel level sending unit to the pu...

Page 334: ...material between the front frame and the electrical connections on the rear of the instrument panel to prevent contact between the two 5 Disconnect the purple wire 1 from the fuel gauge hour meter Fig...

Page 335: ...in an enclosed area without proper ventilation The engine produces carbon monoxide which is an odorless deadly poison NOTE Keep the battery connected while performing this test procedure 1 If necessar...

Page 336: ...nt panel 4 Set the multimeter set to 20 VDC 5 Put alligator clips on the multimeter probes 6 Connect the red probe to terminal of the headlight switch where the green white wire is connected 7 Connect...

Page 337: ...ectly 3 Remove the wire harness connector from the headlight bulb 4 Set the headlight switch to ON 5 Check for voltage across the two terminals in the connector 2m 20 m 200 m 2k 200 200 200 200 20 2 2...

Page 338: ...ting Basics 2 Disable the vehicle 3 Remove the cowl 4 Disconnect the black wire from positive terminal of voltage limiter 5 Disconnect the green wire from negative terminal of the voltage limiter 6 Se...

Page 339: ...If there is no coninuity check sonic welds 4 10 and 14 Proceed to the next step 4 Set the key switch to ON 5 Set the multimeter to 20 VDC 6 Check for battery voltage at pin 2 red wire of the 4 pin co...

Page 340: ...ng to the switch The brown white wire should show zero 0 volts If it shows battery voltage the switch has failed CLOSED and must be replaced 4 Set the key switch to ON The brown white wire should show...

Page 341: ...rewire or tighten as necessary 4 Coil Side Check the resistance across the small posts 2 of the solenoid 3 The reading should be 14 to 16 ohms If the reading is not within limits replace the solenoid...

Page 342: ...SED 1 3027B Figure 18 28 Solenoid Voltage Test 6 4 With key switch in the OFF and ON positions The multimeter should read no voltage 6 4 1 If there is voltage replace the solenoid 6 5 With key switch...

Page 343: ...Test for Key Start Vehicles 3 Set the switch to MAINTENANCE 1 Figure 18 8 Page 18 19 3 1 Check for no continuity between terminals T1 and T2 If there is continuity replace the switch 3 2 Check for con...

Page 344: ...rk plug wire 4 Disconnect the red wire and white wire of the charging diode assembly from the solenoid 5 Set the multimeter to the diode test function 6 Connect the black multimeter probe to the white...

Page 345: ...be to the white lead of the charging diode 9 1 The multimeter should read 400 to 500 mV 10 Connect the red multimeter probe to the diode body 11 Connect the black multimeter probe to the red charging...

Page 346: ...Pagination Page 18 Test Procedures GASOLINE VEHICLE TROUBLESHOOTING AND ELECTRICAL SYSTEM Page 18 48 2021 Carryall 300 Maintenance and Service Manual...

Page 347: ...following items unique to the key start vehicle Key Switch Only way to start and shut off the engine Accelerator Pedal Is not linked to the accelerator pedal limit switch and kill limit switch in the...

Page 348: ...ator and remove the belt 6 from the pulley 7 Support the starter generator so that when the pivot bolts are removed the starter generator will not fall 8 Remove the pivot nuts and bolts from the mount...

Page 349: ...19 3 See following NOTE NOTE To clean and inspect the armature commutator and the bearings see Disassembly of the Starter Generator to Service the Armature Commutator on page 19 5 20 23 24 28 27 30 2...

Page 350: ...he terminal hardware 25 Figure 19 4 Page 19 3 2 To prevent contact between the brushes and commutator as the commutator is installed and possible damage to the brushes lift the brush springs and pull...

Page 351: ...field coil housing first remove the two securing bolts 43 Carefully remove armature and output end cover assembly from the field coil housing so components are not damaged 3 To separate armature 33 f...

Page 352: ...al A and radial B play Figure 19 9 Page 19 6 2 Replace the bearing if it is noisy does not spin smoothly or has excessive play Check the bearings and replace if rusted worn cracked or if there is an a...

Page 353: ...against armature shaft 7 Use bearing puller if a press is not available 494 Figure 19 10 Bearing Removal FIELD COIL ASSEMBLY Replace entire field coil housing assembly if coils pole shoes or terminal...

Page 354: ...commutator can be polished away with 400 grit or finer sandpaper See following CAUTION CAUTION Do not use emery cloth on the commutator Particles of emery are conductive and may short circuit the comm...

Page 355: ...E Before testing wipe the armature with a clean cloth and remove carbon dust and metal particles from between commutator bars Using a multimeter set on 200 ohms place the positive probe on the commuta...

Page 356: ...STARTER GENERATOR REWORK Any rework must be performed by a qualified technician Starter generator service specifications are listed in the following table _ ITEM SERVICE LIMIT Commutator diameter min...

Page 357: ...towards the center of the cover Figure 19 7 Page 19 5 6 Install the commutator end cover 23 onto the armature shaft Use the tapped mounting holes to align housing to the cover rotate and orient as sh...

Page 358: ...LECTRICAL COMPONENTS 1 2 F1 DF 3 90 F2 1 Jumper Wire 2 1 inch 25 4 mm Minimum Radius 3 Jumper Wire Not Allowed in this Area 2687 Figure 19 14 A1 to F1 Terminal Jumper Wire Routing Page 19 12 2021 Carr...

Page 359: ...n Wire 4 Install a flat washer lock washer and nut onto each terminal and tighten to 48 in lb 5 4 N m 5 Position the starter generator over the mounting bracket 6 Install the pivot bolts 2 and pivot n...

Page 360: ...the black wire 9 from the frame to the A1 terminal on the starter generator 14 Install a flat washer lock washer and nut onto each terminal and tighten the nut to 48 in lb 5 4 N m 15 Connect the batte...

Page 361: ...just the belt tension See Belt Tension Adjustment For EFI Engines BELT TENSION ADJUSTMENT FOR EFI ENGINES NOTE To prevent belt slipping while starting an EFI engine follow procedure outlined below whi...

Page 362: ...Figure 19 20 Belt Tension Gauge 4 Tighten the adjustment nut 1 and pivot nut 2 with your hand Figure 19 21 Page 19 16 2997C Figure 19 21 Starter Generator Mounting Hardware 5 Install the belt tension...

Page 363: ...t on belt tension tool 1 2 turn and check belt tension with the gauge NOTE To prevent errors in measurement caused by residual tension ensure to loosen then reapply the Universal Belt Tension gauge be...

Page 364: ...ove the belt tension tool 11 Confirm proper belt tension with a final measurement 12 Connect the spark plug wire BELT TENSION TOOL MODIFICATION 1 Remove the nut and J bolt from the bracket 2 Grind or...

Page 365: ...voltage regulator 5 in the electrical component box Figure 19 25 2 Install the screw 4 Tighten the screw to 23 in lb 2 6 N m 3 Connect the voltage regulator red wire 1 at the large post on the soleno...

Page 366: ...metal frame around the dash 3 Disconnect the wires from the key switch Do not allow wires to touch 4 From the back of the instrument panel push down on the retaining tabs 1 and remove the key switch...

Page 367: ...n the nut to 35 to 45 in lb 4 to 5 N m 3 Install key switch cap 4 into instrument panel 4 Connect the wires to the key switch terminals See the following table Pedal Start _ Terminal Wire Color 1 Brow...

Page 368: ...ch 2 from bracket 3 4 Disconnect the wires and remove Maintenance Operate switch MAINTENANCE OPERATE SWITCH INSTALLATION 1 Connect the wires to the Maintenance Operate switch Pedal Start Terminal Wire...

Page 369: ...ten the boot hex nut to 16 in lb 1 8 N m 4 Connect the battery NEUTRAL LOCKOUT LIMIT SWITCH NEUTRAL LOCKOUT LIMIT SWITCH REMOVAL On Transaxle 1 Disable the vehicle 2 Disconnect the battery and spark p...

Page 370: ...t limit switch On FNR 1 Disable the vehicle 2 Disconnect the battery and spark plug wire 3 Remove the instrument panel 4 Disconnect the 3 wire connector from the neutral lockout limit switch 1 Figure...

Page 371: ...N m Figure 19 32 000999 003 Figure 19 32 Transaxle Neutral Lockout Limit Switch 2 Move the Forward Neutral Reverse control FNR to make sure that the switch actuates 3 Connect the 3 wire connector to...

Page 372: ...ates 3 Connect the 3 wire connector to the neutral lockout limit switch lead 4 Connect the battery and spark plug wire 5 Test drive the vehicle in both forward and reverse for proper operation SOLENOI...

Page 373: ...4 Remove the screws 3 from the solenoid Figure 19 35 001014 003 Figure 19 35 Solenoid Screws 5 Remove the solenoid SOLENOID INSTALLATION 1 Install the solenoid in the electrical component box 2 Insta...

Page 374: ...e red wire 10 gauge red wire and 16 gauge orange wire to the other large post on the solenoid 5 Connect the 18 gauge orange wire to the small post on the solenoid 6 Connect the 18 gauge blue wire to t...

Page 375: ...is blown determine the cause of the failure and make necessary repairs before installing a new fuse Use the appropriately rated fuse if a fuse with a higher amp rating is used damage to the vehicle el...

Page 376: ...Connect the green wire to the common COM terminal 2 Connect the pink wire to the normally closed NC terminal 3 Install the two washers 4 and two nuts 3 Figure 19 37 Page 19 30 Tighten the nuts to 5 i...

Page 377: ...imit switch KILL LIMIT SWITCH INSTALLATION 1 Connect the white black wire to the common COM terminal 2 Connect the blue wire to the normally open NO terminal 3 Install the kill limit switch 6 on the m...

Page 378: ...rning buzzer 2 Do not let the wires touch 4 Remove the mounting screws 3 5 Remove the reverse buzzer REVERSE WARNING BUZZER INSTALLATION 1 Install the reverse buzzer 2 on the instrument panel 1 Figure...

Page 379: ...wires from the reverse buzzer limit switch 4 8 Remove the screws 5 and reverse buzzer limit switch REVERSE BUZZER LIMIT SWITCH INSTALLATION 1 Install the reverse buzzer switch 4 with two screws 5 Figu...

Page 380: ...touch 3003C Figure 19 41 Low Oil Warning Light 4 Push the retaining tabs and remove the low oil warning light from the instrument panel LOW OIL WARNING LIGHT INSTALLATION 1 Install the low oil warnin...

Page 381: ...lfunction indicator light 1 wires 3 Install the instrument panel Make sure that the key switch terminals cannot touch the frame Make sure that the instrument panel is correctly seated and snapped in p...

Page 382: ...ION 1 Install the fuel gauge hour meter 1 into the hole in the instrument panel until the flange seats against the instrument panel Figure 19 43 Page 19 36 2 Connect the wires to the fuel gauge hour m...

Page 383: ...4 Page 19 37 Do not allow wires to touch 3002B Figure 19 44 Voltage Limiter 5 Remove the hardware 2 6 Remove the voltage limiter VOLTAGE LIMITER INSTALLATION 1 Install the voltage limiter to the drive...

Page 384: ...the tabs and remove the headlight switch from the instrument panel HEADLIGHT SWITCH INSTALLATION 1 Connect the wires to the headlight switch 1 Figure 19 45 2 Install the headlight switch into instrum...

Page 385: ...1 Figure 19 46 Page 19 39 Figure 19 46 Headlight Bezel 6 Remove the headlight bezel 2 HEADLIGHT BEZEL INSTALLATION 1 Install the headlight bezel 2 to vehicle frame Figure 19 46 Page 19 39 2 Install th...

Page 386: ...Page 19 40 2993C Figure 19 47 Halogen Headlight Bulb 4 Turn the headlight bulb clockwise 1 4 one quarter turn Remove the headlight bulb from the headlight assembly 2 HALOGEN HEADLIGHT BULB INSTALLATIO...

Page 387: ...ockwise 1 4 one quarter turn Remove the headlight bulb from the headlight lens 2 5 Remove the screws 3 6 Remove the headlight lens HALOGEN HEADLIGHT LENS INSTALLATION CAUTION Do not touch the glass pa...

Page 388: ...nector onto the LED headlight 4 Connect the battery 5 Install the cowl BATTERY DANGER Due to the danger of an exploding battery wear a full face shield and rubber gloves when working on or near batter...

Page 389: ...hould be clean and tight Any frayed or worn wires should be replaced After all cables have been connected and properly tightened to 41 in lb 4 3 N m coat terminals with Battery Terminal Protector Spra...

Page 390: ...the battery using an automotive type 12 volt battery charger Follow all warnings and procedures supplied by the battery charger manufacturer 2 Attach the positive charger cable to the positive batter...

Page 391: ...y should be recharged See following WARNING WARNING If the battery is frozen or the container is bulged discard battery A frozen battery can explode 6 The frequency of recharging required depends on t...

Page 392: ...the oxygen sensor 2 OXYGEN SENSOR INSTALLATION 1 Install the oxygen sensor 2 into the muffler tube Figure 19 50 Page 19 46 Tighten the oxygen sensor to 13 25 ft lb 18 N m 2 Connect the oxygen sensor c...

Page 393: ...3 Remove the screw 1 Figure 19 51 Page 19 47 2978Beps Figure 19 51 Charging Diode 4 Remove the electrical component box cover 2 5 Remove the nuts 3 from the two large solenoid posts 6 Disconnect the c...

Page 394: ...6 Tighten the nut to 25 in lb 2 8 N m 6 Route and connect the charging diode wires to the solenoid posts in the electrical component box See following WARNING WARNING Incorrect wiring could result in...

Page 395: ...tery drain USB RECEPTACLE REMOVAL 1 Disable the vehicle 2 Disconnect the battery 3 Remove the cowl 4 Disconnect the USB red wire from the 12V power point 1 and the main harness red wire 2 Figure 13 8...

Page 396: ...COMPONENTS 4 Connect the USB black wire to the jumper wire 3 5 Connect the USB red wire to the main harness red wire 2 and the 12V power point 1 6 Install the cowl 7 Connect the battery Page 19 50 202...

Page 397: ...e of the engine This section contains information for removing and replacing the engine and snubber See Kohler Engine Service Manual for complete disassembly rebuild and repair information BEFORE SERV...

Page 398: ...n will increase the engine temperature faster Figure 20 1 _ POSITION FUNCTION Open Set the louver arm to close for short trip operation Set the louver arm to open when The vehicle continuously operate...

Page 399: ...engine 5 Disconnect the fuel line See Fuel Line Removal 6 Remove the screw 1 Figure 20 2 Page 20 3 Figure 20 2 Governor Cover and Ground Cable Removal 7 Remove the governor cover 2 8 Loosen the clamp...

Page 400: ...and 6 Figure 20 3 Page 20 4 Figure 20 3 Clutch Plate Removal 17 Remove the clutch plate 7 18 Remove the bolts 8 Figure 20 4 Page 20 4 Figure 20 4 Exhaust Weldment Removal 19 Remove the exhaust weldme...

Page 401: ...ine pan 13 See following NOTE NOTE The engine weighs approximately 54 lb 24 5 kg 22 Remove the oil drain plug and drain all oil from crankcase Dispose of engine oil properly 23 If replacing the engine...

Page 402: ...oil drain plug and tighten to 13 ft lb 18 N m 3 Place the engine onto the engine pan 13 and secure with mounting hardware 10 11 and 12 Figure 20 6 Page 20 6 Tighten the nuts to 33 ft lb 40 6 N m Figur...

Page 403: ...nerator Installation 9 If necessary install the powertrain See Transaxle Installation 10 Install the governor cable See Governor Cable Installation and Adjustment 11 Install the accelerator cable See...

Page 404: ...etween 75 to 85 in lb 8 48 to 9 6 N m 20 Check all hardware for proper torque tightness 21 Fill engine to proper level with correct type of oil See Vehicle Specifications CAUTION Do not overfill with...

Page 405: ...two lock nuts 4 securing the snubber bracket 5 to the engine pan 3 Slide the snubber and snubber bracket assembly toward the battery to remove it from vehicle 4 Slide the snubber off the snubber brack...

Page 406: ...Pagination Page 20 Snubber GASOLINE VEHICLE ENGINE Page 20 10 2021 Carryall 300 Maintenance and Service Manual...

Page 407: ...r engine block temperature sensor and ignition timing EFI SYSTEM FEATURES SPECIFICATIONS The fuel pump operating pressure is 50 psi 3 The Kohler fuel pressure gauge has a psi variance of 3 Fuel pump o...

Page 408: ...tment can result in poor vehicle performance and or damage to the engine components GROUND SPEED NOTE If possible the manufacturer recommends measuring ground speed when setting engine RPM This vehicl...

Page 409: ...the electrical component box screw and cover Figure 21 3 Page 21 4 5 Adjust length of accelerator rod With the ball joint jam nuts 3 loose Figure 21 1 Page 21 3 adjust the length of the rod to obtain...

Page 410: ...EL Park brake release 0 to 4 Solenoid activation and engine start 4 to 15 Throttle body actuation 15 and greater 9 While holding the accelerator ball joint with pliers tighten the jam nuts against the...

Page 411: ...e 3 2 Remove the governor cable fitting 1 from the linkage retainer 2 Figure 21 4 Page 21 5 Figure 21 4 Governor Cable Removal Throttle Body 3 3 Disconnect the governor cable fitting from throttle lev...

Page 412: ...e lever 2 1 3 Install the governor cable fitting into the linkage retainer 3 2 At transaxle 2 1 Slide bellows off threaded end of cable housing separate jam nuts and place threaded end into governor b...

Page 413: ...il throttle lever is at wide open throttle WOT and tighten the governor cable jam nuts to 36 in lb 4 0 N m 6 Release governor arm to return to idle position 7 Adjust gap A between governor arm and thr...

Page 414: ...Remove electrical component box cover and loosen jam nuts 4 on side of electrical component box Figure 21 10 Page 21 8 3046B Figure 21 10 Accelerator Cable Removal Electrical Component Box 4 2 Discon...

Page 415: ...cal component box Figure 21 12 Page 21 9 3046C Figure 21 12 Accelerator Cable Installation Electrical Component Box 2 2 Separate jam nuts 8 on cable and place threaded end into slot of electrical comp...

Page 416: ...e in seconds Divide distance 100 ft 30 5 m by time 5 seconds 20 ft sec 6 1 m sec 4 2 Convert seconds to hour Multiply 20 ft sec 6 1 m sec by 3600 the number of seconds in an hour 72000 ft hour 21960 m...

Page 417: ...evious step See following NOTE NOTE If more adjustment is required than the cable housing will allow make sure the spring fitting on the other end of the accelerator cable is properly installed Excess...

Page 418: ...e System GASOLINE VEHICLE FUEL SYSTEM AIR INTAKE SYSTEM See General Warnings on page 1 1 3 2 1 4 10 5 6 7 8 9 3048 Figure 21 13 Air Intake System CA 300 Page 21 12 2021 Carryall 300 Maintenance and Se...

Page 419: ...p 5 and disconnect air intake hose 6 from air cleaner 3 Figure 21 13 Page 21 12 4 Remove hardware 7 8 and 9 securing air cleaner 3 to vehicle AIR CLEANER INSTALLATION 1 Place air cleaner 3 into vehicl...

Page 420: ...on 2 1 Turn the key switch to OFF 2 Disconnect the fuel pump module at the fuel tank 3 Crank the engine for 5 seconds to start reducing the fuel pressure 4 Wait for 2 5 seconds 5 Crank the engine for...

Page 421: ...of properly 1 Disable the vehicle WARNING Fuel may be under pressure Use extreme caution when disconnecting fuel line to prevent the spray of fuel onto hot engine See Relieving Fuel Pressure 2 Relieve...

Page 422: ...r 6 At fuel tank 6 1 Pull out the locking clip 6 2 Push in and hold the release tab 6 3 Remove the fuel line from fuel tank FUEL LINE INSTALLATION 1 At fuel tank and engine 1 1 Route the fuel line and...

Page 423: ...ort bracket 3 Figure 21 17 Page 21 17 Tighten the bolt to 93 to 111 in lb 10 5 to 12 5 N m Figure 21 17 Fuel Line Support Bracket Connect 1 3 Clean the nipple on top of fuel pump module 1 4 Push the f...

Page 424: ...sary to build fuel pressure Any leaks found must be fixed DANGER Repair all fuel leaks before returning the vehicle to service 7 If no leaks are found set the Maintenance Operate switch in the OPERATE...

Page 425: ...GASOLINE VEHICLE FUEL SYSTEM Fuel Pump Module 21 FUEL PUMP MODULE REMOVAL 3052B Figure 21 19 Fuel Pump Module Removal 2021 Carryall 300 Maintenance and Service Manual Page 21 19...

Page 426: ...the fuel pump module out of fuel tank and drain into an appropriate container Discard the fuel module o ring 7 NOTE If equipped with a fuel level sending unit carefully maneuver module so as to avoid...

Page 427: ...e Operate switch to OPERATE FUEL TANK See General Warnings on page 1 1 GENERAL INFORMATION The vehicle is equipped with a high impact plastic fuel tank WARNING If the fuel tank is damaged replace it D...

Page 428: ...21 Fuel Tank GASOLINE VEHICLE FUEL SYSTEM FUEL TANK REMOVAL 3052D Figure 21 20 Fuel Tank Removal Page 21 22 2021 Carryall 300 Maintenance and Service Manual...

Page 429: ...onnecting fuel line to prevent the spray of fuel onto hot engine See Relieving Fuel Pressure Carefully drain any fuel remaining in the hose or pump module into an approved container Add drained fuel b...

Page 430: ...with retaining strap 7 2 1 Position the retaining strap in the indention of the tank 2 2 Install the screw 6 into retaining strap and tighten to 26 5 in lb 3 N m 3 Connect fuel pump module ground wire...

Page 431: ...21 25 See Fuel Pump Module Removal 4 Disconnect the flex hoses 2 and 3 from filter 4 4 1 Pull the hose retainer clip straight up and out of the filter Do not discard clip 4 2 Pull the flex hoses stra...

Page 432: ...until fully seated 3 Install fuel pump module See Fuel Pump Module Installation 4 Connect the battery and spark plug wire 5 Set the Forward Neutral Reverse control FNR to N 6 Chock the wheels 7 Set t...

Page 433: ...REMOVAL 1 Disconnect the battery and spark plug wire 2 If necessary remove the oxygen sensor 1 from the muffler 2 Figure 22 1 Page 22 1 See Oxygen Sensor Removal Figure 22 1 Muffler Removal 3 Remove...

Page 434: ...m 4 3 Tighten the bolts 6 to 17 ft lb 23 N m 5 If the oxygen sensor 1 was removed install the oxygen sensor See Oxygen Sensor Installation 6 Connect the battery and spark plug wire 7 Set the Forward...

Page 435: ...he diameter of the belt loop As the diameter of the belt loop increases at the drive clutch the driven clutch is forced open as the diameter of its belt loop decreases On steep grades or when the vehi...

Page 436: ...he torque converter is not operating properly perform the following steps 1 Check the governor and throttle settings See Engine Control Linkages 2 Inspect the driven clutch for dirt and dust buildup o...

Page 437: ...rce the sheaves of the driven clutch 1 apart then roll the belt off the driven clutch by rotating the clutch counterclockwise Figure 23 1 Page 23 3 See following CAUTION CAUTION Make sure fingers are...

Page 438: ...Retainer 2 Washer Hard M10 11 Ring Spiral Backup 3 Washer 3 8 Type A Flat 12 Bushing Split Drive Clutch 4 Cap Plug 13 Sheave Moveable Drive 5 Drive Hub Assy Drive Clutch 14 Spacer Fixed Face Shaft 6...

Page 439: ...on page 23 3 2 Loosen starter generator mounting and adjusting hardware and remove starter belt See WARNING Moving parts Do not in General Warnings on page 1 1 2962 Figure 23 3 Loosen Retaining Bolt 5...

Page 440: ...5 Lubricate the threaded portion of the clutch puller tool 1 with a light oil and thread the clutch puller tool into the clutch retaining bolt hole Figure 23 4 Page 23 5 6 Use a 1 2 in drive air wrenc...

Page 441: ...into clutch until the stop nut touches the clutch then back the bolt out one half turn Figure 23 6 Page 23 7 2 3 Thread the three small bolts of the puller into corresponding holes in the clutch Tight...

Page 442: ...ights 3 as shown Figure 23 8 Page 23 8 5 2 Pull the weight assemblies 3 with pins from slots 4 in the clutch See following NOTE NOTE Before removing note the orientation of the wave washer 1 and secon...

Page 443: ...the bore in the fixed sheave Figure 23 2 Page 23 4 See also Figure 23 10 Page 23 9 Discard the rings 605 Figure 23 10 Spiral Back up Rings INSPECTION OF DRIVE CLUTCH PARTS 1 Inspect the idler spacer 1...

Page 444: ...all the retaining ring 6 Figure 23 2 Page 23 4 5 Install the primary weights 3 on the mounting pins 4 Figure 23 9 Page 23 9 6 Install a wave washer 1 on each mounting pin 4 Make sure that the concave...

Page 445: ...three plastic plugs 4 into the holes Figure 23 2 Page 23 4 3054 Figure 23 12 Correct Orientation of Drive Button Take up Springs DRIVE CLUTCH INSTALLATION 1 Place the drive clutch assembly on the cran...

Page 446: ...on page 1 1 1 Screw 5 16 18 X 3 4 Hex Head with Patch 7 Screw 8 32 X 3 4 Socket Head Cap 2 Washer Driven Clutch 8 Button Drive 3 Ring Retaining 9 Sheave Movable Driven 4 Key Driven Clutch 10 Washer Ac...

Page 447: ...e key 12 in the keyway Figure 23 13 Page 23 12 5 Inspect the key for damage Replace as necessary DRIVEN CLUTCH DISASSEMBLY CAUTION The driven clutch is balanced as an assembly Before disassembly make...

Page 448: ...nches and hold the threaded bolt head while tightening the cam press plate to press the cam onto the keyed shaft Advance the cam press plate until it is firm against the shaft end WARNING Do not place...

Page 449: ...a driven clutch cam puller 12 to remove the cam 13 from the fixed sheave 11 Remove the spring 14 Figure 23 17 Page 23 15 2961B Figure 23 17 Driven Clutch Disassembly 12 Inspect the key 15 for damage R...

Page 450: ...worn more than 0 060 in 1 5 mm 4 Inspect the bronze bearing in the moveable sheave If the bearing bore diameter is more than 1 384 in 35 15 mm the entire moveable sheave must be replaced 5 Inspect th...

Page 451: ...ey 7 into the keyway of the fixed sheave shaft 5 Holding the cam 8 in position for assembly on the shaft install the other end of the spring into the center spring hole of the cam Rotate the cam until...

Page 452: ...thrust washer 16 and nut 17 onto the threaded bolt 11 Thread the nut down onto the cam hub centering the press hub onto the cam hub 12 Hold the fixed sheave of the clutch and rotate the moveable sheav...

Page 453: ...ake sure that the washer 2 is mounted with the flat portion of the washer against the driven clutch Figure 23 13 Page 23 12 3 Tighten the new bolt 1 to 18 ft lb 24 4 N m See following NOTE NOTE The bo...

Page 454: ...Pagination Page 23 Driven Clutch GASOLINE VEHICLE CLUTCHES Page 23 20 2021 Carryall 300 Maintenance and Service Manual...

Page 455: ...Bring the vehicle to a complete stop before changing F or R direction MAINTENANCE OPERATE SWITCH For the convenience of the trained technician there is a Maintenance Operate switch located on the sea...

Page 456: ...em regulates vehicle ground speed It is mounted inside the transaxle and is driven by transaxle gears If any of the governor linkages are removed in order to service other components readjustment of t...

Page 457: ...oist Torque wrench 3 8 in drive 1 2 in combination wrench Jack stands 2 one ton capacity 3 8 in socket 3 8 in drive 9 16 in combination wrench Standard slip joint pliers 7 16 in socket 3 8 in drive Sm...

Page 458: ...upport the rear of vehicle 8 Remove the lug nuts and wheel 9 Slide brake drum off hub 10 Remove hub nut 4 and large flat washer 5 and pull hub 6 off axle shaft See following NOTE NOTE If the hub 6 doe...

Page 459: ...possible position the locking cap 3 on hub nut 4 and install new cotter pin 2 If necessary tighten hub nut 4 further 177 ft lb 240 N m max until the locking cap 3 and new cotter pin 2 can be installed...

Page 460: ...ust be removed in order to replace these oil seals DIFFERENTIAL GUARD REMOVAL Differential guard is installed on some vehicles to protect the transaxle remove it before working on the axle tube 1 Clea...

Page 461: ...entire transaxle from vehicle remove the transaxle and clean it in preparation for disassembly See Transaxle Removal on page 24 10 See following NOTE NOTE After cleaning move transaxle to a clean loc...

Page 462: ...in transaxle gearcase 4 carefully install axle shaft 3 and tube 2 See following NOTE NOTE It may be necessary to rotate each shaft 3 slightly to engage the splines in the differential 4 Secure axle t...

Page 463: ...8 6 Install hub See Rear Hub Installation on page 24 4 AXLE SHAFT OIL SEAL REMOVAL The rear axle tubes 2 must be unbolted from the transaxle to replace oil seals 7 Figure 24 7 Page 24 8 1 Clean debri...

Page 464: ...y Disconnect 3 wire plug from limit switch on transaxle 8 Disconnect three wires of main wire harness from starter generator 9 Loosen jam nuts 1 securing shifter cable 2 to FNR accelerator cable mount...

Page 465: ...k Stands 17 Continue raising vehicle until chassis is higher than the top of the transaxle i e enough to allow powertrain to be rolled out from under vehicle Figure 24 12 Page 24 11 Position jack stan...

Page 466: ...l from transaxle Dispose of gear oil properly 23 Remove driven clutch See Driven Clutch Removal Section 23 Page 23 13 24 Remove eight bolts 1 total that secure transaxle to powertrain Figure 24 14 Pag...

Page 467: ...GASOLINE VEHICLE TRANSAXLE Transaxle Removal 24 1 1 3 2 3063 Figure 24 14 Transaxle Mounting Bolts 2021 Carryall 300 Maintenance and Service Manual Page 24 13...

Page 468: ...hey are properly routed and secured to vehicle frame Failure to properly route and secure wires and cables could result in vehicle malfunction property damage or personal injury 4 Connect battery and...

Page 469: ...en jam nuts 1 to 22 ft lb 29 8 N m 3 Hook shifter cable end 4 into transaxle shift lever 5 and secure with bowtie clip 3 4 Feed front of cable 2 through its mounting hole and push the plastic anchor i...

Page 470: ...Pagination Page 24 Shifter Cable GASOLINE VEHICLE TRANSAXLE Page 24 16 2021 Carryall 300 Maintenance and Service Manual...

Page 471: ...SECTION 25 KOHLER ENGINE SERVICE MANUAL 25 Kohler Engine Service Manual 2021 Carryall 300 Maintenance and Service Manual Page 25 1...

Page 472: ...EFI System 51 Governor System OEM Supplied 52 Lubrication System 54 Electrical System 57 Starter System OEM Supplied 58 Disassembly Inspection and Service 70 Reassembly IMPORTANT Read all safety preca...

Page 473: ...cause severe injury or death Disconnect and ground spark plug lead s before servicing Before working on engine or equipment disable engine as follows 1 Disconnect spark plug lead s 2 Disconnect negat...

Page 474: ...y 200 Hours3 Change oil Lubrication System Every 300 Hours Check fuel lters tank outlet lter and in line lter clean or replace if needed OEM supplied if equipped Refer to equipment manual Every 300 Ho...

Page 475: ...ed and should NOT be used e ects of old stale or contaminated fuel are not warrantable Fuel must meet these requirements Clean fresh unleaded gasoline Octane rating of 87 R M 2 or higher Research Octa...

Page 476: ...ttle Body Evap Fitting B 164 3 mm 6 47 in Throttle Cable Mount Face C 2 X 112 1 mm 4 42 in D 138 6 mm 5 46 in Throttle Cable Center Line E 116 4 mm 4 58 in F Oil Fill Plug G Oil Drain Plug H 239 0 mm...

Page 477: ...mm 0 36 mm 3 37 in 0 01 in J 12 5 mm 0 43 mm 0 49 in 0 02 in K 3 X M8 X 1 25 6H Tap Thru L 2 5 mm 0 36 mm 0 10 in 0 01 in M 152 9 mm 0 43 mm 6 02 in 0 02 in N Emission Label O Diagnostic Connector P...

Page 478: ...in Deep D Dipstick and Oil Fill Tube E 300 9 mm 11 85 in Oxygen Sensor Harness Clip F 218 6 mm 8 61 in Exhaust Port G 35 0 mm 1 38 in H 32 4 mm 1 28 in I 6 X 5 16 24 UNF TAP 18 0 mm 0 71 in Deep J 4...

Page 479: ...le Cable Mount Face B 105 0 mm 4 13 in C 56 6 mm 2 23 in D 2 X M8 X 1 25 6H Tap 22 0 mm 0 87 in Deep E Primary Mounting Face F 29 1 mm 1 14 in G M6 X 1 0 6H 14 5 mm Min Full Thread Ground Location H 1...

Page 480: ...in 0 02 in Machined Holes Distance B 90 5 mm 3 56 in C 2 X 11 25 mm 0 25 mm 0 44 in 0 01 in D 2 X 94 5 mm 0 75 mm 3 72 in 0 03 in E 82 1 mm 3 23 in F 3 75 mm 0 15 in Pilot G 195 5 mm 1 0 mm 7 70 in 0...

Page 481: ...for Club Car Bore 89 mm 3 5 in Stroke 69 mm 2 7 in Displacement 429 cc 26 2 cu in Oil Capacity re ll 1 1 L 1 16 U S qt Maximum Angle of Operation full oil level 6 25 TORQUE SEQUENCES ECH440 for Club C...

Page 482: ...105 in lb Oil Fill Tube Bracket Screw 5 4 N m 48 in lb Oil Drain Plug 18 N m 13 ft lb Oil Sentry Level Switch Screw 8 N m 71 in lb Oil Sentry Wire Lead Nut 10 N m 89 in lb Closure Plate Screw torque s...

Page 483: ...in Camshaft Bearing Surface O D New 15 975 mm 0 6289 in Max Wear Limit 15 90 mm 0 626 in Cam Lobe Pro le minimum dimension measured from base circle to top of lobe Intake New 32 286 mm 1 271 in Max W...

Page 484: ...Limit 36 92 mm 1 4535 in Max Taper Max Out of Round 2 5 microns 0 0001 in 12 7 microns 0 0005 in Width 28 30 28 36 mm 1 1142 1 1165 in Runout either end 0 025 mm 0 001 in Main Bearing I D Crankcase C...

Page 485: ...Wear Limit 88 82 mm 3 497 in Piston Thrust Face to Cylinder Bore Running Clearance 0 025 0 060 mm 0 001 0 002 in 8 Valves and Valve Lifters Valve Lash 0 0762 0 127 mm 0 003 0 005 in Intake Valve Stem...

Page 486: ...nglish Fastener Torque Recommendations for Standard Applications Bolts Screws Nuts and Fasteners Assembled Into Cast Iron or Steel Grade 2 or 5 Fasteners Into Aluminum Size Grade 2 Grade 5 Grade 8 Tig...

Page 487: ...Kohler required tools Components of 25 761 39 S Ignition System Tester Cylinder Leakdown Tester Oil Pressure Test Kit Recti er Regulator Tester 120 V AC 60Hz Kohler 25 761 39 S Kohler 25 455 01 S Kohl...

Page 488: ...d Shift SE Tools KLR 82411 SE Tools KLR 82416 Stepper Motor Controller Tool For testing operation of stepper motor Digital Linear Actuator DLA Kohler 25 455 21 S Jumper Lead Tool For use with Stepper...

Page 489: ...g gear teeth Bosses will lock tool and ywheel in position for loosening tightening or removing with a puller A spanner wrench to lift rocker arms or turn crankshaft may be made out of an old junk conn...

Page 490: ...at intermittently ground ignition kill circuit Seized internal engine components TROUBLESHOOTING GUIDE When troubles occur be sure to check simple causes which at rst may seem too obvious to be consid...

Page 491: ...lied for damage or indications of improper t and seal Check air cleaner element OEM supplied Look for holes tears cracked or damaged sealing surfaces or other damage that could allow un ltered air int...

Page 492: ...no load high speed 3 Open clamp and note water level in tube Level in engine side should be a minimum of 10 2 cm 4 in above level in open side If level in engine side is less than speci ed low no vacu...

Page 493: ...se a breaker bar and socket on ywheel nut screw to hold it in position An assistant may be needed to hold breaker bar during testing If engine is mounted in a piece of equipment it may be possible to...

Page 494: ...Inlet Elbow NOTE Refer to equipment manufacturer s manual for air cleaner they supply 1 Disconnect one end of breather hose from valve cover or air inlet elbow 2 Remove nuts securing air inlet elbow t...

Page 495: ...is on This can range from 2 to over 12 milliseconds depending on fuel requirements Controlled injection of fuel occurs every other crankshaft revolution or once for each 4 stroke cycle When intake val...

Page 496: ...d be measured indicating that wiring of that particular circuit is OK Crankshaft position sensor is essential to engine operation constantly monitoring rotation and speed RPM of crankshaft There are 2...

Page 497: ...will pressurize high pressure fuel line to 50 psi and voltage is present at injector At proper instant ECU completes ground circuit energizing injector Valve needle in injector is opened electromagne...

Page 498: ...ll quantities can cause signi cant problems Clean any joint or tting with parts cleaning solvent before opening to prevent dirt from entering system Always depressurize fuel system through fuel connec...

Page 499: ...Absolute Pressure TMAP sensor input 12 Throttle Position Sensor TPS input 13 Speed Sensor Ground 14 Engine Temperature Sensor input 15 Ignition Switch Switched 12V 16 Power for TPS and TMAP Sensors 5...

Page 500: ...seconds a second time 5 Remove Red wire jumper Turn key ignition ON then OFF and count to 15 seconds a third time ECU is reset A TPS Learn Procedure must be performed after ECU Reset Follow TPS Learn...

Page 501: ...Switch P 10A Fuse Ignition Switch Q 10A Fuse Battery Power R Black Connector S Grey Connector T Fuel Injector U Ignition Coil V Crankshaft Position Sensor W Oxygen Sensor X Throttle Position Sensor Y...

Page 502: ...agnostic software communicating to ECU and key ON engine not running these values can be observed while throttle is moved from closed to full open position There should be a smooth and repeatable thro...

Page 503: ...w it to reach room temperature 20 C 68 F 3 Unplug Black connector from ECU 4 With sensor still connected check temperature sensor circuit resistance between Black pin 10 and 8 pin terminals Value shou...

Page 504: ...ans that it is not reading continuous output of sensor A voltmeter can also be used as an e ective tool in diagnosing sensors It is advisable to use an electronic meter such as a digital voltmeter Sim...

Page 505: ...ection or a fault of ECU With key ON and sensor unplugged using a digital voltmeter observe voltage between Pin socket C and Pin socket D of engine wiring harness refer to engine harness connector plu...

Page 506: ...7 or less Fault codes P0172 or P0132 may set Silica poisoning Replace sensor Identify and resolve root cause Contaminated gasoline Purge fuel system and retest Wiring shorted to voltage Replace damage...

Page 507: ...removal of injector 1 Remove throttle body from engine leaving TPS high pressure fuel line injector and fuel line connections intact Discard old gaskets 2 Position throttle body over an appropriate co...

Page 508: ...appropriate procedures to install new injector and reassemble engine Use new O ring and retaining clip any time an injector is removed new replacement injector includes new O rings and retaining clip...

Page 509: ...e Lever C Window D Return Spring E Hook End F L Shaped Hook End G Post 1 Remove screw throttle lever and return spring 2 Insert hook end of return spring in window of throttle lever and hold in place...

Page 510: ...l pump not running Fuel pressure low Insu cient fuel delivery TPS set incorrect ECU Reset and TPS Initialization Crankshaft position sensor loose or faulty TPS faulty Engine temperature sensor faulty...

Page 511: ...ll not start it may indicate a problem with EFI fuel system A quick test will verify if system is operating 1 Disconnect and ground spark plug lead 2 Complete all safety interlock requirements and cra...

Page 512: ...to normal MIL will go out but code is stored in ECU as a historic code MIL Operation for Key Start Applications ECU continuously monitors engine operation against preset performance limits If operati...

Page 513: ...be related to current event Clear codes and retest to con rm If code status is current refer to Oxygen Sensor O2 earlier in this section to test and troubleshoot Component Oxygen Sensor Heater Fault O...

Page 514: ...pin 10 and 8 may be damaged ECU to harness connection problem or broken wire Code 0117 Component Engine Temperature Sensor Fault Engine Temperature Sensor Circuit Low Voltage Condition Shorted connec...

Page 515: ...shaft or bearings worn damaged Engine Wiring Harness Related ECU pins Black 10 12 and 16 damaged wiring connectors ECU pins Black 10 12 and 16 routed near noisy electrical signal coil alternator Inter...

Page 516: ...ow fuel pump Combustion air air cleaner dirty restricted intake leak throttle bore Base engine problem rings valves Exhaust system leak mu er ange oxygen sensor mounting boss etc Fuel in crankcase oil...

Page 517: ...manufacturer s manual for information Code 0201 Component Fuel Injector Fault Injector Circuit Malfunction Condition Injector damaged or faulty shorted or open connection Conclusion Injector Related...

Page 518: ...or earlier in this section If P0337 is present and engine operates clear codes and retest Component Crankshaft Position Sensor Fault Crankshaft Position Sensor No Signal Condition Loose sensor open or...

Page 519: ...system Bad or missing fuse Refer to equipment manufacturer s manual for information Code 0563 Component System Voltage Fault System Voltage High Condition Shorted connection Conclusion Bad Battery Lo...

Page 520: ...ICATION NO YES YES MIL GOES OFF YES NO NO NO NO NO YES REFER TO DIAGNOSTIC AID 1 SYSTEM POWER REFER TO DIAGNOSTIC FAULT CODE SUMMARY CLEAR CODES NO REFER TO DIAGNOSTIC AID 3 RUN ON OPERATE AT VARIOUS...

Page 521: ...des are active check MIL wiring between ECU and bulb Diagnostic Aid 4 CRANKSHAFT POSITION SENSOR MIL does not turn o during cranking Condition Crankshaft position sensor Crankshaft position sensor cir...

Page 522: ...51 Governor System 17 690 15 Rev KohlerEngines com GOVERNOR OEM Supplied Refer to operating instructions of equipment this engine powers for speci c governor instructions...

Page 523: ...nd become mixed with engine oil In addition to water vapor in cold conditions liquid fuel can pass by piston rings and accumulate in engine oil Emulsified fluids in oil can give the oil a cloudy or mi...

Page 524: ...these troubleshooting guidelines 1 Set an ohmmeter to Rx1 scale and zero meter Connect one ohmmeter lead to Oil Sentry oil level switch lead yellow with green sleeve and touch other lead to a bare sp...

Page 525: ...al for starter generator charging system troubleshooting information Battery A 12 volt battery with 400 cold cranking amps cca is generally recommended for starting in all conditions A smaller capacit...

Page 526: ...ap Replace a worn spark plug immediately Wet Fouled A wet plug is caused by excess fuel or oil in combustion chamber Excess fuel could be caused by a restricted air cleaner a fuel mixture problem Oil...

Page 527: ...with black tracer at coil primary connector with ignition key ON Battery voltage should be seen If no voltage check all fuses Key OFF perform continuity test between black primary wire connector and...

Page 528: ...57 Starter System 17 690 15 Rev KohlerEngines com Starter OEM Supplied Refer to operating instructions of equipment this engine powers for speci c starter system instructions...

Page 529: ...il NOTE Engines in this application have air cleaner starter generator in tank fuel pump EFI fuel lter and all fuel lines supplied and installed by OEM Refer to equipment manufacturer s manual for inf...

Page 530: ...er securing cap to injector is unnecessary 1 Disconnect fuel injector electrical connector 2 Remove screw and pull injector out of throttle body 3 When removed pull metal retaining clip connecting fue...

Page 531: ...connector 2 Remove screw and ground stud securing lower shield to cylinder head remove lower shield Blower Housing Components C E A B D A Blower Housing Screen B Screw C Screw D Blower Housing E Clamp...

Page 532: ...3 Remove ywheel from crankshaft using a suitable puller 4 Remove ywheel key from crankshaft keyway Inspection Inspect ywheel for cracks and ywheel keyway for damage Replace ywheel if it is cracked Rep...

Page 533: ...alve stem Remove valve spring and valve from head Repeat this procedure for remaining valve 2 Remove and replace valve stem seals whenever cylinder head is serviced or disassembled Inspection and Serv...

Page 534: ...nal cut should be made with a 44 5 cutter as speci ed for valve seat angle Cutting proper 45 valve face angle as speci ed and proper valve seat angle 44 5 will achieve desired 0 5 1 0 full cut interfe...

Page 535: ...ate C Screw D Closure Plate Bearing E Closure Plate Gasket F Closure Plate Balance Shaft Bearing G Wave Spring H Balance Shaft I Crankcase Balance Shaft Bearing J Crankshaft K Connector Rod End Cap L...

Page 536: ...raight out of crankcase 2 Remove valve tappets by pulling them straight out of crankcase Mark their positions Automatic Compression Release ACR ACR Operation Details B C E D A A Camshaft B Exhaust Cam...

Page 537: ...de micrometer and compare with speci cations listed Measure camshaft journals C which t in ball bearings for wear using a micrometer Compare with speci cations listed Remove Piston Connecting Rod and...

Page 538: ...explode to create extreme hammering pressures on a speci c area of piston Detonation generally occurs from using low octane fuels Preignition or ignition of fuel charge before timed spark can cause da...

Page 539: ...essary Inspect crankpin for score marks or metallic pickup Slight score marks can be cleaned with crocus cloth soaked in oil If wear limits are exceeded as stated in Speci cations it will be necessary...

Page 540: ...for roundness taper and size Use an inside micrometer telescoping gauge or bore gauge to take measurements These measurements should be taken at 3 locations in cylinder at top middle and bottom Two m...

Page 541: ...Ring Set Q Camshaft R Oil Sentry Level Switch S Screw T Oil Sentry Wire U Tappet V Crankcase Bearing W Dowel Pin X Crankcase Y Crankcase Oil Seal NOTE Engines in this application have air cleaner sta...

Page 542: ...linder 6 Install connecting rod cap to connecting rod so dipper is down and match marks are aligned 7 Torque both screws in increments to 20 N m 177 in lb Install Crankcase Bearings and Oil Seals Deta...

Page 543: ...nkgear Install Valve Tappets and Camshaft Timing Mark Detail A B A Camshaft Gear Timing Mark B Camshaft Drive Gear on Crankshaft Timing Mark 1 Lubricate face and stem of each tappet with engine oil In...

Page 544: ...nd secure with bracket screw Tighten screw until bracket is tight all around tube then torque to 5 4 N m 48 in lb Install Closure Plate Torque Sequence 1 2 3 4 5 6 7 1 Check to make sure sealing surfa...

Page 545: ...ve seals on stem of valves 3 Install valve springs and retainers into their respective locations in cylinder head Support valve heads from underneath Using hand pressure compress each valve spring and...

Page 546: ...lways be installed in original location 1 Identify proper position of each push rod Dip ends of push rods in engine oil and install them in their respective locations seating each into tappet socket 2...

Page 547: ...ng using screws Torque screws to 7 3 N m 65 in lb Install Wiring Harness Clamp Insert wiring harness into clamp and install clamp with wiring harness to blower housing Tighten screw securely Install C...

Page 548: ...Absolute Pressure TMAP Sensor NOTE Ensure all parts are clean undamaged and free of debris and make sure electrical connector has seal in place 1 Lightly oil TMAP sensor O ring and push sensor into bo...

Page 549: ...ds 3 Push electrical connector onto throttle position sensor TPS making sure a good connection is made Install Air Inlet Elbow G E A D B E F C A A Nut B Air Inlet Elbow C Breather Hose with Sleeve D C...

Page 550: ...e is now reassembled Before starting or operating engine be sure to do following 1 Make sure all hardware is properly torqued 2 Make sure oil drain plugs oil ll plugs and Oil SentryTM wire lead bushin...

Page 551: ...80 2018 by Kohler Co All rights reserved KohlerEngines com 17 690 15 Rev...

Page 552: ...Pagination Page 25 Shifter Cable KOHLER ENGINE SERVICE MANUAL Page 25 2 2021 Carryall 300 Maintenance and Service Manual...

Page 553: ...ion Wire Color BLK Black BLU Blue LT BLU Light Blue BRN Brown GRAY Gray GRN Green ORG Orange PINK Pink PUR Purple RED Red TAN Tan WHT White YEL Yellow BLK_LT_BLUE Black with Light Blue Stripe BLK_ORG...

Page 554: ...White Stripe RED_GRN Red with Green Stripe RED_WHT Red with White Stripe RED_YEL Red with Yellow Stripe WHT_BLK White with Black Stripe PEDAL START CONNECTOR PINOUTS PEDAL START MAIN HARNESS CONNECTO...

Page 555: ...Black White Fuel Pump H OPEN OPEN To Instrument Panel IP Harness _ Pin Wire Color Description 1 Green White Headlights Taillights 2 Green Red Headlight Switch Power 3 Red Yellow To Key Switch M 4 OPE...

Page 556: ...ack Yellow 2 Orange 3 Purple White 4 Black Light Blue 5 Blue White 6 Yellow To Accessories _ Pin Wire Color Description 1 Blue Horn Power 2 Gray To Rear Lights 3 Gray Black Brake Light Relay 4 White T...

Page 557: ...Black To Accessories Pin 3 To Fuel Pump _ Pin Wire Color Description 1 Open Open 2 Orange Black Sending Unit Positive 3 Black Sending Unit Negative 4 Black White Fuel Pump Negative 5 Red White Fuel Pu...

Page 558: ...s WIRING DIAGRAMS 2 Black White 3 Red White 4 Open 5 Red Fuse Holder _ Pin Wire Color A Red B Red Black E Orange White F Orange Fuse Connector _ Pin Wire Color 1 Red 2 Pink Page 26 6 2021 Carryall 300...

Page 559: ...escription 1 Red Power 2 Black Ground 3 OPEN OPEN 4 OPEN OPEN To Engine Harness _ Pin Wire Color Description A Red Switched 12V Power B Red Constant 12V Power C OPEN OPEN D Tan Malfunction Indicator L...

Page 560: ...OPEN 5 Orange White Reverse Buzzer Power 6 Blue White Power 7 Black White Ground 8 Tan Malfunction Indicator Light MIL 9 Purple White To FNR Harness Pin 3 10 Orange Black Fuel Sending Unit Input 11 Wh...

Page 561: ...Gray Black Brake Light Relay 4 White To Rear Lights 5 OPEN OPEN 6 Black Ground 7 Brown Power 8 Red Right Turn Signal Power 9 Green Left Turn Signal Power To Brake Light Relay _ Pin Wire Color Descrip...

Page 562: ...on 1 Open Open 2 Orange Black Sending Unit Positive 3 Black Sending Unit Negative 4 Black White Fuel Pump Negative 5 Red White Fuel Pump Positive Fuel Pump Relay _ Pin Wire Color 1 Green 2 Black White...

Page 563: ...RAMS Key Start Connector Pinouts 26 Fuse Holder _ Pin Wire Color A Red B Red Black E Orange White F Orange Fuse Connector _ Pin Wire Color 1 Red 2 Pink 2021 Carryall 300 Maintenance and Service Manual...

Page 564: ...10 Tan 11 White 12 Grey 13 Black 14 To Main Harness 15 Oil Level Switch 16 10 amp Fuse Ignition Switch 17 10 amp Fuse Battery Power 18 Black Connector 19 Grey Connector 20 Fuel Injector 21 Ignition C...

Page 565: ...GASOLINE ENGINE HARNESS Wiring Diagrams Gasoline Engine Harness 26...

Page 566: ...Page intentionally left blank...

Page 567: ...GASOLINE KEY START MAIN HARNESS Wiring Diagrams Gasoline Key Start Main Harness 26...

Page 568: ...Page intentionally left blank...

Page 569: ...GASOLINE PEDAL START MAIN HARNESS Wiring Diagrams Gasoline Pedal Start Main Harness 26...

Page 570: ...Page intentionally left blank...

Page 571: ...GASOLINE INSTRUMENT PANEL HARNESS Wiring Diagrams Gasoline Instrument Panel Harness 26...

Page 572: ...Page intentionally left blank...

Page 573: ...GASOLINE FNR HARNESS Wiring Diagrams Gasoline FNR Harness 26...

Page 574: ...Page intentionally left blank...

Page 575: ...ELECTRIC MAIN HARNESS Wiring Diagrams Electric Main Harness 26...

Page 576: ...Page intentionally left blank...

Page 577: ...ELECTRIC INSTRUMENT PANEL HARNESS Wiring Diagrams Electric Instrument Panel Harness 26...

Page 578: ...Page intentionally left blank...

Page 579: ...ELECTRIC ACCESSORIES HARNESS Wiring Diagrams Electric Accessories Harness 26...

Page 580: ...Page intentionally left blank...

Page 581: ...t 14 5 see also battery charger 14 1 self discharge 14 10 storage 14 14 testing 14 3 basics 14 2 voltage test 12 14 voltage test under load 12 15 vibration damage 14 11 battery installation 19 44 stor...

Page 582: ...anufacture 11 9 vehicle decal 11 9 vehicle s n 11 9 walkaway deterrent 11 8 charge indicator light installation 13 10 removal 13 10 testing 12 33 charger battery ERIC 15 1 charger receptacle inspectio...

Page 583: ...15 removal 24 14 switch testing 12 20 fuel relieving pressure 21 14 fuel filter installation 21 25 removal 21 25 fuel gauge hour meter 19 35 fuel gauge circuit testing 18 36 fuel level sending unit 19...

Page 584: ...d suspension rear 9 2 light switch testing 18 38 low oil warning light installation 19 34 removal 19 34 testing 18 29 lubrication front suspension 7 15 transaxle type g 17 1 M magnet motor speed senso...

Page 585: ...location 12 4 reverse buzzer installation 13 5 19 32 limit switch installation 19 33 removal 19 33 testing 18 28 removal 13 5 19 32 testing 12 32 18 28 RPM adjustment 21 2 21 10 Run Tow switch 12 3 in...

Page 586: ...rger AC power and continuity test of AC circuit 15 30 battery condition using charger 15 30 battery voltage using multimeter 15 29 DC circuit continuity test 15 31 DC plug receptacle 15 29 on charge b...

Page 587: ...4 2 transaxle type g assembly 17 10 axle bearing 17 4 axle shaft installation 17 4 removal 17 1 disassembly 17 8 inspection 17 8 installation 17 12 lubrication 17 1 oil seal installation 17 4 removal...

Page 588: ...NOTES...

Page 589: ...NOTES...

Page 590: ...NOTES...

Page 591: ...NOTES...

Page 592: ...NOTES...

Page 593: ...NOTES...

Page 594: ...NOTES...

Page 595: ......

Page 596: ......

Reviews:

Related manuals for Carryall 300 2021