21
Fuel Tank
GASOLINE VEHICLE - FUEL SYSTEM
3.
In a well-ventilated area, set the tank upside down so that the water can drain out of it. To make sure that the tank
dries completely, allow the tank to sit for 24 hours.
4.
Completely drain gas from fuel pump module and allow to module to dry.
5.
After the module is completely dry, install it in fuel tank. See Fuel Pump Module Installation.
6.
Store the tank upside down, with the cap installed, in a well-ventilated area.
FUEL TANK INSTALLATION
NOTE:
This gasoline vehicle complies with the California Air Resources Board (CARB) and EPA evaporative
emissions regulations when equipped with SAEJ30R9 1/4 in (6.3 mm) fuel vent hose and 3/16 in (4.78 mm)
fuel vent hose. To remain in compliance with California and EPA regulations, replace any fuel vent hose on
this vehicle with Club Car fuel vent hoses or equivalent.
1.
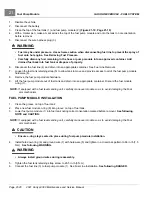
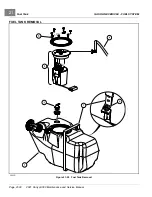
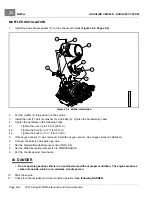
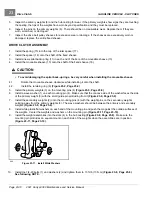
Place fuel tank (1) in vehicle
.
2.
Secure tank with retaining strap (7).
2.1.
Position the retaining strap in the indention of the tank.
2.2.
Install the screw (6) into retaining strap and tighten to 26.5 in·lb (3 N·m).
3.
Connect fuel pump module ground wire (5) to main wire harness.
See following WARNING.
WARNING
• Always install ground wires during reassembly.
4.
Connect fuel line (4) to fuel pump module (2).
See Fuel Line Installation on page 21-16. See following
DANGER.
DANGER
• Ensure line is connected properly to avoid a leak that can cause a fire.
5.
Install the vent line onto the fuel tank vent (3).
6.
Connect the wire harness plug to fuel pump module.
7.
Clean spilled fuel and remove any drained fuel from the area.
8.
Connect the battery.
9.
Add fuel to the fuel tank.
10.
Disable the vehicle.
11.
Set the Maintenance/Operate switch to MAINTENANCE.
12.
Turn key switch to the ON position and check for fuel leaks. Repeat as necessary to build fuel pressure. Any
leaks found must be fixed.
DANGER
• Repair all fuel leaks before returning the vehicle to service.
13.
If no leaks are found, set the Maintenance/Operate switch to OPERATE.
Page 21-24
2021 Carryall 300 Maintenance and Service Manual
Summary of Contents for Carryall 300 2021
Page 2: ......
Page 16: ......
Page 551: ...80 2018 by Kohler Co All rights reserved KohlerEngines com 17 690 15 Rev...
Page 565: ...GASOLINE ENGINE HARNESS Wiring Diagrams Gasoline Engine Harness 26...
Page 566: ...Page intentionally left blank...
Page 567: ...GASOLINE KEY START MAIN HARNESS Wiring Diagrams Gasoline Key Start Main Harness 26...
Page 568: ...Page intentionally left blank...
Page 569: ...GASOLINE PEDAL START MAIN HARNESS Wiring Diagrams Gasoline Pedal Start Main Harness 26...
Page 570: ...Page intentionally left blank...
Page 571: ...GASOLINE INSTRUMENT PANEL HARNESS Wiring Diagrams Gasoline Instrument Panel Harness 26...
Page 572: ...Page intentionally left blank...
Page 573: ...GASOLINE FNR HARNESS Wiring Diagrams Gasoline FNR Harness 26...
Page 574: ...Page intentionally left blank...
Page 575: ...ELECTRIC MAIN HARNESS Wiring Diagrams Electric Main Harness 26...
Page 576: ...Page intentionally left blank...
Page 577: ...ELECTRIC INSTRUMENT PANEL HARNESS Wiring Diagrams Electric Instrument Panel Harness 26...
Page 578: ...Page intentionally left blank...
Page 579: ...ELECTRIC ACCESSORIES HARNESS Wiring Diagrams Electric Accessories Harness 26...
Page 580: ...Page intentionally left blank...
Page 588: ...NOTES...
Page 589: ...NOTES...
Page 590: ...NOTES...
Page 591: ...NOTES...
Page 592: ...NOTES...
Page 593: ...NOTES...
Page 594: ...NOTES...
Page 595: ......
Page 596: ......

