GENERAL INFORMATION
Storage – Electric Vehicles
3
2.
Turn the key switch to the OFF position, remove the key, and leave the Forward/Neutral/Reverse control (FNR) in
the NEUTRAL position during storage.
3.
If so installed, turn off all accessories, including GPS units, fans, etc.
4.
Place the Run/Tow switch in the TOW position.
NOTE:
All functions of the dash-mounted charge indicator light are disabled when the Run/Tow switch is in the
TOW position.
If Visage or Guardian units are installed on vehicles and remote monitoring will be used during the storage
period, make sure the Run/Tow switch remains in the RUN position rather than in the TOW position required
for all other vehicles during storage.
5.
Batteries should be clean and free of corrosion. Wash tops and terminals of batteries with a solution of baking
soda and water; use 1 cup (237 mL) baking soda per 1 gallon (3.8 L) of water. Rinse solution off batteries. Do
not allow this solution to enter the batteries. Let the terminals dry and then coat them with Battery Terminal
Protector Spray.
6.
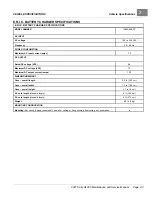
Tighten all battery cable connections to 110 in·lb (12.4 N·m).
7.
Store vehicle in a cool, dry place. This will minimize battery self-discharge.
8.
Adjust tires to recommended tire pressure.
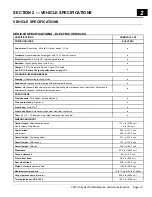
See Vehicle Specifications – Electric Vehicles on page 2-1.
9.
Perform semiannual periodic lubrication.
See Periodic Lubrication Schedules on page 10-7.
10.
Thoroughly clean front body, rear body, seats, battery compartment, and underside of vehicle.
11.
Do not engage the park brake. Chock the wheels to prevent the vehicle from rolling.
NOTE:
It is recommended that the vehicles be plugged in and the electrolyte level maintained throughout the storage
period. If any of the following conditions exist, however, then disconnect the batteries for storage: 1) The
charger cannot remain plugged in, 2) AC power will not be available during extended storage, or 3) Electrolyte
levels will not be maintained. To disconnect batteries for storage, go to step 13.
12.
To keep batteries fully charged during storage:
12.1.
Plug the battery charger into the car. Leave battery chargers plugged in during storage. The charger will
automatically activate when necessary.
12.2.
Check the electrolyte level and charger function monthly to ensure that proper operation is maintained. The
charger is functioning properly if the blue light is ON and the triangular light is OFF.
CAUTION
• Be sure to check the batteries and charger monthly to maintain correct battery water level and to
ensure the charger is operating correctly during storage.
13.
If disconnecting the batteries for storage, disconnect B negative (-) battery cable and secure it in a way that
ensures the cable will not come into contact with battery terminal.
RETURNING THE STORED ELECTRIC VEHICLE TO SERVICE
1.
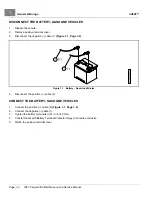
If necessary, connect batteries.
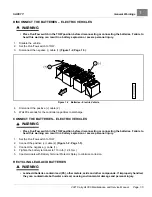
See Connect the Batteries – Electric Vehicles on page 1-5.
2.
Fully charge batteries.
WARNING
• Do not attempt to charge frozen batteries or batteries with bulged cases. Discard the battery. Frozen
batteries can explode.
3.
Adjust tires to recommended tire pressure.
See Vehicle Specifications – Electric Vehicles on page 2-1.
2021 Carryall 300 Maintenance and Service Manual
Page 3-3
Summary of Contents for Carryall 300 2021
Page 2: ......
Page 16: ......
Page 551: ...80 2018 by Kohler Co All rights reserved KohlerEngines com 17 690 15 Rev...
Page 565: ...GASOLINE ENGINE HARNESS Wiring Diagrams Gasoline Engine Harness 26...
Page 566: ...Page intentionally left blank...
Page 567: ...GASOLINE KEY START MAIN HARNESS Wiring Diagrams Gasoline Key Start Main Harness 26...
Page 568: ...Page intentionally left blank...
Page 569: ...GASOLINE PEDAL START MAIN HARNESS Wiring Diagrams Gasoline Pedal Start Main Harness 26...
Page 570: ...Page intentionally left blank...
Page 571: ...GASOLINE INSTRUMENT PANEL HARNESS Wiring Diagrams Gasoline Instrument Panel Harness 26...
Page 572: ...Page intentionally left blank...
Page 573: ...GASOLINE FNR HARNESS Wiring Diagrams Gasoline FNR Harness 26...
Page 574: ...Page intentionally left blank...
Page 575: ...ELECTRIC MAIN HARNESS Wiring Diagrams Electric Main Harness 26...
Page 576: ...Page intentionally left blank...
Page 577: ...ELECTRIC INSTRUMENT PANEL HARNESS Wiring Diagrams Electric Instrument Panel Harness 26...
Page 578: ...Page intentionally left blank...
Page 579: ...ELECTRIC ACCESSORIES HARNESS Wiring Diagrams Electric Accessories Harness 26...
Page 580: ...Page intentionally left blank...
Page 588: ...NOTES...
Page 589: ...NOTES...
Page 590: ...NOTES...
Page 591: ...NOTES...
Page 592: ...NOTES...
Page 593: ...NOTES...
Page 594: ...NOTES...
Page 595: ......
Page 596: ......

