ELECTRIC VEHICLE - ELECTRICAL SYSTEM
TROUBLESHOOTING
Test Procedures
12
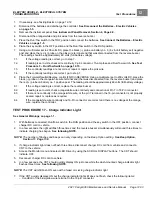
If 16-pin must be disconnected:
1.
Keep the 16-pin connector disconnected from the controller.
2.
With Run/Tow switch in the TOW position, reconnect the batteries.
See Connect the Batteries – Electric
3.
Place the Run/Tow switch in the RUN position and then check the appropriate wires.
If 16-pin must be connected:
1.
Disconnect the batteries and discharge the controller.
See Disconnect the Batteries – Electric Vehicles
2.
Connect the 16-pin connector to the controller.
See following NOTE.
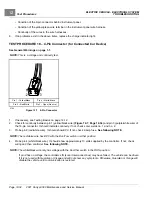
NOTE:
When connecting the 16-pin connector to the controller, push plug into controller receptacle with enough force
to lock plug into place. An audible click will be heard when plug is properly seated to the controller.
3.
With Run/Tow switch in the TOW position, reconnect the batteries.
See Connect the Batteries – Electric
4.
Place the Run/Tow switch in the RUN position and then check the appropriate wires.
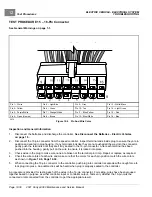
Refer to the following tables. Each table contains the following information:
• What function the wire performs.
• Whether or not the 16-pin connector must remain connected during the test.
• The appropriate test result for each pin.
If results differ from those described in the procedure, check the continuity of the wires in the wire harness and test the
connected components with the appropriate test procedures.
See Index of Test Procedures.
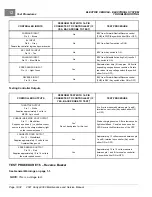
Testing Controller Inputs
_
CONTROLLER INPUTS
PERFORM TEST WITH 16-PIN
CONNECTED TO CONTROLLER? (IF
YES, BACK-PROBE TO TEST)
TEST PROCEDURE
THROTTLE INPUT
Pin 2 – Yellow
Yes
Range of zero (0) volts (with accelerator pedal
at rest) to 4.65 volts (with accelerator pedal
fully pressed) from MCOR 3-pin circuit
GROUND FOR PINS 1 AND 15
Pin 3 – Purple/White
Yes
BPV measured between solenoid post with
red wires and pin 3
CHARGER INTERLOCK INPUT
Pin 5 – Light Blue
Yes
Approx. 42 to 46 volts (can vary depending
on BPV) with charger disconnected.
See Test
Procedure 10 – Charger Interlock on page
FOOT INPUT
Pin 6 – Green
No
BPV from MCOR limit switch (Key switch must
be ON)
REVERSE BUZZER INPUT
Pin 7 – Orange/White
No
BPV from Reverse Buzzer with Run/Tow
switch in RUN (Key switch either ON or OFF)
TABLE CONTINUED ON NEXT PAGE
2021 Carryall 300 Maintenance and Service Manual
Page 12-31
Summary of Contents for Carryall 300 2021
Page 2: ......
Page 16: ......
Page 551: ...80 2018 by Kohler Co All rights reserved KohlerEngines com 17 690 15 Rev...
Page 565: ...GASOLINE ENGINE HARNESS Wiring Diagrams Gasoline Engine Harness 26...
Page 566: ...Page intentionally left blank...
Page 567: ...GASOLINE KEY START MAIN HARNESS Wiring Diagrams Gasoline Key Start Main Harness 26...
Page 568: ...Page intentionally left blank...
Page 569: ...GASOLINE PEDAL START MAIN HARNESS Wiring Diagrams Gasoline Pedal Start Main Harness 26...
Page 570: ...Page intentionally left blank...
Page 571: ...GASOLINE INSTRUMENT PANEL HARNESS Wiring Diagrams Gasoline Instrument Panel Harness 26...
Page 572: ...Page intentionally left blank...
Page 573: ...GASOLINE FNR HARNESS Wiring Diagrams Gasoline FNR Harness 26...
Page 574: ...Page intentionally left blank...
Page 575: ...ELECTRIC MAIN HARNESS Wiring Diagrams Electric Main Harness 26...
Page 576: ...Page intentionally left blank...
Page 577: ...ELECTRIC INSTRUMENT PANEL HARNESS Wiring Diagrams Electric Instrument Panel Harness 26...
Page 578: ...Page intentionally left blank...
Page 579: ...ELECTRIC ACCESSORIES HARNESS Wiring Diagrams Electric Accessories Harness 26...
Page 580: ...Page intentionally left blank...
Page 588: ...NOTES...
Page 589: ...NOTES...
Page 590: ...NOTES...
Page 591: ...NOTES...
Page 592: ...NOTES...
Page 593: ...NOTES...
Page 594: ...NOTES...
Page 595: ......
Page 596: ......


