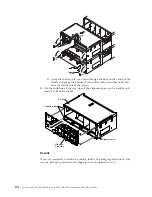
3.
Turn off the circuit breaker(s) for the power supplies.
4.
If the server is in a rack, at the back of the server, pull back the cable
management arm to gain access to the rear of the server and the power
supply.
5.
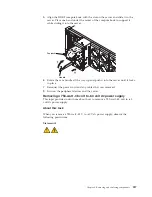
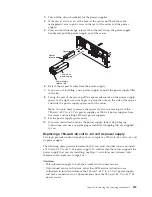
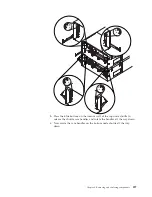
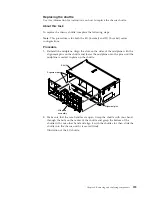
Press and hold the orange release tab to the left. Grasp the power supply
handle and pull the power supply out of the server.
Spacer
750-watt ac
power supply
Power supply
release tab
Spacer
release tab
6.
Detach the dc power cable from the power supply.
7.
If you are not installing a new power supply, reinstall the power supply filler
in the bay.
8.
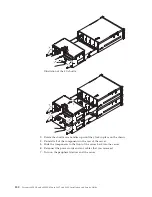
Facing the rear of the server, pull the spacer release tab on the power supply
spacer to the right, use your finger to grasp the hole on the side of the spacer,
and slide the power supply spacer out of the server.
Note:
You only need to remove the spacer if you are removing all of the
750-watt -48 V to -60 V dc power supplies or 900-watt power supplies from
the server and installing 1400-watt power supplies.
9.
Set the power supply spacer aside.
10.
If you are instructed to return the power supply, follow all packaging
instructions, and use any packaging materials for shipping that are supplied
to you.
Replacing a 750-watt -48 volt to -60 volt dc power supply
This topic provides instructions about how to replace a 750-watt -48 volt to -60 volt
dc power supply.
The following notes provide information that you must consider when you install
a 750-watt -48 V to -60 V dc power supply. To confirm that the server supports the
power supply that you are installing, see http://www.ibm.com/systems/info/
x86servers/serverproven/compat/us/.
Attention:
v
This information apply to both the 4-socket and 8-socket servers.
v
Only trained service technicians, other than IBM service technicians, are
authorized to install and remove the 750-watt -48 V to -60 V dc power supply,
and make connections to or disconnections from the 750-watt -48 V to -60 V dc
power source.
Chapter 6. Removing and replacing components
289
Содержание X3850 X6
Страница 1: ...System x3850 X6 and x3950 X6 Types 3837 and 3839 Installation and Service Guide...
Страница 2: ......
Страница 3: ...System x3850 X6 and x3950 X6 Types 3837 and 3839 Installation and Service Guide...
Страница 138: ...120 System x3850 X6 and x3950 X6 Types 3837 and 3839 Installation and Service Guide...
Страница 225: ...25 26 27 Chapter 5 Parts listing System x3850 X6 and x3950 X6 Types 3837 and 3839 207...
Страница 1682: ...1664 System x3850 X6 and x3950 X6 Types 3837 and 3839 Installation and Service Guide...
Страница 1706: ...1688 System x3850 X6 and x3950 X6 Types 3837 and 3839 Installation and Service Guide...
Страница 1710: ...1692 System x3850 X6 and x3950 X6 Types 3837 and 3839 Installation and Service Guide...
Страница 1728: ...1710 System x3850 X6 and x3950 X6 Types 3837 and 3839 Installation and Service Guide...
Страница 1729: ......
Страница 1730: ...Part Number 00FH434 Printed in USA 1P P N 00FH434...

