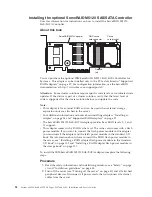

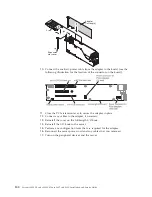
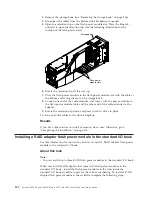
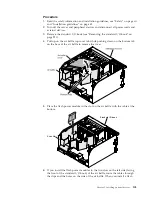

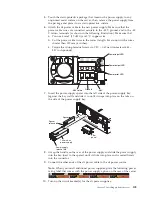


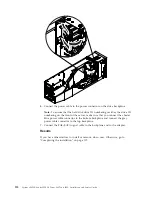

power module in the slot on the right side of the air baffle, route the cable
through the hole under the flash power module slot.
7.
Connect one end of the cable extender, that comes with the power module, to
the flash power module cable and the other end of the cable extender to the
adapter.
8.
Replace the air baffle cover. Align the tabs on the cover with the slots on the air
baffle and rotate the cover down, then press the cover down until it latches.
Results
If you have other devices to install or remove, do so now. Otherwise, go to
“Completing the installation” on page 119.
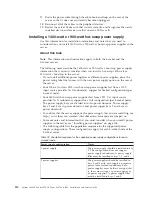
Installing power supplies
Use this information for an overview of the type of power supplies that the server
supports and information about installation rules and population sequence.
About this task
The server supports 900-watt ac power supplies, 1400-watt ac power supplies, and
750-watt -48 volt dc power supplies. For more information about the supported
power supplies and instructions on how to install the power supplies, see
“Installing a 1400-watt or 900-watt hot-swap power supply” on page 110 and
“Installing a 750-watt -48 volt to -60 volt dc power supply” on page 106.
Note:
The information and instructions in this documentation apply to both the
4-socket and the 8-socket server.
The following notes describe the types of power supplies that the server supports
and other information that you must consider when you install power supplies:
Note:
v
The server default power supply configuration setting, when shipped from the
factory, is non-redundant mode with throttling enabled for both ac and dc
power supply models. If you want to change the mode to redundancy mode,
you must use IMM2 web interface to set and change the power supply Power
Policy and System Power Configurations options settings. You can set and
change the policies and configurations using the IMM2 web interface, CIM, or
the Advanced Settings Utility. You cannot set or change the Power Policy or
System Power Configurations setting using the UEFI Setup utility. For more
information, see “Setting power supply power policy and system power
configurations” on page 143.
v
If you are using two power input feeds, connect power supplies 1 and 3 to input
feed A and power supplies 2 and 4 to input feed B.
v
You cannot mix ac and dc power supplies in the same server.
v
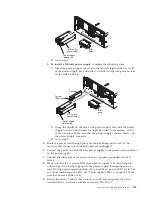
The power supply bays are divided into two power domains. Power supply
bays 1 and 3 are in power domain A and power supply bays 2 and 4 are in
power domain B.
v
You must use a power-supply spacer when installing the 750-watt -48 volt dc
power supplies and the 900-watt power supplies.
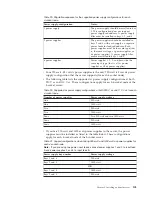
v
The following table lists the population sequence for the supported power
supply configurations. These configurations apply for each 4-socket node of the
8-socket server.
104
System x3850 X6 and x3950 X6 Types 3837 and 3839: Installation and Service Guide
Содержание X3850 X6
Страница 1: ...System x3850 X6 and x3950 X6 Types 3837 and 3839 Installation and Service Guide...
Страница 2: ......
Страница 3: ...System x3850 X6 and x3950 X6 Types 3837 and 3839 Installation and Service Guide...
Страница 138: ...120 System x3850 X6 and x3950 X6 Types 3837 and 3839 Installation and Service Guide...
Страница 225: ...25 26 27 Chapter 5 Parts listing System x3850 X6 and x3950 X6 Types 3837 and 3839 207...
Страница 1682: ...1664 System x3850 X6 and x3950 X6 Types 3837 and 3839 Installation and Service Guide...
Страница 1706: ...1688 System x3850 X6 and x3950 X6 Types 3837 and 3839 Installation and Service Guide...
Страница 1710: ...1692 System x3850 X6 and x3950 X6 Types 3837 and 3839 Installation and Service Guide...
Страница 1728: ...1710 System x3850 X6 and x3950 X6 Types 3837 and 3839 Installation and Service Guide...
Страница 1729: ......
Страница 1730: ...Part Number 00FH434 Printed in USA 1P P N 00FH434...


