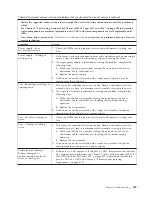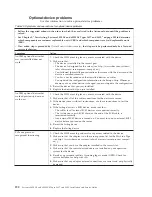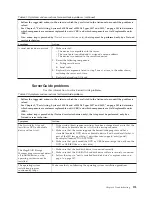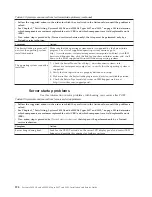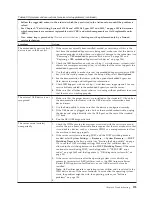
Table 40. Symptoms and user actions for hard disk drive problems (continued)
v
Follow the suggested actions in the order in which they are listed in the Action column until the problem is
solved.
v
See Chapter 5, “Parts listing, System x3850 X6 and x3950 X6 Types 3837 and 3839,” on page 205 to determine
which components are customer replaceable units (CRU) and which components are field replaceable units
(FRU).
v
If an action step is preceded by
(Trained service technician only)
, that step must be performed only by a Trained
service technician.
Symptom
Action
A newly installed hard disk
drive is not recognized.
1.
Set up the RAID configuration (see “Configuring RAID arrays” on page 147).
2.
Check the IMM event log for hard disk drive events and resolve the problem.
3.
If the LED is lit, remove the drive from the drive bay, wait 45 seconds, and
reinsert the drive, making sure that the drive assembly connects to the hard
disk drive backplane.
4.
Observe the associated green hard disk drive activity LED and the amber
status LED:
v
If the green activity LED is flashing and the amber status LED is not lit, the
drive is recognized by the controller and is working correctly. Run the DSA
hard disk drive test to determine whether the drive is detected (see
“Running the DSA Preboot diagnostic programs” on page 175).
v
If the green activity LED is flashing and the amber status LED is flashing
slowly, the drive is recognized by the controller and is rebuilding.
v
If neither LED is lit or flashing, check the hard disk drive backplane (go to
step 5).
v
If the green activity LED is flashing and the amber status LED is lit, replace
the drive. If the activity of the LEDs remain the same, go to step 5. If the
activity of the LEDs changes, return to step 1.
5.
Make sure that there is a hard disk drive backplane is present to install the
drive into.
6.
Make sure that the hard disk drive backplane is correctly seated. When it is
correctly seated, the drive assemblies correctly connect to the backplane
without bowing or causing movement of the backplane.
7.
Reseat the backplane power cable and repeat steps 1 through 3.
8.
Reseat the backplane signal cable and repeat steps 1 through 3.
9.
The backplane signal cable or the backplane is the potential problem:
a.
Replace the affected backplane signal cable.
b.
Replace the affected backplane.
10.
Run the DSA tests for the SAS/SATA adapter and hard disk drives (see
“Running the DSA Preboot diagnostic programs” on page 175).
v
If the adapter passes the test but the drives are not recognized, replace the
backplane signal cable and run the tests again.
v
Replace the backplane.
v
If the adapter fails the test, disconnect the backplane signal cable from the
adapter and run the tests again.
v
If the adapter fails the test, replace the adapter.
11.
See “Problem determination tips” on page 200 for more information.
12.
Check for Retain Tips for related issues on IBM Support web site at
http://www.ibm.com/supportportal/.
13.
If the problem persist, contact IBM Support.
182
System x3850 X6 and x3950 X6 Types 3837 and 3839: Installation and Service Guide
Содержание X3850 X6
Страница 1: ...System x3850 X6 and x3950 X6 Types 3837 and 3839 Installation and Service Guide...
Страница 2: ......
Страница 3: ...System x3850 X6 and x3950 X6 Types 3837 and 3839 Installation and Service Guide...
Страница 138: ...120 System x3850 X6 and x3950 X6 Types 3837 and 3839 Installation and Service Guide...
Страница 225: ...25 26 27 Chapter 5 Parts listing System x3850 X6 and x3950 X6 Types 3837 and 3839 207...
Страница 1682: ...1664 System x3850 X6 and x3950 X6 Types 3837 and 3839 Installation and Service Guide...
Страница 1706: ...1688 System x3850 X6 and x3950 X6 Types 3837 and 3839 Installation and Service Guide...
Страница 1710: ...1692 System x3850 X6 and x3950 X6 Types 3837 and 3839 Installation and Service Guide...
Страница 1728: ...1710 System x3850 X6 and x3950 X6 Types 3837 and 3839 Installation and Service Guide...
Страница 1729: ......
Страница 1730: ...Part Number 00FH434 Printed in USA 1P P N 00FH434...


