


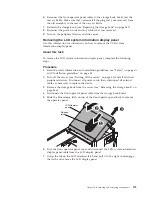


9.
Remove the storage book board (see “Removing the storage book board
assembly” on page 268.
10.
Remove the backplanes (see “Removing the 4x2.5-inch hot-swap drive
backplanes” on page 235 and “Removing the 8x1.8-inch hot-swap drive
backplane assembly” on page 237).
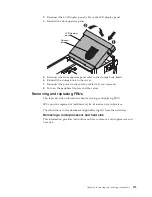
11.
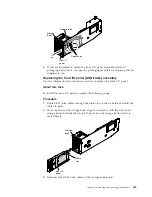
Remove the front operator panel (see “Removing the front operator panel
assembly” on page 270).
12.
Remove the front I/O panel (see “Removing the front I/O panel (USB/video)
assembly” on page 264).
13.
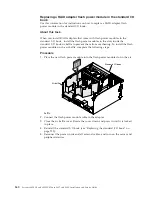
If you are instructed to return the assembly, follow all packaging instructions,
and use any packaging materials for shipping that are supplied to you.
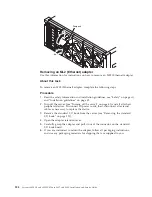
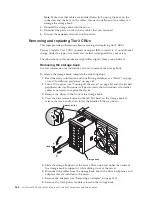
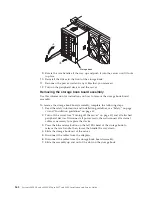
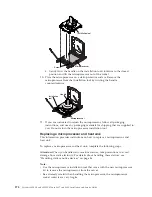
Replacing the storage book
Use this information for instructions on how to replace the storage book.
Note:
.
v
For additional information, see “Storage book” on page 24
v
The PCIe slots on this storage book only support storage host bus adapters. Do
not install any other adapters in these slots. Other adapters are not supported on
this storage book.
v
You must power-off the server to remove or add adapters in the PCIe slots on
the storage book. The PCIe slots are not hot-swappable.
v
Slot 12 (the primary storage slot) is connected to compute book 1 and slot 11
(the secondary storage slot) is connected to compute book 2.
v
The PCIe slots on this storage book only support low profile RAID adapters and
host bus adapters.
v
Install internal RAID adapters and the adapter batteries or flash power modules
in the storage book component.
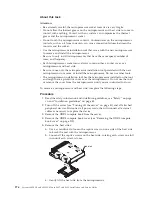
To replace the storage book, complete the following steps:
1.
Install the front operator panel on the new storage book (see “Replacing the
front operator panel assembly” on page 272).
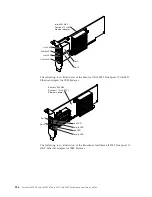
2.
Reinstall the front I/O panel (see “Replacing the front I/O panel (USB/video)
assembly” on page 265).
3.
Reinstall the drive backplanes (see “Replacing the 4x2.5-inch hot-swap drive
backplanes” on page 236 and “Replacing the 8x1.8-inch hot-swap drive
backplane assembly” on page 238).
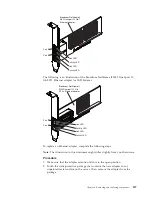
4.
Reinstall the storage book board. (see “Replacing the storage book board
assembly” on page 269).
5.
Reinstall the flash power modules, if any were removed (
6.
Reinstall the adapters (see “Adapter installation instructions” on page 92).
7.
Reconnect the cables to the adapters, the drive backplanes, and the storage
book board.
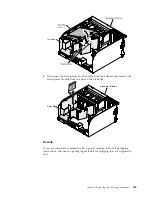
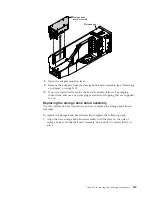
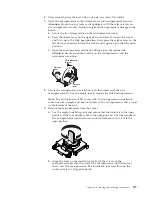
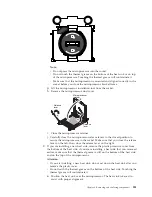
8.
Reinstall the storage book. Grasp the storage book and align it with the bay
on the front of the server and slide the storage book into the server. Place one
hand under the center of the storage book to support it while sliding it into
the server.
Chapter 6. Removing and replacing components
267
Содержание X3850 X6
Страница 1: ...System x3850 X6 and x3950 X6 Types 3837 and 3839 Installation and Service Guide...
Страница 2: ......
Страница 3: ...System x3850 X6 and x3950 X6 Types 3837 and 3839 Installation and Service Guide...
Страница 138: ...120 System x3850 X6 and x3950 X6 Types 3837 and 3839 Installation and Service Guide...
Страница 225: ...25 26 27 Chapter 5 Parts listing System x3850 X6 and x3950 X6 Types 3837 and 3839 207...
Страница 1682: ...1664 System x3850 X6 and x3950 X6 Types 3837 and 3839 Installation and Service Guide...
Страница 1706: ...1688 System x3850 X6 and x3950 X6 Types 3837 and 3839 Installation and Service Guide...
Страница 1710: ...1692 System x3850 X6 and x3950 X6 Types 3837 and 3839 Installation and Service Guide...
Страница 1728: ...1710 System x3850 X6 and x3950 X6 Types 3837 and 3839 Installation and Service Guide...
Страница 1729: ......
Страница 1730: ...Part Number 00FH434 Printed in USA 1P P N 00FH434...


