Replacing the shuttle
Use this information for instructions on how to replace the chassis shuttle.
About this task
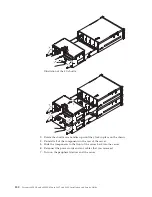
To replace the chassis shuttle, complete the following steps:
Note:
This procedure is for both the 4U (4-socket) and 8U (8-socket) server
configurations.
Procedure
1.
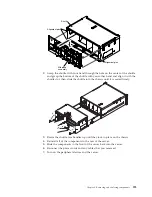
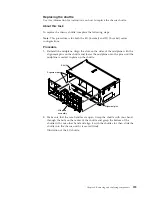
Reinstall the midplane. Align the slots on the sides of the midplane with the
alignment pins on the shuttle and lower the midplane onto the pins until the
midplane is seated in place on the shuttle.
Midplane
assembly
Alignment pins
Alignment pins
Shuttle
2.
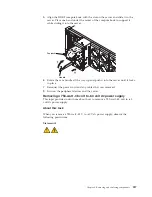
Make sure that the cam handles are open. Grasp the shuttle with your hand
through the hole on the center of the shuttle and grasp the bottom of the
shuttle with your other hand and align it with the shuttle slot; then, slide the
shuttle into the chassis until it is seated firmly.
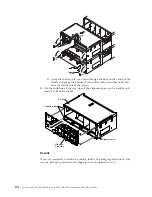
Illustration of the 4U shuttle:
Chapter 6. Removing and replacing components
299
Содержание X3850 X6
Страница 1: ...System x3850 X6 and x3950 X6 Types 3837 and 3839 Installation and Service Guide...
Страница 2: ......
Страница 3: ...System x3850 X6 and x3950 X6 Types 3837 and 3839 Installation and Service Guide...
Страница 138: ...120 System x3850 X6 and x3950 X6 Types 3837 and 3839 Installation and Service Guide...
Страница 225: ...25 26 27 Chapter 5 Parts listing System x3850 X6 and x3950 X6 Types 3837 and 3839 207...
Страница 1682: ...1664 System x3850 X6 and x3950 X6 Types 3837 and 3839 Installation and Service Guide...
Страница 1706: ...1688 System x3850 X6 and x3950 X6 Types 3837 and 3839 Installation and Service Guide...
Страница 1710: ...1692 System x3850 X6 and x3950 X6 Types 3837 and 3839 Installation and Service Guide...
Страница 1728: ...1710 System x3850 X6 and x3950 X6 Types 3837 and 3839 Installation and Service Guide...
Страница 1729: ......
Страница 1730: ...Part Number 00FH434 Printed in USA 1P P N 00FH434...


