2-30
Installing and Setting up the Machine > Energy Saver function
Auto Sleep
Auto Sleep automatically switches the machine into Sleep if left idle for a preset time.
The default preset time is 20 minutes (models for Europe) or 45 minutes (models except for Europe).
To change the preset sleep time, refer to the following:
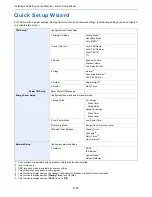
Quick Setup Wizard (page 2-31)
Sleep Rules (models for Europe)
You can set whether sleep mode operates for each function. When the machine enters sleep mode, the ID card cannot
be recognized.
For more information on Sleep Rules settings, refer to the following:
Sleep Rules (models for Europe) (page 8-54)
Sleep Level (Energy Saver) (models except for
Europe)
This mode reduces power consumption even more than normal Sleep mode, and allows Sleep Mode to be set
separately for each function. Printing from a computer connected with a USB cable is not available while the machine is
asleep. The time required for the machine to wake up from power save mode and resume normal operation will be
longer than for normal Sleep Mode.
For more information on Sleep Level (Energy Saver) Mode settings, refer to the following:
Quick Setup Wizard (page 2-31)
Energy Saver Recovery Level
This machine can reduce power consumption when recovering from Energy Saver Mode.
For EnergySaver RecoveryLevel, "Full Recovery", "Normal Recovery" or "Power Saving Recovery" can be selected.
The factory default is "Normal Recovery".
For more information on Energy Saver Mode settings, refer to the following:
Quick Setup Wizard (page 2-31)
Weekly Timer Settings
Set the machine to automatically sleep and wake up at the times specified for each day.
For more information on Weekly Timer Settings, refer to the following:
Quick Setup Wizard (page 2-31)
NOTE
If the Low Power Timer is equal to the Sleep Timer, a Sleep mode is preceded.
NOTE
If the optional network interface kit is installed, Energy Saver cannot be specified.
Summary of Contents for TASKalfa 356ci
Page 1: ...OPERATION GUIDE q PRINT q COPY q SCAN q FAX TASKalfa 356ci TASKalfa 406ci ...
Page 463: ...10 22 Troubleshooting Regular Maintenance 4 Install the Punch Waste Box 5 Close the cover ...
Page 504: ...10 63 Troubleshooting Clearing Paper Jams 8 Remove any jammed paper 9 Push Right Cover 1 ...
Page 564: ......

