2-28
Installing and Setting up the Machine > Default Settings of the Machine
2
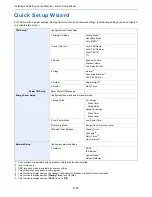
Configure the settings.
When using DHCP server
[
DHCP
]: Set to [
On
].
When setting the static IP address
[
DHCP
]: Set to [
Off
].
[
IP Address
]: Enter the address.
[
Subnet Mask
]: Enter the subnet mask in decimal representation (0 to 255).
[
Default Gateway
]: Enter the address.
When using the Auto-IP, enter "0.0.0.0" in [
IP Address
].
Wireless Network Settings
When the optional Wireless Network Interface Kit is installed on the machine and the connection settings are configured,
it is possible to print in a wireless network (wireless LAN) environment. The following is an introduction to the settings for
connecting using the Quick Setup.
To connect to a wireless access point, Quick Setup has the following four methods. Select a desired method.
Setup (page 8-48)
Available Network
Displays access points to which the machine can connect. Select a desired access point from the list.
Push Button
If the access point supports the push button method, wireless settings can be configured using the push button. This
setting executes push button, and the connection is started by pressing the push button on the access point.
PIN Code Method (Device)
Starts connection at both sides using the PIN code which has been generated at the machine. In addition, the same PIN
code should be entered into the access point previously.
PIN Code Method (Terminal)
Starts connection at both sides using the PIN code which has been generated at the access point. In addition, the same
PIN code should be entered into the machine previously.
IMPORTANT
After changing the setting, restart the network from System Menu, or turn the
machine OFF and then ON.
Restart Network (page 8-46)
NOTE
The push button method supports only the WPS.
Summary of Contents for TASKalfa 356ci
Page 1: ...OPERATION GUIDE q PRINT q COPY q SCAN q FAX TASKalfa 356ci TASKalfa 406ci ...
Page 463: ...10 22 Troubleshooting Regular Maintenance 4 Install the Punch Waste Box 5 Close the cover ...
Page 504: ...10 63 Troubleshooting Clearing Paper Jams 8 Remove any jammed paper 9 Push Right Cover 1 ...
Page 564: ......


