FISCHERSCOPE
®
X-RAY
179
Pattern Recognition (XDLM 237)
6. Click
Take new picture
.
The video image appears in the pattern recognition window.
7. In the
Pattern definition
area, click
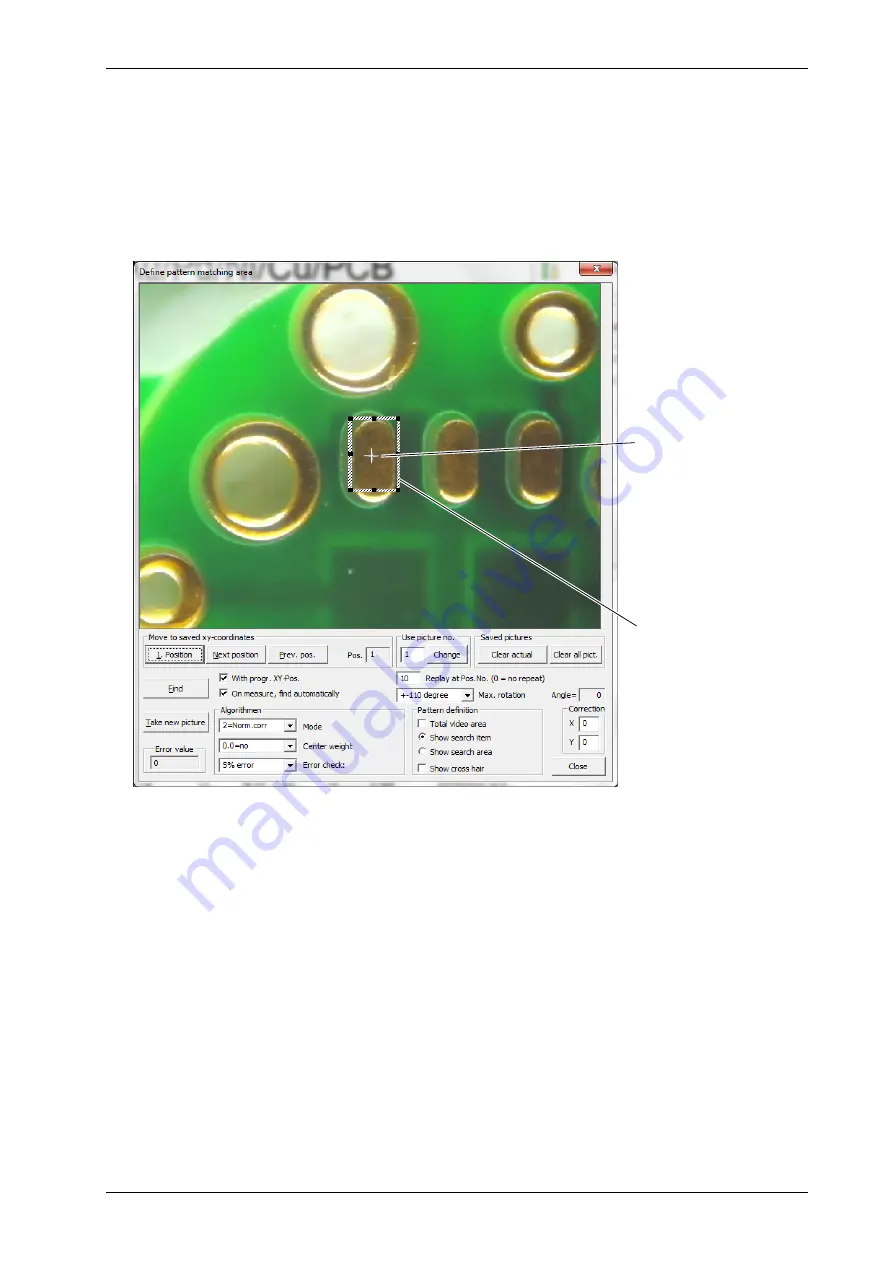
Show search item
. If the
Total video area
option is activated,
deactivate it.
A hatched rectangle appears. This rectangle marks the search item, i.e. the area of the image
that is to be found again.
Figure 21.4: Pattern recognition window: The hatched rectangle shows the search item
8. Define the search item:
Position of the search item: Place the cursor in the rectangle, keep the left mouse button
pressed and move the rectangle.
Size of the search item: Place the cursor on one of the eight black points, keep the left
mouse button pressed and change the size of the rectangle.
In the example (see Fig. 21.4), the lower part of the solder pad is not in the area of the search
item. The lower area is very light; not all solder pads are that light. If the light area were in the
search item, pads might not be detected.
Search item
Measuring position
Summary of Contents for FISCHERSCOPE X-RAY XDLM 231
Page 8: ...6 FISCHERSCOPE X RAY Table of Contents...
Page 14: ...12 FISCHERSCOPE X RAY Safety Information...
Page 30: ...28 FISCHERSCOPE X RAY Set up...
Page 36: ...34 FISCHERSCOPE X RAY WinFTM File Structure...
Page 52: ...50 FISCHERSCOPE X RAY User Interface of the WinFTM Software...
Page 134: ...132 FISCHERSCOPE X RAY Def MA...
Page 146: ...144 FISCHERSCOPE X RAY Programming Coordinates for Automatic Measurements XDLM 237...
Page 186: ...184 FISCHERSCOPE X RAY Pattern Recognition XDLM 237...
Page 192: ...190 FISCHERSCOPE X RAY Cleaning and Maintenance...
Page 202: ...200 FISCHERSCOPE X RAY Addendum...
Page 228: ...226 FISCHERSCOPE X RAY WinFTM SUPER For the Experienced X RAY User...
Page 229: ...FISCHERSCOPE X RAY 227...
Page 232: ......


