


7.
Press the ENT pushbutton. If prompted, enter a valid Level 2 Access Code. The
following will be displayed:
Paralleling Type
DISABLE C
8.
Utilizing the arrow pushbuttons, select the Paralleling Type to be "MASTER/
FOLLOWER", then press the ENT pushbutton.
9.
Press the Down arrow pushbutton once, the "Master/Follower" screen will be
displayed.
10. Verify that the Master/Follower Configuration is selected to "NONE".
•
If the Master/Follower Configuration is set to "NONE", proceed to the next
step.
•
If the Master/Follower Configuration is not set to "NONE", utilize the arrow
pushbuttons to select "NONE", then press the ENT pushbutton.
11. Press the Down arrow pushbutton once, the "Paralleling Address" screen will be
displayed.
Paralleling Address
16
The Master P aralleling Address must be the highest address in the network. All
Follower addresses must be a value less than the Master.
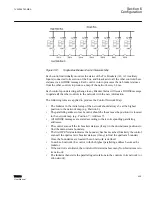
The control’s position in the paralleling network is determined by its paralleling
address. As shown in
, Position 1 should be assigned a paralleling address
of 1, Position 2 a paralleling address of 2 and so on, in an ascending order. In this
example the Master control will be in Position 8 with a Paralleling Address of 8.
12. Press the ENT pushbutton. If prompted, enter a valid Level 2 Access Code. The
following will be displayed:
Paralleling Address
16 C
13. Utilizing the arrow pushbuttons, enter the desired Paralleling Address (1 to 16) then
press the ENT pushbutton.
14. Press the Down arrow pushbutton once, the "Num. Devices" screen will be
displayed.
Number of De vices is the number of total devices that are in the paralleling scheme
(maximum 16 inclusive of the Master).
15. Press the ENT pushbutton. If prompted, enter a valid Level 2 Access Code. The
following will be displayed:
Num. Devices
2 C
16. Utilizing the arrow pushbuttons, enter the total Number of Devices then press the
ENT pushbutton.
17. Press the Down arrow pushbutton once, the "T.P.R. Timeout" screen will be
displayed.
T.P.R. Timeout
60000 ms
1VAC388793-MB A
Section 6
Configuration
TCC300
423
User Manual
Summary of Contents for TCC300
Page 1: ...Digital Tapchanger Control TCC300 User Manual ...
Page 2: ......
Page 3: ...Document ID 1VAC388793 MB Issued 2016 08 10 Revision A Copyright 2016 ABB All rights reserved ...
Page 26: ...20 ...
Page 34: ...28 ...
Page 91: ...1VAC388793 MB A Section 3 Operation TCC300 85 User Manual ...
Page 126: ...120 ...
Page 176: ...Section 4 1VAC388793 MB A TCC600 170 TCC300 User Manual ...
Page 260: ...254 ...
Page 328: ...322 ...
Page 494: ...488 ...
Page 556: ...550 ...
Page 580: ...574 ...
Page 600: ...594 ...
Page 700: ...694 ...
Page 710: ...704 ...
Page 712: ...706 ...
Page 713: ...707 ...
Page 714: ......
Page 715: ......