23 Problem Solving
684
3
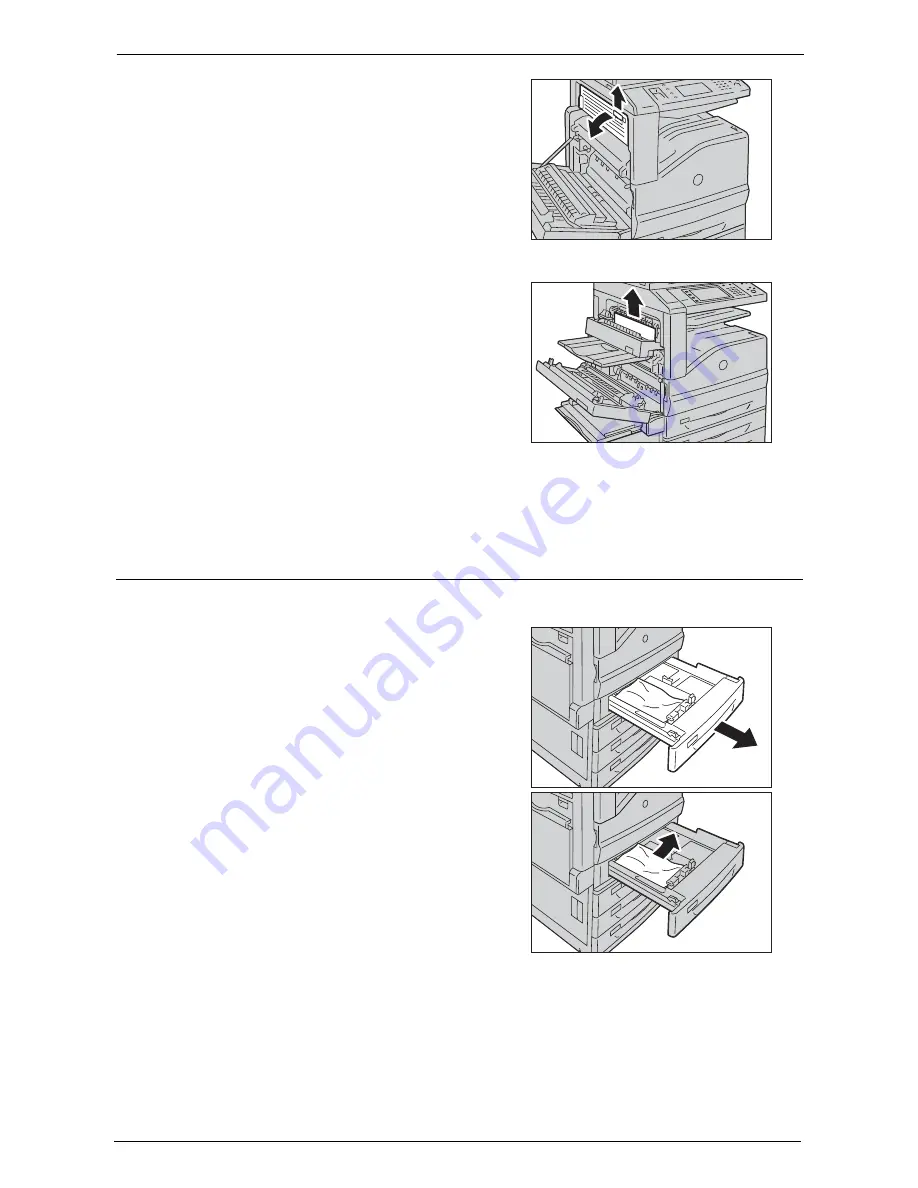
Lift up the lever to open the top left cover.
4
Remove the jammed paper.
Note
•
If the paper is torn, make sure no piece of
paper remains inside the machine.
5
Close the top left cover gently.
6
Push the center of the upper left cover and close the cover gently, and then close Tray 5.
Paper Jams in Trays 1 to 4
The following describes how to clear paper jams occurring in Trays 1 to 4.
1
Pull out the tray where the paper jam occurred.
Note
•
If you pull out a paper tray without checking
the paper jam location, the jammed paper may
be torn and the pieces may remain inside the
machine. This may cause machine
malfunctions; therefore, always check where
the paper jam occurred first.
2
Remove the jammed paper.
Note
•
If the paper is torn, make sure no piece of
paper remains inside the machine.
3
Push the tray in gently until it stops.
Содержание C7765DN
Страница 1: ...Dell C7765dn Color Multifunction Printer User s Guide Regulatory Model C7765dn ...
Страница 32: ...1 Before Using the Machine 32 ...
Страница 144: ...3 Copy 144 ...
Страница 155: ...Operations during Faxing 155 3 Set Resolution Original Size and the density 4 Select Save 5 Press the Start button ...
Страница 156: ...4 Fax 156 ...
Страница 168: ...5 Scan 168 ...
Страница 272: ...13 Maintenance 272 ...
Страница 294: ...14 Machine Status 294 ...
Страница 468: ...16 Dell Printer Configuration Web Tool Settings 468 ...
Страница 510: ...19 Scanner Environment Settings 510 ...
Страница 559: ...Configuration for Authentication 559 10 Select Close repeatedly until the Tools screen is displayed 11 Select Close ...
Страница 564: ...22 Authentication and Accounting Features 564 ...
Страница 764: ...28 Using Shortcut Menu 764 ...
Страница 796: ...29 Using Access Google Drive 796 2 Check the content status 3 Select Close ...
Страница 802: ...29 Using Access Google Drive 802 ...
Страница 816: ...30 Google Cloud Print 816 ...
Страница 829: ...www dell com dell com support KB3206EN0 5 ...


