Machine Trouble
569
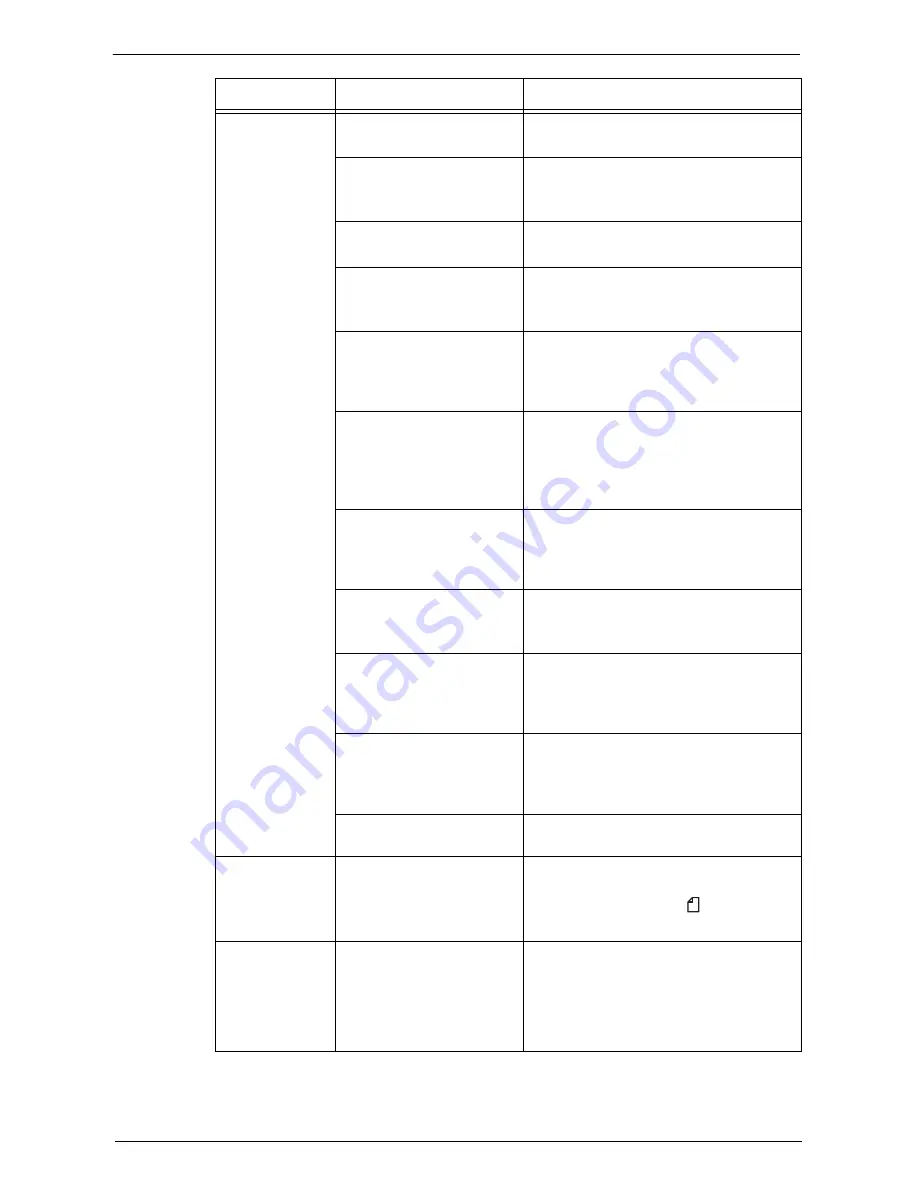
Paper is often
jammed or
wrinkled.
Is the paper loaded correctly
in the tray?
Load the paper correctly.
Refer to "Loading Paper" (P.237).
Is the paper tray inserted
correctly?
Firmly push in the paper tray until it stops to
insert it correctly.
Refer to "Loading Paper" (P.237).
Is the paper damp?
Replace the paper with new one.
Refer to "Loading Paper" (P.237).
Is the paper curled?
Turn over the paper in the tray, or replace the
paper with new one.
Refer to "Loading Paper" (P.237).
Are the paper and paper tray
settings correct?
Correctly set the paper and paper trays to
correspond to the paper.
Refer to "Changing the Paper Settings"
(P.244).
Are any torn pieces of paper
remaining or is there a foreign
object in the machine?
Open the cover of the machine or slide out
the paper tray to remove the torn pieces or
the foreign object.
Refer to "Paper Jams" (P.681) or "Loading
Paper" (P.237).
Is non-standard paper loaded
in the tray?
Replace with paper that meets machine
specifications.
Refer to "Paper Types" (P.226) or "Loading
Paper" (P.237).
Is paper exceeding the
maximum fill line in the tray?
Load paper in the paper tray so that it does
not exceed the maximum fill line.
Refer to "Loading Paper" (P.237).
Are the paper guides set
correctly?
Load the paper correctly, and align the paper
guides to the paper.
Refer to "Loading Paper" (P.237) or
"Changing the Paper Size" (P.241).
Is the image nearly the same
size as the paper?
Increase the edge erase widths.
For more information, refer to "Copy" (P.59)
when you copying, or to the help of the print
driver when printing.
Is the paper finely cut out?
Some types of paper may not be cut out
finely. Load the paper after fanning it well.
A document is not
fed into the
document feeder.
Is the document small?
The minimum size of the document that can
be loaded on the document feeder is 125 x 85
mm (Standard size: A5, A5 ).
Refer to "Copying Procedure" (P.60).
An error message
appears after
paper is loaded in
Tray 5 and the
<Start> button is
pressed.
Check the positions of the
paper guides of Tray 5.
Adjust the paper guides to the correct
positions.
Refer to "Loading Paper in Tray 5 (Bypass
Tray)" (P.238).
Symptom
Cause
Remedy
Содержание C7765DN
Страница 1: ...Dell C7765dn Color Multifunction Printer User s Guide Regulatory Model C7765dn ...
Страница 32: ...1 Before Using the Machine 32 ...
Страница 144: ...3 Copy 144 ...
Страница 155: ...Operations during Faxing 155 3 Set Resolution Original Size and the density 4 Select Save 5 Press the Start button ...
Страница 156: ...4 Fax 156 ...
Страница 168: ...5 Scan 168 ...
Страница 272: ...13 Maintenance 272 ...
Страница 294: ...14 Machine Status 294 ...
Страница 468: ...16 Dell Printer Configuration Web Tool Settings 468 ...
Страница 510: ...19 Scanner Environment Settings 510 ...
Страница 559: ...Configuration for Authentication 559 10 Select Close repeatedly until the Tools screen is displayed 11 Select Close ...
Страница 564: ...22 Authentication and Accounting Features 564 ...
Страница 764: ...28 Using Shortcut Menu 764 ...
Страница 796: ...29 Using Access Google Drive 796 2 Check the content status 3 Select Close ...
Страница 802: ...29 Using Access Google Drive 802 ...
Страница 816: ...30 Google Cloud Print 816 ...
Страница 829: ...www dell com dell com support KB3206EN0 5 ...


