10 Job Status
214
Note
•
Unlike the Private Charge Print feature, the Charge Print feature can store jobs without a user ID, such
as e-mail printing and print jobs sent from Dell Printer Configuration Web Tool, and can print the jobs
after authenticating users.
•
[Charge Print] appears when [Save as Charge Print Job] is selected by using one of the following
procedures in the System Administration mode:
- Select [Save as Charge Print Job] in [Receive Control].
- Select [According to Print Accounting] in [Receive Control], and then select [Save as Charge Print
Job] in [Job Login Failure].
- Select [According to Print Accounting] or [Save as Private Charge Print Job] in [Receive Control],
and then select [Save as Charge Print Job] in [Job Without User ID].
For information on how to set Charge Print, refer to "Charge/Private Print Settings" (P.456).
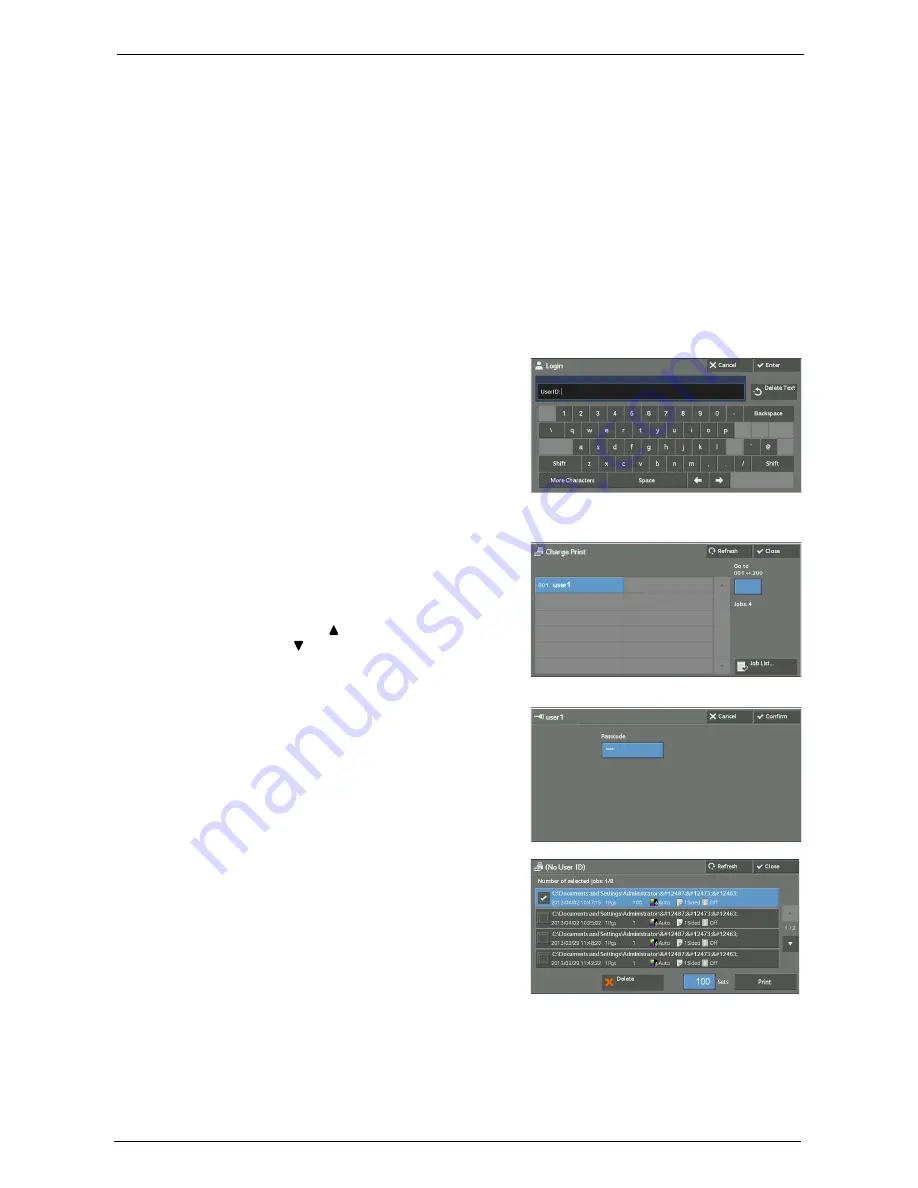
The following describes how to print and delete a job stored with the Charge Print feature.
1
Press the <Log In/Out> button on the control panel, or select the login information field
on the touch screen.
2
Enter the user ID, and select [Enter].
Note
•
When the passcode is set, enter the user ID
and select [Next]. Then, enter the passcode
and select [Enter].
•
While a user is authenticated, the <Log In/
Out> button lights up on the control panel.
•
To log out of the machine, press the <Log In/
Out> button on the control panel.
3
Select [Charge Print].
4
Select the user to be checked, and select [Job
List].
Note
•
Select [Refresh] to display the updated
information.
•
Select [ ] to return to the previous screen or
[ ] to move to the next screen.
•
You can enter a user ID in [Go to] using the
numeric keypad to display the user ID at the
top of the list.
5
Enter the passcode, and select [Confirm].
Note
•
If the passcode is not set, the passcode entry
screen does not appear.
6
Select the job to be printed or deleted.
7
Select any option.
8
When printing, specify the number of print sets using the numeric keypad.
Содержание C7765DN
Страница 1: ...Dell C7765dn Color Multifunction Printer User s Guide Regulatory Model C7765dn ...
Страница 32: ...1 Before Using the Machine 32 ...
Страница 144: ...3 Copy 144 ...
Страница 155: ...Operations during Faxing 155 3 Set Resolution Original Size and the density 4 Select Save 5 Press the Start button ...
Страница 156: ...4 Fax 156 ...
Страница 168: ...5 Scan 168 ...
Страница 272: ...13 Maintenance 272 ...
Страница 294: ...14 Machine Status 294 ...
Страница 468: ...16 Dell Printer Configuration Web Tool Settings 468 ...
Страница 510: ...19 Scanner Environment Settings 510 ...
Страница 559: ...Configuration for Authentication 559 10 Select Close repeatedly until the Tools screen is displayed 11 Select Close ...
Страница 564: ...22 Authentication and Accounting Features 564 ...
Страница 764: ...28 Using Shortcut Menu 764 ...
Страница 796: ...29 Using Access Google Drive 796 2 Check the content status 3 Select Close ...
Страница 802: ...29 Using Access Google Drive 802 ...
Страница 816: ...30 Google Cloud Print 816 ...
Страница 829: ...www dell com dell com support KB3206EN0 5 ...


