background image

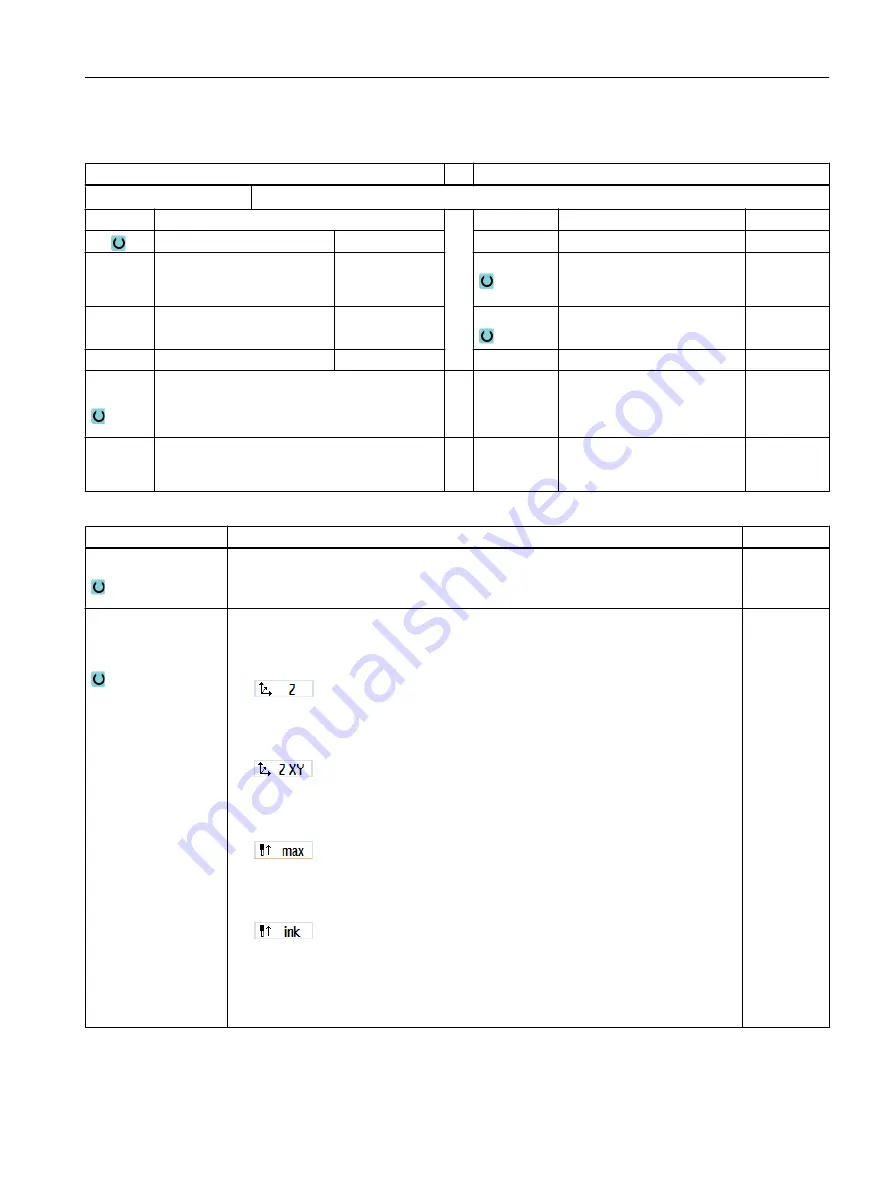
Parameters in the "Input complete" mode

G code program parameters


ShopMill program parameters

Input

● Complete

PRG

Name of the program to be generated


T

Tool name


PL 

Machining plane 


D

Cutting edge number


RP

Retraction plane – (only for 

machining direction, longitu‐

dinal, inner)

mm

Feedrate

mm/min
mm/rev

SC

Safety clearance

mm

S / V 

Spindle speed or
constant cutting rate

rpm
m/min

F

Feedrate

*


Residual 

material

With subsequent residual material removal.
● Yes
● No


CONR

Name to save the updated unmachined-part 

contour for residual material removal - (only 

"Yes" for residual material removal).


Parameter

Description

Unit

TC 

Name of the swivel data set
Note: The selection box only appears if more than one swivel data set has been set 

up.


Retraction
(for ShopMill pro‐

gram)

● No

The axis is not retracted before swiveling.

● Z

Retraction in the direction of machine axis Z.

● Z,X,Y

Move machining axes to retraction position before swiveling.

● Tool direction, max.

Maximum retraction (up to the software end position) in the tool direction.

● Tool direction, inc.

Incremental retraction (specified retraction distance, up to the software end 
position) in the tool direction.

When retracting in the tool direction, in the swiveled machine state, several axes can 

move (traverse).


Programming technological functions (cycles)

10.5 Contour turning - Milling/turning machine

Milling

Operating Manual, 08/2018, 6FC5398-7CP41-0BA0

591

Summary of Contents for SINUMERIK 828D Turning

Page 1: ...undamental safety instructions 1 Introduction 2 Multitouch operation with SINUMERIK Operate 3 Setting up the machine 4 Execution in manual mode 5 Machining the workpiece 6 Simulating machining 7 Generating a G code program 8 Creating a ShopMill program 9 Programming technological functions cycles 10 Multi channel view 11 Collision avoidance 12 Tool management 13 Managing programs 14 Alarm error an...

Page 2: ...Siemens AG Division Digital Factory Postfach 48 48 90026 NÜRNBERG GERMANY Document order number 6FC5398 7CP41 0BA0 Ⓟ 07 2018 Subject to change Copyright Siemens AG 2008 2018 All rights reserved ...

Page 3: ...perating Manual Continued Working with Manual Machine 16 Teaching in a program 17 HT 8 840D sl only 18 Ctrl Energy 19 Easy Message 828D only 20 Easy Extend 21 Service Planner 828D only 22 Edit PLC user program 828D only 23 Appendix A ...

Page 4: ...ose who based on their training and experience are capable of identifying risks and avoiding potential hazards when working with these products systems Proper use of Siemens products Note the following WARNING Siemens products may only be used for the applications described in the catalog and in the relevant technical documentation If products and components from other manufacturers are used these...

Page 5: ...ail to the following address mailto docu motioncontrol siemens com mySupport Documentation At the following address https support industry siemens com My ww en documentation you can find information on how to create your own individual documentation based on Siemens content and adapt it for your own machine documentation Training At the following address http www siemens com sitrain you can find i...

Page 6: ...tion does not contain all detailed information about all types of the product and cannot cover every conceivable case of installation operation or maintenance Terms The meanings of some basic terms used in this documentation are given below Program A program is a sequence of instructions to the CNC which combine to produce a specific workpiece on the machine Contour The term contour refers general...

Page 7: ...y 47 2 4 6 Operation via softkeys and buttons 49 2 4 7 Entering or selecting parameters 50 2 4 8 Pocket calculator 52 2 4 9 Pocket calculator functions 53 2 4 10 Context menu 55 2 4 11 Changing the user interface language 55 2 4 12 Entering Chinese characters 56 2 4 12 1 Function input editor 56 2 4 12 2 Entering Asian characters 57 2 4 12 3 Editing the dictionary 59 2 4 13 Entering Korean charact...

Page 8: ...eement 91 4 3 Operating modes 93 4 3 1 General 93 4 3 2 Modes groups and channels 94 4 3 3 Channel switchover 95 4 4 Settings for the machine 96 4 4 1 Switching over the coordinate system MCS WCS 96 4 4 2 Switching the unit of measurement 96 4 4 3 Setting the zero offset 98 4 5 Measure tool 100 4 5 1 Overview 100 4 5 2 Manually measuring drilling and milling tools 100 4 5 3 Measuring drilling and ...

Page 9: ...g settable zero offset 149 4 8 5 Displaying and editing details of the zero offsets 149 4 8 6 Deleting a zero offset 151 4 8 7 Measuring the workpiece zero 152 4 9 Monitoring axis and spindle data 153 4 9 1 Specify working area limitations 153 4 9 2 Editing spindle data 153 4 10 Displaying setting data lists 155 4 11 Handwheel assignment 156 4 12 MDA 158 4 12 1 Loading an MDA program from the Prog...

Page 10: ...nt as search target 203 6 7 5 Entering the search target via search pointer 203 6 7 6 Parameters for block search in the search pointer 204 6 7 7 Block search mode 205 6 7 8 Block search to a position pattern for ShopMill programs 207 6 8 Controlling the program run 209 6 8 1 Program control 209 6 8 2 Skip blocks 210 6 9 Overstore 212 6 10 Editing a program 214 6 10 1 Searching in programs 214 6 1...

Page 11: ...ns 251 6 13 3 G functions for mold making 251 6 13 4 Auxiliary functions 252 6 14 Displaying superimpositions 254 6 15 Mold making view 257 6 15 1 Overview 257 6 15 2 Starting the mold making view 259 6 15 3 Adapting the mold making view 259 6 15 4 Specifically jump to the program block 260 6 15 5 Searching for program blocks 261 6 15 6 Changing the view 262 6 15 6 1 Enlarging or reducing the grap...

Page 12: ...hining planes 301 8 4 2 Current planes in cycles and input screens 301 8 4 3 Programming a tool T 302 8 5 Generating a G code program 303 8 6 Blank input 304 8 7 Machining plane milling direction retraction plane safe clearance and feedrate PL RP SC F 306 8 8 Selection of the cycles via softkey 307 8 9 Calling technology functions 311 8 9 1 Hiding cycle parameters 311 8 9 2 Setting data for cycles...

Page 13: ...ort 352 9 17 Measuring cycle support 353 9 18 Example standard machining 354 9 18 1 Workpiece drawing 355 9 18 2 Programming 355 9 18 3 Results simulation test 366 9 18 4 G code machining program 368 10 Programming technological functions cycles 371 10 1 Drilling 371 10 1 1 General 371 10 1 2 Centering CYCLE81 372 10 1 3 Drilling CYCLE82 374 10 1 4 Reaming CYCLE85 377 10 1 5 Deep hole drilling 1 C...

Page 14: ...01 10 3 11 Residual material contour pocket CYCLE63 506 10 3 12 Milling contour spigot CYCLE63 507 10 3 13 Residual material contour spigot CYCLE63 511 10 4 Turning milling turning machine 514 10 4 1 General 514 10 4 2 Stock removal CYCLE951 514 10 4 3 Groove CYCLE930 518 10 4 4 Undercut form E and F CYCLE940 523 10 4 5 Thread undercut CYCLE940 529 10 4 6 Thread turning CYCLE99 only for G code 534...

Page 15: ...ates 666 10 7 13 Straight polar 667 10 7 14 Circle polar 668 10 7 15 Obstacle 669 11 Multi channel view 671 11 1 Multi channel view 671 11 2 Multi channel view in the Machine operating area 672 11 3 Multi channel view for large operator panels 675 11 4 Setting the multi channel view 677 12 Collision avoidance 679 12 1 Activate collision avoidance 681 12 2 Set collision avoidance 682 13 Tool manage...

Page 16: ...itool 738 13 16 3 Equipping multitool with tools 740 13 16 4 Removing a tool from multitool 741 13 16 5 Deleting multitool 742 13 16 6 Loading and unloading multitool 742 13 16 7 Reactivating the multitool 743 13 16 8 Relocating a multitool 744 13 16 9 Positioning a multitool 745 14 Managing programs 747 14 1 Overview 747 14 1 1 NC memory 750 14 1 2 Local drive 750 14 1 3 USB drives 752 14 1 4 FTP...

Page 17: ...g in an archive in the Program Manager 791 14 16 4 Read in archive from system data 792 14 17 Setup data 794 14 17 1 Backing up setup data 794 14 17 2 Reading in set up data 796 14 18 Backing up parameters 798 14 19 RS 232 C 801 14 19 1 Reading in and reading out archives via a serial interface 801 14 19 2 Setting V24 in the program manager 803 14 20 Multiple clamping 805 14 20 1 Multiple clamping...

Page 18: ...lar machining 839 16 6 3 1 Straight milling 839 16 6 3 2 Circular milling 840 16 7 More complex machining 842 16 7 1 Drilling with Manual Machine 843 16 7 2 Milling with Manual Machine 844 16 7 3 Contour milling with manual machine 845 16 7 4 Turning with manual machine milling turning machine 845 16 8 Simulation and simultaneous recording 847 17 Teaching in a program 849 17 1 Overview 849 17 2 Ge...

Page 19: ...surement of the energy consumption 877 19 3 Ctrl E profiles 879 19 3 1 Using the energy saving profile 879 20 Easy Message 828D only 881 20 1 Overview 881 20 2 Activating Easy Message 882 20 3 Creating editing a user profile 883 20 4 Setting up events 885 20 5 Logging an active user on and off 887 20 6 Displaying SMS logs 888 20 7 Making settings for Easy Message 889 21 Easy Extend 891 21 1 Overvi...

Page 20: ...ying and editing the program block 911 23 5 7 2 Displaying local variable table 912 23 5 7 3 Creating a program block 912 23 5 7 4 Opening a program block in the window 914 23 5 7 5 Displaying canceling the access protection 914 23 5 7 6 Editing block properties subsequently 915 23 5 8 Editing a program block 915 23 5 8 1 Editing the PLC user program 915 23 5 8 2 Editing a program block 916 23 5 8...

Page 21: ...ructions given in the hardware documentation Consider the residual risks for the risk evaluation WARNING Malfunctions of the machine as a result of incorrect or changed parameter settings As a result of incorrect or changed parameterization machines can malfunction which in turn can lead to injuries or death Protect the parameterization parameter assignments against unauthorized access Handle poss...

Page 22: ...tions but are only intended to provide support for typical tasks As the user you yourself are responsible for ensuring that the products described are operated correctly Application examples do not relieve you of your responsibility for safe handling when using installing operating and maintaining the equipment Fundamental safety instructions 1 2 Warranty and liability for application examples Mil...

Page 23: ...s and or network segmentation are in place For additional information on industrial security measures that may be implemented please visit Industrial security http www siemens com industrialsecurity Siemens products and solutions undergo continuous development to make them more secure Siemens strongly recommends that product updates are applied as soon as they are available and that the latest pro...

Page 24: ...olistic state of the art industrial security concept for the installation or machine Make sure that you include all installed products into the holistic industrial security concept Protect files stored on exchangeable storage media from malicious software by with suitable protection measures e g virus scanners Protect the drive against unauthorized changes by activating the know how protection dri...

Page 25: ...Manage tools zero points and further user data required in programs Diagnose control system and machine Operating areas The basic functions are grouped in the following operating areas in the control HFXWH SDUW SURJUDP PDQXDO FRQWURO GLWLQJ GDWD IRU SURJUDPV 7RRO PDQDJHPHQW UHDWLQJ DQG DGDSWLQJ SDUW SURJUDPV FFHVV WR LQWHUQDO DQG H WHUQDO GDWD PHGLD ODUP GLVSOD VHUYLFH GLVSOD GDSWLQJ WKH 1 GDWD DW...

Page 26: ... of the SINUMERIK Operate user interface use the operator panel front In this example the OP 010 operator panel front is used to illustrate the components that are available for operating the controller and machine tool Introduction 2 2 Operator panel fronts Milling 26 Operating Manual 08 2018 6FC5398 7CP41 0BA0 ...

Page 27: ... pressed you activate the special characters on keys with double assign ments 3 Control key group 4 Hotkey group 5 Cursor key group 6 USB interface 7 Menu select key 8 Menu forward button 9 Machine area button 10 Menu back key 11 Softkeys Figure 2 1 View of OP 010 operator panel front References A more precise description as well as a view of the other operator panel fronts that can be used may be...

Page 28: ...ction lists and in selection fields Moves the cursor to the beginning of a text on USB keyboards use the Home or Pos 1 key NEXT WINDOW SHIFT Selects the first entry in selection lists and in selection fields Moves the cursor to the beginning of a text Selects a contiguous selection from the current cursor position up to the target position Selects a contiguous selection from the current cursor pos...

Page 29: ...m editor from the cursor position selects directories or program blocks up to the end of the window PAGE DOWN CTRL Positions the cursor to the lowest line of a window Cursor right Editing box Opens a directory or program e g cycle in the editor Navigation Moves the cursor further to the right by one character Cursor right CTRL Editing box Moves the cursor further to the right by one word Navigatio...

Page 30: ...he table Moves the cursor to the end of a window Simulation Reduces the override Cursor down SHIFT In the program manager and in the program editor selects a contig uous selection of directories and program blocks SELECT Switches between several specified options in selection lists and in selection boxes Activates checkboxes In the program editor and in the program manager selects a program block ...

Page 31: ...of the cursor Navigation Deletes all of the selected characters to the left of the cursor TAB In the program editor indents the cursor by one character In the program manager moves the cursor to the next entry to the right TAB SHIFT In the program editor indents the cursor by one character In the program manager moves the cursor to the next entry to the left TAB CTRL In the program editor indents ...

Page 32: ...all installed languages one after the other CTRL SHIFT L Scrolls the actual user interface through all installed languages in the inverse sequence CTRL M Selects the maximum feedrate of 120 during the simulation CTRL P Generates a screenshot from the actual user interface and saves it as file CTRL S Switches the single block in or out in the simulation CTRL V Pastes text from the clipboard at the ...

Page 33: ...ufacturer s specifications CTRL ALT D Backs up the log files on the USB FlashDrive If a USB FlashDrive is not inserted then the files are backed up in the manufacturer s area of the CF card SHIFT ALT D Backs up the log files on the USB FlashDrive If a USB FlashDrive is not inserted then the files are backed up in the manufacturer s area of the CF card SHIFT ALT T Starts HMI Trace SHIFT ALT T Exits...

Page 34: ...s Asterisk Opens a directory with all of the subdirectories Tilde Changes the sign of a number between plus and minus INSERT Opens an editing window in the insert mode Pressing the key again exits the window and the entries are undone Opens a selection box and shows the selection possibilities In the machining step program enters an empty line for G code Changes into the double editor or into the ...

Page 35: ...the operating mode You can return to the edit mode by pressing the key again ALARM only OP 010 and OP 010C Calls the Diagnosis operating area PROGRAM only OP 010 and OP 010C Calls the Program Manager operating area OFFSET only OP 010 and OP 010C Calls the Parameter operating area PROGRAM MANAGER only OP 010 and OP 010C Calls the Program Manager operating area Menu forward key Advances in the exten...

Page 36: ...e control panel is used to illustrate the operator controls and displays of a Siemens machine control panel Overview 1 EMERGENCY STOP button 2 Installation locations for control devices d 16 mm 3 RESET 4 Program control 5 Operating modes machine functions 6 User keys T1 to T15 7 Traversing axes with rapid traverse override and coordinate switchover 8 Spindle control with override switch 9 Feed con...

Page 37: ...CK control remains synchronized with the machine It is in its initial state and ready for a new program run Cancel alarm Program control SINGLE BLOCK Single block mode on off CYCLE START The key is also referred to as NC Start Execution of a program is started CYCLE STOP The key is also referred to as NC Stop Execution of a program is stopped Operating modes machine functions JOG Select JOG mode T...

Page 38: ...raversing axes with rapid traverse override and coordinate switchover Axis keys Selects an axis Direction keys Select the traversing direction RAPID Traverse axis in rapid traverse while pressing the direction key WCS MCS Switches between the workpiece coordinate system WCS and machine coordinate system MCS Spindle control with override switch SPINDLE STOP Stop spindle SPINDLE START Spindle is ena...

Page 39: ...running program and shuts down axis drives FEED START Enable for program execution in the current block and enable for ramp up to the feedrate value specified by the program Introduction 2 3 Machine control panels Milling Operating Manual 08 2018 6FC5398 7CP41 0BA0 39 ...

Page 40: ...y for Active tool T Current feedrate F Active spindle with current status S Spindle utilization rate in percent Name of the active tool holder with display of a rotation in space and plane Name of the active kinematic transformation 5 Vertical softkey bar Introduction 2 4 User interface Milling 40 Operating Manual 08 2018 6FC5398 7CP41 0BA0 ...

Page 41: ...tatus display is made up of three lines in the Machine operating area Small status display In the Parameter Program Program Manager Diagnosis and Start up operating areas the status display consists of the first line from the large display Status display of Machine operating area First line Ctrl Energy Power rating display Display Description The machine is not productive The machine is productive...

Page 42: ... a red background The associated alarm text is shown in red lettering An arrow indicates that several alarms are active An acknowledgment symbol indicates that the alarm can be ac knowledged or canceled NC or PLC message Message numbers and texts are shown in black lettering An arrow indicates that several messages are active Messages from NC programs do not have numbers and appear in green letter...

Page 43: ...Dry run feedrate RG0 reduced rapid traverse M01 programmed stop 1 M101 programmed stop 2 name varies SB1 Single block coarse program stops only after blocks which perform a machine function SB2 Data block program stops after each block SB3 Single block fine program also only stops after blocks which perform a machine function in cycles Channel operational messages Stop An operator action is usuall...

Page 44: ... the system when machining and are then reset again By using the SZS coordinate system jumps into the actual value display are avoided that would otherwise be caused by the additional components Machine manufacturer Please refer to the machine manufacturer s specifications Maximize display Press the and Zoom act val softkeys Display overview Display Meaning Header columns Work Machine Display of a...

Page 45: ...o Overview Page 113 Zero offsets Page 145 2 4 4 T F S window The most important data concerning the current tool the feedrate path feed or axis feed in JOG and the spindle is displayed in the T F S window In addition to the T F S window name the following information is also displayed Display Meaning BC example Name of the tool carrier Turning example Name of the active kinematic transformation Ac...

Page 46: ... tool Z Z value of the current tool X X value of the current tool Feed data Display Meaning F Feed disable Actual feed value If several axes traverse is displayed for JOG mode Axis feed for the traversing axis MDA and AUTO mode Programmed axis feed Rapid traverse G0 is active 0 000 No feed is active Override Display as a percentage Spindle data Display Meaning S S1 Spindle selection identification...

Page 47: ... blocks currently being executed Display of current program The following information is displayed in the running program The workpiece name or program name is entered in the header line The program block which is just being processed appears colored Display of the machining times If you set that the machining times are to be recorded in the settings for automatic mode the measured times are shown...

Page 48: ...mmand Blue green font G2 or G3 motion command Gray font Comment Machine manufacturer You can define further highlight colors in the sleditorwidget ini configuration file Please refer to the machine manufacturer s instructions Editing a program directly In the Reset state you can edit the current program directly 1 Press the INSERT key 2 Place the cursor at the relevant position and edit the progra...

Page 49: ...oftkey bar You can call the Machine operating area directly using the key on the operator panel Press the MACHINE key to select the machine operating area Changing the operating mode You can select a mode or submode directly using the keys on the machine control panel or using the vertical softkeys in the main menu General keys and softkeys When the symbol appears to the right of the dialog line o...

Page 50: ...on on the status of the entry field Orange background The input field is selected Light orange background The input field is in edit mode Pink background The entered value is incorrect Selecting parameters Some parameters require you to select from a number of options in the input field Fields of this type do not allow you to type in a value The selection symbol is displayed in the tooltip Associa...

Page 51: ...f the calculator Function calls of the calculator are not available in the parameter screens of the cycles and functions in the Program operating area Press the INSERT key The insert mode is activated You can navigate within the input field using the Cursor left and Cursor right keys Use the BACKSPACE and DEL key to delete individual characters Enter the value or the calculation Close the value en...

Page 52: ...n use the calculator using the mouse Procedure 1 Position the cursor on the desired entry field 2 Press the key The calculator is displayed 3 Press the min key if you would like to work with the standard calculator OR Press the extend key to switch to the extended view 4 Input the arithmetic statement You can use functions arithmetic symbols numbers and commas 5 Press the equals symbol on the calc...

Page 53: ...ment Delete all entries Clear Nesting functions Various possibilities are available for the nesting of functions as follows Position the cursor within the bracket of the function call and supplement the argument with an additional function Highlight the expression which is to be used as an argument in the entry line and then press the desired function key Percentage calculation The calculator supp...

Page 54: ...y for the desired trigonometric function e g SIN Enter the numerical value Further mathematical functions Press the keys in the specified order Square number Num ber Square root Num ber Exponential function Base number Exponent Residue class calculation Number Divider Absolute value Num ber Integer component Num ber Conversion between millimeters and inches 1 Enter the numerical value 2 Press the ...

Page 55: ...Ctrl C Paste Paste Ctrl V Program editor Additional functions are available in the editor Undo the last change Undo Ctrl Z Redo the changes that were undone Redo Ctrl Y Up to 50 changes can be undone 2 4 11 Changing the user interface language Procedure 1 Select the Start up operating area 2 Press the Change language softkey The Language selection window opens The language set last is selec ted 3 ...

Page 56: ...put editor can only be called there where it is permissible to enter Asian characters The editor is available for the following Asian languages Simplified Chinese Traditional Chinese Input types Input type Description Pinyin input Latin letters are combined phonetically to denote the sound of the character The editor lists all of the characters from the dictionary that can be selected Zhuyin input...

Page 57: ...pplied can be expanded If you enter new phonetic notations the editor creates a new line The entered phonetic notation is broken down into known phonetic notations Select the associated character for each component The compiled characters are displayed in the additional line Accept the new word into the dictionary and into the input field by pressing the Input key Using any Unicode editor you can ...

Page 58: ...y with which it is selected for a specific phonetic notation and offers this character at the top of the list when the editor is next opened Editing characters using the Zhuyin method only traditional Chinese 1 Open the screen form and position the cursor on the input field Press the Alt S keys The editor is displayed 2 Enter the desired phonetic notation using the numerical block Each number is a...

Page 59: ... 3 Repeat step 2 until the complete phonetic notation has been compiled Press the TAB key to toggle between the compiled phonetic notation field and the phonetic notation input Compiled characters are deleted using the BACKSPACE key 4 Press the input key to transfer the compiled phonetic notation to the dictionary and the input field Importing a dictionary A dictionary can now be generated using a...

Page 60: ...lled the next time it enters the content of the dictionary into the system dictionary Example 2 4 13 Entering Korean characters You can enter Korean characters in the input fields on classic panels without touch operation using the input editor IME Input Method Editor Note You require a special keyboard to enter Korean characters If this is not available then you can enter the characters using a m...

Page 61: ...WERTY keyboard and individual events must be grouped together to form syllables Structure of the editor Functions Editing characters using a matrix Editing characters using the keyboard Entering Korean characters Entering Latin letters Precondition The control has been switched over to Korean Introduction 2 4 User interface Milling Operating Manual 08 2018 6FC5398 7CP41 0BA0 61 ...

Page 62: ... a matrix 1 Open the screen form and position the cursor on the input field Press the Alt S keys The editor is displayed 2 Switch to the Keyboard Matrix selection box 3 Select the matrix 4 Switch to the function selection box 5 Select Korean character input 6 Enter the number of the line in which the required character is located The line is highlighted in color 7 Enter the number of the column in...

Page 63: ...setting Tool offsets Work offsets Setting data Program creation program editing Note Configuring access levels for softkeys You have the option of providing softkeys with protection levels or completely hiding them References For additional information please refer to the following documentation SINUMERIK Operate Commissioning Manual Softkeys Machine operating area Protection level End user protec...

Page 64: ...r protection level 3 End user protection level 3 2 4 15 Online help in SINUMERIK Operate A comprehensive context sensitive online help is stored in the control system A brief description is provided for each window and if required step by step instructions for the operating sequences A detailed help is provided in the editor for every entered G code You can also display all G functions and take ov...

Page 65: ...tion the cursor on the desired link and press the Follow reference softkey The selected help page is displayed 5 Press the Back to reference softkey to jump back to the previous help Calling a topic in the table of contents 1 Press the Table of contents softkey Depending on which technology you are using the Operating Manuals Operator control Milling Operator control Turning or Operator control Un...

Page 66: ... to display the index of the operating and programming manual Displaying alarm descriptions and machine data 1 If messages or alarms are pending in the Alarms Messages or Alarm Log window position the cursor at the appropriate display and press HELP or key F12 The associated alarm description is displayed 2 If you are in the Start up operating area in the windows for the display of the machine set...

Page 67: ...unction is taken into the program at the cursor position 5 Press the Exit help softkey again to close the help See also Additional functions in the input screens Page 313 Introduction 2 4 User interface Milling Operating Manual 08 2018 6FC5398 7CP41 0BA0 67 ...

Page 68: ...Introduction 2 4 User interface Milling 68 Operating Manual 08 2018 6FC5398 7CP41 0BA0 ...

Page 69: ...r panel fronts and SINUMERIK controllers can be operated with the SINUMERIK Operate Generation 2 user interface OP 015 black OP 019 black PPU 290 3 Literature Further information on the subject of user interface is available in the following literature SINUMERIK Operate Commissioning Manual IM9 840D sl SINUMERIK Operate Commissioning Manual IH9 828D Further information on multitouch panels is avai...

Page 70: ...sitive glass user interface on the Operator panel optimally with the following gloves Dermatril L Camatril Velours type 730 Uvex Profas Profi ENB 20A Camapur Comfort Antistatic type 625 Carex type 1505 k leather Reusable gloves medium white cotton BM Polyco RS order number 562 952 Thicker work gloves Thermoplus KCL type 955 KCL Men at Work type 301 Camapur Comfort type 619 Comasec PU 4342 Multitou...

Page 71: ...cally with one finger Scroll in lists e g programs tools zero points Scroll in files e g NC program Flick vertically with two fingers Page scroll in lists e g ZO Page scroll in files e g NC programs Flick vertically with three fingers Scroll to the start or end of lists Scroll to the start or end of files Multitouch operation with SINUMERIK Operate 3 3 Finger gestures Milling Operating Manual 08 2...

Page 72: ...ing view Pan with one finger Move graphic contents e g simulation mold making view Move list contents Pan with two fingers Rotate graphic contents e g simulation mold making view Tap and hold Open input fields to change Activate or deactivate edit mode e g current block display Multitouch operation with SINUMERIK Operate 3 3 Finger gestures Milling 72 Operating Manual 08 2018 6FC5398 7CP41 0BA0 ...

Page 73: ... right and left hand corners to open the TCU menu The menu has to be opened for service purposes Note Flicking gestures with several fingers The gestures only function reliably if you hold your fingers sufficiently far apart The fingers should be at least 1 cm apart Multitouch operation with SINUMERIK Operate 3 3 Finger gestures Milling Operating Manual 08 2018 6FC5398 7CP41 0BA0 73 ...

Page 74: ...3 4 2 Function key block Operator control Function Switch operating area Tap the current operating area and select the desired operating area from the operating area bar Switch operating mode The operating mode is only displayed To switch the operating mode tap the operating area and select the operating area from the vertical softkey bar Multitouch operation with SINUMERIK Operate 3 4 Multitouch ...

Page 75: ...ine help Camera Generates a screenshot 3 4 3 Further operator touch controls Operator control Function Advances to the next horizontal softkey bar When page 2 of the menu is called the arrow appears on the right Advances to the higher level menu Advances to the next vertical softkey bar Tapping the Cancel alarm symbol clears all queued cancel alarms If a channel menu has been configured it is disp...

Page 76: ...ed the icon of a minimized keyboard appears in place of the virtual keyboard Use the icon to open the virtual keyboard again 3 4 5 Special tilde character If the shift key for letters and special characters is pressed the keyboard assignment changes to the special characters Tilde In the Editor or in alphanumeric input fields the special character Tilde is entered with the Tilde key In numerical i...

Page 77: ...descreen format multitouch panel e g OP 015 black is required to display widgets and pages It is only possible to activate and configure a sidescreen when using the SINUMERIK Operate Generation 2 user interface References For information on activating the sidescreen and to configure the virtual keys refer to the following literature SINUMERIK Operate IM9 SINUMERIK 840D sl Commissioning Manual 3 5 ...

Page 78: ...ow in the Parameter operating area Opens the Program operating area Opens the Program manager operating area Opens the Diagnostics operating area Opens the Commissioning operating area Hides the sidescreen Shows the sidescreen Multitouch operation with SINUMERIK Operate 3 5 Expansion with side screen Milling 78 Operating Manual 08 2018 6FC5398 7CP41 0BA0 ...

Page 79: ...ertically with 1 finger OR To return to the end or to the beginning of the list of widgets swipe vertically with 3 fingers Open widgets To open a widget tap the header line of the widget 3 5 4 Actual value widget The widget contains the position of the axes in the displayed coordinate system The distance to go for the current NC block is displayed while a program is running Multitouch operation wi...

Page 80: ...tion are displayed for every alarm An acknowledgment symbol indicates how the alarm is acknowledged or canceled Vertical scrolling is possible if multiple alarms are pending Wipe horizontally to switch between alarms and messages 3 5 7 Axle load widget The widget shows the load on all axles in a bar chart Up to 6 axes are displayed Vertical scrolling is possible if multiple axes are present Multit...

Page 81: ...hat were made in the individual tool directions 3 5 9 Service life widget The widget displays the tool monitoring in relation to the following values Operating time of tool standard time monitoring Finished workpieces quantity monitoring Tool wear wear monitoring Note Multiple cutting edges If a tool has multiple cutting edges the values of the edge with the lowest residual service life quantity a...

Page 82: ...d widgets but also pages with ABC keyboards and machine control panels can be configured in the sidescreen of a multitouch panel Configure ABC keyboard and MCP If you configured ABC keyboard and MCP keys then the navigation bar is extended for the sidescreen Operator control Function Display of standard widgets in the sidescreen Display of an ABC keyboard on the sidescreen Display of a machine con...

Page 83: ...xample 1 ABC keyboard in the sidescreen ABC keyboard Key to display the keyboard Multitouch operation with SINUMERIK Operate 3 5 Expansion with side screen Milling Operating Manual 08 2018 6FC5398 7CP41 0BA0 83 ...

Page 84: ... control panel in the sidescreen Machine control panel Key to display the machine control panel Multitouch operation with SINUMERIK Operate 3 5 Expansion with side screen Milling 84 Operating Manual 08 2018 6FC5398 7CP41 0BA0 ...

Page 85: ...ions are provided in the various areas Software option The option P81 SINUMERIK Operate Display Manager is required for the SINUMERIK Operate Display Manager function References For further information on the activation and configuration of the Display Manager please refer to SINUMERIK Operate IM9 SINUMERIK 840D sl Commissioning Manual For further information on Full HD Panels please refer to Oper...

Page 86: ...dgets Display area for applications e g PDF 3 6 3 Operator controls The Display Manager is activated Operator control Function Menu Tap on the menu to select the desired arrangement of the display areas 3 display areas SINUMERIK Operate with function block Widget area Applications area PDF virtual keyboard Multitouch operation with SINUMERIK Operate 3 6 SINUMERIK Operate Display Manager 840D sl on...

Page 87: ... Page 82 Service life Page 81 PDF Opens the PDF stored here Virtual keyboard Displays a QWERTY keyboard in the display area for applications as well as in the 4th display area below SINUMERIK Operate If the virtual keyboard is selected while the maximum representation of the display area is active the keyboard opens as a pop up The keyboard can be moved as required on the display by means of touch...

Page 88: ...tions are reduced back to their original size Machine Control Panel Shows a machine control panel Note Please observe the information provided by the machine manufacturer Multitouch operation with SINUMERIK Operate 3 6 SINUMERIK Operate Display Manager 840D sl only Milling 88 Operating Manual 08 2018 6FC5398 7CP41 0BA0 ...

Page 89: ...s up the main screen opens according to the operating mode specified by the machine manufacturer In general this is the main screen for the REF POINT submode Machine manufacturer Please refer to the machine manufacturer s specifications Milling Operating Manual 08 2018 6FC5398 7CP41 0BA0 89 ...

Page 90: ...ition from where they can approach the reference point without a collision The axes can also all approach the reference point simultaneously depending on the manufacturer s settings Machine manufacturer Please refer to the machine manufacturer s specifications NOTICE Risk of collision If the axes are not in a collision free position you must first traverse them to safe positions in JOG or MDI mode...

Page 91: ...ayed position of an axis corresponds to its actual position on the machine when you reference an axis Your confirmation is the requirement for the availability of other Safety Integrated functions You can only give your user agreement for an axis after it has approached the reference point The displayed axis position always refers to the machine coordinate system Machine Option User agreement with...

Page 92: ...knowledgement field for the axis in ques tion 7 Activate the acknowledgement with the SELECT key The selected axis is marked with an x meaning safely referenced in the Acknowledgement column By pressing the SELECT key again you deactivate the acknowl edgement again Setting up the machine 4 2 Approaching a reference point Milling 92 Operating Manual 08 2018 6FC5398 7CP41 0BA0 ...

Page 93: ... mode The REF POINT operating mode is used to synchronize the control and the machine For this purpose you approach the reference point in JOG mode Selecting REF POINT Press the REF POINT key REPOS operating mode The REPOS operating mode is used for repositioning to a defined position After a program interruption e g to correct tool wear values move the tool away from the contour in JOG mode The d...

Page 94: ...and MDI operating modes There you may create edit and execute part programs main programs or subroutines for motional sequences or simple workpieces by approaching and saving positions Selecting Teach In Press the TEACH IN key 4 3 2 Modes groups and channels Every channel behaves like an independent NC A maximum of one part program can be processed per channel Control with 1channel One mode group ...

Page 95: ...me different operating modes 4 3 3 Channel switchover It is possible to switch between channels when several are in use Since individual channels may be assigned to different mode groups a channel switchover command is also an implicit mode switchover command When a channel menu is available all of the channels are displayed on softkeys and can be switched over Changing the channel Press the CHANN...

Page 96: ...Press the JOG or AUTO key 3 Press the Act vls MCS softkey The machine coordinate system is selected The title of the actual value window changes in the MCS Machine manufacturer The softkey to changeover the coordinate system can be hidden Please refer to the machine manufacturer s specifications 4 4 2 Switching the unit of measurement You can set millimeters or inches as the unit of measurement fo...

Page 97: ...s Setpoint Actual Value System Closed Loop Control G2 Section Metric inch dimension system Procedure 1 Select the mode JOG or AUTO in the Machine operating area 2 Press the menu forward key and the Settings softkey A new vertical softkey bar appears 3 Press the Switch to inch softkey A prompt asks you whether you really want to switch over the unit of measurement 4 Press the OK softkey The softkey...

Page 98: ...as no effect on the axis positions and the active zero offset Resetting the relative actual value Press the Delete REL softkey The actual values are deleted The softkeys to set the zero point in the relative coordinate system are only available if the corresponding machine data is set Machine manufacturer Please refer to the machine manufacturer s specifications Precondition The controller is in t...

Page 99: ...th the cursor keys and press the Input key to confirm the entries OR Press softkeys X 0 Y 0 or Z 0 to set the relevant position to zero OR Press softkey X Y Z 0 to set all axis positions to zero simultaneously Resetting the actual value Press the Delete active ZO softkey The offset is deleted permanently Note Irreversible active zero offset The current active zero offset is irreversibly deleted by...

Page 100: ... either manually or automatically using a tool probe Machine manufacturer Please refer to the machine manufacturer s specifications Logging the measurement result After you have completed the measurement you have the option to output the displayed values in a log You can define whether the log file that is generated is continually written to for each new measurement or is overwritten See also Logg...

Page 101: ...eclare the position of the fixed point before the measurement 4 5 3 Measuring drilling and milling tools with the workpiece reference point Procedure 1 Insert the tool you want to measure in the spindle 2 Select JOG mode in the Machine operating area 3 Press the Meas tool and Length manual softkeys The Length Manual window opens 4 Select the cutting edge number D and the number of the replacement ...

Page 102: ...tool and press the In Manual softkey You return to the Length Manual window 5 Select the cutting edge number D and the number of the replacement tool ST of the tool 6 Select the fixed point reference point 7 If you are measuring with a test socket enter 0 for offset value DZ and approach the fixed point in the Z direction Approaching is performed with a rotating spindle in the opposite direction o...

Page 103: ...perating area 2 Press the Meas tool softkey 3 Press the Radius manual or Diam manual softkey 4 Select the cutting edge number D and the the number of the replacement tool ST 5 Approach the workpiece in the X or Y direction and perform scratching with the spindle rotating in the opposite direction 6 Specify the setpoint position X0 or Y0 of the workpiece edge 7 Press the Set radius or Set diam soft...

Page 104: ...ine manufacturer Please refer to the machine manufacturer s specifications Procedure 1 Traverse the tool or spindle to the fixed point 2 Press the Measure tool softkey in the JOG mode 3 Press the Calibrate fixed point softkey 4 Enter a correction value for DZ If you have used a distance gauge enter the thickness of the plate used 5 Press the Calibrate softkey 6 The distance between machine zero an...

Page 105: ...ications Tool offset Some tool types require an offset for correct length measurement The following settings are available Auto With a tool that is larger than the probe the tool edge is set on the center of the probe You can specify an offset correction in the ΔV input field Select the direction and axis in the adjacent selection field Yes The tool edge is positioned centrally on the probe You ca...

Page 106: ...ol 5 Select the cutting edge number D and the number of the replacement tool ST 6 If you wish to check the cutting edges of the milling tool then click Yes under Check teeth individually 7 If you require a tool offset select Yes or Auto in Tool offset 8 Enter the tool offset ΔV and select the direction and the axis 9 Press the CYCLE START key This starts the automatic measuring process When you me...

Page 107: ...ve the option to calibrate the tool probe with rotation This entails more exact calibration values of the tool probe and thus more exact measuring values During calibration the probe is withdrawn after the first probing the spindle is rotated by 180 and probing repeated A mean value of two values is then determined and entered Note Setting the protection level The Calibrate probe function is only ...

Page 108: ...rence point Reference point The workpiece edge is used as the reference point when measuring length X and length Z The chuck of the main or counterspindle can also be used when measuring in the Z direction You specify the position of the workpiece edge during the measurement Note Milling turning machines with a B axis only 840D sl For milling turning machines with a B axis execute the tool change ...

Page 109: ...ameter are auto matically taken into consideration as well Note Tool measurement is only possible with an active tool 4 5 10 Manually measuring a turning tool using a tool probe for milling turning machine During automatic measuring you determine the tool dimensions in the X and Z axes using a probe You have the possibility of measuring a tool using a tool holder that can be oriented tool carrier ...

Page 110: ...rameterize special measuring functions for that purpose Enter the cutting edge position and the radius or diameter of the tool in the tool list before performing the actual measurement If the tool is measured using a tool carrier that can be orientated then the cutting edge position must be entered into the tool list corresponding to the initial tool carrier position Calibrate the probe first Mach...

Page 111: ... When you measure turning tools with orientable tool carrier around Y using any positions not multiples of 90 of the swivel axis then it should be taken into consideration that the turning tool is measured with the same tool position in both axes X Z assuming that this is possible 4 5 11 Logging tool measurement results After measuring a tool you have the option to output the measured values to a ...

Page 112: ...lect the measuring version and measure the tool as usual The tool data are displayed once the measurement has been completed 3 Press the Measurement log softkey to save the measurement data as log The Measurement log softkey becomes inactive again Setting up the machine 4 5 Measure tool Milling 112 Operating Manual 08 2018 6FC5398 7CP41 0BA0 ...

Page 113: ...10 712 You must calibrate the electronic workpiece probes beforehand In the case of automatic measuring first position the workpiece probe manually After starting using the CYCLE START key the workpiece probe is automatically extended to the workpiece with the measuring feedrate Retraction motion from the measuring point is realized as a function of the setting data with the rapid traverse velocit...

Page 114: ...spindle you have the possibility of measuring workpieces using electronic probes To do this you will need a 3D probe multi probe type 710 This measurement method requires that the measuring task does not require that the spindle is positioned Adapting the user interface to calibrating and measuring functions Activate the following selection options using setting data Calibration plane measurement ...

Page 115: ...cturer Please refer to the machine manufacturer s specifications References Information on user specific settings is provided in the Chapter Measuring in the JOG mode SINUMERIK Operate Commissioning Manual Selecting the measuring plane The measuring plane G17 18 19 can be selected to flexibly adapt to measuring tasks If the measuring plane selection is not activated then the measurement is perform...

Page 116: ...currently active measured value Measuring only If you only want to measure the workpiece zero the measured values are calculated and displayed without changing the coordinate system Work offset You usually store the measured workpiece zero in a work offset The HMI allows rotations and offsets to be measured Zero point The measurement values for the offsets are stored in the coarse offset and the r...

Page 117: ...r s specifications See also Logging measurement results for the workpiece zero Page 138 4 6 2 Sequence of operations To measure the workpiece zero the workpiece probe must always be located or set perpendicular to the measuring plane machining plane e g using Align plane For the measuring versions Set edge Distance 2 edges Rectangular pocket and Rectangular spigot the workpiece must first be align...

Page 118: ... measurement In that way you will ensure that the rotary axis positions match the actual coordinate system 4 6 3 Examples with manual swivel Two typical examples demonstrate the interaction and the use of Measure workpiece and Manual swivel when measuring and aligning workpieces First example The following steps are required when remachining a cylinder head with 2 holes on an inclined plane 1 Clam...

Page 119: ...ffset 3 Manual swivel With direct swiveling enter the required rotary axis positions or with axis by axis the required rotations e g Y 90 and CYCLE START 4 Measure workpiece Apply Set edge Z The measured offset in Z is converted and entered as an X value in the chosen work offset 4 6 4 Setting the edge The workpiece lies parallel to the coordinate system on the work table You measure one reference...

Page 120: ...he measurement window 5 Use the softkeys to select in which axis direction you want to approach the workpiece first 6 Select the measuring direction or you want to approach the workpiece in For Z0 the workpiece is always approached in the Z minus direction 7 In X0 Y0 or Z0 specify the setpoint position of the workpiece edge The setpoint position corresponds e g to the dimension specifications of t...

Page 121: ...cted you determine the angle to the coordinate system Distance between 2 edges The workpiece lies parallel to the coordinate system on the work table You measure distance L of two parallel workpiece edges in one of the axes X Y or Z and determine its center Requirement You can insert any tool in the spindle for scratching when measuring the workpiece zero manually OR An electronic workpiece probe ...

Page 122: ...he measurement window 6 Under Measuring axis select the axis in which you want to approach the workpiece and the measuring direction or 7 Enter the setpoint angle between the workpiece edge and the reference axis 8 Traverse the tool to the workpiece edge 9 Press the Save P1 softkey 10 Reposition the tool and repeat the measuring procedure step 7 to meas ure the second point and then press the Save...

Page 123: ...int angle The calculated rotation is stored in the correction target that you have selected 4 6 6 Measuring a corner You have the option to measure workpiece corners which are defined by a right angle 90 or any inner angle Measuring a right angled corner The workpiece corner to be measured has a 90 inner angle and is clamped to the worktable in any position By measuring 3 points you can determine ...

Page 124: ...n measuring the workpiece zero automatically Procedure 1 Select the Machine operating area and press the JOG key 2 Press the Workpiece zero softkey 3 Press the Right angled corner softkey if the workpiece has a right an gled corner OR Press the Any corner softkey if you want to measure a corner not equal to 90 OR If these softkeys are not listed press any vertical softkey with the excep tion of Se...

Page 125: ...g point are measured and stored 10 Reposition the spindle holding the tool each time approach measuring points P2 and P3 and press the Save P2 and Save P3 softkeys 11 Repeat the procedure to measure the fourth measuring point when you measure any corner 12 Press the Calculate softkey The corner point and angle α are calculated and displayed OR 13 Press the Set WO softkey The corner point now corre...

Page 126: ...d then align the workpiece Measuring a rectangular pocket The rectangular pocket must be aligned at right angles to the coordinate system By automatically measuring four points inside the pocket its length width and center point can be determined Measuring one hole The workpiece with the hole to be measured is clamped to the work table in any position In the hole four points are automatically meas...

Page 127: ...t of intersection is determined from the two lines that are obtained This point of intersection represents the new workpiece zero to be determined When an angular offset is selected the base angle of rotation α can also be determined Note Measuring only for automatic measuring If Measuring only is selected as offset target then instead of the Set WO softkey the Calculate softkey is displayed The m...

Page 128: ...the desired work offset in which you want to store the zero point OR Press the Select WO softkey to select a settable work offset In the window Work Offset G54 G599 select a work offset in which the zero point should be saved and press the In manual softkey You return to the measurement window 6 Specify the position setpoints X0 Y0 of the pocket center point or hole center point 7 Traverse the too...

Page 129: ...igot should be aligned at right angles to the coordinate system By measuring four points at the spigot you can determine the length width and center point of the spigot Please note that the straight lines between points P1 and P2 or P3 and P4 must intersect with one another in order that a measurement result is displayed Measuring one circular spigot The workpiece is located anywhere on the work t...

Page 130: ...elected the base angle of rotation α can also be determined Note Measuring only for automatic measuring If Measuring only is selected as offset target then instead of the Set WO softkey the Calculate softkey is displayed The measuring versions Rectangular spigot and 1 circular spigot are an exception For these single point measurements for Measuring only neither the Set WO softkey nor the Calculat...

Page 131: ...cular Spigot window The selection of work offsets can differ Please refer to the machine manufacturer s specifications 5 Specify the position setpoints X0 Y0 of the spigot center point P0 6 Traverse the tool to the first measuring point 7 Press the Save P1 softkey The point is measured and stored 8 Repeat steps 6 and 7 to measure and save measuring points P2 P3 and P4 9 Press the Calculate softkey...

Page 132: ... drop down list select the desired measure ment version 3 Traverse the workpiece probe to approximately the center above the rec tangular or circular spigot or for several above the first spigot to be measured 4 Specify whether you want Measurement only or in which work offset you want to store the zero point Rectangular spigot 5 Enter the infeed value in DZ to determine the measuring depth In fie...

Page 133: ...ears if you specified Yes for Angle offs OR 4 circular spigots Enter the approximate diameter of the spigot into Øspigot Enter the infeed value in DZ to determine the measuring depth In Angle offs select entry Yes if you want to align using coordinate rotation or select in Angle offs the entry No Enter the setpoint angle Enter the setpoint positions X0 and Y0 to determine the point of intersection...

Page 134: ... and displayed If you have selected Yes in Coor rot angle α is additionally calculated and displayed For Set WO the center point of the circle now corresponds to the posi tion setpoint The calculated rotation is stored in the work offset 4 spigots The spigot center points are connected diagonally and the intersection point of the two connecting lines calculated and displayed If you have selected Y...

Page 135: ...d values OR Select the desired zero offset in which you want to store the zero point e g basis reference OR Press the Select ZO softkey and select the zero offset in which the zero point is to be saved in the Zero Offset G54 G599 window and press the In manual softkey You return to the appropriate measurement window You return to the Align plane window The selection of zero offsets can differ Plea...

Page 136: ...ion The measurement versions Set edge Align edge Right angled corner 1 hole and 1 circular spigot are listed in the Measure workpiece zero in the associated vertical softkey bar You have the option of replacing these by softkeys with other measurement versions Set edge softkey The Set edge softkey cannot be assigned the softkey of another meas urement version Software option You require the Extend...

Page 137: ...his case Align plane 4 6 11 Corrections after measurement of the zero point If you store the workpiece zero in a work offset changes to the coordinate system or axis positions might be necessary in the following cases Correcting the work offset causes the workpiece coordinate system to rotate after which the tool can be aligned perpendicularly to the plane Correcting the work offset necessitates p...

Page 138: ...rotary axis and entering a feedrate Once you have measured the workpiece zero you must reposition the rotary axis Note Retract the probe to a safe position before the rotary axis should move The activation window asking whether you want to Position rotary axis X to align is displayed 1 Select Yes if you want to position the rotary axis An input field for the feedrate and the softkey Rapid traverse...

Page 139: ...tered into a log once the measurement has been fully completed Procedure 1 You are in the JOG mode and have pressed the Workpiece zero soft key The Measurement log softkey cannot be used 2 Select the required measurement version and measured the workpiece zero as usual The measured values are displayed once the measurement has been completed 3 Press the Measurement log softkey to save the measurem...

Page 140: ...Load the workpiece probe into the spindle 2 Enter the approximate length and radius or diameter in the tool data Calibration of radius diameter 3 Select the JOG mode in the Machine operating area 4 Move the workpiece probe into the hole and position it at the approximate center of the hole 5 Press the Workpiece zero and Probe calibration softkeys The window Calibration Probe is opened OR 6 Press t...

Page 141: ...ion data set number If these parameters are assigned the values saved there are displayed in the entry field Diameter of the reference piece however they can no longer be changed there Height reference piece For the entry field Height reference piece fixed values can be separately entered at parameters for each probe number calibration data set number If these parameters are assigned the values sa...

Page 142: ... reference surface 8 If you choose yes enter the upper edge of the calibration sphere in ZS if you want to calibrate the infeed axis The length of the workpiece probe is determined 9 In the Adjust tool length selection box choose no to save the deter mined length difference in the calibration data set OR Choose yes to calculate the length difference into the probe tool data Note Please observe the...

Page 143: ...h The log created is attached to the previous log Where the log is saved The log created is saved in a specified directory Procedure 1 Select the Machine operating area 2 Press the JOG key 3 Press the menu forward key and the Settings softkey 4 Press the Measurement log softkey The Settings for measurement log window is opened 5 Position the cursor to the log format field and select the required e...

Page 144: ... measurement results for the workpiece zero Page 138 Logging tool measurement results Page 111 Setting up the machine 4 7 Settings for the measurement result log Milling 144 Operating Manual 08 2018 6FC5398 7CP41 0BA0 ...

Page 145: ...displayed 7RWDO RIIVHW RUN RIIVHW FRDUVH DVLV RIIVHW RUN RIIVHW ILQH 6 6 RRUGLQDWH WUDQVIRUPDWLRQ 6 0 6 0 Figure 4 1 Zero offsets When the machine zero is not identical to the workpiece zero at least one offset base offset or zero offset exists in which the position of the workpiece zero is saved Base offset The base offset is a zero offset that is always active If you have not defined a base offs...

Page 146: ...e manufacturer s specifications Procedure 1 Select the Parameter operating area 2 Press the Zero offset softkey The Zero Offset Active window is opened Note Further details on zero offsets If you would like to see further details about the specified offsets or if you would like to change values for the rotation scaling or mirroring press the Details softkey 4 8 2 Displaying the zero offset overvie...

Page 147: ...is offsets G500 Displays the work offsets activated with G54 G599 Under certain circumstances you can change the data us ing Set WO i e you can correct a zero point that has been set Tool reference Displays the additional work offsets programmed with P_TOOLFRAME Workpiece reference Displays the additional work offsets programmed with P_WPFRAME Transformer reference Displays the additional work off...

Page 148: ...all set up axes in the Zero offset Base window Machine manufacturer Please refer to the machine manufacturer s specifications Procedure 1 Select the Parameter operating area 2 Press the Zero offset softkey 3 Press the Base softkey The Zero Offset Base window is opened 4 You can edit the values directly in the table Note Activate base offsets The offsets specified here are immediately active Settin...

Page 149: ...7 G54 G505 G54 G599 Please observe the information provided by the machine manufacturer 4 You can edit the values directly in the table Note Activate settable zero offsets The settable zero offsets must first be selected in the program before they have an impact 4 8 5 Displaying and editing details of the zero offsets For each zero offset you can display and edit all data for all axes You can also...

Page 150: ... chine Coordinate System and the Workpiece Coordinate System Machine manufacturer Please refer to the machine manufacturer s specifications Procedure 1 Select the Parameter operating area 2 Press the Zero offset softkey 3 Press the Active Base or G54 G599 softkey The corresponding window opens 4 Place the cursor on the desired zero offset to view its details 5 Press the Details softkey A window op...

Page 151: ...alue changes are available in the part program immediately or after Reset Machine manufacturer Please refer to the machine manufacturer s specifications Press the Back softkey to close the window 4 8 6 Deleting a zero offset You have the option of deleting work offsets This resets the entered values Procedure 1 Select the Parameter operating area 2 Press the Work offset softkey 3 Press the Overvie...

Page 152: ...s to be saved 3 Press the Meas workp softkey You change to the Set Edge window in the JOG mode 4 Use the softkeys to select in which axis direction you want to approach the workpiece first 5 Select the measuring direction or you want to approach the work piece in The measuring direction cannot be selected for Z0 6 In X0 Y0 or Z0 specify the setpoint position of the workpiece edge you are approachi...

Page 153: ... however only become active at the start of a new motion Procedure 1 Select the Parameter operating area 2 Press the Setting data softkey The Working Area Limitation window appears 3 Place the cursor in the required field and enter the new values via the numeric keyboard The upper or lower limit of the protection zone changes according to your inputs 4 Click the active checkbox to activate the pro...

Page 154: ...dle from accelerating to the max spindle speed of the current gear stage G96 when performing tapping operations or machining very small diameters Note The Spindle data softkey only appears if a spindle is configured Procedure 1 Select the Parameter operating area 2 Press the Setting data and Spindle data softkeys The Spindles window opens 3 If you want to change the spindle speed place the cursor ...

Page 155: ...ications Procedure 1 Select the Parameter operating area 2 Press the Setting data and Data lists softkeys The Setting Data Lists window opens 3 Press the Select data list softkey and in the View list select the re quired list with setting data Setting up the machine 4 10 Displaying setting data lists Milling Operating Manual 08 2018 6FC5398 7CP41 0BA0 155 ...

Page 156: ...ine axes are assigned to the particular channel They can only be individually traversed i e the actual machine state has no influence The also applies to channel machine axes that are declared as geometry axes Machine manufacturer Please refer to the machine manufacturer s specifications Procedure 1 Select the Machine operating area 2 Press the JOG AUTO or MDI key 3 Press the menu forward key and ...

Page 157: ... closes Deactivate handwheel 1 Position the cursor on the handwheel whose assignment you wish to cancel e g No 1 2 Press the softkey for the assigned axis again e g X OR Open the Axis selection box using the INSERT key navigate to the empty field and press the INPUT key Clearing an axis selection also clears the handwheel selection e g X is cleared for handwheel no 1 and is no longer active Settin...

Page 158: ...A program from the Program Manager Procedure 1 Select the Machine operating area 2 Press the MDI key The MDI editor opens 3 Press the Load MDI softkey A changeover is made into the Program Manager The Load in MDI window opens It shows you a view of the program manager 4 Position the cursor to the corresponding storage location press the Search softkey and enter the required search term in the sear...

Page 159: ...orage location press the Search softkey and enter the required search term in the search dialog if you wish to search for a specific directory or subdirectory Note The place holders replaces any character string and re places any character make it easier for you to perform a search 6 Press the OK softkey When you place the cursor on a folder a window opens which prompts you to assign a name OR Whe...

Page 160: ... cursor right key enter the required value and press OK When editing a cycle either the help screen or the graphic view can be displayed 5 Press the CYCLE START key The control executes the input blocks When executing G code commands and standard cycles you have the option of controlling the sequence as follows Executing the program block by block Testing the program Settings under program control...

Page 161: ... program that you created in the MDI window or loaded from the program manager Procedure Press the Delete blocks softkey The program blocks displayed in the program window are deleted Setting up the machine 4 12 MDA Milling Operating Manual 08 2018 6FC5398 7CP41 0BA0 161 ...

Page 162: ...Setting up the machine 4 12 MDA Milling 162 Operating Manual 08 2018 6FC5398 7CP41 0BA0 ...

Page 163: ...f the controller with the machine reference point approach Set up the machine i e activate manually controlled motions on the machine using the keys and handwheels provided on the machine control panel You can activate manually controlled motions on the machine using the keys and handwheels provided on the machine control panel while a part program is interrupted Milling Operating Manual 08 2018 6...

Page 164: ...tool list using the Select tool softkey D Cutting edge number of the tool 1 9 ST Sister tool number 1 99 for sister tool strategy Spindle Spindle selection identification with spindle number Spindle M function Spindle off Spindle is stopped CW rotation Spindle rotates clockwise CCW rotation Spindle rotates counterclockwise Spindle positioning Spindle is moved to the desired position Other M functi...

Page 165: ...he T field is empty and a turning tool is currently active Parameter Meaning Unit TC Name of the swivel data record β Angle of the tool to the axis of rotation degrees Zero degrees 90 degrees Input value The required angle can be freely entered Hirth gearing Round of β to the next Hirth gearing Round of β to the next Hirth gearing Round of β to the next Hirth gearing Tool Tool tip position when sw...

Page 166: ...edge D or enter the number directly in field D 5 Select the sister tool ST or enter the number directly into the ST field 6 Press the CYCLE START key The tool is loaded into the spindle 5 2 3 Starting and stopping a spindle manually Procedure 1 Select the JOG operating mode 2 Press the T S M softkey 3 Select the desired spindle e g S1 and enter the desired spindle speed rpm or the constant cutting...

Page 167: ...d If you enter the speed in the Spindle field while the spindle is rotating the new speed is applied 5 2 4 Position spindle Procedure 1 Select the JOG operating mode 2 Press the T S M softkey 3 Select the Stop Pos setting in the Spindle M function field The Stop Pos entry field appears 4 Enter the desired spindle stop position The spindle position is specified in degrees 5 Press the CYCLE START ke...

Page 168: ...during a tool change A stationary spindle is positioned via the shortest possible route A rotating spindle is positioned as it continues to turn in the same direction Execution in manual mode 5 2 Selecting a tool and spindle Milling 168 Operating Manual 08 2018 6FC5398 7CP41 0BA0 ...

Page 169: ...raverse the axes in manual mode via the Increment and Axis keys or handwheels Procedure 1 Select the Machine operating area 2 Press the JOG key 3 Press keys 1 10 etc up to 10000 in order to move the axis in a defined increment The numbers on the keys indicate the traverse path in micrometers or microinches Example Press the 100 button for a desired increment of 100 μm 0 1 mm 4 Select the axis to b...

Page 170: ...5 3 2 Traversing axes by a variable increment Procedure 1 Select the Machine operating area 2 Press the JOG key 3 Press the Settings softkey The Settings for Manual Operation window is opened 4 Enter the desired value for the Variable increment parameter Example Enter 500 for a desired increment of 500 μm 0 5 mm 5 Press the Inc VAR key 6 Select the axis to be traversed 7 Press the or key Each time...

Page 171: ...Positions softkey 4 Specify the desired value for the feedrate F OR Press the Rapid traverse softkey The rapid traverse is displayed in field F 5 Enter the target position or target angle for the axis or axes to be traversed 6 Press the CYCLE START key The axis is traversed to the specified target position If target positions were specified for several axes the axes are traversed simultaneously Ex...

Page 172: ...e settings after a program interrupt e g as a result of a retraction in the Z direction you can retract from an inclined hole Machine manufacturer Please refer to the machine manufacturer s specifications Important parameters TC name of swivel data record Here you can select the swivel data record Retraction Before swiveling the axes you can move the tool to a safe retraction position The retracti...

Page 173: ...of CYCLE800 For swivel systems with 2 rotary axes a particular plane can be reached in two different ways You can choose between these two different positions in the Direction parameter The corresponds to the larger or smaller value of a rotary axis This may affect the working area When the swivel data record is set up the entries in the Direction parameter determine for which rotary axis you can ...

Page 174: ...use the actual swiveled plane as the reference plane for setting up your workpiece you must define this plane as the zero plane With Set zero plane the actual swivel plane in the active zero offset is stored as the zero plane As a result the rotations in the active zero offset are overwritten With Delete zero plane the rotations in the active zero offset are set to zero Note The overall coordinate...

Page 175: ...ne axis Z Retract towards the machine axis Z and then in the direction X Y ZR Retraction path only for incremental retraction in the tool direction Swivel plane New New swivel plane Additive Additive swivel plane Swivel mode Axis by axis Rotate coordinate system axis by axis Direct Directly position rotary axes Positions the rotary axes of the active swivel data record Angle of rotation in the pla...

Page 176: ...ion when swiveling Tracking The position of the tool tip is maintained during swiveling No tracking The position of the tool tip changes during swiveling Execution in manual mode 5 5 Swiveling Milling 176 Operating Manual 08 2018 6FC5398 7CP41 0BA0 ...

Page 177: ...ce is taken into account and the spindle moved according to the thread Use the Z axis as well as the spindle when retracting from threads The machine OEM sets up the Retract function Machine manufacturer Please observe the information provided by the machine manufacturer Procedure 1 The power feed to the machine is interrupted OR RESET interrupts an active part program 2 After a power supply inter...

Page 178: ...the workpiece according to the retraction axis displayed in the Retract Tool window 8 Press the Retract softkey again when the tool is at the desired position Execution in manual mode 5 6 Manual retraction Milling 178 Operating Manual 08 2018 6FC5398 7CP41 0BA0 ...

Page 179: ...achine data SCS_MAJOG_SAFETY_CLEARANCE or SCS_MAJOG_RELEASE_PLANE Machine manufacturer Please refer to the machine manufacturer s specifications Direction of spindle rotation If the ShopTurn ShopMill option is activated the direction of spindle rotation is taken from the tool parameters entered in the tool list If the ShopTurn ShopMill option is not set select the direction of spindle rotation in ...

Page 180: ...e CYCLE START key The face milling cycle is started You can return to the parameter screen at any time to check and correct the inputs Note You cannot use the Repos function while face milling Parameter Description Unit T Tool name D Cutting edge number F Feedrate mm min mm rev S V Spindle speed or constant cutting rate rpm m min Spindle M function Direction of spindle rotation only when ShopMill ...

Page 181: ...mm DXY Max infeed in the XY plane dependent on milling cutter diameter Alternatively you can specify the plane infeed as a as a ratio plane infeed mm to milling cutter diameter mm mm DZ Max infeed in Z direction only for roughing mm UZ Finishing allowance depth mm Note The same finishing allowance must be entered for both roughing and finishing The finishing allowance is used to position the tool ...

Page 182: ...on plane and safety clearance are set using the machine data SCS_MAJOG_SAFETY_CLEARANCE or SCS_MAJOG_RELEASE_PLANE Machine manufacturer Please refer to the machine manufacturer s specifications Direction of spindle rotation If the ShopTurn ShopMill option is activated the direction of spindle rotation is taken from the tool parameters entered in the tool list If the ShopTurn ShopMill option is not...

Page 183: ...eter screen is closed 9 Press the CYCLE START key The face milling cycle is started You can return to the parameter screen at any time to check and correct the inputs Note You cannot use the Repos function while face milling Parameter Description Unit T Tool name D Cutting edge number F Feedrate mm min mm rev S V Spindle speed or constant cutting rate rpm m min Spindle M function Direction of spin...

Page 184: ...n only for roughing mm UZ Finishing allowance depth mm Note The same finishing allowance must be entered for both roughing and finishing The finishing allowance is used to position the tool for retraction 5 8 2 Simple stock removal of workpiece for milling turning machine Some blanks do not have a smooth or even surface For example you can use the stock removal cycle to turn the face surface of th...

Page 185: ...screen Note The Repos function cannot be used during simple stock removal Requirement To carry out simple stock removal of a workpiece in manual mode a measured tool must be in the machining position Procedure 1 Press the Machine operating area key 2 Press the JOG key 3 Press the Machining and Stock removal softkeys 4 Enter desired values for the parameters 5 Press the OK softkey The parameter scr...

Page 186: ...ol tip is maintained during swiveling No tracking The position of the tool tip is not maintained during swiveling γ Angle of rotation of the tool around itself degrees αC Alignment of the plane of rotation in the pole position degrees F Feedrate mm rev S V Spindle speed or constant cutting rate rpm m min Spindle M function Direction of spindle rotation only when ShopMill is not active Machining ro...

Page 187: ...FS1 FS3 or R1 R3 Chamfer width FS1 FS3 or rounding radius R1 R3 mm XF2 Undercut alternative to FS2 or R2 mm D Infeed depth inc for roughing only mm UX Final machining allowance in X direction inc for roughing only mm UZ Final machining allowance in Z direction inc for roughing only mm Execution in manual mode 5 8 Simple workpiece machining operations with milling turning machines Milling Operating...

Page 188: ... feedrate in mm min Setup feedrate G95 Enter the desired feedrate in mm rev Variable increment For variable increments enter the desired increment when traversing axes Spindle speed Here enter the desired spindle speed in rpm Procedure 1 Select the Machine operating area 2 Press the JOG key 3 Press the menu forward key and the Settings softkey The Settings for manual operation window is opened Exe...

Page 189: ...ve been entered The necessary safety interlocks implemented by the machine manufacturer are activated General sequence 1 Use the Program manager to select the desired program 2 Select under NC Local Drive USB or set up network drives the desired program 3 Press the Select softkey The program is selected for execution and automatically switched to the Machine operating area 4 Press the CYCLE START ...

Page 190: ...ocation where it stopped Canceling machining Press the RESET key Execution of the program is interrupted On the next start machining will start from the beginning Machine manufacturer Please observe the information provided by the machine manufacturer Machining the workpiece 6 1 Starting and stopping machining Milling 190 Operating Manual 08 2018 6FC5398 7CP41 0BA0 ...

Page 191: ...ining the program that you want to select 4 Press the INPUT key OR Press the Right cursor key The directory contents are displayed 5 Place the cursor on the desired program 6 Press the Select softkey When the program has been successfully selected an automatic change over to the Machine operating area occurs Machining the workpiece 6 2 Selecting a program Milling Operating Manual 08 2018 6FC5398 7...

Page 192: ...s after every machine block except for cycles SB2 Data block Machining stops after every block i e also for data blocks except for cycles SB3 Single block fine Machining stops after every machine block also in cycles Precondition A program must be selected for execution in AUTO or MDA mode Procedure 1 Press the Prog ctrl softkey and select the desired variant in the SBL field 2 Press the SINGLE BL...

Page 193: ...supposed to run block by block The key is deselected again If you now press the CYCLE START key again the program is execu ted to the end without interruption Machining the workpiece 6 3 Testing a program Milling Operating Manual 08 2018 6FC5398 7CP41 0BA0 193 ...

Page 194: ...background Measured machining time of the program block automatic mode Green background Measured machining time of the program block automatic mode Light blue background Estimated machining time of the program block simulation Blue background Estimated machining time of the program block simulation Yellow background Wait time automatic mode or simulation Highlighting of selected G code commands or...

Page 195: ...a basic block If you want precise information about axis positions and important G functions during testing or program execution you can call up the basic block display This is how you check when using cycles for example whether the machine is actually traversing Positions programmed by means of variables or R parameters are resolved in the basic block display and replaced by the variable value Yo...

Page 196: ...ent program level during the execution of a large program with several subprograms Several program run throughs If you have programmed several program run throughs i e subprograms are run through several times one after the other by specifying the additional parameter P then during processing the program runs still to be executed are displayed in the Program Levels window Program example N10 subpr...

Page 197: ...am run throughs Precondition A program must be selected for execution in AUTO mode Procedure Press the Program levels softkey The Program levels window appears Machining the workpiece 6 4 Displaying the current program block Milling Operating Manual 08 2018 6FC5398 7CP41 0BA0 197 ...

Page 198: ...e Procedure 1 The program to be corrected is in the Stop or Reset mode 2 Press the Prog corr softkey The program is opened in the editor The program preprocessing and the current block are displayed The current block is also updated in the running program but not the displayed program section i e the current block moves out of the displayed pro gram section If a subprogram is executed it is not op...

Page 199: ...line from the current position to the interrupt point Therefore you must first move the axes to a safe position in order to avoid collisions If you do not use the Repos function and subsequently move the axes in manual mode after a program interrupt the control automatically moves the axes during the switch to automatic mode and the subsequent start of the machining process in a straight line back...

Page 200: ... information provided by the machine manufacturer Search target via text search The search target is the interruption point main program and subprogram The function is only available if there is an interruption point After a program interruption CYCLE STOP RESET or power off the controller saves the coordinates of the interruption point The search target is the higher program level of the interrup...

Page 201: ...d NOTICE Risk of collision Pay attention to a collision free start position and appropriate active tools and other technological values If necessary manually approach a collision free start position Select the target block considering the selected block search type Toggling between search pointer and search positions Press the Search pointer softkey again to exit the Search Pointer win dow and ret...

Page 202: ...definition Requirement The program is selected and the controller is in Reset mode Procedure 1 Press the Block search softkey 2 Place the cursor on a particular program block OR Press the Find text softkey select the search direction enter the search text and confirm with OK 3 Press the Start search softkey The search starts Your specified search mode will be taken into ac count The current block ...

Page 203: ...our specified search mode will be taken into account The search screen closes The current block will be displayed in the Program window as soon as the target is found 5 Press the CYCLE START key twice The execution will continue from the interruption point 6 7 5 Entering the search target via search pointer Enter the program point which you would like to proceed to in the Search Pointer window Sof...

Page 204: ...evel 1 main program Procedure 1 Press the Block search softkey 2 Press the Search pointer softkey 3 Enter the full path of the program as well as the subprograms if required in the input fields 4 Press the Start search softkey The search starts Your specified search mode will be taken into account The Search window closes The current block will be displayed in the Program window as soon as the tar...

Page 205: ...tion is ap proached using the type of interpolation valid in the target block Only the axes programmed in the target block are moved Note If machine data 11450 1 1 is set the rotary axes of the active swivel data record are pre positioned after the block search With calculation with approach It is used to be able to approach the contour in any circumstance The end position of the block prior to th...

Page 206: ...n ning of the target block and deselects program test mode again After con tinuing the program with NC start after REPOS motion the auxiliary func tions of the target block are output For single channel systems the coordination is supported with events run ning in parallel e g synchronized actions Note The search speed depends on MD settings Note Search mode for ShopMill programs The search varian...

Page 207: ...opTurn option for the block search for ShopMill machining step programs Machine manufacturer Please observe the information provided by the machine manufacturer Procedure The required ShopMill program is in the block display 1 Press the Block search softkey 2 Position the cursor to the position block 3 Press the Start search softkey The Block search window opens All of the technologies used in the...

Page 208: ...le and goes to all additional positions of this position pattern and all of the following position patterns Note If you have hidden certain positions then only the displayed positions are applicable for the starting hole number Machining the workpiece 6 7 Starting machining at a specific point Milling 208 Operating Manual 08 2018 6FC5398 7CP41 0BA0 ...

Page 209: ...ion M01 is programmed In this way you can check the already obtained result during the processing of a workpiece Note In order to continue executing the program press the CYCLE START key again Programmed stop 2 e g M101 The processing of the program stops at every block in which the Cycle end is programmed e g with M101 Note In order to continue executing the program press the CYCLE START key agai...

Page 210: ...d every time the program runs The skip blocks are identified by placing a forward slash or x x number of skip level character in front of the block number You have the option of hiding several block sequences The statements in the skipped blocks are not executed The program continues with the next block which is not skipped The number of skip levels that can be used depends on a machine datum Mach...

Page 211: ...box to activate the desired skip level Note The Program Control Skip Blocks window is only available when more than one skip level is set up Machining the workpiece 6 8 Controlling the program run Milling Operating Manual 08 2018 6FC5398 7CP41 0BA0 211 ...

Page 212: ... can be successfully continued Software option You require the Extended operator functions option for the overstore function for 828D Precondition The program to be corrected is in the Stop or Reset mode Procedure 1 Open the program in the AUTO mode 2 Press the Overstore softkey The Overstore window opens 3 Enter the required data and NC block 4 Press the CYCLE START key The blocks you have entere...

Page 213: ...everal blocks are entered in the overstore buffer then these are executed block by block after each NC start Deleting blocks Press the Delete blocks softkey to delete program blocks you have en tered Machining the workpiece 6 9 Overstore Milling Operating Manual 08 2018 6FC5398 7CP41 0BA0 213 ...

Page 214: ... the changes to programs saved in the NC memory take immediate effect If you are editing on a local drive or external drives you can also exit the editor without saving depending on the setting Programs in the NC memory are always automatically saved Exit the program correction mode using the Close softkey to return to the Program manager operating area See also Editor settings Page 222 Opening an...

Page 215: ...ened in the editor Procedure 1 Press the Search softkey A new vertical softkey bar appears The Search window opens at the same time 2 Enter the desired search term in the Text field 3 Select Whole words if you want to search for whole words only OR Activate the Exact expression checkbox if for example you want to search for place holders in program lines 4 Position the cursor in the Direction fiel...

Page 216: ...the text you would like to insert automatically during the search 4 Position the cursor in the Direction field and choose the search direction forward backward with the SELECT key 5 Press the OK softkey to start the search If the text you are searching for is found the corresponding line is high lighted 6 Press the Replace softkey to replace the text OR Press the Replace all softkey to replace all...

Page 217: ...sert If you insert a G code then the program block is directly inserted where the write mark is located If you insert a program step then the program block is always inserted at the next block independent of the position of the write mark within the actual line This is necessary as a cycle call always requires its own line This behavior is in all applications irrespective of whether the program st...

Page 218: ...n the newly added program blocks are allocated a block number N num ber The following rules apply When creating a new program the first line is allocated the first block number If up until now the program had no N number then the program block inserted is allocated the starting block number defined in the First block number input field If N numbers already exist before and after the insertion poin...

Page 219: ...bering window appears 3 Enter the values for the first block number and the increment to be used for numbering 4 Press the OK softkey The program is renumbered Note If you only want to renumber a section before the function call select the program blocks whose block numbering you want to edit When you enter a value of 0 for the increment size then all of the existing block numbers are deleted from...

Page 220: ...point i e the tool is brought into a safe range No Structuring programs Before generating the actual program generate a program frame using empty blocks By forming blocks structure existing G code or ShopMill programs Procedure 1 Select the Program manager operating area 2 Select the storage location and create a program or open a program The program editor opens 3 Select the required program bloc...

Page 221: ...EF statements in program blocks or block generation in the DEF part of a part program cycle are not permitted 6 10 6 Opening additional programs You have the option of viewing and editing several programs simultaneously in the editor For instance you can copy program blocks or machining steps of a program and paste them into another program Opening several programs You have the option of opening u...

Page 222: ...ult settings in the Settings window that are to take effect automatically when the editor is opened Defaults Setting Meaning Number automatically Yes A new block number will automatically be assigned after every line change In this case the specifications provided under First block number and Increment are applicable No No automatic numbering First block number Specifies the starting block number ...

Page 223: ...th of the program that has the input focus in the editor as a percentage of the window width Save automatically Yes The changes are saved automatically when you change to another operating area No You are prompted to save when changing to another operating area Save or reject the changes with the Yes and No softkeys Note Only for local and external drives Cut only after selecting Yes Parts of prog...

Page 224: ...he standard color Yes Selected G code commands or keywords are highlighted in color Define the rules for the color assignment in the sleditorwidget ini configuration file Note Please observe the information provided by the machine manufacturer Note This setting also has an effect on the current block display Font size Defines the font size for the editor and the display of the program sequence aut...

Page 225: ... delete the machining times The machining times that have been determined are deleted from the editor as well as from the actual block display If the machining times are saved to an ini file then this file is also deleted 6 Press the OK softkey to confirm the settings See also Replacing program text Page 216 Machining the workpiece 6 10 Editing a program Milling Operating Manual 08 2018 6FC5398 7C...

Page 226: ...e Program Manager operating area 2 Choose the desired storage location and position the cursor on the DFX file that you want to display 3 Press the Open softkey The selected CAD drawing will be displayed with all its layers i e with all graphic levels 4 Press the Close softkey to close the CAD drawing and to return to the Program Manager 6 11 2 2 Cleaning a DXF file All contained layers are shown ...

Page 227: ... 11 2 3 Enlarging or reducing the CAD drawing Requirement The DXF file is opened in the Program Manager Procedure 1 Press the Details and Zoom softkeys if you wish to enlarge the size of the segment OR 2 Press the Details and Zoom softkeys if you wish to reduce the size of the segment OR 3 Press the Details and Auto zoom softkeys if you wish to automatically adapt the segment to the size of the wi...

Page 228: ... DXF file is opened in the Program Manager or in the editor Procedure 1 Press the Details and Magnifying glass softkeys A magnifying glass in the shape of a rectangular frame appears 2 Press the key to enlarge the frame OR Press the key to reduce the frame OR Press a cursor key to move the frame up down left or right 3 Press the OK softkey to accept the section 6 11 2 5 Rotating the view You can c...

Page 229: ... example you have selected a straight line the following window opens Straight line on layer You are shown the coordinates corre sponding to the actual zero point in the selected layer Start point for X and Y end point for X and Y as well as the length 4 If you are currently in the editor press the Element edit softkey The coordinate values can be edited 3 Press the Back softkey to close the displ...

Page 230: ...reference point Procedure 1 The DXF file is opened in the editor 2 Press the and Specify reference point softkeys 3 Press the Element start softkey to place the zero point at the start of the selected element OR Press the Element center softkey to place the zero point at the center of the selected element OR Press the Element end softkey to place the zero point at the end of the selected element O...

Page 231: ...e Large snap radius The larger that the snap radius is set the larger the number of available following elements Procedure 1 The DXF file is opened in the editor 2 Press the Details and Snap radius softkeys The Input window appears 3 Enter the desired value and press the OK softkey 6 11 3 5 Selecting the machining range deleting the range and element You can select ranges in the DXF file and there...

Page 232: ... Deselect range softkey to undo the selection of the machining range The DXF fie is reset to the original display Delete selected ranges and elements of the DXF file 6 Press the Reduce softkey Delete range 7 Press the Range delete softkey A blue rectangle is displayed 8 Press the Range softkey to enlarge the section or press the Range softkey to reduce the section 9 Press the Arrow right Arrow lef...

Page 233: ...required storage location 6 If required press the New directory softkey enter the required name in the New Directory window and press the OK softkey to create a direc tory 7 Press the OK softkey 6 11 3 7 Transferring the drilling positions Procedure 1 The part program or ShopMill program to be processed has been created and you are in the editor 2 Press the Drilling softkey 3 Press the Positions s...

Page 234: ...n to search directly for a DXF file in com prehensive folders and directories 3 Press the OK softkey The CAD drawing opens and the cursor takes the form of a cross Cleaning a file 4 Prior to selecting the drilling positions you can select a layer and clean the file Specifying a reference point 5 If required specify a zero point Specify clearance s position pattern Row Arbitrary positions and Circl...

Page 235: ...e position row or position frame and position grid are valid the drilling positions are displayed with blue points Circle direction circle and pitch circle Once the reference point and clearance have been specified press the Select element softkey repeatedly The circle is shown in the possible orientations Press the Select element softkey to confirm the selected circle or pitch circle If all eleme...

Page 236: ... can be processed you will be offered the option of transferring the contour to the program as pure G code This contour then can no longer be edited in the editor With the Undo softkey you can undo your contour selection back to a specific point Procedure Opening a DXF file 1 Enter the desired name in the New Contour window 2 Press the From DXF file and Accept softkeys The Open DXF File window ope...

Page 237: ...tkey to place the contour start at the end point of the element OR Press the Element center softkey to place the contour start at the center of the element OR Press the Cursor softkey to define the start of the element with the cursor at any position 9 Press the OK softkey to confirm your selection 10 Press the Accept element softkey to accept the offered elements The softkey can be operated while...

Page 238: ... Press the OK softkey The selected contour is transferred to the contour input screen of the editor Press the Accept contour softkey The program block is transferred to the program Operation with mouse and keyboard In addition to operation using softkeys you can also operate the functions with the keyboard and with the mouse Machining the workpiece 6 11 Working with DXF files Milling 238 Operating...

Page 239: ...decimal places are evaluated If you enter a number with more than 15 places it will be written in exponential notation 15 places EXXX LUD or PUD Only local or program global user data can be displayed at one time Whether the user data are available as LUD or PUD depends on the current control configuration Machine manufacturer Please observe the information provided by the machine manufacturer Not...

Page 240: ...w These comments can be edited You have the option of either individually deleting these comments or using the delete function These comments are retained after the control is switched off Number of global R parameters The number of global R parameters is defined in a machine data element Range RG 0 RG 999 dependent on the machine data There are no gaps in the numbering within the range Machine ma...

Page 241: ... parameters or to all global R parameters The selected comments are also deleted 6 12 3 R parameters R parameters arithmetic parameters are channel specific variables that you can use within a G code program G code programs can read and write R parameters These values are retained after the controller is switched off Comments You can save comments in the R parameters with comments window These com...

Page 242: ...ain to return to the R pa rameters window Delete R variables 1 Press the and Delete softkeys The Delete R parameters window appears 2 In fields from R parameters and to R parameters select the R param eters whose values you wish to delete OR Press the Delete all softkey 3 Activate the checkbox also delete comments if the associated com ments should also be automatically deleted 4 Press the OK soft...

Page 243: ...files with the ending DEF The following file names are reserved for this purpose File name Meaning MGUD DEF Definitions for global machine manufacturer data UGUD DEF Definitions for global user data GUD4 DEF User definable data GUD8 DEF GUD9 DEF User definable data Procedure 1 Select the Parameter operating area 2 Press the User variable softkey 3 Press the Global GUD softkeys The Global User Vari...

Page 244: ... is displayed in the Global User Variables window 6 12 5 Displaying channel GUDs Channel specific user variables Like the GUDs channel specific user variables are applicable in all programs for each channel However unlike GUDs they have specific values Definition A channel specific GUD variable is defined with the following Keyword DEF Range of validity CHAN Data type Variable names Value assignme...

Page 245: ...to display GUD 7 and GUD 9 of the channel specific user variables 6 12 6 Displaying local user data LUD Local user variables LUDs are only valid in the program or subprogram in which they were defined The controller displays the LUDs after the start of program processing The display is available until the end of program processing Definition A local user variable is defined with the following Keyw...

Page 246: ...in programs and subprograms where they can also be written and read Machine manufacturer Please refer to the machine manufacturer s specifications Procedure 1 Select the Parameter operating area 2 Press the User variable softkey 3 Press the Program PUD softkey 6 12 8 Searching for user variables You can search for R parameters and user variables Machining the workpiece 6 12 Display and edit user v...

Page 247: ...s or user vari ables you are searching for if they exist By editing a DEF MAC file you can alter or delete existing definition macro files or add new ones Procedure 1 Select the Start up operating area 2 Press the System data softkey 3 In the data tree select the NC data folder and then open the Definitions folder 4 Select the file you want to edit 5 Double click the file OR Press the Open softkey...

Page 248: ...er the current values in the definition files should be retained OR Select whether the current values in the definition files should be deleted This will overwrite the definition files with the initial values 3 Press the OK softkey to continue the process Machining the workpiece 6 12 Display and edit user variables Milling 248 Operating Manual 08 2018 6FC5398 7CP41 0BA0 ...

Page 249: ...8 Settable work offset e g G54 G57 G500 G group 9 Offset suppression e g SUPA G53 G group 10 Exact stop continuous path mode e g G60 G641 G group 13 Workpiece dimensioning inches metric e g G70 G700 G group 14 Workpiece dimensioning absolute incremental G90 G group 15 Feedrate type e g G93 G961 G972 G group 16 Feedrate override on inside and outside curvature e g CFC G group 21 Acceleration profil...

Page 250: ...T2DF G group 29 Radius diameter programming e g DIAMOF DIAMCYCOF G group 30 Compressor ON OFF e g COMPOF Procedure 1 Select the Machine operating area 2 Press the JOG MDA or AUTO key 3 Press the G functions softkey The G Functions window is opened 4 Press the G functions softkey again to hide the window The G groups selection displayed in the G Functions window may differ Machine manufacturer Plea...

Page 251: ...ffsets Spindle speed Path feedrate Active tool 6 13 3 G functions for mold making In the window G functions important information for machining free form surfaces can be displayed using the High Speed Settings function CYCLE832 Software option You require the Advanced Surface software option in order to use this function High speed cutting information In addition to the information that is provide...

Page 252: ...UTO key 3 Press the and All G functions softkeys The G Functions window is opened 6 13 4 Auxiliary functions Auxiliary functions include M and H functions preprogrammed by the machine manufacturer which transfer parameters to the PLC to trigger reactions defined by the manufacturer Displayed auxiliary functions Up to five current M functions and three H functions are displayed in the Auxiliary Fun...

Page 253: ...UTO key 3 Press the H functions softkey The Auxiliary Functions window opens 4 Press the H functions softkey again to hide the window again Machining the workpiece 6 13 Displaying G Functions and Auxiliary Functions Milling Operating Manual 08 2018 6FC5398 7CP41 0BA0 253 ...

Page 254: ... Machine operating area 2 Press the AUTO MDI or JOG key 3 Press the and Superimposition softkeys The Superimposition window opens 4 Enter the required new minimum and maximum values for superimposi tion and press the INPUT key to confirm your entries Note You can only change the superimposition values in JOG mode 5 Press the Superimposition softkey again to hide the window You can display status i...

Page 255: ... effective in every operating type also beyond the end of program n 1 254 Without ID IDS Non modal synchronized actions in the automatic mode Note Numbers from the number range 1 to 254 can only be assigned once irrespective of the identification number Display of synchronized actions Using softkeys you have the option of restricting the display to activated synchronized actions Procedure 1 Select...

Page 256: ...tatic synchronized actions AND OR Press the Blockwise softkey if you wish to hide the non modal synchron ized actions in the automatic mode 5 Press the ID IDS or Blockwise softkeys to re display the corre sponding synchronized actions Machining the workpiece 6 14 Displaying superimpositions Milling 256 Operating Manual 08 2018 6FC5398 7CP41 0BA0 ...

Page 257: ...tion realized NC blocks that can be interpreted The following NC blocks are supported for the mold making view Types Lines G0 G1 with X Y Z Circles G2 G3 with center point I J K or radius CR depending on the working plane G17 G18 G19 CIP with circular point I1 J1 K1 or radius CR Absolute data AC and incremental data IC are possible For G2 G3 and different radii at the start and end an Archimedes s...

Page 258: ...ng view On the left in the editor if you place the cursor on an NC block with position data then this NC block is marked in the graphic view If you select a point on the right in the mold making view using the mouse then conversely you mark the corresponding NC block on the left hand side of the editor This is how you jump directly to a position in the program in order to edit a program block for ...

Page 259: ...Program manager operating area 2 Select the program that you would like to display in the mold making view 3 Press the Open softkey The program is opened in the editor 4 Press the and Mold making view softkeys The editor splits up into two areas The G code blocks are displayed in the left half of the editor The workpiece is displayed in the mold making view on the right hand side of the editor All...

Page 260: ...s to display all orientation vectors Note This softkey can only be operated if vectors are programmed OR Press the softkeys and Surface to calculate the surface area of the workpiece OR Press the softkeys and Curvature The Curvature input window opens Enter the desired minimum and maximum value and press OK to con firm the entry and to highlight the curvature changes in color 6 15 4 Specifically j...

Page 261: ...ciated program block in the editor 6 15 5 Searching for program blocks Using the Search function you can go specifically to program blocks where you can edit programs You can find and replace text in one step Precondition The required program is opened in the mold making view The NC blocks softkey is active Procedure 1 Press the Search softkey A new vertical softkey bar appears See also Searching ...

Page 262: ...crease the size of the segment OR Press the Details and Zoom softkeys if you wish to decrease the size of the segment OR Press the Details and Auto zoom softkeys if you wish to automatically adapt the segment to the size of the window The automatic scaling function Fit to size takes account of the largest expansion of the workpiece in the individual axes Note Selected section The selected sections...

Page 263: ...move the graphic with the left hand mouse key pressed in order to reposition the mold making view To do this move the graphic with the right hand mouse key pressed in order to rotate the mold making view 6 15 6 3 Modifying the viewport If you want to look at the details you can shift and change the size of the mold building view section using a magnifying glass Using the magnifying glass you can d...

Page 264: ... 3 Press the Magnify or softkey to enlarge the frame OR Press the Magnify or softkey to reduce the frame OR Press one of the cursor keys to move the frame up down left or right 4 Press the Accept softkey to accept the section Machining the workpiece 6 15 Mold making view Milling 264 Operating Manual 08 2018 6FC5398 7CP41 0BA0 ...

Page 265: ...m offset The larger the program and the more linear that it is executed the more precise the first estimate This estimate is very inaccurate as a result of the system for programs with steps and or subprograms For each additional program execution the measured overall program execution time is used as basis for the program progress display Influencing the time measurement The time measurement is s...

Page 266: ... the Desired workpieces field The number of workpieces already finished is displayed in Actual work pieces You can correct this value when required After the defined number of workpieces is reached the current workpie ces display is automatically reset to zero See also Specifying the number of workpieces Page 341 Machining the workpiece 6 16 Displaying the program runtime and counting workpieces M...

Page 267: ...operating area and the window with the measurement results is displayed The window with the measurement results is opened by pressing the Measurement result softkey Recording machining times To provide support when creating and optimizing a program you have the option of displaying the machining times You define whether the time is determined while the workpiece is being machined i e if the functi...

Page 268: ... 3 Press the menu forward key and the Settings softkey The Settings for Automatic Operation window opens 4 In DRY run feedrate enter the desired dry run speed 5 Enter the desired percentage in the Reduced rapid traverse RG0 field RG0 has no effect if you do not change the specified amount of 100 6 Select the required entry in the Display measurement result field Automatic The measurement result wi...

Page 269: ...Cycles 840D sl 828D Note You have the option of changing the feedrate velocity in operation See also Current block display Page 47 Machining the workpiece 6 17 Setting for automatic mode Milling Operating Manual 08 2018 6FC5398 7CP41 0BA0 269 ...

Page 270: ...Machining the workpiece 6 17 Setting for automatic mode Milling 270 Operating Manual 08 2018 6FC5398 7CP41 0BA0 ...

Page 271: ...he time that the blank was defined This means that before defining the blank in G code programs the required output conditions must be established e g by selecting a suitable work offset Programming a blank example G54 G17 G90 CYCLE800 0 TABLE 100000 57 0 0 0 0 0 0 0 0 0 1 100 1 WORKPIECE Box 112 0 50 80 00 155 100 T NC SPOTDRILL_D16 Note Blank offset for a changed work offset The blank is always ...

Page 272: ...offset Programmable frames All frames and work offsets are taken into account in the simulation Note Manually swiveled axes Note that swivel movement in simulation and during simultaneous recording is also displayed when the axes are swiveled manually at the start Simulation display You can choose one of the following types of display Material removal simulation During simulation or simultaneous r...

Page 273: ...is motion Simultaneous recording during machining of the workpiece You can follow machining of the workpiece on the screen while the program is being executed on the machine Views The following views are available for all three variants Top view 3D view Side views Turning view milling turning machine Half section milling turning machine Note Simulation in half section view The half section view in...

Page 274: ...ew traversing path Optimum display If simultaneous machining is stopped or has been completed then the display is again converted into a high resolution image In some cases this is not possible In this case the following message is output High resolution image cannot be generated Working zone limitation No working zone limits and software limit switches are effective in the tool simulation Start p...

Page 275: ...become effective after Power On Transformation change and swivel data record change are supported However a real kinematic change is not supported where a swivel head is physically changed The simulation of mold making programs with extremely short block change times can take longer than machining as the computation time distribution for this application is dimensioned in favor of the machining an...

Page 276: ...Swivel head 90 45 Swivel table 90 90 Simulating machining 7 1 Overview Milling 276 Operating Manual 08 2018 6FC5398 7CP41 0BA0 ...

Page 277: ...Swivel table 90 45 Swivel combination 90 90 Simulating machining 7 1 Overview Milling Operating Manual 08 2018 6FC5398 7CP41 0BA0 277 ...

Page 278: ...Swivel combination 45 90 Simulating machining 7 1 Overview Milling 278 Operating Manual 08 2018 6FC5398 7CP41 0BA0 ...

Page 279: ... storage location and position the cursor on the program to be simulated 3 Press the INPUT or Cursor right key OR Double click the program The selected program is opened in the Program operating area 4 Press the Simulation softkey The program execution is displayed graphically on the screen The ma chine axes do not move 5 Press the Stop softkey if you wish to stop the simulation OR Press the Reset...

Page 280: ...If you would like to view the current program blocks again instead of the graphical display you can switch to the program view Procedure 1 Load a program in the AUTO mode 2 Press the Prog ctrl softkey and activate the checkboxes PRT no axis movement and DRY run feedrate The program is executed without axis movement The programmed fee drate is replaced by a dry run feedrate 3 Press the Sim rec soft...

Page 281: ... machining of the workpiece is started and graphically displayed on the screen 4 Press the Sim rec softkey again to stop the recording Note If you switch on simultaneous recording after the unmachined part information has already been processed in the program only traversing paths and tool are displayed If you switch off simultaneous recording during machining and then switch on the function again...

Page 282: ...ation in half cut view In the simulation the Half cut view is used for more precise viewing of inside turning operations This view is not designed for viewing milling operations Displaying milling operations in this way can result in long simulation times 7 5 1 Plan view Display as a top view 1 Simultaneous recording or the simulation is started 2 Press the Top view softkey The workpiece is shown ...

Page 283: ...nes You can display and move cutting planes X Y and Z See also Defining cutting planes Page 291 7 5 3 Side view Displaying further side views 1 Simultaneous recording or the simulation is started 2 Press the Other views softkey 3 Press the From front softkey if you wish to view the workpiece from the front OR Press the From rear softkey if you wish to view the workpiece from the rear OR Press the ...

Page 284: ...er to the machine manufacturer s specifications Changing the display You can increase or decrease the size of the simulation graphic and move it as well as change the segment 7 5 5 Half section Display half cut view for milling turning machine 1 Start the simulation 2 Press the Further views and Half cut view softkeys The half cut view shows the workpiece cut in the Z X plane Machine manufacturer ...

Page 285: ...y You can increase or decrease the size of the simulation graphic and move it as well as change the segment Simulating machining 7 5 Different views of the workpiece Milling Operating Manual 08 2018 6FC5398 7CP41 0BA0 285 ...

Page 286: ...tries The newly defined workpiece is displayed 7 6 2 Showing and hiding the tool path The path display follows the programmed tool path of the selected program The path is continuously updated as a function of the tool movement The tool paths can be shown or hidden as required Procedure 1 The simulation or the simultaneous recording is started 2 Press the softkey The tool paths are displayed in th...

Page 287: ...ride softkey to increase or decrease the feedrate by 5 respectively OR Press the 100 override softkey to set the feedrate to 100 OR Press the softkey to return to the main screen and perform the sim ulation with changed feedrate Toggling between Override and Override Simultaneously press the Ctrl and cursor down or cursor up keys to toggle between the Override and Override softkeys Selecting the m...

Page 288: ...Back and Start SBL softkeys The pending program block is simulated and then stops 4 Press Start SBL as many times as you want to simulate a single program block 5 Press the Program control and the Single block softkeys to exist the single block mode Switching a single block on and off Press the CTRL and S keys simultaneously to enable and disable the single block mode Simulating machining 7 7 Prog...

Page 289: ...the size of the segment OR Press the Details and Zoom softkeys if you wish to decrease the size of the segment OR Press the Details and Auto zoom softkeys if you wish to automatically adapt the segment to the size of the window The automatic scaling function Fit to size takes account of the largest expansion of the workpiece in the individual axes Note Selected section The selected sections and si...

Page 290: ...e simulation or simultaneous recording has been started and the 3D view is selected Procedure 1 Press the Details softkey 2 Press the Rotate view softkey 3 Press the Arrow right Arrow left Arrow up Arrow down Arrow clockwise and Arrow counterclockwise softkeys to change the position of the workpiece OR Keep the Shift key pressed and then turn the workpiece in the desired direction using the approp...

Page 291: ...gnifying glass in the shape of a rectangular frame appears 3 Press the Magnify or softkey to enlarge the frame OR Press the Magnify or softkey to reduce the frame OR Press one of the cursor keys to move the frame up down left or right 4 Press the Accept softkey to accept the selected section 7 8 5 Defining cutting planes In the 3D view you have the option of cutting the workpiece and therefore dis...

Page 292: ...tkey The workpiece is displayed in the cut state 3 Press the corresponding softkey to shift the cutting plane in the required direction Simulating machining 7 8 Changing and adapting a simulation graphic Milling 292 Operating Manual 08 2018 6FC5398 7CP41 0BA0 ...

Page 293: ...ion Simulation is running and an alarm is active Procedure 1 Press the Program control and Alarm softkeys The Simulation Alarms window is opened and a list of all pending alarms is displayed Press the Acknowledge alarm softkey to reset the simulation alarms indicated by the Reset or Cancel symbol The simulation can be continued OR Press the Simulation Power On softkey to reset a simulation alarm i...

Page 294: ...Simulating machining 7 9 Displaying simulation alarms Milling 294 Operating Manual 08 2018 6FC5398 7CP41 0BA0 ...

Page 295: ...ntext sensitive online help for every input window Support with contour input geometry processor Call and return conditions The G functions active before the cycle call and the programmable frame remain active beyond the cycle The starting position must be approached in the higher level program before the cycle is called The coordinates are programmed in a clockwise coordinate system Milling Opera...

Page 296: ...ns of the cyclic support Program view The program view in the editor provides an overview of the individual machining steps of a program Figure 8 1 Program view of a G code program Note In the program editor settings you define as to whether cycle calls are to be displayed as plain text or in NC syntax You can also configure the recording of the machining times Generating a G code program 8 2 Prog...

Page 297: ...lected G code commands are to be highlighted in color The following colors are used as standard Display Meaning Blue font D S F T M and H functions Red font G0 motion command Green font G1 motion command Blue green font G2 or G3 motion command Gray font Comment Machine manufacturer You can define further highlight colors in the sleditorwidget ini configuration file Please refer to the machine manu...

Page 298: ...w The associated parameter screen with help screen is then displayed Figure 8 2 Parameter screen with help display The animated help displays are always displayed with the correct orientation to the selected coordinate system The parameters are dynamically displayed in the graphic The selected parameter is displayed highlighted in the graphic The colored symbols Red arrow tool traverses in rapid t...

Page 299: ...lp screen and the graphic view The key combination CTRL G is also available for the switchover between the help screen and the graphic view Figure 8 3 Parameter screen with a graphical view of a G code program block See also Editor settings Page 222 Generating a G code program 8 2 Program views Milling Operating Manual 08 2018 6FC5398 7CP41 0BA0 299 ...

Page 300: ...edrate type G94 G95 speed and direction of rotation of the spindle S and M Positions and calls technology functions cycles End of program For G code programs before calling cycles a tool must be selected and the required technology values F S programmed A blank can be specified for simulation See also Blank input Page 304 Generating a G code program 8 3 Program structure Milling 300 Operating Manu...

Page 301: ...planes are defined as follows Plane Tool axis X Y G17 Z Z X G18 Y Y Z G19 X 8 4 2 Current planes in cycles and input screens Each input screen has a selection box for the planes if the planes have not been specified by NC machine data Empty for compatibility reasons to screen forms without plane G17 XY G18 ZX G19 YZ There are parameters in the cycle screens whose names depend on this plane setting...

Page 302: ...nserted in a program without having to change the plane for the remaining program 8 4 3 Programming a tool T Calling a tool 1 You are in the part program 2 Press the Select tool softkey The Tool selection window is opened 3 Position the cursor on the desired tool and press the To program softkey The selected tool is loaded into the G code editor Text such as the fol lowing is displayed at the curr...

Page 303: ...d press the OK softkey The name can contain up to 28 characters name dot 3 character extension You can use any letters except accented digits or the un derscore symbol _ The program type MPF is set by default The project is created and opened in the Editor Creating a new part program for a workpiece 5 Position the cursor on the folder Workpieces and press the New soft key The New G Code Program wi...

Page 304: ...eclamping the blank If the blank is to be manually reclamped from the main spindle to the counterspindle for example then delete the blank Example Blank main spindle cylinder Machining M0 Manually reclamping the blank Blank main spindle delete Blank counterspindle cylinder Machining The blank entry always refers to the work offset currently effective at the position in the program Note Swiveling F...

Page 305: ... cuboid Y0 1 Rectangular point Y only for cuboid X1 2 Rectangular point X abs or 2nd rectangular point X referred to X0 inc only for cuboid Y1 2 Rectangular point Y abs or 2nd rectangular point Y referred to Y0 inc only for cuboid ZA Initial dimension ZI Final dimension abs or final dimension in relation to ZA inc ZB Machining dimension abs or machining dimension in relation to ZA inc XA Outside d...

Page 306: ...he tool travels at the machining feedrate away from the workpiece to the safety clearance level It travels from the safety clearance to the retraction plane and then to the tool change point in rapid traverse The retraction plane is entered as an absolute value Normally reference point Z0 and retraction plane RP have different values The cycle assumes that the retraction plane is in front of the r...

Page 307: ...ining steps All of the cycles functions available in the control are shown in this display However at a specific system only the steps possible corresponding to the selected technology can be selected Generating a G code program 8 8 Selection of the cycles via softkey Milling Operating Manual 08 2018 6FC5398 7CP41 0BA0 307 ...

Page 308: ... Generating a G code program 8 8 Selection of the cycles via softkey Milling 308 Operating Manual 08 2018 6FC5398 7CP41 0BA0 ...

Page 309: ...Turning cycles only for milling turning machine Generating a G code program 8 8 Selection of the cycles via softkey Milling Operating Manual 08 2018 6FC5398 7CP41 0BA0 309 ...

Page 310: ...ing reference Programming Manual Measuring cycles SINUMERIK 840D sl 828D A menu tree with all of the available measuring versions of the measuring cycle function Measure tool can be found in the following reference Programming Manual Measuring cycles SINUMERIK 840D sl 828D Generating a G code program 8 8 Selection of the cycles via softkey Milling 310 Operating Manual 08 2018 6FC5398 7CP41 0BA0 ...

Page 311: ... to select whether you want support for programming contours drilling or milling cycles 2 Select the desired cycle via the softkey 3 Enter the parameters and press the Accept key The cycle is transferred to the editor as G code 8 9 2 Setting data for cycles Cycle functions can be influenced and configured using machine and setting data References For additional information please refer to the foll...

Page 312: ...bles Please note the following points when using variables Values of variables and expressions are not checked since the values are not known at the time of programming Variables and expressions cannot be used in fields in which a text is expected e g tool name An exception is the Engraving function in which you can assign the desired text in the text field via a variable as Variable text Selectio...

Page 313: ...ls in NC programs can always be recompiled with a higher software version changed and then run again When transferring NC programs to a machine with a lower software version it cannot be guaranteed however that the program will be able to be changed by recompiling cycle calls 8 9 7 Additional functions in the input screens Selection of units If for example the unit can be switched in a field this ...

Page 314: ...e detailed information about certain G code commands or cycle parameters then you can call a context sensitive online help Generating a G code program 8 9 Calling technology functions Milling 314 Operating Manual 08 2018 6FC5398 7CP41 0BA0 ...

Page 315: ...a parameter settings Software option You require the Measuring cycles option to use Measuring cycles References You will find a more detailed description on how to use measuring cycles in Programming Manual Measuring cycles SINUMERIK 840D sl 828D Generating a G code program 8 10 Measuring cycle support Milling Operating Manual 08 2018 6FC5398 7CP41 0BA0 315 ...

Page 316: ...Generating a G code program 8 10 Measuring cycle support Milling 316 Operating Manual 08 2018 6FC5398 7CP41 0BA0 ...

Page 317: ...arger program loops or nested program loops this can result in performance problems in the editor Therefore always program program repetitions in the program end block Functions The following functionality is available Technology oriented program step selection cycles using softkeys Input windows for parameter assignment with animated help screens Context sensitive online help for every input wind...

Page 318: ...matics can be displayed in help screens and animations of the cyclic support Work plan The work plan in the editor provides an overview of the individual machining steps of a program Figure 9 1 Work plan of a ShopMill program Note In the program editor settings you can specify whether the machining times are to be recorded Creating a ShopMill program 9 1 Program views Milling 318 Operating Manual ...

Page 319: ...selected G code commands are to be highlighted in color The following colors are used as standard Display Meaning Blue font D S F T M and H functions Red font G0 motion command Green font G1 motion command Blue green font G2 or G3 motion command Gray font Comment Machine manufacturer You can define further highlight colors in the sleditorwidget ini configuration file Please refer to the machine ma...

Page 320: ...ew Note Switching between the help screen and the graphic view The key combination CTRL G is also available for the switchover between the help screen and the graphic view Graphic view The graphic view shows the contour of the workpiece as a dynamic graphic with broken lines The program block selected in the work plan is highlighted in color in the graphic view Figure 9 2 Graphic view of a ShopMil...

Page 321: ... graphic The selected parameter is displayed highlighted in the graphic The colored symbols Red arrow tool traverses in rapid traverse Green arrow tool traverses with the machining feedrate Parameter screen with graphic view Press the Graphic view softkey to toggle between the help screen and the graphic view in the screen Note Switching between the help screen and the graphic view The key combina...

Page 322: ...Figure 9 4 Parameter screen with graphic view See also Editor settings Page 222 Creating a ShopMill program 9 1 Program views Milling 322 Operating Manual 08 2018 6FC5398 7CP41 0BA0 ...

Page 323: ...locks and contours or positioning blocks separately These program blocks are automatically linked by the control and connected by brackets in the work plan In the technology blocks you specify how and in what form the machining should take place e g centering first and then drilling In the positioning blocks you define the positions for drilling or milling operations End of program End of program ...

Page 324: ...s of circular programming and polar coordinates Working planes Working planes are defined as follows Plane Tool axis X Y G17 Z Z X G18 Y Y Z G19 X 9 3 2 Polar coordinates The rectangular coordinate system is suitable in cases where dimensions in the production drawing are orthogonal For workpieces dimensioned with arcs or angles it is better to define positions using polar coordinates This is poss...

Page 325: ... the position specifications refer to the currently valid zero point Applied to tool movement this means The absolute dimension data defines the position to which the tool is to travel Example 3 3 3 The position data points P1 to P3 in absolute dimensions relative to the zero point are the following P1 X20 Y35 P2 X50 Y60 P3 X70 Y20 Creating a ShopMill program 9 3 Fundamentals Milling Operating Man...

Page 326: ...imension When incremental dimensions are entered each item of position data refers to a point programmed beforehand Example 3 3 3 The position data for points P1 to P3 in incremental dimensions are P1 X20 Y35 referred to the zero point P2 X30 Y20 referred to P1 P3 X20 Y 35 referred to P2 Creating a ShopMill program 9 3 Fundamentals Milling 326 Operating Manual 08 2018 6FC5398 7CP41 0BA0 ...

Page 327: ... required name and press the OK softkey The name can contain up to 28 characters name dot 3 character extension You can use any letters except accented digits or the un derscore symbol _ The ShopMill program type is selected The editor is opened and the Program header parameter screen is dis played Filling out the program header 5 Select a work offset and enter the dimensions of the blank and the ...

Page 328: ...e used in the program with the Table selection C1 All clampings are mounted on a rotary axis Note Please refer to the machine manufacturer s specifications Blank Define the form and dimensions of the workpiece Cylinder A Outer diameter mm Polygon N Number of edges SW L Width across flats Edge length mm Centered cuboid W Width of blank mm L Length of blank mm Cuboid X0 1 1st corner point X mm Y0 1 ...

Page 329: ...must be entered as an incremental value without sign Machining direction When machining a pocket a longitudinal slot or a spigot ShopMill takes the machining direction down cut or up cut and the spindle direction in the tool list into account The pocket is then machined in a clockwise or counterclockwise direction During path milling the programmed contour direction determines the machining di rec...

Page 330: ...in the program with the Table selection C1 All clampings are mounted on a rotary axis Note Please refer to the machine manufacturer s specifications Blank Define the form and dimensions of the workpiece Cylinder ØA Outer diameter mm Polygon N Number of edges SW L Width across flats Edge length mm Centered cuboid W Width of blank mm L Length of blank mm Cuboid X0 1 corner point X mm Y0 1 corner poi...

Page 331: ...value without sign Note Retraction milling cannot be used in turning applications Retraction turning only for Cylinder Tube Centered cu boid Polygon and Without blanks The retraction area indicates the area outside of which collision free traversing of the axes must be possible Simple XRA Retraction plane X external abs or retraction plane X referred to HA inc XRI only for Tube blank Retraction pl...

Page 332: ...t a longitudinal slot or a spigot ShopMill takes the machining direction down cut or up cut and the spindle direction in the tool list into account The pocket is then machined in a clockwise or counterclockwise direction During path milling the programmed contour direction determines the machining di rection Retraction position pat tern Optimized When machining with optimized retraction the tool t...

Page 333: ...T D F S V and then enter the values for the other parameters Selecting a tool from the tool list 4 Press the Select tools softkey if you wish to select the tool for parameter T The Tool selection window is opened 5 Position the cursor on the tool that you wish to use for machining and press the To program softkey The selected tool is accepted into the parameter screen form OR Press the Tool list a...

Page 334: ...ou would like to use for machining NOTICE Risk of collision Collisions may occur if you specify the wrong cutting edge number for some tools e g a flat chamfering drill with guide spigot or step drill and then traverse the tool Always ensure that you enter the correct cutting edge number Tool length compensation Tool length compensation takes effect as soon as the tool is loaded into the spindle D...

Page 335: ... the exception of concave curves where the feedrate is relative to the contact point between the tool and workpiece The maximum feedrate is determined via machine data Converting the feedrate F for drilling and milling The feedrate entered for drilling cycles is automatically converted when switching from mm min to mm rev and vice versa using the selected tool diameter The feedrate entered for mil...

Page 336: ...orward key and the Straight Circle softkey 3 Press the Machine functions softkey The Machine functions window opens 4 Enter the desired parameters 5 Press the Accept softkey See also Starting and stopping a spindle manually Page 166 Parameters Description Unit Spindle Spindle M function defines the spindle direction of rotation or spindle position Spindle off Spindle rotates clockwise Spindle rota...

Page 337: ...achining is continued s Programmed stop Programmed stop on Stops machining at the machine if under Machine in the Program control window the check box Programmed stop was activated Stop Stop on Stops machining at the machine Note Coolant after a block search After a block search the coolant specified for a tool in the tool management is always output after a block search even if a different coolan...

Page 338: ... of the selected offset here Procedure 1 Press the Various Transformations and Work offset softkeys The Work offset window opens 2 Select the desired work offset e g G54 3 Press the Accept softkey The work offset is transferred into the work plan Creating a ShopMill program 9 10 Call work offsets Milling 338 Operating Manual 08 2018 6FC5398 7CP41 0BA0 ...

Page 339: ...ave different names No names used in the NCK can be used You can also set markers and repeats after creating the program but not within linked program blocks Note You can use one and the same marker as end marker for preceding program blocks and as start marker for following program blocks Procedure 1 Position the cursor at the program block behind which a program block that will be repeated shoul...

Page 340: ...nd Repeat progr softkeys 9 Enter the names of the start and end markers and the number of times the blocks are to be repeated 10 Press the Accept softkey The marked program blocks are repeated Creating a ShopMill program 9 11 Repeating program blocks Milling 340 Operating Manual 08 2018 6FC5398 7CP41 0BA0 ...

Page 341: ...The workpieces are counted Yes Yes The program is repeated without a new CYCLE START until the required number of workpieces have been ma chined Yes No Without a new CYCLE START the program is repeated an infinite number of times You can interrupt program execution with RESET Procedure 1 Open the Program end program block if you want to machine more than one workpiece 2 In the Repeat field enter Y...

Page 342: ... that you wish to change in the Program Manager operating area 2 Press the Cursor right or INPUT key The work plan of the program is displayed 3 Position the cursor in the work plan at the desired program block and press the Cursor right key The parameter screen for the selected program block is displayed 4 Make the desired changes 5 Press the Accept softkey OR Press the Cursor left key The change...

Page 343: ...centered cuboid and your dimensions The blank entry always refers to the work offset currently effective at the position in the program Procedure 1 Select the Program operating area 2 Press the Various and Settings softkeys The Settings input window opens Parameters Description Unit Clamping Selecting the clamping location of the blank Table The blank is mounted on a table C1 The blank is mounted ...

Page 344: ...on N Number of edges SW L Width across flats Edge length mm Without No blank use HA Initial dimension mm HI Final dimension abs or final dimension in relation to HA inc mm PL Machining plane G17 XY G18 ZX G19 YZ RP Retraction plane abs mm SC Safety clearance inc Acts in relation to the reference point The direction in which the safety clearance is effec tive is automatically determined by the cycl...

Page 345: ...sertion All of the cycles functions available in the control are shown in this display However at a specific system only the steps possible corresponding to the selected technology can be selected Creating a ShopMill program 9 15 Selection of the cycles via softkey Milling Operating Manual 08 2018 6FC5398 7CP41 0BA0 345 ...

Page 346: ... Creating a ShopMill program 9 15 Selection of the cycles via softkey Milling 346 Operating Manual 08 2018 6FC5398 7CP41 0BA0 ...

Page 347: ... Turning cycles only for milling turning machine Creating a ShopMill program 9 15 Selection of the cycles via softkey Milling Operating Manual 08 2018 6FC5398 7CP41 0BA0 347 ...

Page 348: ...Note Please refer to the machine manufacturer s specifications Creating a ShopMill program 9 15 Selection of the cycles via softkey Milling 348 Operating Manual 08 2018 6FC5398 7CP41 0BA0 ...

Page 349: ...l Measuring cycles SINUMERIK 840D sl 828D A menu tree with all of the available measuring versions of the measuring cycle function Measure tool can be found in the following reference Programming Manual Measuring cycles SINUMERIK 840D sl 828D Creating a ShopMill program 9 15 Selection of the cycles via softkey Milling Operating Manual 08 2018 6FC5398 7CP41 0BA0 349 ...

Page 350: ...help 9 16 2 Checking input parameters When generating the program the parameters that are entered are already checked in order to avoid making incorrect entries If a parameter is assigned an illegal value this is indicated in the input screen and is designated as follows The entry field has a colored background background color pink A note is displayed in the comment line If the parameter input fi...

Page 351: ...creen You exit the edit mode by pressing the SHIFT INSERT key combi nation OR You are in the edit mode and press the INPUT key A new line is created after the cursor position 9 16 5 Programming variables In principle variables or expressions can also be used in the input fields of the screen forms instead of specific numeric values In this way programs can be created very flexibly Input of variabl...

Page 352: ...n always be recompiled with a higher software version changed and then run again When transferring NC programs to a machine with a lower software version it cannot be guaranteed however that the program will be able to be changed by recompiling cycle calls Creating a ShopMill program 9 16 Calling technology functions Milling 352 Operating Manual 08 2018 6FC5398 7CP41 0BA0 ...

Page 353: ...a parameter settings Software option You require the Measuring cycles option to use Measuring cycles References You will find a more detailed description on how to use measuring cycles in Programming Manual Measuring cycles SINUMERIK 840D sl 828D Creating a ShopMill program 9 17 Measuring cycle support Milling Operating Manual 08 2018 6FC5398 7CP41 0BA0 353 ...

Page 354: ...eter Cutting materials Number of teeth Face miller D80 mm HM Z 8 End mill D20 mm HM Z 3 End mill D10 mm HM Z 3 End mill D8 mm HM Z 3 Centering tool NC spotdrill D10 mm HM Twist drill D10 mm HSS The correction compensation values for length and radius as well as the tip angle for drills and number of teeth for milling tools should be entered into the tool list If you are working with ShopMill in ad...

Page 355: ...18 2 Programming 1 Program header 1 Specify the blank Measurement unit mm Work offset G54 Blank Cuboid X0 2 5abs Y0 2 5abs X1 182 5abs Y1 182 5abs ZA 1abs Creating a ShopMill program 9 18 Example standard machining Milling Operating Manual 08 2018 6FC5398 7CP41 0BA0 355 ...

Page 356: ...omatically defined 2 Rectangular spigots face milling 1 Press the Milling and Face milling softkeys 2 Enter the following technology parameters T Facing tool_80mm D1 F 0 10 mm tooth V 750 m min 3 Enter the following parameters Machining Roughing Direction X0 2 5abs Y0 2 5abs Z0 1abs X1 185abs Y1 185abs Z1 0abs DXY 80 DZ 2 0 UZ 0 4 Press the Accept softkey Creating a ShopMill program 9 18 Example s...

Page 357: ...abs Z0 0abs W1 185 fictitious blank dimension L1 185 fictitious blank dimension W 180abs L 180abs R 10abs α0 0degrees Z1 20inc DZ 5 UXY 0 UZ 0 4 Press the Accept softkey 4 Outside contour islands To simply machine the entire surface outside the island define a contour pocket around the blank and then program the island In this way the entire surface area is machined and no residual material is lef...

Page 358: ... Accept softkey 6 Enter the following contour elements and acknowledge using the Accept softkey 6 1 X 190abs 6 2 Y 190abs 6 3 X 10abs 6 4 Press the and Close contour softkeys to close the contour 7 Press the Accept softkey Outside contour of the island 1 Press the Contour milling Contour and New contour softkeys The New Contour input window opens 2 Enter the contour name in this case Part_4_ISLAND...

Page 359: ...0 6 3 X 15abs Y 135abs 6 4 Y 155abs R 10 6 5 X 60abs R 15 6 6 Y 135abs R 20 7 Direction of rotation 8 R 25 X 110abs 9 1 Y 155abs R 15 9 2 R 0 9 3 X 165abs Y 95abs α1290 degreesR 0 9 4 X 155abs α1 240 De grees R 28 9 5 FS 0 9 6 X 140abs Y 25 abs α1225 degreesR 0 10 Press the and Close contour softkeys to close the contour 11 Press the Accept softkey Creating a ShopMill program 9 18 Example standard...

Page 360: ...he tool diameter is large enough to cut the intended pocket A message will be displayed if you make a mistake If you want to finish cut the pocket you must assign parameters UXY and UZ accordingly and add a second solid machining cycle for finishing 5 Milling a rectangular pocket large 1 Press the Milling Pocket and Rectangular pocket softkeys The Rectangular Pocket input window opens 2 Enter the ...

Page 361: ...l 1 Press the Milling Pocket and Rectangular pocket softkeys The Rectangular Pocket input window opens 2 Enter the following technology parameters T End mill_10mm D1 F 0 04 mm tooth V 260 m min 3 Enter the following parameters Reference point Machining Roughing Machining position Single position X0 90abs Y0 60abs Z0 4abs W 20 L 35 R 5 α0 15degrees Creating a ShopMill program 9 18 Example standard ...

Page 362: ...Groove input window opens 2 Enter the following technology parameters T End_mill_8mm D1 F 0 018 mm tooth FZ 0 010 mm tooth V 230 m min 3 Enter the following parameters Machining Roughing Circular pattern Pitch circle X0 85abs Y0 135abs Z0 0abs N 1 R 40 α0 180degrees α1 180degrees W 10 Z1 3inc DZ 3 UXY 0mm 4 Press the Accept softkey Creating a ShopMill program 9 18 Example standard machining Millin...

Page 363: ... 4 Press the Accept softkey 9 Drilling reaming 1 Press the Drilling Drilling reaming and Drilling softkeys The Drilling input window opens 2 Enter the following technology parameters T DRILL10 D1 F 500 mm min S 1600 rev min 3 Enter the following parameters Diameter tip Tip Z1 25abs Predrilling No Through drilling No DT 0 4 Press the Accept softkey Creating a ShopMill program 9 18 Example standard ...

Page 364: ...bstacle 1 Press the Drilling Positions and Obstacle softkeys The obstacle input window opens 2 Enter the following parameters Z 2abs 3 Press the Accept softkey Note If this obstacle cycle is not inserted the drill will violate the right hand corner of the island contour Alternately you could increase the safety clearance Creating a ShopMill program 9 18 Example standard machining Milling 364 Opera...

Page 365: ...cket and Circular pocket softkeys The Circular Pocket input window opens 2 Enter the following technology parameters T End_mill_8mm D1 F 0 018 mm tooth V 230 m min 3 Enter the following parameters Machining Roughing Machining type Plane by plane Machining position Single position X0 85abs Y0 135abs Z0 10abs Diameter 30 Z1 12inc DXY 40 DZ 5 UXY 0mm UZ 0 Insertion Helical Creating a ShopMill program...

Page 366: ...so program the four countersinks 16 and 4 deep using a circular pocket and repeating positions 2 3 and 4 9 18 3 Results simulation test Figure 9 5 Programming graphics Creating a ShopMill program 9 18 Example standard machining Milling 366 Operating Manual 08 2018 6FC5398 7CP41 0BA0 ...

Page 367: ... simulation During simulation the current program is calculated in its entirety and the result displayed in graphic form Figure 9 7 3D view Creating a ShopMill program 9 18 Example standard machining Milling Operating Manual 08 2018 6FC5398 7CP41 0BA0 367 ...

Page 368: ...0 04 S8500 M3 M8 POCKET3 50 0 1 4 70 40 10 90 60 15 4 0 0 0 04 0 2 0 21 40 8 3 15 2 1 0 1 2 11100 11 111 POCKET3 50 4 1 2 35 20 6 90 60 15 2 0 0 0 04 0 2 0 31 40 8 3 15 10 2 0 1 2 11100 11 111 G0 Z200 M9 Tool change T MILLER8 D1 M6 G95 FZ 0 018 S9000 M3 M8 SLOT2 50 0 1 3 1 180 10 85 135 40 180 90 0 01 0 018 3 0 0 2001 0 0 0 0 1 2 100 1001 101 G0 Z200 M9 Tool change T CENTERING TOOL10 D1 M6 G94 F10...

Page 369: ...0 0 0 0 0 3 2 100 1001 101 POCKET4 50 10 1 12 30 85 135 5 0 0 500 0 01 0 15 40 9 15 0 2 0 0 3 2 10100 111 111 MCALL POCKET4 50 10 1 4 16 0 0 5 0 0 500 0 025 0 15 40 9 15 0 2 0 0 3 4 10100 111 111 REPEATB POS_1 SM MCALL G0 Z200 M9 M30 Contour E_LAB_A_PART_4_POCKET SM Z 5 7__DlgK contour definition begin Don t change GP RO HD G17 G90 DIAMOF GP G0 X 10 Y 10 GP G1 X190 GP Y190 GP X 10 GP Y 10 GP CON 0...

Page 370: ...35 GP RO HD LU EY 155 GP RO HD R RROUND 10 GP RO HD LR EX 60 GP RO HD R RROUND 15 GP RO HD LD EY 135 GP RO HD ACCW EX 110 RAD 25 GP RO HD LU EY 155 AT 0 GP RO HD R RROUND 15 GP RO HD LR GP RO HD LA EX 165 EY 95 ASE 290 GP RO HD LA EX 155 ASE 240 GP RO HD R RROUND 28 GP RO HD LD GP RO HD LA EX 140 EY 25 ASE 225 GP RO HD LA EX 90 EY 25 GP RO HD End contour definition end Don t change GP RO HD E_LAB_...

Page 371: ... is automatically determined by the cycle Drilling depth Depending on the selection of the drill shank or drill tip or the centering diameter the programmed drilling depth refers to the following for cycles with a selection field Tip drilling depth in relation to the tip The drill is inserted into the workpiece until the drill tip reaches the value programmed for Z1 Shank drilling depth in relatio...

Page 372: ...g depth or So deep until the programmed diameter of the centering is reached The tool is retracted after a programmed dwell time has elapsed Approach retraction 1 The tool moves with G0 to safety clearance of the reference point 2 Inserted into the workpiece with G1 and the programmed feedrate F until the depth or the centering diameter is reached 3 On expiry of a dwell time DT the tool is retract...

Page 373: ... the tool list is applied Tip centered with reference to the depth The drill is inserted into the workpiece until the programmed insertion depth is reached It is inserted into the workpiece until the diameter is correct for diameter centering only mm Z1 Drilling depth abs or drilling depth in relation to Z0 inc It is inserted into the workpiece until it reaches Z1 for tip centering only mm DT Dwel...

Page 374: ... the machine manufacturer s specifications If the workpiece programming requires it you can display and change all of the parameters using Input complete Approach retraction 1 The tool moves with G0 to safety clearance of the reference point 2 The tool is inserted into the workpiece with G1 and the programmed feedrate F until it reaches the programmed final depth Z1 3 When a dwell time DT expires ...

Page 375: ...ip drilling depth in relation to the tip The drill is inserted into the workpiece until the drill tip reaches the value programmed for Z1 Z1 Drilling depth abs or drilling depth in relation to Z0 inc It is inserted into the workpiece until it reaches Z1 mm Predrilling Yes No ZA only for pre drilling yes Predrilling depth abs or predrilling depth in relation to the reference point inc mm FA only fo...

Page 376: ...sition only for G code Single position Drill hole at programmed position Position pattern Position with MCALL Z0 only for G code Reference point Z mm Drilling depth Shank drilling depth in relation to the shank The drill is inserted into the workpiece until the drill shank reaches the value programmed for Z1 The angle entered in the tool list is taken into account Tip drilling depth in relation to...

Page 377: ...1 4 Reaming CYCLE85 Function With the Reaming cycle the tool is inserted in the workpiece with the programmed spindle speed and the feedrate programmed at F If Z1 has been reached and the dwell time expired the reamer is retracted at the programmed retraction feedrate to the retraction plane Approach retraction 1 The tool moves with G0 to safety clearance of the reference point 2 The tool is inser...

Page 378: ...tion Unit Machining posi tion only for G code Single position Drill hole at programmed position Position pattern Position with MCALL Z0 only for G code Reference point Z mm FR only for G code Feedrate during retraction FR only for Shop Mill Feedrate during retraction mm min mm rev Z1 Drilling depth abs or drilling depth in relation to Z0 inc It is inserted into the workpiece until it reaches Z1 fo...

Page 379: ...ple mode the hidden parameters are allocated a fixed value that cannot be adjusted Machine manufacturer Various defined values can be pre assigned using setting data Please refer to the machine manufacturer s specifications If the workpiece programming requires it you can display and change all of the parameters using Input complete Approach retraction during chip breaking 1 The tool moves with G0...

Page 380: ... depth Z1 is reached 9 Dwell time at final drilling depth 10 The tool retracts to the retraction plane at rapid traverse Procedure 1 The part program or ShopMill program to be processed has been created and you are in the editor 2 Press the Drilling softkey 3 Press the Deep hole drilling and Deep hole drilling 1 softkeys The Deep hole Drilling 1 input window opens Parameters in the Input complete ...

Page 381: ...mm D only ShopMill Maximum depth infeed mm DF Infeed Degression amount by which each additional infeed is reduced inc Percentage for each additional infeed DF 100 Infeed increment remains constant DF 100 Infeed increment is reduced in direction of final drilling depth Example Last infeed was 4 mm DF is 80 Next infeed 4 x 80 3 2 mm Next infeed 3 2 x 80 2 56 mm etc mm V1 Minimum depth infeed only fo...

Page 382: ...ng edge number F Feedrate mm min mm rev S V Spindle speed or constant cutting rate rpm m min Parameter Description Machining position Single position Drill hole at programmed position Position pattern Position with MCALL Machining Swarf removal The drill is retracted from the workpiece for swarf removal Chip breaking The drill is retracted by the retraction distance V2 for chip breaking Z0 only fo...

Page 383: ...utomatic DBT Dwell time at drilling depth 0 6 s x DT Dwell time at final drilling depth 0 6 s x DTS only for G code Dwell time for swarf removal for swarf removal only 0 6 s x Machine manufacturer Please refer to the machine manufacturer s specifications 10 1 6 Deep hole drilling 2 CYCLE830 Function The cycle Deep hole drilling 2 covers the complete functionality of Deep hole drilling 1 in additio...

Page 384: ...pbreaking and drills up to the next infeed depth with programmed feedrate F 5 Step 4 is repeated until the final drilling depth Z1 is reached 6 Dwell time at final drilling depth DT 7 The tool retracts to the retraction plane at rapid traverse Approach retraction during stock removal 1 The tool moves with G0 to safety clearance of the reference point 2 The tool drills with the programmed spindle s...

Page 385: ...ble If a pilot hole exists the 1st drilling depth must be between the pilot hole and the final drilling depth The tool enters the pilot hole with reduced feedrate and reduced speed these values can be programmed Direction of spindle rotation The direction of spindle rotation with which the tool enters and withdraws from the pilot hole can be programmed as follows with stationary spindle with clock...

Page 386: ...hrough drilling yes Up to the remaining drilling depth you program drilling with the drilling feedrate and from that point onward you program drilling with a special feedrate FD Retraction Retraction can be realized at the pilot hole depth or the retraction plane Retraction to the retraction plane is realized with G0 or feedrate programmable speed as well as direction of rotation respectively stat...

Page 387: ...t cutting rate rpm distance min Parameter Description Unit Machining position only for G code Single position Drill hole at programmed position Position pattern with MCALL Z0 only G code Reference point Z mm Drilling depth Shank drilling depth in relation to the shank The drill is inserted into the workpiece until the drill shank reaches the value programmed for Z1 The angle entered in the tool li...

Page 388: ...pproach as a percentage of the drilling speed Spindle speed during approach rpm Constant cutting speed during approach G code distance min Constant cutting speed during approach ShopMill m min ZA only for predrilling Predrilling depth abs or predrilling depth in relation to Z0 inc mm FA only for predrilling Predrilling feedrate as a percentage of the drilling feedrate Predrilling feedrate ShopMill...

Page 389: ...V1 Infeed increment The tool is inserted by the infeed value programmed under V1 mm V2 for chip break ing only Retraction distance after each machining step Distance by which the drill is retracted for chip breaking V2 0 The tool is not retracted but is left in place for one revolution mm DTB Dwell time at drilling depth in seconds Dwell time at drilling depth in revolutions s rev Clearance dis ta...

Page 390: ...tion Retraction to pilot hole depth Retraction to retraction plane FR Retraction G code with rapid traverse Feedrate for retraction distance min Retraction ShopMill with rapid traverse Feedrate for retraction mm min SR VR Retraction with sta tionary spindle Direction of spindle rotation during re traction Spindle speed for retraction to the drilling speed Spindle speed for retraction rpm Constant ...

Page 391: ... pilot hole with feedrate FP ZP Depth of the pilot hole as a factor of the bore diameter Depth of the pilot hole in relation to Z0 inc or depth of the pilot hole abs Ø mm ZPV Clearance distance of pilot hole mm FP First cut feedrate as a percentage of the drilling feedrate First cut feedrate ShopMill mm rev or mm min First cut feedrate G code distance min or distance rev SP Approach with stationar...

Page 392: ...rilling ShopMill mm min or mm rev Coolant off only G code M9 M function to switch off the coolant Hidden parameters The following parameters are hidden They are pre assigned fixed values or values that can be adjusted using setting data Parameter Description Value Can be set in SD PL only for G code Machining plane Defined in MD 52005 SC only for G code Safety clearance 1 mm x Drilling depth Drill...

Page 393: ...Number of chipbreaking strokes before each swarf removal operation 1 Retraction for swarf removal Swarf removal at the pilot hole depth or safety clearance Safety clearance DTS Dwell time for swarf removal in seconds 0 6 s DT only for through drilling no Dwell time at final depth in seconds 0 6 s Retraction Retraction to pilot hole depth or retraction plane Pilot hole depth FR Retraction in rapid ...

Page 394: ...l orientation angle α Note The Boring cycle can be used if the spindle to be used for the boring operation is technically able to go into position controlled spindle operation Approach retraction 1 The tool moves with G0 to safety clearance of the reference point 2 Travel to the final drilling depth with G1 and the speed and feedrate programmed before the cycle call 3 Dwell time at final drilling ...

Page 395: ... in relation to Z0 inc mm DT Dwell time at final drilling depth in seconds Dwell time at final drilling depth in revolutions s rev SPOS Spindle stop position Degrees Lift mode Do not lift off contour The cutting edge is not fully retracted but traverses back to the retraction plane Lift The cutting edge retracts from the edge of the hole and then retracts to the safety clearance from the reference...

Page 396: ... to reduce the wide variety of parameters to the most important parameters using the Input selection field In this Input simple mode the hidden parameters are allocated a fixed value that cannot be adjusted Machine manufacturer Various defined values can be pre assigned using setting data Please refer to the machine manufacturer s specifications If the workpiece programming requires it you can dis...

Page 397: ...s with spindle speed S as far as the next infeed depth 6 Steps 2 to 5 are repeated until the programmed final drilling depth Z1 is reached 7 On expiry of dwell time DT the tool is retracted with spindle speed SR to the safety clearance The spindle stops and retracts to the retraction plane Approach retraction CYCLE84 without compensating chuck in the chip breaking mode 1 The tool drills at the pro...

Page 398: ... for G code Single position Drill hole at programmed position Position pattern Position with MCALL Z0 only for G code Reference point Z mm Z1 End point of the thread abs or thread length inc It is inserted into the workpiece until it reaches Z1 mm Machining with compensating chuck You can select the following technologies for tapping With encoder Tapping with spindle encoder Without encoder Tappin...

Page 399: ... MODULUS MODULUS Pitch π in turns per inch Used with pipe threads for example When entered per inch enter the integer number in front of the decimal point in the first parameter field and the figures after the decimal point as a fraction in the second and third field in mm rev in inch rev The pitch is determined by the tool used MODULUS Turns mm rev in rev αS only for G code Starting angle offset ...

Page 400: ...h encoder Dwell time after drilling without encoder Dwell time at final drilling depth s SR only for G code Spindle speed for retraction only for when a compensating chuck is not used rpm SDE only for G code Direction of rotation after end of cycle Technology Adapting the technology Yes Exact stop Precontrol Acceleration Spindle No Note The technology fields are only displayed if their display has...

Page 401: ... Description Compensating chuck mode With compensating chuck Without compensating chuck Machining position Single position Drill hole at programmed position Position pattern Position with MCALL Z0 Reference point Z mm Z1 End point of the thread abs or thread length inc It is inserted into the workpiece until it reaches Z1 mm Machining with compensating chuck With encoder Tapping with spindle encod...

Page 402: ...selected One cut The thread is drilled in one cut without interruption Chip breaking The drill is retracted by the retraction amount V2 for chip breaking Swarf removal The drill is retracted from the workpiece for swarf removal D 1st drilling depth abs or 1st drilling depth referred to Z0 inc mm SR Spindle speed for retraction only for without compensating chuck rpm Hidden parameters The following...

Page 403: ...drilling depth D If the final drilling depth Z1 is not reached the tool will travel back to the workpiece surface in rapid traverse for stock removal Then the tool will traverse with rapid traverse to a position 1 mm above the drilling depth previously achieved allowing it to continue drilling at drill feedrate F1 at the next infeed Parameter DF is taken into account from the 2nd infeed and higher...

Page 404: ...gle position Drill hole at programmed position Position pattern Position with MCALL F1 only for G code Drilling feedrate mm min mm rev Z0 only for G code Reference point Z mm Z1 Thread length inc or end point of the thread abs mm D Maximum depth infeed D Z1 Infeed to the final drilling depth D Z1 Several infeeds with stock removal mm DF Percentage for each additional infeed DF 100 Infeed increment...

Page 405: ... reduced drilling feedrate inc yes only for predrilling mm Through drilling Remaining drilling depth with drilling feedrate Yes No ZD Depth for feedrate reduction yes only for through drilling mm FD Feedrate for through drilling yes only for through drilling mm min mm rev Swarf removal Swarf removal before thread milling Yes No Return to workpiece surface for swarf removal before thread milling Th...

Page 406: ...d in one cycle Synchronous operation Up cut operation Mill thread in two cycles rough cutting is performed by Up cut operation milling with defined allowances then finish cutting is performed by climb milling with milling feedrate FS FS Finishing feedrate only for Synchronous operation Up cut operation milling mm min mm tooth 10 1 10 Positioning and position patterns Function The positions are pro...

Page 407: ... starts at the reference point In the case of a grid machining is performed first in the direction of the 1st axis and then meandering back and forth The frame and circle or pitch circle are machined counter clockwise G code For G code for rows frames grids a start is always made at the next corner of the frame or grid or the end of the row The frame and circle or pitch circle are machined counter...

Page 408: ...linder surface transformation is active 10 1 11 Arbitrary positions CYCLE802 Function The Arbitrary positions function allows you to program any positions i e in rectangular or polar coordinates Individual positions are approached in the order in which you program them Press softkey Delete all to delete all positions programmed in X Y Rotary axis XA plane You program in XA to prevent the Y axis mo...

Page 409: ...plane You program in XYA if the Y axis should also move during machining A value can be specified for each position In addition to the possibilities of XA the following is also possible for example Programming technological functions cycles 10 1 Drilling Milling Operating Manual 08 2018 6FC5398 7CP41 0BA0 409 ...

Page 410: ...code Repeat jump label for position PL only for G code Machining plane Axes Selection of the participating axes XY 1st and 2nd axis of the plane XA 1st rotary axis and assigned linear axis XYA 1st rotary axis and both axes of the plane Note Rotary axes are only displayed in the selection field if they have been released for use in the position pattern Please observe the information provided by you...

Page 411: ...nly right angled X coordinate of the 1st position abs Y coordinate of the 1st position abs X coordinate of additional positions abs or inc Y coordinate of additional positions abs or inc mm mm mm mm X0 A0 X1 X8 A1 A8 Axes XA X coordinate of the 1st position abs A coordinate angle of the 1st position abs X coordinates of additional positions abs or inc A coordinates angle of additional positions ab...

Page 412: ...ositive angle Line is rotated counter clockwise Negative angle Line is rotated clockwise Degrees L0 L N Distance of the 1st position to reference point Distance between the positions Number of positions mm mm 10 1 13 Grid or frame position pattern CYCLE801 Function You can use the Grid position pattern function CYCLE801 to program any number of positions that are spaced at an equal distance along ...

Page 413: ...his position must be programmed absolutely in the 1st call mm Y0 Y coordinate of the reference point Y abs This position must be programmed absolutely in the 1st call mm α0 Angle of rotation of the line referred to the X axis Positive angle Line is rotated counter clockwise Negative angle Line is rotated clockwise Degrees αX αY L1 L2 N1 N2 Shear angle X Shear angle Y Distance between columns Dista...

Page 414: ...n HOLES2 Function You can program holes on a full circle or a pitch circle of a defined radius with the Circle position pattern and Pitch circle position pattern functions The basic angle of rotation α0 for the 1st position is relative to the X axis The control calculates the angle of the next hole position as a function of the total number of holes The angle it calculates is identical for all pos...

Page 415: ... only for G code Repeat jump label for position PL only for G code Machining plane Axes Selection of the participating axes XY 1st and 2nd axis of the plane XA 1st rotary axis and assigned linear axis Note Rotary axes are only displayed in the selection field if they have been released for use in the position pattern Please observe the information provided by your machine manufacturer Z0 only for ...

Page 416: ...a mm mm Degrees mm X0 A0 N Axes XA X coordinate of the reference point abs Start angle of the A axis abs Number of positions mm Degrees Parameters Pitch circle position pattern Parameter Description Unit LAB only for G code Repeat jump label for position PL only for G code Machining plane Axes Selection of the participating axes XY 1st and 2nd axis of the plane XA 1st rotary axis and assigned line...

Page 417: ...on between the positions Straight line Next position is approached linearly in rapid traverse Circle Next position is approached along a circular path at the feedrate defined in the machine data mm mm Degrees Degrees mm X0 A0 A1 N Axes XA X coordinate of the reference point abs Start angle of the A axis abs Advance angle of the A axis inc Number of positions mm Degrees Degrees 10 1 15 Displaying a...

Page 418: ...ide position window opens on top of the input form of the position pattern The positions are displayed in a table The numbers of the positions their angle α as well as a checkbox with the state activated check mark set deactivated no check mark set are displayed The selected position in the graphic is highlighted in color 5 Using the mouse select the required position and deactivate or activate th...

Page 419: ...rk plan program view or G code program after the block number Procedure 1 The part program or ShopMill program to be processed has been created and you are in the editor 2 Press the Drilling and Repeat position softkeys The Repeat positions input window opens 3 After you have entered the label or the position pattern number e g 1 press the Accept softkey The position pattern you have selected is t...

Page 420: ...above the workpiece edge Finishing Milling the surface once Tool turns at safety distance in the X Y plane Retraction of milling cutter Depth infeed always takes place outside the workpiece For a workpiece with edge breaking select the rectangular spigot cycle In face milling the effective tool diameter for a tool of type Milling cutter is stored in a machine data item Machine manufacturer Please ...

Page 421: ... in the editor 2 Press the Milling softkey 3 Press the Face milling softkey The Face Milling input window opens Parameters G code program Parameters ShopMill program PL Machining plane T Tool name RP Retraction plane mm D Cutting edge number SC Safety clearance mm F Feedrate mm min mm tooth F Feedrate S V Spindle speed or constant cutting rate rpm m min Programming technological functions cycles 1...

Page 422: ...tion to Z0 inc mm mm mm DXY Maximum plane infeed Alternately you can specify the plane infeed in as a ratio plane infeed mm to the milling cutter diameter mm mm DZ Maximum depth infeed for roughing only mm UZ Finishing allowance depth mm Unit of feedrate as programmed before the cycle call Note The same finishing allowance must be entered for both roughing and finishing The finishing allowance is ...

Page 423: ...ure if you wish to predrill Input simple For simple machining operations you have the option to reduce the wide variety of parameters to the most important parameters using the Input selection field In this Input simple mode the hidden parameters are allocated a fixed value that cannot be adjusted Machine manufacturer Various defined values can be pre assigned using setting data Please refer to th...

Page 424: ...angular pocket 6 6 6 Figure 10 4 Geometries when chamfering inside contours Note The following error messages can occur when chamfering inside contours Safety clearance in the program header too large This error message appears when chamfering would in principle be possible with the parameters entered for FS and ZFS but the safety clearance then could not be maintained Immersion depth too large Th...

Page 425: ...ty clearance mm S V Spindle speed or constant cutting rate rpm m min F Feedrate Parameter Description Unit Reference point The following different reference point positions can be selected center bottom left bottom right top left top right The reference point highlighted in blue is displayed in the Help screen Machining The following machining operations can be selected roughing finishing edge edg...

Page 426: ...e center of pocket The tool executes the calculated actual depth infeed at the pocket center in a single block This setting can be used only if the cutter can cut across center or if the pocket has been predrilled Helical Insert along helical path The cutter center point traverses along the helical path determined by the radius and depth per revolution helical path If the depth for one infeed has ...

Page 427: ...call Parameters in the Input simple mode G code program parameters ShopMill program parameters Input simple Milling direction T Tool name RP Retraction plane mm D Cutting edge number F Feedrate F Feedrate mm min mm rev S V Spindle speed or constant cutting rate rpm m min Parameter Description Machining The following machining operations can be selected roughing finishing edge edge finishing Chamfe...

Page 428: ...nt traverses along the helical path determined by the radius and depth per revolution helical path If the depth for one infeed has been reached a full circle motion is executed to eliminate the inclined insertion path Oscillating Insert with oscillation along center axis of rectangular pocket The cutter center point oscillates back and forth along a linear path until it reaches the depth infeed Wh...

Page 429: ... manufacturer Please refer to the machine manufacturer s specifications 10 2 3 Circular pocket POCKET4 Function You can mill any circular pocket with the Circular pocket cycle The following machining methods are available Mill circular pocket from solid material Predrill circular pocket in the center first if for example the milling cutter does not cut in the center program the drilling circular p...

Page 430: ...method 4 The tool moves back to the safety clearance at rapid traverse Approach retraction for helical solid machining In helical reaming the material is removed down to pocket depth in a helical movement 1 The tool approaches the center point of the pocket at rapid traverse at the height of the retraction plane and adjusts to the safety clearance 2 Infeed to the first machining diameter 3 The cir...

Page 431: ... too large This error message appears when chamfering would in principle be possible with the parameters entered for FS and ZFS but the safety clearance then could not be maintained Immersion depth too large This error message appears when chamfering would be possible through the reduction of the immersion depth ZFS Tool diameter too large This error message appears when the tool would already dam...

Page 432: ...ket to a safety clearance Edge finishing In edge finishing the edge is machined first with a helical movement down to the bottom A full circle is effected down to pocket depth to remove the residual material The tool is retracted from the edge and base of the pocket in a quadrant and retracted with rapid traverse to a safety clearance Procedure 1 The part program or ShopMill program to be processe...

Page 433: ...tter diameter only for and In DZ Maximum depth infeed only for and Rand mm UXY Plane finishing allowance only for and edge mm UZ Depth finishing allowance only for and mm Insertion Various insertion modes can be selected only for plane by plane machin ing method and for or edge Predrilled only for G code Perpendicular Insert vertically at the center of pocket The tool executes the calculated depth...

Page 434: ...et or hole has already been machined in the workpiece This needs to be enlarged Parameters AZ and 1 must be programmed FS Chamfer width for chamfering for chamfering only mm ZFS Insertion depth of tool tip abs or inc for chamfering only mm AZ Depth of premachining for remachining only mm 1 Diameter of premachining for remachining only mm Unit of feedrate as programmed before the cycle call Paramet...

Page 435: ...plane machining method and for and edge Predrilled only for G code Perpendicular Insert vertically at the center of pocket The tool executes the calculated depth infeed vertically at the center of the pocket Feedrate Infeed rate as programmed under FZ Helical Insert along helical path The cutter center point traverses along the helical path determined by the radius and depth per revolution If the ...

Page 436: ...tion Mill circular pocket at the programmed position X0 Y0 Z0 Single posi tion Solid machining The pocket is milled from the solid material Complete machining Machine manufacturer Please refer to the machine manufacturer s specifications 10 2 4 Rectangular spigot CYCLE76 Function You can mill various rectangular spigots with the Rectangular spigot cycle You can select from the following shapes wit...

Page 437: ...starting point is on the positive X axis rotated through α0 2 The tool approaches the spigot contour sideways in a semicircle at machining feedrate The tool first executes infeed at machining depth and then moves in the plane The rectangular spigot is machined depending on the programmed machining direction up cut down cut in a clockwise or counterclockwise direction 3 When the rectangular spigot ...

Page 438: ...tooth SC Safety clearance mm S V Spindle speed or constant cutting rate rpm m min F Feedrate Parameter Description Unit FZ only for G code Depth infeed rate Reference point The following different reference point positions can be selected center bottom left bottom right top left top right Machining roughing finishing Chamfering Machining posi tion Single position A rectangular spigot is machined a...

Page 439: ...h a lower finishing allowance only for and mm UZ Depth finishing allowance tool axis only for and mm W1 Width of blank spigot important for determining approach position only for and mm L1 Length of blank spigot important for determining approach position only for and mm FS Chamfer width for chamfering for chamfering only mm ZFS Insertion depth of tool tip abs or inc for chamfering only mm Unit of...

Page 440: ...Depth finishing allowance tool axis only for or mm W1 Width of blank spigot important for determining approach position only for and mm L1 Length of blank spigot important for determining approach position only for and mm FS Chamfer width for chamfering for chamfering only mm ZFS Insertion depth of tool tip abs or inc for chamfering only mm Unit of feedrate as programmed before the cycle call Hidd...

Page 441: ...lues can be pre assigned using setting data Please refer to the machine manufacturer s specifications If the workpiece programming requires it you can display and change all of the parameters using Input complete Approach retraction 1 The tool approaches the starting point at rapid traverse at the height of the retraction plane and is fed in to the safety clearance The starting point is always on ...

Page 442: ...ogram or ShopMill program to be processed has been created and you are in the editor 2 Press the Milling softkey 3 Press the Multi edge spigot and Circular spigot softkeys The Circular Spigot input window opens Parameters in the Input complete mode Parameters G code program Parameters ShopMill program Input complete PL Machining plane T Tool name Milling direction D Cutting edge number RP Retracti...

Page 443: ... for the length L and width W of the circular spigot Smaller circular spigot dimensions are obtained by calling the cycle again and program ming it with a lower finishing allowance only for and mm UZ Depth finishing allowance tool axis only for and mm 1 Diameter of blank spigot important for determining approach position only for and mm FS Chamfer width for chamfering for chamfering only mm ZFS In...

Page 444: ...ing allowance only for and mm UZ Depth finishing allowance tool axis only for or mm FS Chamfer width for chamfering for chamfering only mm ZFS Insertion depth of tool tip abs or inc for chamfering only mm Unit of feedrate as programmed before the cycle call Hidden parameters The following parameters are hidden They are pre assigned fixed values or values that can be adjusted using setting data Par...

Page 445: ... be adjusted Machine manufacturer Various defined values can be pre assigned using setting data Please refer to the machine manufacturer s specifications If the workpiece programming requires it you can display and change all of the parameters using Input complete Approach retraction 1 The tool approaches the starting point at rapid traverse at the height of the retraction plane and is fed in to t...

Page 446: ...softkey 3 Press the Multi edge spigot and Multi edge softkeys The Multi edge input window opens Parameters in the Input complete mode Parameters G code program Parameters ShopMill program Input complete PL Machining plane T Tool name Milling direction D Cutting edge number RP Retraction plane mm F Feedrate mm min mm tooth SC Safety clearance mm S V Spindle speed or constant cutting rate rpm m min ...

Page 447: ...in relation to Z0 inc only for and edge mm DXY Maximum plane infeed Maximum plane infeed as a percentage of the milling cutter diameter only for and mm DZ Maximum depth infeed only for and mm UXY Plane finishing allowance only for and edge mm UZ Depth finishing allowance only for and mm FS Chamfer width for chamfering for chamfering only mm ZFS Insertion depth of tool tip abs or inc for chamfering...

Page 448: ... Plane finishing allowance only for and edge mm UZ Depth finishing allowance only for and mm FS Chamfer width for chamfering for chamfering only mm ZFS Insertion depth of tool tip abs or inc for chamfering only mm Unit of feedrate as programmed before the cycle call Hidden parameters The following parameters are hidden They are pre assigned fixed values or values that can be adjusted using setting...

Page 449: ...t be adjusted Machine manufacturer Various defined values can be pre assigned using setting data Please refer to the machine manufacturer s specifications If the workpiece programming requires it you can display and change all of the parameters using Input complete Approach retraction 1 The tool moves at rapid traverse to the retraction plane and infeeds at safety clearance 2 The tool is inserted ...

Page 450: ...FS and ZFS but the safety clearance then could not be maintained Immersion depth too large This error message appears when chamfering would be possible through the reduction of the immersion depth ZFS Tool diameter too large This error message appears when the tool would already damage the edges during insertion In this case the chamfer FS must be reduced Procedure 1 The part program or ShopMill p...

Page 451: ...ght righthand edge Machining roughing finishing edge edge finishing Chamfering Machining posi tion Single position A slot is milled at the programmed position X0 Y0 Z0 Position pattern Several slots are milled at the programmed position pattern e g pitch circle grid line X0 Y0 Z0 The positions refer to the reference point Reference point X only for single position Reference point Y only for single...

Page 452: ...center Helical Insertion on helical path only for G code The cutter center point traverses along the helical path determined by the radius and depth per revolution helical path If the depth for one infeed has been reached a full longitudinal slot is machined to eliminate the inclined insertion path Oscillating Insert with oscillation along center axis of longitudinal slot The cutter center point o...

Page 453: ...Tool name RP Retraction plane mm D Cutting edge number F Feedrate F Feedrate mm min mm rev S V Spindle speed or constant cutting rate rpm m min Parameter Description Machining The following machining operations can be selected roughing finishing edge edge finishing Chamfering X0 Y0 Z0 The positions refer to the reference point Reference point X Reference point Y Reference point Z mm mm mm W Slot w...

Page 454: ...ath until it reaches the depth infeed When the depth has been reached the path is traversed again without depth infeed in order to remove the slope caused by insertion FZ only for G code Depth infeed rate only for vertical insertion FZ only for ShopMill Depth infeed rate only for vertical insertion mm min mm tooth EP only for G code Maximum pitch of helix for helical insertion only mm rev ER only ...

Page 455: ... 8 Circumferential groove SLOT2 Function You can mill one or several circumferential slots of equal size on a full or pitch circle with the circumferential slot cycle Tool size Please note that there is a minimum size for the milling cutter used to machine the circumferential slot Roughing 1 2 groove width W finishing allowance UXY milling cutter diameter Finishing 1 2 groove width W milling cutte...

Page 456: ...e circumferential slot is machined in the programmed machining direction up cut or down cut in a clockwise or counterclockwise direction 3 When the first circumferential slot is finished the tool moves to the retraction plane at rapid traverse 4 The next circumferential slot is approached along a straight line or circular path and then machined 5 The tool moves back to the safety clearance at rapi...

Page 457: ...r FS and ZFS but the safety clearance then could not be maintained Immersion depth too large This error message appears when chamfering would be possible through the reduction of the immersion depth ZFS Tool diameter too large This error message appears when the tool would already damage the edges during insertion In this case the chamfer FS must be reduced Procedure 1 The part program or ShopMill...

Page 458: ... slot to the next circumferential slot is always the same and is calculated by the control Pitch circle The circumferential slots are positioned around a pitch circle The distance from one circumferential slot to the next circumferential slot can be defined using angle α2 X0 Y0 Z0 The positions refer to the center point Reference point X Reference point Y Reference point Z mm mm mm N Number of gro...

Page 459: ...n mm rev S V Spindle speed or constant cutting rate rpm m min Parameter Description FZ only for G code Depth infeed rate only for and FZ only for ShopMill Depth infeed rate only for and mm min in tooth Machining The following machining operations can be selected roughing finishing edge edge finishing Chamfering Circular pattern Full circle The circumferential slots are positioned around a full cir...

Page 460: ...tioning Positioning motion between the slots Straight line Next position is approached linearly in rapid traverse Circular Next position is approached along a circular path at the feedrate defined in the machine data Unit of feedrate as programmed before the cycle call Hidden parameters The following parameters are hidden They are pre assigned fixed values or values that can be adjusted using sett...

Page 461: ...rkpiece geometries This method generally only exerts forces along the tool axis i e perpendicular to the surface of the pocket slot to be machined with the XY plane in Z direction Therefore the tool is subject to virtually no deformation As a result of the axial loading of the tool there is hardly any danger of vibration occurring for unstable workpieces The cutting depth can be considerably incre...

Page 462: ...s always machined along its entire length using the selected machining method 3 The tool retracts to the safety clearance in rapid traverse Machining type roughing vortex milling Roughing is performed by moving the milling cutter along a circular path While performing this motion the milling cutter is continuously fed into the plane Once the milling cutter has traveled along the entire slot it ret...

Page 463: ...ext insertion point The milling cutter moves along the length of the slot at half the infeed rate and inserts alternately at the left hand and right hand walls The first insertion motion takes place at the slot edge with the milling cutter inserted at half the infeed less the safety clearance if the safety clearance is greater than the infeed this will be on the outside For this cycle the maximum ...

Page 464: ...maximum radial infeed Machining type rough finishing If there is too much residual material on the slot walls unwanted corners are removed to the finishing dimension Machining type finishing When finishing walls the milling cutter travels along the slot walls whereby just like for roughing it is again fed in the Z direction increment by increment During this process the milling cutter travels thro...

Page 465: ...FS Tool diameter too large This error message appears when the tool would already damage the edges during insertion In this case the chamfer FS must be reduced Additional supplementary conditions Finishing 1 2 slot width W milling cutter diameter Edge finishing Finishing allowance UXY milling cutter diameter Chamfering The tip angle must be entered into the tool table Procedure 1 The part program ...

Page 466: ...nishing finishing base base finishing edge edge finishing Chamfering Technology Vortex milling The milling cutter performs circular motions along the length of the slot and back again Plunge cutting Sequential drilling motion along the tool axis Milling direction except plunge cutting Climbing cutting Conventional cutting Climbing conventional cutting Machining posi tion Single position Mill a slo...

Page 467: ...g and edge only for vortex milling mm UXY Plane finishing allowance slot edge only for rough finishing and base mm UZ Depth finishing allowance slot base only for rough finishing and edge mm FS Chamfer width for chamfering inc for chamfering only mm ZFS Insertion depth of tool tip abs or inc for chamfering only mm Unit of feedrate as programmed before the cycle call Parameters in the Input simple ...

Page 468: ... Reference point Z mm mm mm W Slot width L Slot length mm Z1 Slot depth abs or depth in relation to Z0 inc mm DXY Maximum plane infeed Maximum plane infeed as a percentage of the milling cutter diameter only for and mm DZ Maximum depth infeed only for pre finishing and edge only for vortex milling mm UXY Plane finishing allowance slot base only for pre finishing and base mm UZ Plane finishing allo...

Page 469: ...ut alternately at the end points The path to be traversed in the plane along the longitudinal axis of the elongated hole changes its direction after each infeed The cycle searches for the shortest path when changing to the next elongated hole Note The cycle requires a milling cutter with a face tooth cutting over center DIN 844 Approach retraction 1 Using G0 the starting position for the cycle is ...

Page 470: ...ype Plane by plane The tool is inserted to infeed depth in the pocket center Note This setting can be used only if the cutter can cut across center Oscillating Insert with oscillation along center axis of longitudinal slot The cutter center point oscillates along a linear path until it reaches the depth infeed When the depth has been reached the path is traversed again without depth infeed in orde...

Page 471: ...election must be activated via a machine data code Machine manufacturer Please refer to the machine manufacturer s specifications The entered feedrate acts on the workpiece contour i e it refers to the thread diameter However the feedrate of the cutter center point is displayed That is why a smaller value is displayed for internal threads and a larger value is displayed for external threads than w...

Page 472: ...id traverse 2 Approach of starting point of the approach circle in the current plane with rapid traverse 3 Infeed to a starting point in the tool axis calculated internally in the controller with rapid traverse 4 Approach motion to thread core diameter on an approach circle calculated internally in the controller with the programmed feedrate taking into account the finishing allowance and maximum ...

Page 473: ...m bottom to top Direction of rotation of the thread Right hand thread A right hand thread is cut Left hand thread A left hand thread is cut Position of the thread Internal thread An internal thread is cut External thread An external thread is cut NT Number of teeth per cutting edge Single or multiple toothed milling inserts can be used The motions required are executed by the cycle internally so t...

Page 474: ...put field Table and Selection MODULUS Turns mm rev inch rev P selection option only for ta ble selection with out Pitch in MODULUS For instance used for worms that mesh with a gearwheel per inch Used with pipe threads for example When entered per inch enter the integer number in front of the decimal point in the first parameter field and the figures after the decimal point as a fraction in the sec...

Page 475: ...il the entire text has been milled 5 The tool moves to the retraction plane in rapid traverse Procedure 1 The part program or ShopMill program to be processed has been created and you are in the editor 2 Press the Milling softkey 3 Press the Engraving softkey The Engraving input window opens Entering the engraving text 4 Press the Special characters softkey if you need a character that does not ap...

Page 476: ...ions e g is not sufficient to represent the unit quantity then the cycle automatically increases the number of positions OR 7 Press the Variable and Workpiece count 123 softkeys if you want to engrave a workpiece count without lead zeroes The format text _ AC_ACTUAL_PARTS is inserted and you return to the engraving field with the softkey bar Define the number of digits by adjusting the number of p...

Page 477: ...tered it is automatically extended If the specified number of digits is larger than the number to be engraved the output format is au tomatically filled with the appropriate number of leading and trailing ze roes Instead of the decimal point you can also use a blank Instead of _VAR_NUM you can use any other numerical variable e g R0 7 Press the Variable and Variable text softkeys if you want to ta...

Page 478: ...utting number e g measurement results you can select the output format digits either side of the point of the number to be engraved Text Instead of entering a fixed text in the engraving text field you can specify the text to be engraved via a text variable e g _VAR_TEXT ABC123 Mirror writing You can engrave the text mirrored on the workpiece Full circle If you want to distribute the characters ev...

Page 479: ...e point angle polar in ShopMill for curved alignment only mm or de grees X0 Reference point Y abs for linear alignment only mm Y0 Reference point Y abs for linear alignment only mm Z0 Reference point Z abs mm Z1 Engraving depth abs or depth referred to Z0 inc mm W Character height mm DX1 or α2 Distance between characters or angle of opening for curved alignment only mm or de grees DX1 or DX2 Dista...

Page 480: ...bs only for curved alignment mm YM ShopMill only Center point Y abs only for curved alignment mm Unit of feedrate as programmed before the cycle call Programming technological functions cycles 10 2 Milling Milling 480 Operating Manual 08 2018 6FC5398 7CP41 0BA0 ...

Page 481: ...fore you program the technology 10 3 2 Representation of the contour G Code program In the editor the contour is represented in a program section using individual program blocks If you open an individual block then the contour is opened ShopMill program The cycle represents a contour as a program block in the program If you open this block the individual contour elements are listed symbolically an...

Page 482: ...rrently evaluated element will only be evaluated when it is selected with the cur sor Graphical display The progress of contour programming is shown in broken line graphics while the contour elements are being entered When the contour element has been created it can be displayed in different line styles and colors Black Programmed contour Orange Current contour element Green dashed Alternative ele...

Page 483: ...e additional commands max 40 characters in the extended parameter screens All parameters softkey However make sure that the additional commands do not collide with the generated G code of the contour Therefore do not use any G code commands of group 1 G0 G1 G2 G3 no coordinates in the plane and no G code commands that have to be programmed in a separate block Procedure 1 The part program or ShopMi...

Page 484: ...hed in continuous path mode G64 As a result contour transitions such as corners chamfers or radii may not be machined precisely If you wish to avoid this then it is possible to use additional commands when program ming Example For a contour first program the X parallel straight line and then enter G9 non modal exact stop for the additional command parameter Then program the Y parallel straight lin...

Page 485: ... the machine manufacturer s specifications Parameter input Parameter entry is supported by various help screens that explain the parameters If you leave certain fields blank the geometry processor assumes that the values are unknown and attempts to calculate them from other parameters Conflicts may result if you enter more parameters than are absolutely necessary for a contour In such a case try t...

Page 486: ...on 2 Contour input using contour support 2 1 Press the Contour milling Contour and New contour softkeys 2 2 In the opened input window enter a name for the contour e g contour_1 Press the Accept softkey 2 3 The input screen to enter the contour opens in which you initially enter a starting point for the contour This is marked in the lefthand navigation bar using the symbol Press the Accept softkey...

Page 487: ...y further parameters for certain contour elements e g to enter additional commands press the All parameters softkey Contour element Straight line e g X Parameter Description Unit X End point X abs or inc mm α1 Starting angle e g to the X axis Degrees α2 Angle to the preceding element Degrees Transition to next ele ment Type of transition Radius Chamfer Radius R Transition to following element radi...

Page 488: ...r element Circle Parameter Description Unit Direction of rotation Clockwise direction of rotation Counterclockwise direction of rotation R Radius mm e g X End point X abs or inc mm e g Y End point Y abs or inc mm e g I Circle center point I abs or inc mm e g J Circle center point J abs or inc mm α1 Starting angle to X axis Degrees α2 Angle to the preceding element Degrees β1 End angle to Z axis De...

Page 489: ...be added changed inserted or deleted Procedure for changing a contour element 1 Open the part program or ShopMill program to be executed 2 With the cursor select the program block where you want to change the contour Open the geometry processor The individual contour elements are listed 3 Position the cursor at the position where a contour element is to be in serted or changed 4 Select the desired...

Page 490: ...bels The contour is in the calling main program and is limited by the labels that have been entered 3 Subprogram The contour is located in a subprogram in the same workpiece 4 Labels in the subprogram The contour is in a subprogram and is limited by the labels that have been entered Procedure 1 The subprogram to be edited has been created and you are in the editor 2 Press the Contour milling softk...

Page 491: ...illing cycle The function operates with cutter radius compensation You can machine in any direction i e in the direction of the programmed contour or in the opposite direction It is not imperative that the contour is closed The following machining operations are possible Inside or outside machining on left or right of the contour Machining along the center point path For machining in the opposite ...

Page 492: ...nned edge breaking chamfer the workpiece with a special tool Path milling on right or left of the contour A programmed contour can be machined with the cutter radius compensation to the right or left You can also select various modes and strategies of approach and retraction from the contour Approach retraction mode The tool can approach or retract from the contour along a quadrant semi circle or ...

Page 493: ...sible for example approach in the machining plane retract spatially Path milling along center point path A programmed contour can also be machined along the center point path if the radius correction was switched out In this case approaching and retraction is only possible along a straight line or vertical Vertical approach retraction can be used for closed contours for example Procedure 1 The par...

Page 494: ... Right machining to the right of the contour off A programmed contour can also be machined on the center point path In this case approaching and retraction is only possible along a straight line or vertical Vertical ap proach retraction can be used for closed contours for example Z0 Reference point Z abs or inc Z1 Final depth abs or final depth referred to Z0 inc only for and mm DZ Maximum depth i...

Page 495: ...ur Semi circle Part of a spiral only with path milling left and right of the contour Retraction strat egy Axis by axis Spatial not with perpendicular approach mode R2 Retraction radius only for quadrant or semi circle retraction mm L2 Retraction distance only for straight line retraction mm Lift mode If more than one depth infeed is necessary specify the retraction height to which the tool retract...

Page 496: ...t of the starting point Using Automatic starting point you have the option of calculating the optimum plunge point By selecting Manual starting point you define the plunge point in the parameter screen If the islands and the miller diameter which must be plunged at various locations are obtained from the pocket contour then the manual entry only defines the first plunge point the remaining plunge ...

Page 497: ...reduced Software option For solid machining residual material you require the option residual material detection and machining Name convention For multi channel systems cycles attach a _C and a two digit number of the specific channel to the names of the programs to be generated e g for channel 1 _C01 This is the reason that the name of the main program must not end with _C and a two digit number ...

Page 498: ... pocket 1 2 Centering 3 Contour pocket 2 4 Centering 5 Contour pocket 1 6 Predrilling 7 Contour pocket 2 8 Predrilling 9 Contour pocket 1 10 Stock removal 11 Contour pocket 2 12 Stock removal If you are doing all the machining for the pocket at once i e centering rough drilling and removing stock directly in sequence and do not set the additional parameters for centering rough drilling the cycle w...

Page 499: ...ription Unit TR Reference tool Tool which is used in the Stock removal machining step This is used to determine the plunge position Z0 Reference point Z mm Z1 Depth with reference to Z0 inc mm DXY Maximum plane infeed Maximum plane infeed as a percentage of the milling cutter diameter mm UXY Finishing allowance plane mm Lift mode Lift mode before new infeed If the machining operation requires seve...

Page 500: ...Tool which is used in the Stock removal machining step This is used to determine the plunge position Z0 Reference point in the tool axis Z mm Z1 Pocket depth abs or depth referred to Z0 inc mm DXY Maximum plane infeed Maximum plane infeed as a percentage of the milling cutter diameter mm UXY Finishing allowance plane mm UZ Finishing allowance depth mm Lift mode Lift mode before new infeed If the m...

Page 501: ...le mode the hidden parameters are allocated a fixed value that cannot be adjusted Machine manufacturer Various defined values can be pre assigned using setting data Please refer to the machine manufacturer s specifications If the workpiece programming requires it you can display and change all of the parameters using Input complete Machining type For solid machining you can select the machining ty...

Page 502: ...r constant cutting rate rpm m min SC Safety clearance mm F Feedrate mm min Parameter Description Unit Machining The following machining operations can be selected roughing base base finishing edge edge finishing Chamfering Z0 Reference point in the tool axis Z mm Z1 Pocket depth abs or depth relative to Z0 inc only for base or edge mm DXY Maximum plane infeed Maximum plane infeed as a percentage o...

Page 503: ...es the depth infeed When the depth has been reached the path is traversed again without depth infeed in order to eliminate the inclined insertion path FZ only for ShopMill Depth infeed rate only for perpendicular insertion and mm min mm tooth FZ only for G code Depth infeed rate only for perpendicular insertion and EP Maximum pitch of helix for helical insertion only mm rev ER Radius of helix for ...

Page 504: ...umber RP Retraction plane mm F Feedrate mm min mm rev F Feedrate S V Spindle speed or constant cutting rate rpm m min Parameter Description Machining The following machining operations can be selected roughing base base finishing edge edge finishing Chamfering Z0 Reference point in the tool axis Z mm Z1 Pocket depth abs or depth relative to Z0 inc only for base or edge mm DXY Maximum plane infeed ...

Page 505: ... only for perpendicular insertion and EP Maximum pitch of helix for helical insertion only mm rev ER Radius of helix for helical insertion only The radius cannot be any larger than the cutter radius otherwise material will remain mm EW Maximum insertion angle only for insertion with oscillation Degrees FS Chamfer width for chamfering inc for chamfering only mm ZFS Insertion depth of tool tip abs o...

Page 506: ...tock from all the pockets first and then remove the residual material In this case for removing the residual material you also have to enter a value for the reference tool TR parameter which for the ShopMill program additionally appears when you press the All parameters softkey When programming you must then proceed as follows 1 Contour pocket 1 2 Stock removal 3 Contour pocket 2 4 Stock removal 5...

Page 507: ...Z mm Z1 Pocket depth abs or depth referred to Z0 inc mm DXY Maximum plane infeed Maximum plane infeed as a percentage of the milling cutter diameter mm DZ Maximum depth infeed mm UXY Finishing allowance plane mm UZ Finishing allowance depth mm Lift mode Lift mode before new infeed If the machining operation requires several points of insertion the retraction height to which the tool is retracted i...

Page 508: ...you can display and change all of the parameters using Input complete Machining type You can select the machining mode roughing base finishing edge finishing chamfer for milling If you want to rough and then finish you have to call the machining cycle twice Block 1 roughing Block 2 finishing The programmed parameters are retained when the cycle is called for the second time Approach retraction 1 T...

Page 509: ...g edge number Milling direction Climbing cutting Conventional cutting F Feedrate mm min mm tooth RP Retraction plane mm S V Spindle speed or constant cutting rate rpm m min SC Safety clearance mm F Feedrate mm min Parameter Description Unit Machining The following machining operations can be selected roughing base base finishing edge edge finishing Chamfering Z0 Reference point in the tool axis Z ...

Page 510: ... ShopMill program parameters Input simple PRG Name of the program to be generated T Tool name Milling direction Climbing cutting Conventional cutting D Cutting edge number RP Retraction plane mm F Feedrate mm min mm rev F Feedrate S V Spindle speed or constant cutting rate rpm m min Parameter Description Machining The following machining operations can be selected roughing base base finishing edge...

Page 511: ...ve this residual material without having to machine the whole spigot again i e avoiding unnecessary non productive motion The finishing allowance should be set identically for all machining steps because it does not count as residual material The residual material is calculated on the basis of the milling cutter used for clearing It is also possible to run multiple residual material steps one afte...

Page 512: ... Press the Contour milling and Spigot Res Mat softkeys The Spigot Res Mat input window opens 3 For the ShopMill program press the All parameters softkey if you want to enter additional parameters Parameters G code program Parameters ShopMill program PRG Name of the program to be generated T Tool name PL Machining plane F Feedrate mm min mm tooth Milling direction Synchronous operation Up cut opera...

Page 513: ...age of the milling cutter diameter mm DZ Maximum depth infeed mm Lift mode Lift mode before new infeed If the machining operation requires several points of insertion the retraction height to which the tool is retracted is selected as follows To retraction plane Z0 safety clearance If there are no elements larger than Z0 in the pocket area Z0 safety clearance can be selected as the lift mode mm mm...

Page 514: ...e that has been programmed If no finishing allowance has been programmed the workpiece is roughed down to the final contour During roughing the cycle reduces the programmed infeed depth D if necessary so that it is possible for cuts of an equal size to be made For example if the overall infeed depth is 10 and you have specified an infeed depth of 3 this would result in cuts of 3 3 3 and 1 The cycl...

Page 515: ...ted and you are in the editor 2 Press the Turning softkey 3 Press the Stock removal softkey The Stock Removal input window opens 4 Select one of the three stock removal cycles via the softkeys Simple straight stock removal cycle The Stock removal 1 input window opens OR Straight stock removal cycle with radii or chamfers The Stock removal 2 input window opens OR Stock removal cycle with oblique li...

Page 516: ...everal axes can move travel ZR for ShopMill program Retraction path only for incremental retraction in the tool direction Align tool through beta and gamma angles β for ShopMill program Align tool with swivel axes Input value The required angle can be freely entered β 0 β 90 Degrees γ for ShopMill program 0 180 The required angle can be freely entered Degrees Directly position rotary axes B1 for S...

Page 517: ...f the tool tip is maintained during swiveling No tracking The position of the tool tip is not maintained during swiveling Preferred direction for ShopMill program Preferred direction of the swivel axis for several possible alignments of the machine Machining roughing finishing Position Stock removal position Programming technological functions cycles 10 4 Turning milling turning machine Milling Op...

Page 518: ... FS3 or rounding radius R1 R3 not for stock removal 1 mm Parameter selection of intermediate point The intermediate point can be determined through position specification or angle The following combinations are possible not for stock removal 1 and 2 XM ZM XM α1 XM α2 α1 ZM α2 ZM α1 α2 XM Intermediate point X abs or intermediate point X in relation to X0 inc mm ZM Intermediate point Z abs or inc mm...

Page 519: ... 6 The tool cuts alternating in the first and second groove with the infeed depth 2 D until the final depth T1 is reached Between the individual grooves the tool moves back by D safety clearance with rapid traverse After the last groove the tool is retracted at rapid traverse to the safety distance 7 All subsequent groove cuts are made alternating and directly down to the final depth T1 Between th...

Page 520: ...pens OR Groove cycle on an incline with inclines radii or chamfers The Groove 3 input window opens G code program parameters ShopMill program parameters PL Machining plane T SC Safety clearance mm D Cutting edge number F Feedrate F Feedrate mm min mm rev S V Spindle speed or constant cutting rate rpm m min Programming technological functions cycles 10 4 Turning milling turning machine Milling 520 ...

Page 521: ...ol direction in the swiveled machine state several axes can move travel ZR for ShopMill program Retraction path only for incremental retraction in the tool direction mm Align tool through beta and gamma angles β For ShopMill program Align tool Input value The required angle can be freely entered β 90 β 0 Degrees γ for ShopMill program 0 180 The required angle can be freely entered Directly positio...

Page 522: ...ents of the machine Machining roughing finishing roughing and finishing Position Groove position reference point X0 Reference point in X mm Z0 Reference point in Z mm B1 Groove width mm T1 Groove depth abs or groove depth referred to X0 or Z0 inc mm α1 α2 Edge angle 1 or edge angle 2 only for grooves 2 and 3 Asymmetric grooves can be described by separate angles The angles can be be tween 0 and 90...

Page 523: ... programmed before the cycle call 10 4 4 Undercut form E and F CYCLE940 Function You can use the Undercut form E or Undercut form F cycle to turn form E or F undercuts in accordance with DIN 509 Approach retraction 1 The tool first moves to the starting point calculated internally in the cycle at rapid traverse 2 The undercut is made in one cut at the machining feedrate starting from the flank thr...

Page 524: ...gram No The axis is not retracted before swiveling Z Retraction in the direction of machine axis Z Z X Y Move machining axes to retraction position before swiveling Tool direction max Maximum retraction up to the software end position in the tool direction Tool direction inc Incremental retraction specified retraction distance up to the software end position in the tool direction When retracting i...

Page 525: ...egrees αC for ShopMill program Rotational position for a pole position degrees Hirth joint Round to the next Hirth joint Round up to Hirth joint Round down to Hirth joint Note For machines with a Hirth joint Tool Tool tip when swiveling Tracking The position of the tool tip is maintained during swiveling No tracking The position of the tool tip is not maintained during swiveling Preferred directio...

Page 526: ...ross feed abs or cross feed inc mm Unit of feedrate as programmed before the cycle call G code program undercut form F parameters PL Machining plane T Tool name SC Safety clearance mm D Cutting edge number F Feedrate F Feedrate mm min mm rev S V Spindle speed or Constant cutting rate rpm m min Programming technological functions cycles 10 4 Turning milling turning machine Milling 526 Operating Man...

Page 527: ...cting in the tool direction in the swiveled machine state several axes can move travel ZR for ShopMill program Retraction path only for incremental retraction in mm Align tool through beta and gamma angles β for ShopMill program Align tool with swivel axes Input value The required angle can be freely entered β 0 β 90 Degrees γ for ShopMill program 0 180 The required angle can be freely entered Deg...

Page 528: ...direction for ShopMill program Preferred direction of the swivel axis for several possible alignments of the machine Position Form F machining position Undercut size according to DIN table e g F0 6 x 0 3 undercut form F X0 Reference point X mm Z0 Reference point Z mm X1 Allowance in X abs or allowance in X inc mm Z1 Allowance in Z abs or allowance in Z inc for undercut form F only mm VX Cross feed...

Page 529: ...shed 5 The tool moves back to the starting point at rapid traverse During finishing the tool travels as far as cross feed VX Procedure 1 The part program or ShopMill program to be processed has been created and you are in the editor 2 Press the Turning softkey 3 Press the Undercut softkey 4 Press the Thread undercut DIN softkey The Thread Undercut DIN 76 input window opens OR Press the Thread unde...

Page 530: ...cting in the tool direction in the swiveled machine state several axes can move travel ZR for ShopMill program Retraction path only for incremental retraction in mm Align tool through beta and gamma angles β for ShopMill program Align tool with swivel axes Input value The required angle can be freely entered β 0 β 90 Degrees γ for ShopMill program 0 180 The required angle can be freely entered Deg...

Page 531: ...on of the tool tip is not maintained during swiveling Preferred direction for ShopMill program Preferred direction of the swivel axis for several possible alignments of the machine Machining roughing finishing roughing and finishing Position Machining position Machining direction Longitudinal Parallel to the contour Form Normal form A Short form B P Thread pitch select from the preset DIN table or...

Page 532: ...m m min Parameter Description Unit TC Name of the swivel data set Note The selection box only appears if more than one swivel data set has been set up Retraction for ShopMill program No The axis is not retracted before swiveling Z Retraction in the direction of machine axis Z Z X Y Move machining axes to retraction position before swiveling Tool direction max Maximum retraction up to the software ...

Page 533: ...ng axes The required angle can be freely entered Degrees C1 for ShopMill program The required angle can be freely entered Degrees αC for ShopMill program Rotational position for a pole position Degrees Hirth joint Round to the next Hirth joint Round up to Hirth joint Round down to Hirth joint Note For machines with a Hirth joint Tool Tool tip when swiveling Tracking The position of the tool tip is...

Page 534: ...dius 2 mm α Insertion angle Degrees VX Cross feed abs or cross feed inc only for and D Maximum depth infeed only for and mm U or UX Finishing allowance in X or finishing allowance in X and Z only for and mm UZ Finishing allowance in Z only for UZ and mm Unit of feedrate as programmed before the cycle call 10 4 6 Thread turning CYCLE99 only for G code Function The Longitudinal thread Tapered thread...

Page 535: ...hread synchronization Input simple For simple machining operations you have the option to reduce the wide variety of parameters to the most important parameters using the Input selection field In this Input simple mode the hidden parameters are allocated a fixed value that cannot be adjusted Machine manufacturer Various defined values can be pre assigned using setting data Please refer to the mach...

Page 536: ...The thread block is inserted in front of the actual thread on which the tool is inserted You require thread run in if you want to cut a thread on the middle of a shaft If you program a thread run out 0 an additional thread block is generated at the end of the thread Note Commands DITS and DITE In CYCLE99 the commands DITS and DITE are not programmed The setting data SD 42010 SC_THREAD_RAMP_DISP 0 ...

Page 537: ... ShopMill program No The axis is not retracted before swiveling Z Retraction in the direction of machine axis Z Z X Y Move machining axes to retraction position before swiveling Tool direction max Maximum retraction up to the software end position in the tool direction Tool direction inc Incremental retraction specified retraction distance up to the software end position in the tool direction When...

Page 538: ...egrees αC for ShopMill program Rotational position for a pole position Degrees Hirth joint Round to the next Hirth joint Round up to Hirth joint Round down to Hirth joint Note For machines with a Hirth joint Tool Tool tip when swiveling Tracking The position of the tool tip is maintained during swiveling No tracking The position of the tool tip is not maintained during swiveling Preferred directio...

Page 539: ...olution If the start and end pitch of the thread are known the pitch change to be programmed can be calculated as follows Pe 2 P2 G mm rev2 2 Z1 The meanings are as follows Pe End pitch of thread mm rev P Start pitch of thread mm rev Z1 Thread length mm A larger pitch results in a larger distance between the thread turns on the workpiece mm rev2 Machining roughing finishing roughing and finishing ...

Page 540: ...inc mm DP or αP Infeed slope as flank inc alternative to infeed slope as angle DP 0 Infeed along the rear flank DP 0 Infeed along the front flank Infeed slope as angle alternative to infeed slope as flank α 0 Infeed along the rear flank α 0 Infeed along the front flank α 0 Infeed at right angle to cutting direction If you wish to infeed along the flanks the maximum absolute value of this parameter...

Page 541: ...the final depth is reached DA 0 Thread changeover depth is not taken into account i e finish machining each thread before starting the next thread mm Machining Complete or From thread N1 N1 1 4 start thread N1 1 N or Only thread NX NX 1 4 1 from N threads Parameters in the input simple mode longitudinal thread G code program parameters ShopMill program parameters Input simple T Tool name D Cutting...

Page 542: ...cting in the tool direction in the swiveled machine state several axes can move travel ZR for ShopMill program Retraction path only for incremental retraction in mm Align tool through beta and gamma angles β for ShopMill program Align tool with swivel axes Input value The required angle can be freely entered β 0 β 90 Degrees γ for ShopMill program 0 180 The required angle can be freely entered Deg...

Page 543: ...ments of the machine P Select the thread pitch turns Thread pitch in mm revolution Thread pitch in inch revolution Thread turns per inch Thread pitch in MODULUS mm rev in rev turns MODULUS Machining roughing finishing roughing and finishing Infeed only for and Linear Infeed with constant cutting depth Degressive Infeed with constant cutting cross section Thread Internal thread External thread X0 R...

Page 544: ... 0 Infeed along the front flank α 0 Infeed at right angle to cutting direction If you wish to infeed along the flanks the maximum absolute value of this parameter may be half the flank angle of the tool Degrees Infeed along the flank Infeed with alternating flanks alternative Instead of infeed along one flank you can infeed along alternating flanks to avoid always loading the same tool cutting edg...

Page 545: ... manufacturer Please observe the information provided by the machine manufacturer Parameters in the complete mode face thread G code program parameters ShopMill program parameters Input complete PL Machining plane T Tool name D Cutting edge number S V Spindle speed or Constant cutting rate rpm m min Programming technological functions cycles 10 4 Turning milling turning machine Milling Operating M...

Page 546: ...cting in the tool direction in the swiveled machine state several axes can move travel ZR for ShopMill program Retraction path only for incremental retraction in mm Align tool through beta and gamma angles β for ShopMill program Align tool with swivel axes Input value The required angle can be freely entered β 0 β 90 Degrees γ for ShopMill program 0 180 The required angle can be freely entered Deg...

Page 547: ...ution Thread turns per inch Thread pitch in MODULUS mm rev in rev turns MODULUS G Change in thread pitch per revolution only for P mm rev or in rev G 0 The thread pitch P does not change G 0 The thread pitch P increases by the value G per revolution G 0 The thread pitch P decreases by the value G per revolution If the start and end pitch of the thread are known the pitch change to be programmed ca...

Page 548: ...un in thread run out inc mm mm mm LR Thread run out inc The thread run out can be used if you wish to retract the tool obliquely at the end of the thread e g lubrication groove on a shaft mm H1 Thread depth inc mm DP or αP Infeed slope as flank inc alternative to infeed slope as angle DP 0 Infeed along the rear flank DP 0 Infeed along the front flank Infeed slope as angle alternative to infeed slo...

Page 549: ...th inc First machine all thread turns sequentially to thread changeover depth DA then machine all thread turns sequentially to depth 2 DA etc until the final depth is reached DA 0 Thread changeover depth is not taken into account i e finish machining each thread before starting the next thread mm Machining Complete or From thread N1 N1 1 4 start thread N1 1 N or Only thread NX NX 1 4 1 from N thre...

Page 550: ...cting in the tool direction in the swiveled machine state several axes can move travel ZR for ShopMill program Retraction path only for incremental retraction in mm Align tool through beta and gamma angles β for ShopMill program Align tool with swivel axes Input value The required angle can be freely entered β 0 β 90 Degrees γ for ShopMill program 0 180 The required angle can be freely entered Deg...

Page 551: ...ments of the machine P Select the thread pitch turns Thread pitch in mm revolution Thread pitch in inch revolution Thread turns per inch Thread pitch in MODULUS mm rev in rev turns MODULUS Machining roughing finishing roughing and finishing Infeed only for and Linear Infeed with constant cutting depth Degressive Infeed with constant cutting cross section Thread Internal thread External thread X0 R...

Page 552: ...ank DP 0 Infeed along the front flank Infeed slope as angle alternative to infeed slope as flank α 0 Infeed along the rear flank α 0 Infeed along the front flank α 0 Infeed at right angle to cutting direction If you wish to infeed along the flanks the maximum absolute value of this parameter may be half the flank angle of the tool Degrees Infeed along the flank Infeed with alternating flanks alter...

Page 553: ...R Return distance 2 mm x Multiple threads 1 Thread No α0 Starting angle offset 0 Machine manufacturer Please observe the information provided by the machine manufacturer Parameters in the complete mode tapered thread G code program parameters ShopMill program parameters Input complete PL Machining plane T Tool name D Cutting edge number S V Spindle speed or Constant cutting rate rpm m min Programm...

Page 554: ...cting in the tool direction in the swiveled machine state several axes can move travel ZR for ShopMill program Retraction path only for incremental retraction in mm Align tool through beta and gamma angles β for ShopMill program Align tool with swivel axes Input value The required angle can be freely entered β 0 β 90 Degrees γ for ShopMill program 0 180 The required angle can be freely entered Deg...

Page 555: ...ution Thread turns per inch Thread pitch in MODULUS mm rev in rev turns MODULUS G Change in thread pitch per revolution only for P mm rev or in rev G 0 The thread pitch P does not change G 0 The thread pitch P increases by the value G per revolution G 0 The thread pitch P decreases by the value G per revolution If the start and end pitch of the thread are known the pitch change to be programmed ca...

Page 556: ... a precise start of thread Thread run in inc The thread run in can be used if you cannot approach the thread from the side and instead have to insert the tool into the material e g lubrication groove on a shaft Thread run in thread run out inc mm mm mm LR Thread run out inc The thread run out can be used if you wish to retract the tool obliquely at the end of the thread e g lubrication groove on a...

Page 557: ...urns The thread turns are distributed evenly across the periphery of the turned part the 1st thread is always placed at 0 DA Thread changeover depth inc First machine all thread turns sequentially to thread changeover depth DA then machine all thread turns sequentially to depth 2 DA etc until the final depth is reached DA 0 Thread changeover depth is not taken into account i e finish machining eac...

Page 558: ...cting in the tool direction in the swiveled machine state several axes can move travel ZR for ShopMill program Retraction path only for incremental retraction in mm Align tool through beta and gamma angles β for ShopMill program Align tool with swivel axes Input value The required angle can be freely entered β 0 β 90 Degrees γ for ShopMill program 0 180 The required angle can be freely entered Deg...

Page 559: ...ction of the swivel axis for several possible alignments of the machine P Select the thread pitch turns Thread pitch in mm revolution Thread pitch in inch revolution Thread turns per inch Thread pitch in MODULUS mm rev in rev turns MODULUS Machining roughing finishing roughing and finishing Infeed only for and Linear Infeed with constant cutting depth Degressive Infeed with constant cutting cross ...

Page 560: ...eed slope as flank inc alternative to infeed slope as angle DP 0 Infeed along the rear flank DP 0 Infeed along the front flank Infeed slope as angle alternative to infeed slope as flank α 0 Infeed along the rear flank α 0 Infeed along the front flank α 0 Infeed at right angle to cutting direction If you wish to infeed along the flanks the maximum absolute value of this parameter may be half the fl...

Page 561: ...r multiple threads With multiple threads the individual thread turns are machined one after the other You define a right or left hand thread by the direction of spindle rotation and the feed direction The infeed is performed automatically with a constant infeed depth or constant cutting cross section With a constant infeed depth the cutting cross section increases from cut to cut The finishing all...

Page 562: ... cycle at the beginning of the run in path for the first thread with G0 2 Infeed for roughing according to the defined infeed type 3 Thread cutting is repeated according to the programmed number of roughing cuts 4 The finishing allowance is removed in the following step with G33 5 This cut is repeated according to the number of noncuts 6 The whole sequence of motions is repeated for each further t...

Page 563: ...n a concatenation of several thread blocks Procedure for thread chain 1 The part program to be executed has been created and you are in the editor 2 Press the Turning softkey 3 Press the Thread softkey The Thread input window opens 4 Press the Thread chain softkey The Thread Chain input window opens Parameters in the Input complete mode G code program parameters ShopMill program parameters thread ...

Page 564: ...cting in the tool direction in the swiveled machine state several axes can move travel ZR for ShopMill program Retraction path only for incremental retraction in mm Align tool through beta and gamma angles β for ShopMill program Align tool with swivel axes Input value The required angle can be freely entered β 0 β 90 Degrees γ for ShopMill program 0 180 The required angle can be freely entered Deg...

Page 565: ...swivel axis for several possible alignments of the machine Machining roughing finishing roughing and finishing Infeed only for and Linear Constant cutting depth infeed Degressive Constant cutting cross section infeed Thread Internal thread External thread X0 Reference point X abs always diameter mm Z0 Reference point Z abs mm P0 Thread pitch 1 mm rev in rev turns MODULUS X1 or X1α Intermediate poi...

Page 566: ...point 3 in relation to X2 inc or Thread taper 3 mm Degrees Z3 End point Z abs or End point with reference to Z2 inc mm LW Thread run in mm LR Thread run out mm H1 Thread depth mm DP or αP Infeed slope flank or infeed slope angle mm or de grees Infeed along a flank Infeed with alternating flanks D1 or ND First infeed depth or number of roughing cuts only for and mm rev Finishing allowance in X and ...

Page 567: ...osition before swiveling Tool direction max Maximum retraction up to the software end position in the tool direction Tool direction inc Incremental retraction specified retraction distance up to the software end position in the tool direction When retracting in the tool direction in the swiveled machine state several axes can move travel ZR for ShopMill program Retraction path only for incremental...

Page 568: ... joint Note For machines with a Hirth joint Tool Tool tip when swiveling Tracking The position of the tool tip is maintained during swiveling No tracking The position of the tool tip is not maintained during swiveling Preferred direction for ShopMill program Preferred direction of the swivel axis for several possible alignments of the machine Machining roughing finishing roughing and finishing Inf...

Page 569: ...d mm Degrees Z2 Intermediate point 2 Z abs or Intermediate point 2 in relation to Z0 inc mm P2 Thread pitch 3 unit as parameterized for P0 mm rev in rev turns MODULUS X3 End point X abs or End point 3 in relation to X2 inc or Thread taper 3 mm Degrees Z3 End point Z abs or End point with reference to Z2 inc mm LW Thread advance inc mm LR Thread run out inc mm H1 Thread depth mm DP or αP Infeed slo...

Page 570: ...er diameter Use parameter X2 to enter the final depth that you wish to reach with the cut off With pipes for example you do not need to cut off until you reach the center cutting off slightly more than the wall thickness of the pipe is sufficient Approach retraction 1 The tool first moves to the starting point calculated internally in the cycle at rapid traverse 2 The chamfer or radius is machined...

Page 571: ...on for ShopMill program No The axis is not retracted before swiveling Z Retraction in the direction of machine axis Z Z X Y Move machining axes to retraction position before swiveling Tool direction max Maximum retraction up to the software end position in the tool direction Tool direction inc Incremental retraction specified retraction distance up to the software end position in the tool directio...

Page 572: ...egrees αC for ShopMill program Rotational position for a pole position Degrees Hirth joint Round to the next Hirth joint Round up to Hirth joint Round down to Hirth joint Note For machines with a Hirth joint Tool Tool tip when swiveling Tracking The position of the tool tip is maintained during swiveling No tracking The position of the tool tip is not maintained during swiveling Preferred directio...

Page 573: ...ays diameter mm Z0 Reference point in Z abs mm FS or R Chamfer width or rounding radius mm X1 Depth for speed reduction abs or depth for speed reduction in relation to X0 inc mm FR Reduced feedrate SR Reduced speed rpm X2 Final depth abs or final depth in relation to X1 inc mm Unit of feedrate as programmed before the cycle call Programming technological functions cycles 10 4 Turning milling turni...

Page 574: ...ect one of the the following machining technologies Stock removal Grooving Plunge turning You can rough remove residual material and finish for each of the three technologies above Note Starting point or end point of the machining outside the retraction planes For programs with contour machining from earlier software releases for an NC start it is possible that one of the alarms 61281 Starting poi...

Page 575: ...e this without having to machine the contour again 6 Stock removal along the contour finishing If you programmed a finishing allowance for roughing the contour is machined again 10 5 2 Representation of the contour G code program In the editor the contour is represented in a program section using individual program blocks If you open an individual block then the contour is opened Symbolic represen...

Page 576: ...t has been created it can be displayed in different line styles and colors Black Programmed contour Orange Current contour element Green dashed Alternative element Blue dotted Partially defined element The scaling of the coordinate system is adjusted automatically to match the complete contour The position of the coordinate system is displayed in the graphics window 10 5 3 Creating a new contour F...

Page 577: ...r the starting point of the contour appears Enter the individual contour elements see Section Creating contour el ements Parameter Description Unit Z Starting point Z abs mm X Starting point X abs mm Transition to con tour start Type of transition Radius Chamfer FS 0 or R 0 No transition element R Transition to following element radius mm FS Transition to following element chamfer mm Programming t...

Page 578: ...1 G2 G3 no coordinates in the plane and no G code commands that have to be programmed in a separate block The contour is finished in continuous path mode G64 As a result contour transitions such as corners chamfers or radii may not be machined precisely If you wish to avoid this then it is possible to use additional commands when programming Example For a contour first program the straight X paral...

Page 579: ...input values Otherwise you must use the straight circle contour elements Additional commands You can enter additional commands in the form of G code for each contour element You can enter the additional commands max 40 characters in the extended parameter screens All parameters softkey You can program feedrates and M commands for example using additional G code commands However make sure that the ...

Page 580: ...ter a reduced feedrate in the FRC parameter The slower machining rate means that the transition element is machined more accurately Procedure for entering contour elements 1 The part program is opened Position the cursor at the required input position this is generally at the physical end of the program after M02 or M30 2 Contour input using contour support 2 1 Press the Contour turning Contour an...

Page 581: ... appears in the parameter α2 entry field 7 Repeat the procedure until the contour is complete 8 Press the Accept softkey The programmed contour is transferred into the process plan program view 9 If you want to display further parameters for certain contour elements e g to enter additional commands press the All parameters softkey Contour element Straight line e g Z Parameters Description Unit Z E...

Page 582: ...arting angle to Z axis Degrees α2 Angle to the preceding element Degrees Transition to next ele ment Type of transition Radius Undercut Chamfer Radius R Transition to following element radius mm Undercut Form E Undercut size e g E1 0x0 4 Form F Undercut size e g F0 6x0 3 DIN thread P α Thread pitch Insertion angle mm rev Degrees Thread Z1 Z2 R1 R2 T Length Z1 Length Z2 Radius R1 Radius R2 Insertio...

Page 583: ...tation Clockwise direction of rotation Counterclockwise direction of rotation Z End point Z abs or inc mm X End point X abs or end point X inc mm K Circle center point K abs or inc mm I Circle center point I abs or circle center point I inc mm α1 Starting angle to Z axis Degrees β1 End angle to Z axis Degrees β2 Opening angle Degrees Transition to next ele ment Type of transition Radius Chamfer Ra...

Page 584: ...dividual contour elements are listed 3 Position the cursor at the position where a contour element is to be in serted or changed 4 Select the desired contour element with the cursor 5 Enter the parameters in the input screen or delete the element and select a new element 6 Press the Accept softkey The desired contour element is inserted in the contour or changed Procedure for deleting a contour el...

Page 585: ...entered Procedure 1 The part program to be executed has been created and you are in the editor 2 Press the Turning and Contour turning softkeys 3 Press the Contour and Contour call softkeys The Contour Call input window opens 4 Assign parameters to the contour selection Parameter Description Unit Contour selection Contour name Labels Subprogram Labels in the subprogram Contour name CON Contour nam...

Page 586: ... You must define a blank contour as a separate closed contour in advance of the finished part contour If the blank and finished part contours do not intersect the cycles defines the boundary between blank and finished part If the angle between the straight line and the Z axis is greater than 1 the boundary is placed at the top and if the angle is less than or equal to 1 the boundary is placed at t...

Page 587: ...directly process them as if through the NC program memory Rounding the contour In order to avoid residual corners during roughing you can enable the Always round the contour function This will remove the protrusions that are always left at the end with each cut due to the cut geometry The Round to the previous intersection setting accelerates machining of the contour However any resulting residual...

Page 588: ...he cut segmentation to the contour edges During machining the contour is then divided by the edges into individual sections and cut segmentation is performed separately for each section Set machining area limits If for example you want to machine a certain area of the contour with a different tool you can set machining area limits so that machining only takes place in the area of the contour you h...

Page 589: ...distance after which the feedrate interruption should occur The interruption time or retraction distance is defined in machine data Machine manufacturer Please observe the information provided by the machine manufacturer Residual material machining naming conventions G code program For multi channel systems cycles attach a _C and a two digit number of the specific channel to the names of the progr...

Page 590: ...chine manufacturer Various defined values can be pre assigned using setting data Please observe the information provided by the machine manufacturer If the workpiece programming requires it you can display and change all of the parameters using Input complete Machining type You can freely select the machining type roughing finishing or complete machining roughing finishing During contour roughing ...

Page 591: ...Description Unit TC Name of the swivel data set Note The selection box only appears if more than one swivel data set has been set up Retraction for ShopMill pro gram No The axis is not retracted before swiveling Z Retraction in the direction of machine axis Z Z X Y Move machining axes to retraction position before swiveling Tool direction max Maximum retraction up to the software end position in t...

Page 592: ...axes The required angle can be freely entered Degrees C1 for ShopMill pro gram The required angle can be freely entered Degrees αC for ShopMill pro gram Rotational position for a pole position Degrees Hirth joint Round to the next Hirth joint Round up to Hirth joint Round down to Hirth joint Note For machines with a Hirth joint Tool Tool tip when swiveling Tracking The position of the tool tip is ...

Page 593: ...ont Rear Inside Outside D Maximum depth infeed only for mm DX Maximum depth infeed only for parallel to the contour as an alternative to D mm Do not round contour at end of cut Always round contour at end of cut Uniform cut segmentation Round cut segmentation at the edge Constant cutting depth Alternating cutting depth only with align cut segmentation to edge DZ Maximum depth infeed only for posit...

Page 594: ... description cylinder Version absolute Cylinder dimension abs Version incremental Allowance inc to maximum values of the CYCLE62 finished part contour For blank description allowance Allowance on the CYCLE62 finished part contour inc mm Allowance Allowance for pre finishing only for Yes U1 contour allowance No U1 Compensation allowance in X and Z direction inc only for allowance Positive value Com...

Page 595: ...ppears if more than one swivel data set has been set up Retraction for ShopMill pro gram No The axis is not retracted before swiveling Z Retraction in the direction of machine axis Z Z X Y Move machining axes to retraction position before swiveling Tool direction max Maximum retraction up to the software end position in the tool direction Tool direction inc Incremental retraction specified retract...

Page 596: ...axes The required angle can be freely entered Degrees C1 for ShopMill pro gram The required angle can be freely entered Degrees αC for ShopMill pro gram Rotational position for a pole position Degrees Hirth joint Round to the next Hirth joint Round up to Hirth joint Round down to Hirth joint Note For machines with a Hirth joint Tool Tool tip when swiveling Tracking The position of the tool tip is ...

Page 597: ...mm Position front back inside outside D Maximum depth infeed only for mm DX Maximum depth infeed only for parallel to the contour as an alternative to D mm DZ Maximum depth infeed only for position parallel to the contour and UX mm UX or U Finishing allowance in X or finishing allowance in X and Z only for mm UZ Finishing allowance in Z only for UX mm DI For zero Continuous cut only for mm BL Blan...

Page 598: ...g only for Yes U1 contour allowance No U1 Compensation allowance in X and Z direction inc only for allowance Positive value Compensation allowance is kept Negative value Compensation allowance is removed in addition to finishing allowance mm Relief cuts Yes cannot be changed FR Insertion feedrate relief cuts Unit of feedrate as programmed before the cycle call Hidden parameters The following param...

Page 599: ...n updated blank contour For a G code program for stock removal residual material Yes must be programmed Material that remains as part of the finishing allowance is not residual material Using the Stock removal residual material function you can remove unwanted material with a suitable tool The Stock removal residual material function is a software option Procedure 1 The part program to be executed...

Page 600: ...ing rate rpm m min F Feedrate CON Name of the updated unma chined part contour for residual material machining without the attached character _C and dou ble digit number Residual mate rial With subsequent residual materi al removal Yes No CONR Name to save the updated unma chined part contour for residual material removal only Yes for residual material removal Programming technological functions c...

Page 601: ... the tool direction When retracting in the tool direction in the swiveled machine state several axes can move traverse ZR for ShopMill pro gram Retraction path only for incremental retraction in mm Align tool through beta and gamma angles β for ShopMill pro gram Align tool with swivel axes Input value The required angle can be freely entered β 0 β 90 Degrees γ for ShopMill pro gram 0 180 The requi...

Page 602: ...am Preferred direction of the swivel axis for several possible alignments of the machine Machining roughing finishing Machining direction Face Longitudinal Parallel to the contour From inside to outside From outside to inside From end face to rear side From rear side to end face The machining direction depends on the stock removal direction and choice of tool Position Front Rear Inside Outside D M...

Page 603: ...wance mm Set machining area limits Set machining area limits Yes No XA XB ZA ZB With limited machining area only yes 1 Limit XA 2 Limit XB abs or 2nd limit referred to XA inc 1 Limit ZA 2 Limit ZB abs or 2nd limit referred to ZA inc mm Relief cuts Machine relief cuts Yes No FR Insertion feedrate relief cuts Unit of feedrate as programmed before the cycle call 10 5 9 Grooving CYCLE952 Function The ...

Page 604: ...ES function For additional information please refer to the following documentation SINUMERIK Operate Commissioning Manual Set machining area limits If for example you want to machine a certain area of the contour with a different tool you can set machining area limits so that machining only takes place in the area of the contour you have selected The limit lines must not intersect the contour on t...

Page 605: ...e manufacturer Various defined values can be pre assigned using setting data Please observe the information provided by the machine manufacturer If the workpiece programming requires it you can display and change all of the parameters using Input complete Machining type You can freely select the machining type roughing finishing or complete machining For more detailed information please refer to s...

Page 606: ...Description Unit TC Name of the swivel data set Note The selection box only appears if more than one swivel data set has been set up Retraction for ShopMill pro gram No The axis is not retracted before swiveling Z Retraction in the direction of machine axis Z Z X Y Move machining axes to retraction position before swiveling Tool direction max Maximum retraction up to the software end position in t...

Page 607: ...axes The required angle can be freely entered Degrees C1 for ShopMill pro gram The required angle can be freely entered Degrees αC for ShopMill pro gram Rotational position for a pole position Degrees Hirth joint Round to the next Hirth joint Round up to Hirth joint Round down to Hirth joint Note For machines with a Hirth joint Tool Tool tip when swiveling Tracking The position of the tool tip is ...

Page 608: ...XD and ZD on the finished part contour Contour additional CYCLE62 call with blank contour e g cast iron mold XD only for machining only for blank description cylinder and allowance For blank description cylinder Version absolute Cylinder dimension abs Version incremental Allowance inc to maximum values of the CYCLE62 finished part contour For blank description allowance Allowance on the CYCLE62 fi...

Page 609: ...rred to XA inc 1 Limit ZA 2 Limit ZB abs or 2nd limit referred to ZA inc mm N Number of grooves DP Distance between grooves inc mm Unit of feedrate as programmed before the cycle call Parameters in the Input simple mode G code program parameters ShopMill program parameters Input simple PRG Name of the program to be generated T Tool name RP Retraction plane only for machining direction longitu dina...

Page 610: ...n the tool direction When retracting in the tool direction in the swiveled machine state several axes can move travel ZR for ShopMill pro gram Retraction path only for incremental retraction in mm Align tool through beta and gamma angles β for ShopMill pro gram Align tool with swivel axes Input value The required angle can be freely entered β 0 β 90 Degrees γ for ShopMill pro gram 0 180 The requir...

Page 611: ...ed direction for ShopMill pro gram Preferred direction of the swivel axis for several possible alignments of the machine Machining roughing finishing complete machining Machining direction Face Longitudinal Position front back inside outside D Maximum depth infeed only for mm XDA First grooving limit tool abs only for face machining direction mm XDB Second grooving limit tool abs only for face mac...

Page 612: ...CLE62 finished part contour For blank description allowance Allowance on the CYCLE62 finished part contour inc mm Allowance Allowance for pre finishing only for Yes U1 contour allowance No mm U1 Compensation allowance in X and Z direction inc only for allowance Positive value Compensation allowance is kept Negative value Compensation allowance is removed in addition to finishing allowance mm Unit ...

Page 613: ...sidual material function Material that remains as part of the finishing allowance is not residual material The Grooving residual material function allows you to remove unwanted material with a suitable tool The Grooving residual material function is a software option Procedure 1 The part program to be executed has been created and you are in the editor 2 Press the Turning and Contour turning softk...

Page 614: ...ing rate rpm m min F Feedrate CON Name of the updated unma chined part contour for residual material machining without the attached character _C and dou ble digit number Residual mate rial With subsequent residual materi al removal Yes No CONR Name to save the updated unma chined part contour for residual material removal only Yes for residual material removal Programming technological functions c...

Page 615: ... axes can move traverse ZR for ShopMill pro gram Retraction path only for incremental retraction in mm Align tool through beta and gamma angles β for ShopMill pro gram Align tool with swivel axes Input value The required angle can be freely entered β 0 β 90 Degrees γ for ShopMill pro gram 0 180 The required angle can be freely entered Degrees Directly position rotary axes B1 for ShopMill pro gram ...

Page 616: ...ection of the swivel axis for several possible alignments of the machine Machining roughing finishing Machining direction Face Longitudinal Position Front Rear Inside Outside D Maximum depth infeed only for mm XDA First grooving limit tool abs only for face machining direction mm XDB Second grooving limit tool abs only for face machining direction mm UX or U Finishing allowance in X or finishing a...

Page 617: ...mmed before the cycle call 10 5 11 Plunge turning CYCLE952 Function Using the Plunge turning function you can machine any shape of groove Contrary to grooving the plunge turning function removes material on the sides after the groove has been machined in order to reduce machining time Contrary to stock removal the plunge turning function allows you to machine contours that the tool must enter vert...

Page 618: ...ool you can set machining area limits so that machining only takes place in the area of the contour you have selected The limit lines must not intersect the contour on the side facing the machining This limit has the same effect during roughing and finishing Example of the limit in longitudinal external machining VW OLPLW QG OLPLW UG OLPLW WK OLPLW ODQN LQLVKHG SDUW LPLW 0DFKLQLQJ Figure 10 17 Per...

Page 619: ...Machining type You can freely select the machining type roughing finishing or complete machining For more detailed information please refer to section Stock removal Procedure 1 The part program to be executed has been created and you are in the editor 2 Press the Turning and Contour turning softkeys 3 Press the Plunge turning softkey The Plunge turning input window opens Parameters in the Input co...

Page 620: ...to retraction position before swiveling Tool direction max Maximum retraction up to the software end position in the tool direction Tool direction inc Incremental retraction specified retraction distance up to the software end position in the tool direction When retracting in the tool direction in the swiveled machine state several axes can move traverse ZR for ShopMill program Retraction path onl...

Page 621: ...irth joint Round down to Hirth joint Note For machines with a Hirth joint Tool Tool tip when swiveling Tracking The position of the tool tip is maintained during swiveling No tracking The position of the tool tip is not maintained during swiveling Preferred direction for ShopMill program Preferred direction of the swivel axis for several possible alignments of the machine FX Feedrate in X directio...

Page 622: ...ce inc to maximum values of the CYCLE62 finished part contour For blank description allowance Allowance on the CYCLE62 finished part contour inc mm ZD only for machining only for blank description cylinder and allowance For blank description cylinder Version absolute Cylinder dimension abs Version incremental Allowance inc to maximum values of the CYCLE62 finished part contour For blank descriptio...

Page 623: ...C Name of the swivel data set Note The selection box only appears if more than one swivel data set has been set up Retraction for ShopMill pro gram No The axis is not retracted before swiveling Z Retraction in the direction of machine axis Z Z X Y Move machining axes to retraction position before swiveling Tool direction max Maximum retraction up to the software end position in the tool direction ...

Page 624: ...axes The required angle can be freely entered Degrees C1 for ShopMill pro gram The required angle can be freely entered Degrees αC for ShopMill pro gram Rotational position for a pole position Degrees Hirth joint Round to the next Hirth joint Round up to Hirth joint Round down to Hirth joint Note For machines with a Hirth joint Tool Tool tip when swiveling Tracking The position of the tool tip is ...

Page 625: ...ction mm UX or U Finishing allowance in X or finishing allowance in X and Z only for mm UZ Finishing allowance in Z only for UX mm BL Blank description only for Cylinder described using XD ZD Allowance XD and ZD on the finished part contour Contour additional CYCLE62 call with blank contour e g cast iron mold XD only for machining only for blank description cylinder and allowance For blank descrip...

Page 626: ... allowance is removed in addition to finishing allowance mm Unit of feedrate as programmed before the cycle call Hidden parameters The following parameters are hidden They are pre assigned fixed values or values that can be adjusted using setting data Parameter Description Value Can be set in SD Residual material Without subsequent residual material removal No PL Machining plane Defined in MD 5200...

Page 627: ...ess the Turning and Contour turning softkeys 3 Press the Plunge turning residual material softkey The Plunge turning residual material input window opens G code program parameters ShopMill program parameters PRG Name of the program to be gener ated T Tool name PL Machining plane D Cutting edge number RP Retraction plane only for machining di rection longitu dinal inner mm S V Spindle speed or cons...

Page 628: ... the tool direction When retracting in the tool direction in the swiveled machine state several axes can move traverse ZR for ShopMill pro gram Retraction path only for incremental retraction in mm Align tool through beta and gamma angles β for ShopMill pro gram Align tool with swivel axes Input value The required angle can be freely entered β 0 β 90 Degrees γ for ShopMill pro gram 0 180 The requi...

Page 629: ...ring swiveling Preferred direction for ShopMill pro gram Preferred direction of the swivel axis for several possible alignments of the machine FX Feedrate in X direction FZ Feedrate in Z direction Machining roughing finishing Machining direction Face Longitudinal Position Front Rear Inside Outside D Maximum depth infeed only for mm UX or U Finishing allowance in X or finishing allowance in X and Z...

Page 630: ... inc For blank description allowance Allowance on the contour abs or inc mm U1 Compensation allowance in X and Z direction inc only for allowance Positive value Compensation allowance is retained Negative value Compensation allowance is removed in addition to finishing allowance mm Set machining area limits Set machining area limits Yes No XA XB ZA ZB With limited machining area only yes 1st limit...

Page 631: ...achining and toolholder with orientation capability are available Setting aligning tools for a G code program The swivel function also includes the Setting tool and Aligning milling tool functions Contrary to swiveling when setting and aligning the coordinate system WCS is not rotated at the same time Prerequisites before calling the swivel cycle A tool tool cutting edge D 0 and the work offset WO...

Page 632: ...e workpiece and are therefore independent of the machine with the exception of swivel rotary axis direct No programmable frames are used in the swivel cycle The frames programmed by the user are taken into account for additive swiveling On the other hand when swiveling to a new swivel plane the programmable frames are deleted Any type of machining operation can be performed on the swivel plane e g...

Page 633: ...ftware limit switches above the retraction plane In the event of violation below the retraction plane for safety reasons the program is interrupted with an alarm To avoid this before swiveling e g move the tool in the X Y plane and position it as close as possible to the starting point of the machining operation or define the retraction plane closer to the workpiece Retraction Before swiveling the...

Page 634: ...l frame is added to the swivel frame from the last swivel cycle If several swivel cycles are programmed in a program and programmable frames are also active between them e g AROT ATRANS these are taken into account in the swivel frame If a swivel data set is activated that was not previously active the swivel frames are not deleted If the currently active work offset contains rotations e g due to ...

Page 635: ...on angle YZ 3rd rotation around X When projection angles around XY and YX are programmed the new X axis of the swiveled coordinate system lies in the old ZX plane When projection angles around XZ and ZX are programmed the new Z axis of the swiveled coordinate system lies in the old Y Z plane When projection angles around YZ and ZY are programmed the new Y axis of the swiveled coordinate system lie...

Page 636: ...turer Please observe the information provided by the machine manufacturer If one of the two positions cannot be reached for mechanical reasons the alternative position is automatically selected irrespective of the setting of the Direction parameter Example 1 A rotary axis rotates in the basic position around the tool axis Machine kinematics with swivel head and swivel table Swivel head with rotary...

Page 637: ...ound the tool axis Machine kinematics with swivel table 1st rotary axis A in the swivel table rotates around machine axis X Angular range rotary axis 1 A from 90 degrees to 90 degrees 2nd rotary axis B in the swivel table rotates around machine axis Y Angular range rotary axis 2 B from 0 degrees to 360 degrees modulo 360 Machine manufacturer has set the direction reference to rotary axis 1 A when ...

Page 638: ... solution corresponds to the solution without additional rotation in the Actframe 180 in Z Procedure 1 The part program or ShopMill program to be processed has been created and you are in the editor 2 Select the Miscellaneous softkey 3 Press the Swivel plane softkey The Swivel plane input window opens 4 Press the Basic setting softkey if you wish to reestablish the initial state i e you wish to se...

Page 639: ... for rotation X Y0 Reference point for rotation Y Z0 Reference point for rotation Z Swivel mode Axis by axis Rotate coordinate system axis by axis Solid angle Swivel via solid angle Proj angle Swiveling via projection angle Direct Directly position rotary axes Axis sequence Sequence of the axes which are rotated around only for axis by axis swivel mode XYZ or XZY or YXZ or YZX or ZXY or ZYX X Rota...

Page 640: ...g If a program activating the orientation transformation TRAORI is to be executed on the swiveled machining plane the system frames tool reference and rotary table reference for the swivel head or swivel table must be deactivated before TRAORI is called see example The workpiece reference WPFRAME is retained Example machine with swivel table N1 G54 N2 T MILL_10mm N3 M6 N4 CYCLE800 1 0 57 0 40 0 45...

Page 641: ...cycle the setting angle is generated by an axis rotation max 90 degrees to the active swivel plane When setting the swivel plane is always additive With Setting tool only rotations are displayed on the swivel cycle input screen form The user can freely select the rotation sequence Machine manufacturer Please refer to the machine manufacturer s specifications 7RRO OHQJWK 7 3 5 7 3 5 Figure 10 19 Th...

Page 642: ...ol direction Axis sequence Sequence of the axes which are rotated around XY or XZ or YX or YZ or ZX or ZY X Rotation around X Degrees Y Rotation around Y Degrees Tool Tool tip position when swiveling Tracking The position of the tool tip is maintained during swiveling No tracking The position of the tool tip changes during swiveling 10 6 3 Aligning turning tools CYCLE800 millling turning machine F...

Page 643: ...he β and γ angles The beta and gamma angles orientate the turning tools The angles are referred to WCS If the workpiece coordinate system corresponds to the machine coordinate system the tool data remains unchanged for β 0 γ 0 cutting edge position holder angle Machine manufacturer Please observe the information provided by the machine manufacturer Turning tools fixed on the headstock Turning tool...

Page 644: ... Align tool ß 90 r ˠ r 6 r r r SL cutting edge position Programming technological functions cycles 10 6 Further cycles and functions Milling 644 Operating Manual 08 2018 6FC5398 7CP41 0BA0 ...

Page 645: ...coordinate system when milling r r r Align tool ß 0 A 90 r ˠ r 6 r r r SL cutting edge position Align tool ß 90 A 0 r ˠ r 6 r r r SL cutting edge position Programming technological functions cycles 10 6 Further cycles and functions Milling Operating Manual 08 2018 6FC5398 7CP41 0BA0 645 ...

Page 646: ...raction in the tool direction Swivel mode Swivel mode direct The position of the swivel axis is selected directly Swivel mode align The tool position is specified β Tool alignment with the swivel axis Degrees 0 90 0 Value entry The required angle can be freely entered Note The selected angle does not depend on the machine geometry γ Tool alignment with the swivel axis 0 000 Tool alignment with too...

Page 647: ...ane Alignment of the rotation plane with swivel mode direct or γ fixed Standard Mirrored αC Align the plane of rotation in the pole position only in the align swivel mode and β zero degrees Degrees 10 6 4 High speed settings CYCLE832 Function The High Speed Settings function CYCLE832 is used to preset data for the machining of free form surfaces so that optimum machining is possible The call of CY...

Page 648: ... ways in which the surface quality of free form surfaces can be improved To smooth the surface the continuous path control is optimized within a defined contour tolerance Software option To smooth contours with the High Speed Settings CYCLE832 function you re quire the Top Surface software option Machining methods You can choose between the following technological machining operations Finishing Ro...

Page 649: ...ote Additional G commands that are available for use in machining free form surfaces are also activated in the High Speed Settings cycle When deselecting CYCLE832 the G groups are programmed to the settings during the program run time that are declared in the machine data for the reset state References For additional information please refer to the following documentation SINUMERIK Operate Commiss...

Page 650: ...ion provided by the machine manufacturer Smoothing not for Advanced Surface Yes Optimized path within the contour tolerance No Path close to contour Note The field can be hidden Please observe the information provided by the machine manufacturer Multi axis program Multi axis program for 5 axis machines Yes The orientation tolerance 0 degrees can be entered here No The value 1 is entered automatica...

Page 651: ...y configured for EES If you use the CNC user memory extended software option the subprogram can be stored on the system CF card in a program memory configured for EES Without these two software options the subprogram must always be stored in the NCK work memory in a separate XYZ directory or in the Subprograms directory If you still want to call a subprogram located on another drive you can use G ...

Page 652: ...xample N10 T1 D1 Load tool N11 M6 N20 G54 G710 Select work offset N30 M3 S12000 Switch on spindle N40 CYCLE832 0 05 3 1 Tolerance value 0 05 mm machining type roughing N50 EXTCALL CAM_SCHRUPP Externally call subprogram CAM_SCHRUPP N60 T2 D1 Load tool N61 M6 N70 CYCLE832 0 005 1 1 Tolerance value 0 005 mm machining type finishing N80 EXTCALL CAM_SCHLICHT Call subprogram CAM_SCHLICHT N90 M30 End of ...

Page 653: ...ase note that when selecting TRANSMIT or TRACYL offsets scaling and mirroring the real Y axis is not transferred into the virtual Y axis Offsets scalings and mirroring of the virtual Y axis are deleted for TRAFOOF Procedure for work offset offset rotation scaling or mirroring 1 The ShopMill program has been created and you are in the editor 2 Press the Various and Transformation softkeys 3 Press t...

Page 654: ...fset Additive offset Parameter Description Unit Offset New New offset Additive Additive offset X Offset X mm Y Offset Y mm Z Offset Z mm Programming technological functions cycles 10 7 Additional cycles and functions in ShopMill Milling 654 Operating Manual 08 2018 6FC5398 7CP41 0BA0 ...

Page 655: ...tion Additive rotation Parameter Description Unit Rotation New New rotation Additive Additive rotation X Rotation around X Degrees Y Rotation around Y Degrees Z Rotation around Z Degrees Programming technological functions cycles 10 7 Additional cycles and functions in ShopMill Milling Operating Manual 08 2018 6FC5398 7CP41 0BA0 655 ...

Page 656: ...aling Additive Additive scaling XY Scale factor XY Z Scale factor Z 10 7 5 Mirroring Furthermore you can mirror all axes Enter the axis to be mirrored Note Travel direction of the milling cutter Note that with mirroring the travel direction of the cutting tool conventional climb is also mirrored Programming technological functions cycles 10 7 Additional cycles and functions in ShopMill Milling 656...

Page 657: ...machine Longitudinal grooves on cylindrical bodies Transverse grooves on cylindrical objects grooves with any path on cylindrical bodies The path of the grooves is programmed with reference to the unwrapped level surface of the cylinder The groove can be programmed using line circle drilling or milling cycles or with contour milling free contour programming Programming technological functions cycl...

Page 658: ...e compensation is deactivated any type of slot with parallel sides can be machined if the tool diameter is equal to the slot width The slot sides are not parallel if the slot width is larger than the tool diameter The slot contour is programmed for machining purposes 6ORW VLGH FRPSHQVDWLRQ RII 7UDQVYHUVH VORW RQJLWXGLQDO VORW Slot side compensation on This function is only permissible during path ...

Page 659: ...oint on the center point of the cylinder end face Position the Y axis Y axis must be positioned prior to cylinder surface transformation because it is defined differently after transformation Activate cylinder surface transformation Select work offset for machining on the developed cylinder surface e g shift zero point to the zero point on the workpiece drawing Program machining operation e g ente...

Page 660: ...ctivates slot side compensation off only for Cylinder surface transformation yes Deactivates slot side compensation The selection for slot side compensation depends on the transformation type D Offset to programmed path only for slot side compensation on 10 7 7 Straight or circular machining When you want to perform straight or circular path movements or machining without defining a complete conto...

Page 661: ...s for the tool and spindle speed remain active until you change these again Procedure 1 The ShopMill program to be edited has been created and you are in the editor 2 Press the menu forward key and the Straight Circle softkey 3 Press the Tool softkey The parameter screen Tool is opened 4 Enter a tool in parameter field T OR Press the Select tool softkey The Tool selection window is opened Position...

Page 662: ...e the radius compensation again when you want to traverse without radius compensation Where several straight line blocks with radius compensation are programmed sequentially you may only select radius compensation in the first program block When executing the first path motion with radius compensation the tool traverses without compensation at the starting point and with compensation at the end po...

Page 663: ...tter travels in the programmed direc tion Radius compensation to right of contour Radius compensation to left of contour Radius compensation off The previously programmed setting for radius compensation is used 10 7 9 Programming a circle with known center point The tool travels along a circular path from its actual position to the programmed circle end point You must know the position of the circ...

Page 664: ...nd center point in X direction inc mm J Distance between circle starting point and center point in Y direction inc mm F Machining feedrate mm rev mm min mm tooth PL Plane The circle is traversed in the set plane with the relevant interpolation param eters XYIJ XY plane with interpolation parameters I and J ZXKI ZX plane with interpolation parameters K and I YZJK YZ plane with interpolation paramet...

Page 665: ...rection of rotation X Target position X abs or target position X referred to the last programmed position inc mm Y Target position Y abs or target position Y referred to the last programmed position inc mm R Radius of arc You can select the arc of your choice by entering a positive or a negative sign mm F Machining feedrate mm rev mm min mm tooth 10 7 11 Helix With helical interpolation a circular...

Page 666: ... of the helical end point abs or inc mm F Machining feedrate mm rev mm min mm tooth 10 7 12 Polar coordinates If a workpiece has been dimensioned from a central point pole with radius and angles you will find it helpful to program these as polar coordinates You can program straight lines and circles as polar coordinates Defining a pole You must define the pole before you can program a straight lin...

Page 667: ...ion along a straight line to the programmed end point at the machining feedrate or in rapid traverse The 1st straight line in polar coordinates entered after the pole must be programmed with an absolute angle You can program any additional straight lines or circles with incremental coordinates Procedure 1 The ShopMill program to be edited has been created and you are in the editor 2 Press the menu...

Page 668: ... its actual position on a circular path to the programmed end point angle at the machining feedrate The radius corresponds to the distance from the actual tool position to the defined pole i e the circle starting and end point positions are at the same distance from the defined pole The 1st arc in polar coordinates entered after the pole must be programmed with an absolute angle You can program an...

Page 669: ... obstacle height safety clearance The new position is approached with rapid traverse at this height The tool axis then approaches a position according to Z0 of the position pattern safety clearance with rapid traverse Procedure 1 The ShopMill program to be edited has been created and you are in the editor 2 Press the Drilling softkey 3 Press the Positions and Obstacle softkeys The obstacle input w...

Page 670: ...Parameter Description Unit Z0 Obstacle height abs Programming technological functions cycles 10 7 Additional cycles and functions in ShopMill Milling 670 Operating Manual 08 2018 6FC5398 7CP41 0BA0 ...

Page 671: ...ew The multi channel view allows you to simultaneously view several channels in the following operating areas Machine operating area Program operating area See also Editor settings Page 222 Milling Operating Manual 08 2018 6FC5398 7CP41 0BA0 671 ...

Page 672: ...isplay in the lower window using the vertical softkey bar The following exceptions apply when making a selection using the vertical softkeys The Actual values MCS softkey switches over the coordinate systems of both channels The Zoom actual value and All G functions softkeys switch into the single channel view Single channel view If you only wish to monitor one channel for your multi channel machi...

Page 673: ...If there is not sufficient space you switch over into the single channel view Running in a program You select individual channels to run in the program at the machine Requirement Several channels have been set up The setting 2 channels 3 channels or 4 channels is selected Displaying hiding a multi channel view 1 Select the Machine operating area 2 Select the JOG MDA or AUTO mode 3 Press the menu f...

Page 674: ...r window of the left hand and right hand channel columns are occupied by the actual value window 6 Press the T F S softkey if you wish to view the T F S window The T F S window is displayed in the lower window of the left hand and right hand channel column Note The T F S softkey is present only for smaller operator panels i e up to OP012 Multi channel view 11 2 Multi channel view in the Machine op...

Page 675: ... displayed one above the other for each channel Actual Value window T F S window Block Display window Selecting functions The T F S window is overlaid by pressing one of the vertical softkeys 4 channel view The following windows are displayed one above the other for each channel Actual Value window G functions the G functions softkey is omitted All G functions is accessed with the Menu forward key...

Page 676: ...e the width of the program in the Editor window using the settings in the editor This means that you can distribute programs evenly or you can widen the column with the active program Channel status When required channel messages are displayed in the status display Machine manufacturer Please refer to the machine manufacturer s specifications Multi channel view 11 3 Multi channel view for large op...

Page 677: ...the CHANNEL key advance the channel in the Machine operating area you obtain the following views Channels 1 and 3 channels 3 and 4 channels 4 and 2 Channels 5 and 6 are not displayed in the multi channel view In the single channel view toggle between all of the channels 1 6 without taking into account the configured sequence for the multi channel view Using the channel menu you can always select a...

Page 678: ...s for Multi Channel View window is opened 5 Set the multi channel or single channel view and define which channels are to be seen in the Machine operating area and in the editor in which sequence Multi channel view 11 4 Setting the multi channel view Milling 678 Operating Manual 08 2018 6FC5398 7CP41 0BA0 ...

Page 679: ...turer s specifications Collision avoidance is based on a machine model The kinematics of the machine are described as a kinematic chain For machine parts to be protected protection areas are attached to these chains The geometry of the protection areas is defined using protection area elements The control then knows how they move in the machine coordinate system depending on the position of the ma...

Page 680: ...kpieces that have not been modeled or new objects in the working area are not monitored and can therefore cause collisions References More detailed explanations of collision avoidance can be found in the following reference Special Functions Function Manual Section Kinematic chain K7 Section Geometric machine modeling K8 Section Collision avoidance internal K9 Section Collision avoidance external ...

Page 681: ...TO operating mode or for the JOG and MDA operating modes Procedure 1 Select the Machine operating area 2 Press the AUTO key 3 Press the Sim rec softkey 4 Press the Other views and Machine space softkeys During simultaneous recording an active machine model is displayed Collision avoidance 12 1 Activate collision avoidance Milling Operating Manual 08 2018 6FC5398 7CP41 0BA0 681 ...

Page 682: ...nce They switch the collision avoidance for the operating mode AUTO com pletely on or off JOG MDI Machine If the collision monitoring for the JOG MDI operating modes is activated then as a minimum the machine protection areas are monitored The parameter cannot be changed AUTO Machine If the collision monitoring for the AUTO operating mode is activated then as a minimum the machine protection areas...

Page 683: ...voidance line for the required operating modes e g for JOG MDI select the entry On to activate the collision avoidance or Off to deactivate collision avoidance 6 Deactivate the Tools checkbox if you only want to monitor the machine protection areas Collision avoidance 12 2 Set collision avoidance Milling Operating Manual 08 2018 6FC5398 7CP41 0BA0 683 ...

Page 684: ...Collision avoidance 12 2 Set collision avoidance Milling 684 Operating Manual 08 2018 6FC5398 7CP41 0BA0 ...

Page 685: ...hat are required during operation e g wear and monitoring functions are listed here Magazine You will find the magazine and magazine location related parameters and functions for the tools magazine locations here Tool data OEM This list can be freely defined by the OEM Sorting the lists You can change the sorting within the lists acc to the magazine acc to the name tool identifier alphabetic accor...

Page 686: ...lists according to the following objects Tool Magazine location Empty location Machine manufacturer Please refer to the machine manufacturer s specifications Tool management 13 1 Lists for the tool management Milling 686 Operating Manual 08 2018 6FC5398 7CP41 0BA0 ...

Page 687: ...e lists In the default setting the lists are displayed sorted according to magazine location The magazine selected via the cursor is displayed in the title line of each list The Magazine selection vertical softkey is displayed in the tool list You can load and unload tools to and from a magazine via the tool list Machine manufacturer Please refer to the machine manufacturer s specifications Tool m...

Page 688: ...ine If you are working on a milling turning machine when creating tools turning tools are also available in addition to drilling milling and special tools Machine manufacturer Please refer to the machine manufacturer s specifications Tool types Figure 13 1 Favorites standard selection for a milling machine Tool management 13 3 Tool types Milling 688 Operating Manual 08 2018 6FC5398 7CP41 0BA0 ...

Page 689: ...rites standard selection for milling turning machine Figure 13 2 Available tools in the New Tool Milling Cutter window Tool management 13 3 Tool types Milling Operating Manual 08 2018 6FC5398 7CP41 0BA0 689 ...

Page 690: ...re 13 3 Available tools in the New Tool Drill window Figure 13 4 Available tools in the New Tool Special Tools window Tool management 13 3 Tool types Milling 690 Operating Manual 08 2018 6FC5398 7CP41 0BA0 ...

Page 691: ... overview of the dimensioning of tools Tool types LDPHWHU HQJWK Figure 13 5 End mill Type 120 HQJWK LDPHWHU 2XWHU GLDPHWHU Figure 13 6 Face mill Type 140 Tool management 13 4 Tool dimensioning Milling Operating Manual 08 2018 6FC5398 7CP41 0BA0 691 ...

Page 692: ...WHU HQJWK HQJWK HQJWK Figure 13 7 Angle head cutter Type 130 HQJWK LDPHWHU 7LS DQJOH Figure 13 8 Drill Type 200 Tool management 13 4 Tool dimensioning Milling 692 Operating Manual 08 2018 6FC5398 7CP41 0BA0 ...

Page 693: ...WFK Figure 13 9 Tap Type 240 HQJWK LDPHWHU Figure 13 10 3D tool with an example of a cylindrical die sinking cutter Type 110 Tool management 13 4 Tool dimensioning Milling Operating Manual 08 2018 6FC5398 7CP41 0BA0 693 ...

Page 694: ...pe with an example of a ballhead cutter Type 111 HQJWK LDPHWHU RUQHU UDGLXV Figure 13 12 3D tool with an example of an end mill with corner rounding Type 121 Tool management 13 4 Tool dimensioning Milling 694 Operating Manual 08 2018 6FC5398 7CP41 0BA0 ...

Page 695: ...h an example of a bevel cutter Type 155 HQJWK LDPHWHU RUQHU UDGLXV QJOH IRU WDSHUHG WRROV Figure 13 14 3D tool with an example of a bevel cutter with corner rounding Type 156 Tool management 13 4 Tool dimensioning Milling Operating Manual 08 2018 6FC5398 7CP41 0BA0 695 ...

Page 696: ...X Figure 13 16 Electronic workpiece probe Machine manufacturer The tool length of the workpiece probe is measured to the center of the ball length m or to the ball circumference length u Please refer to the machine manufacturer s specifications Tool management 13 4 Tool dimensioning Milling 696 Operating Manual 08 2018 6FC5398 7CP41 0BA0 ...

Page 697: ...Note An electronic workpiece probe must be calibrated before use Tool management 13 4 Tool dimensioning Milling Operating Manual 08 2018 6FC5398 7CP41 0BA0 697 ...

Page 698: ...h dual gripper is used as icons Type Tool type Specific tool offset data is displayed depending on the tool type represen ted as an icon For milling turning machines the icon identifies the position of the tool this was selected when the tool was created You have the option of changing the tool type or the tool position using the SELECT key Tool name The tool is identified by the name and the sist...

Page 699: ... 121 end mill with corner rounding Type 130 angle head cutter Type 131 angle head cutter with corner rounding Type 140 facing tool Type 150 side mill Type 155 bevel cutter Type 156 bevel cutter with corner rounding and Type 157 tapered die sinking cutter Tip length Tip length of a cutting tool or grooving cutter The tip length is required for displaying the tools during the simulation of the progr...

Page 700: ...ode or via the Machine functions window References Information on the configuration and setting up of the tool list can be found in the following references SINUMERIK Operate Commissioning Manual Icons in the tool list Icon Marking Meaning Tool type Red X The tool is disabled Yellow triangle pointing downward The prewarning limit has been reached Yellow triangle pointing upward The tool is in a sp...

Page 701: ...ngth X Δ length Y Δ length Z Adapter length length X length Y length Z V direction vector 1 6 Vector X vector Y vector Z 131 Angle head cutter with cor ner rounding Geometry length length X length Y length Z Corner radius Wear length Δ length X Δ length Y Δ length Z Adapter length length X length Y length Z V direction vector 1 6 Vector X vector Y vector Z 140 Face milling External radius Tool ang...

Page 702: ...ter diameter You can use the configuration file to specify the data to be displayed for specific tool types in the Additional Data window Machine manufacturer Please refer to the machine manufacturer s specifications Procedure 1 The tool list is opened 2 In the list select an appropriate tool e g an angle head cutter 3 Press the Additional data softkey The Additional Data window opens The Addition...

Page 703: ...ress the OK softkey The tool is added to the tool list with a predefined name If the cursor is located on an empty magazine location in the tool list then the tool is loaded to this magazine location The tool creation sequence can be defined differently Multiple load points If you have configured several loading points for a magazine then the Select loading point window appears when a tool is crea...

Page 704: ... the workpiece in the Z direction scratch it with a turning spindle and enter the set position Z0 of the workpiece edge 5 Press the Set length softkey The tool length is calculated automatically and entered in the tool list 13 5 4 Managing several cutting edges In the case of tools with more than one cutting edge a separate set of offset data is assigned to each cutting edge The number of possible...

Page 705: ...l softkey A safety prompt is displayed 4 Press the OK softkey if you really want to delete the tool Use this softkey to delete the tool If the tool is in a magazine location it is unloaded and then deleted Multiple load points tool in magazine location If you have configured several loading points for a magazine then the Loading Point Selection window appears after pressing the Delete tool softkey...

Page 706: ... location number you require and press the OK softkey OR Press the Spindle softkey The tool is loaded into the specified magazine location or spindle Loading empty magazine location directly with tool 1 Position the cursor at an empty magazine location where you want to load a tool and press the Load softkey The Load with window opens Select the desired tool in the Tool field and press the OK soft...

Page 707: ...from one area to the next i e from the buffer memory to the magazine from the magazine to the NC memory and from the NC memory back to the buffer memory each time you press the softkey The cursor is positioned at the beginning of the magazine each time OR If there is more than one magazine the Magazine Selection window opens Position the cursor on the desired magazine in this window and press the ...

Page 708: ...ing functions are available in SINUMERIK Operate Creating a new tool from code carrier Unloading tools on code carrier Software option In order to use the functions you require the option Tool Ident Connection References Further details on tool management with code carrier and the configuration of the user interface in SINUMERIK Operate can be found in the following reference Function Manual SINUM...

Page 709: ... from the displayed tool will not be overwritten 3 Press the New tool softkey The New Tool Favorites window is opened 4 Position the cursor on the entry Tool from code carrier and press the OK softkey The tool data is read from the code carrier and is displayed in the New tool window with the tool type tool name and possibly with certain pa rameters 5 Press the OK softkey The tool is added to the ...

Page 710: ...Position the cursor on the tool on the code carrier that you want to delete 3 Press the Delete tool and On code carrier softkeys The tool is unloaded and the data of the tool are written to the code carrier The tool is then deleted from the NC memory The deletion of the tool can be set differently i e the On code carrier softkey is not available 13 5 9 Managing a tool in a file If the Enable tool ...

Page 711: ...e tool name and possibly with certain pa rameters 6 Press the OK softkey The tool is added to the tool list with the specified name If the cursor is located on an empty magazine location in the tool list then the tool is loaded to this magazine location The tool creation sequence can be defined differently Unloading a tool in a file 1 The tool list is open 2 Place the cursor on the tool that you w...

Page 712: ...te to the required directory and press the OK softkey 4 Enter the required file name in the Name field and press the OK soft key The field is preassigned with tool names The tool is unloaded and the tool data is written to the file The tool is then deleted from the NC memory Tool management 13 5 Tool list Milling 712 Operating Manual 08 2018 6FC5398 7CP41 0BA0 ...

Page 713: ...addition you can disable tools when you no longer wish to use them Machine manufacturer Please refer to the machine manufacturer s specifications Tool parameters Column heading Meaning Location BS If activated in magazine selection Magazine location number The magazine location numbers The magazine number is specified first followed by the location number in the magazine If there is only one magaz...

Page 714: ... instructions Tool life Workpiece count Wear Parameter depends on selection in TC Tool life Number of workpieces Tool wear Setpoint Setpoint for tool life workpiece count or wear Prewarning limit Specification of the tool life workpiece count or wear at which a warning is displayed G The tool is disabled when the checkbox is selected Further parameters If you have created unique cutting edge numbe...

Page 715: ...gazine location is positioned at the loading position Red X The magazine location is disabled Procedure 1 Select the Parameter operating area 2 Press the Tool wear softkey See also Displaying tool details Page 723 Changing a tool type Page 727 13 6 1 Reactivating a tool You can replace disabled tools or make them ready for use again Preconditions In order to reactivate a tool the monitoring functi...

Page 716: ...n exchange the tool Reactivation of all monitoring types When the Reactivation of all monitoring types function is configured all the monitoring types set in the NC for a tool are reset during reactivation Machine manufacturer Please refer to the machine manufacturer s specifications References SINUMERIK Operate Commissioning Manual Multiple load points If you have configured several loading point...

Page 717: ...nts Refer to the following document for more information on configuring OEM tool data SINUMERIK Operate Commissioning Manual Procedure 1 Select the Parameter operating area 2 Press the OEM tool softkey Tool management 13 7 Tool data OEM Milling Operating Manual 08 2018 6FC5398 7CP41 0BA0 717 ...

Page 718: ... gripper is used as icons Type Tool type Depending on the tool type represented by an icon certain tool offset data is enabled Tool name The tool is identified by the name and the replacement tool number You can enter the name as text or number Note The maximum length of tool names is 31 ASCII characters The number of characters is reduced for Asian characters or Unicode charac ters The following ...

Page 719: ...cial state Place the cursor on the marked tool A tooltip pro vides a short description Green border The tool is preselected Magazine location number Green double arrow The magazine location is positioned at the change position Gray double arrow configura ble The magazine location is positioned at the loading position Red X The magazine location is disabled Procedure 1 Select the Parameter operatin...

Page 720: ... position the magazine location at the loading point 13 8 2 Relocating a tool Tools can be directly relocated within magazines to another magazine location which means that you do not have to unload tools from the magazine in order to load them into a different location When you are relocating a tool the application automatically suggests an empty location You may also directly specify an empty ma...

Page 721: ... set up several magazines then the relocate from magazine location to window appears after pressing the Relocate softkey Select the desired magazine and location and confirm your selection with OK to load the tool 13 8 3 Deleting unloading loading relocating all tools You have the option of deleting or unloading all tools in the magazine list loading them into the magazine list or relocating them ...

Page 722: ...ng loading or relocation of the tools The tools are deleted unloaded loaded or relocated in the magazine in ascending magazine location number order 4 Press the Cancel softkey if you wish to cancel the unloading operation Multiple load points For a magazine if more than one loading point was set up using the Select loading point softkey you have the option of opening a window in which you can assi...

Page 723: ...e magazine press the and Details softkeys OR If you are in the wear list or OEM tool list press the Details softkey The Tool Details window opens All the available tool data are displayed 4 Press the Cutting edge data softkey if you want to display the cutting data 5 Press the Monitoring data softkey if you want to display the monitoring data 13 9 2 Tool data The Tool Details window provides the f...

Page 724: ...tions left two half locations right one half location top and one half location bottom in a magazine Special size Left Number of half locations to the left of the tool Right Number of half locations to the right of the tool Tool OEM parameters 1 6 Freely available pa rameters 13 9 3 Cutting edge data The Tool Details window provides the following data on the selected tool when the Cutting edge dat...

Page 725: ...type 120 end mill type 121 end mill with corner rounding type 130 angle head cutter type 140 facing tool type 150 side mill type 155 bevel cutter type 156 bevel cutter with corner rounding and type 157 tapered die sinking cutter N Number of teeth For driven tools drills and milling tools Direction of spindle rotation Spindle is not switched on CW spindle rotation CCW spindle rotation Coolant 1 and...

Page 726: ...er tool number for sister tool strategy D quantity Number of created cutting edges D Cutting edge number Monitoring type T tool life C count W wear The wear monitoring is configured via machine data Please note the specifications of the machine manufacturer Actual value Tool life count and wear Actual value for tool life count or wear Setpoint Tool life count and wear Setpoint for tool life count ...

Page 727: ...he SELECT key The Tool types Favorites window opens 4 Select the desired tool type in the list of favorites or select using the soft keys Cutters 100 199 Drill 200 299 or Spec tool 700 900 5 Press the OK softkey The new tool type is accepted and the corresponding icon is displayed in the Type column Tool management 13 10 Changing a tool type Milling Operating Manual 08 2018 6FC5398 7CP41 0BA0 727 ...

Page 728: ... manufacturer s specifications References For additional information please refer to the following documentation SINUMERIK Operate Commissioning Manual Graphic display of tools and magazine locations Figure 13 19 Graphic display of tools and magazine locations The following applies to the graphic display If a tool is too long for the display the maximum possible length is shown Oversized tools are...

Page 729: ...ter in the More data window the additional Parameter Boom length or External diameter Switching the graphical magazine display on off 1 The tool list or wear or magazine list is opened 2 Press the Continue and Settings softkeys The Settings window appears 3 Activate the check box Switch on graphic magazine display in order to change into the non graphic display of the lists Tool management 13 11 G...

Page 730: ...ters in turn are sorted according to their radius value 4 Press the Acc to type softkey to display the tools arranged by tool type Identical types e g milling cutters are sorted according to their radius value OR Press the Acc to name softkey to display the tool names in alphabetical order The replacement tool numbers are used to sort tools with the same names OR Press the Acc to T number softkey ...

Page 731: ...ng limit Only tools with remaining quantity of to Only tools with residual tool life of to Only tools with unloading marking Only tools with loading marking Machine manufacturer Please observe the information provided by the machine manufacturer Note Multiple selection You have the option of selecting several criteria You will receive an appropriate message if conflicting filter options are select...

Page 732: ...The Filter window opens 4 Activate the required filter criterion and press the OK softkey The tools that correspond to the selection criteria are displayed in the list The active filter is displayed in the window header Tool management 13 13 Filtering the tool management lists Milling 732 Operating Manual 08 2018 6FC5398 7CP41 0BA0 ...

Page 733: ...ssible to search a specific magazine location in a specific magazine or just to search in a specific magazine Empty locations If the lists with the location type are used then the empty location search is made using the location type and location size Machine manufacturer Please refer to the machine manufacturer s specifications Procedure 1 Select the Parameter operating area 2 Press the Tool list...

Page 734: ...ress the Empty location softkey if you wish to search for a specific empty location Tool management 13 14 Specific search in the tool management lists Milling 734 Operating Manual 08 2018 6FC5398 7CP41 0BA0 ...

Page 735: ... hidden Enable tool in out file When creating a new tool the tool data can be loaded from a file When deleting or unloading a tool the tool data can be backed up in a file Activating the adapter transformed view The geometry lengths and the operation offsets are displayed transformed in the tool list The wear lengths and the sum offsets are displayed transformed in the tool wear list Machine manuf...

Page 736: ...3 Press the Continue and Settings softkeys 4 Activate the checkbox for the desired setting Tool management 13 15 Settings for tool lists Milling 736 Operating Manual 08 2018 6FC5398 7CP41 0BA0 ...

Page 737: ...ing the angle of the multitool location If angle is selected here then the value of the angle must be entered for each multitool location Regarding loading and unloading in a magazine the multitool is treated as a single unit 13 16 1 Tool list for multitool If you work with a multitool the tool list is supplemented by the column for the multitool location number As soon as the cursor is at a multi...

Page 738: ...st window is opened 13 16 2 Create multitool The multitool can be selected in the list of favorites as well as in the list of special tool types Figure 13 21 List of favorites with multitool Tool management 13 16 Working with Multitool Milling 738 Operating Manual 08 2018 6FC5398 7CP41 0BA0 ...

Page 739: ...ll not be overwritten 3 Press the New tool softkey The New Tool Favorites window opens OR Press the softkey Special tool 700 900 4 Select the multitool and press the OK softkey The New Tool window appears 5 Enter the multitool name and define the number of multitool loca tions If you wish to define the clearance of the tools based on the angle activate the Angle input checkbox and for each multito...

Page 740: ...tool with a new tool 2 Select the required multitool position the cursor on an empty mul titool location 3 Press the New tool softkey 4 Using the appropriate selection list e g favorites select the re quired tool Loading the multitool 2 Select the required multitool position the cursor on an empty mul titool location 3 Press the Load softkey The Load with window opens 4 Select the required tool Lo...

Page 741: ... multitool To do this the cursor is positioned at the line where the tool which is to be removed is located When unloading the tool is automatically saved in the tool list outside the magazine in the NC memory Procedure 1 The tool list is opened 2 Position the cursor on the tool that you would like to unload from the multitool and press the Unload softkey OR Position the cursor on the tool that yo...

Page 742: ...Load on window opens The field Locat is initialized with the number of the first empty magazine location 4 Press the OK softkey if you want to load the multitool to the rec ommended empty location OR Enter the location number you require and press the OK softkey The multitool together with the tools in it is loaded to the specified magazine location Loading a multitool into a magazine 2 Position t...

Page 743: ...acturer Please observe the information provided by the machine manufacturer If several tools with monitoring are mounted on the multitool and the lifetime or unit quantity has expired for one tool then only this tool is disabled Reactivating If a tool with expired lifetime or unit quantity that is mounted on a multitool is reactivated then for this tool the lifetime unit quantity is set to the set...

Page 744: ...nge the multitool Reactivation of all monitoring types When the Reactivation of all monitoring types function is configured all the monitoring types set in the NC for a tool are reset during reactivation Machine manufacturer Please observe the information provided by the machine manufacturer References SINUMERIK Operate Commissioning Manual 13 16 8 Relocating a multitool Multitools can be directly...

Page 745: ...ase refer to the machine manufacturer s specifications Press the OK softkey The multitool with the tools is relocated to the specified magazine location 13 16 9 Positioning a multitool You can position a magazine In this case a magazine location is positioned to the loading point Multitools that are located in a spindle can also be positioned The multitool is rotated and therefore the multitool lo...

Page 746: ...Tool management 13 16 Working with Multitool Milling 746 Operating Manual 08 2018 6FC5398 7CP41 0BA0 ...

Page 747: ... unintentional removal of the USB FlashDrive during operation Disconnecting it during operation will result in the stopping of the machining and thus to the workpiece being damaged Multiple clamping with ShopMill With ShopMill you can implement multiple clamping of identical or different workpieces with optimization of the tool series Software options Multiple clamping is only possible with ShopMi...

Page 748: ... the file system data can be displayed additional softkeys can be displayed The USB softkey can only be used when an external storage medium is connected e g USB FlashDrive on the USB port of the operator panel Displaying documents You can display documents on all drives of the program manager e g in the local drive or USB and via the data tree of the system data Various data formats are supported...

Page 749: ...with the following information Name The maximum length is 24 characters Permissible characters include all upper case letters without accents numbers and underscores Type Directory WPD Program MPF Subprogram SPF Initialization programs INI Job lists JOB Tool data TOA Magazine assignment TMA Zero points UFR R parameters RPA Global user data definitions GUD Setting data SEA Protection zones PRO Sag ...

Page 750: ...s here Procedure 1 Select the Program Manager operating area 2 Press the NC softkey 14 1 2 Local drive Workpieces main and subprograms that are saved in the user memory of the CF card or on the local hard disk are displayed For archiving you have the option of mapping the structure of the NC memory system or to create a separate archiving system Managing programs 14 1 Overview Milling 750 Operatin...

Page 751: ... the local drive you have the option of mapping the directory structure of the NC memory This also simplifies the search sequence Creating Directories 1 The local drive is selected 2 Position the cursor on the main directory 3 Press the New and Directory softkeys The New Directory window opens 4 In the Name entry field enter mpf dir spf dir and wks dir and press the OK softkey The directories Part...

Page 752: ... a tree structure as a subtree 01 02 For EXTCALL calls enter the partition e g USB 02 or ACTTCU FRONT 02 or ACTTCU FRONT 2 or TCU TCU1 FRONT 02 You can also configure any partition e g ACTTCU FRONT 3 Procedure 1 Select the Program manager operating area 2 Press the USB softkey Note The USB softkey can only be operated when a USB FlashDrive is inserted in the front interface of the operator panel 1...

Page 753: ...e Program manager operating area 2 Press the FTP softkey When selecting the FTP drive for the first time a login window is displayed 3 Enter the user name and password and press the OK softkey to log into the FTP server The content of the FTP server with its folders is displayed 4 Press the Log out softkey after the required data processing has been completed The connection to the FTP server is di...

Page 754: ... for the currently selected channel This channel is used to simulate the program If you change over a channel in the editor this does not influence the editor Only when closing the editor do you change into the other channel Procedure 1 Select the Program manager operating area 2 Select the desired storage location and position the cursor on the program that you would like to edit 3 Press the Open...

Page 755: ...e of the program press the Cursor left key to close the program and the editor To reopen a program you have exited with Close press the Program key Note A program does not have to be closed in order for it to be executed Managing programs 14 2 Opening and closing the program Milling Operating Manual 08 2018 6FC5398 7CP41 0BA0 755 ...

Page 756: ... selected workpiece is executed For example when you select SHAFT1 MPF the SHAFT1 INI file is executed upon CYCLE START MD11280 MN_WPD_INI_MODE 1 All files of type SEA GUD RPA UFR PRO TOA TMA and CEC which have the same name as the selected main program are executed in the specified sequence The main programs stored in a workpiece directory can be selected and processed by several channels Machine...

Page 757: ... media If you execute programs from an external drive e g network drive you require the Execution from external storage EES software option Managing programs 14 3 Executing a program Milling Operating Manual 08 2018 6FC5398 7CP41 0BA0 757 ...

Page 758: ...CON INI can lead to problems if they are transferred to a Windows environment by copying archiving or uploading for example 14 4 2 Creating a new directory Directory structures help you to manage your program and data transparently At all storage locations you can create subdirectories for this purpose in a directory In a subdirectory in turn you can create programs and then create program blocks ...

Page 759: ...s etc in a workpiece Note Workpiece directories You have the option of nesting tool directories Please note that the length of the call line is restricted You will be informed if the maximum number of characters is reached when entering the workpiece name Procedure 1 Select the Program manager operating area 2 Select the required storage location 3 Position the cursor on the folder in which you wo...

Page 760: ...rsor on the folder in which you would like to store the program 3 Press the New softkey The New G Code Program window opens 4 If necessary select a template if any are available 5 Select the file type MPF or SPF If you are in the NC memory and have selected either the Subprograms or Part programs folder you can only create one subprogram SPF or one main program MPF 6 Enter the desired program name...

Page 761: ...Enter the desired program name and press the OK softkey 14 4 6 Storing any new file In each directory or subdirectory you can create a file in any format that you specify Note File extensions In the NC memory the extension must have 3 characters and DIR or WPD are not permitted In the NC memory you can create the following file types under a workpiece using the Any softkey Managing programs 14 4 C...

Page 762: ...piece directory in the NC memory The file automatically has the selected file format OR Enter a name and file format for the file to be created e g My_Text txt 5 Press the OK softkey 14 4 7 Creating a job list For every workpiece you can create a job list for extended workpiece selection In the job list you specify instructions for program selection in different channels Syntax The job list contai...

Page 763: ...entified in the job list by at the start of the line or by round brackets Template You can select a template from Siemens or the machine manufacturer when creating a new job list Executing a workpiece If the Select softkey is selected for a workpiece the syntax of the associated job list is checked and then executed The cursor can also be placed on the job list for selection Procedure 1 Select the...

Page 764: ...ory is displayed 5 Place the cursor on the desired program and press the OK softkey The selected program is inserted in the first line of the list together with its path OR Enter the program name directly in the list If you are making entries manually check that the path is correct e g NC WKS DIR MEINPROGRAMM WPD MEINPROGRAMM MPF NC and the extension MPF may be added automatically With multi chann...

Page 765: ...ta Templates Manufacturer Part programs or Workpieces HMI Data Templates User Part programs or Workpieces Procedure 1 Select the Start up operating area 2 Press the System data softkey 3 Position the cursor on the file that you wish to store as a template and press the Copy softkey 4 Select the directory in which you want to store the data Part programs or Workpieces and press the Paste softkey St...

Page 766: ...positioned on a file then a search is made from the higher level directory Note Searching in opened directories Open the closed directories for a successful search Procedure 1 Select the Program Manager operating area 2 Select the storage location in which you wish to perform the search and then press the and Search softkeys The Find File window opens 3 Enter the desired search term in the Text fi...

Page 767: ...if the directory or the file does not correspond to the required result OR Press the Cancel softkey when you want to cancel the search Managing programs 14 6 Searching directories and files Milling Operating Manual 08 2018 6FC5398 7CP41 0BA0 767 ...

Page 768: ...rogram manager operating area 2 Select a storage location and place the cursor on the relevant program 3 Press the and Preview window softkeys The Preview window opens 4 Press the Preview window softkey again to close the window Managing programs 14 7 Displaying the program in the Preview Milling 768 Operating Manual 08 2018 6FC5398 7CP41 0BA0 ...

Page 769: ...s selection is kept when closing the directory Procedure 1 Select the Program manager operating area 2 Choose the desired storage location and position the cursor on the file or directory from which you would like your selection to start 3 Press the Select softkey The softkey is active 4 Select the required directories programs with the cursor keys or mouse 5 Press the Select softkey again to deac...

Page 770: ...Meaning Left mouse Click on element The element is selected A previously existing selection is canceled Left mouse Pressed Expand selection consecutively up to the next click Left mouse Pressed Expand selection to individual elements by clicking An existing selection will expand to include the element you clicked Managing programs 14 8 Selecting several directories programs Milling 770 Operating M...

Page 771: ...s except accented characters numbers and underscores are permitted when assigning names The names are automatically converted to upper case letters and extra dots are converted to underscores Example If the name is not changed when copying a copy is created automatically MYPROGRAM MPF is copied to MYPROGRAM__1 MPF The next time it is copied it is changed to MYPROGRAM__2 MPF etc If the files MYPROG...

Page 772: ...ant to overwrite existing directories programs OR Press the No overwriting softkey if you do not want to overwrite already existing directories programs OR Press the Skip softkey if the copy operation is to be continued with the next file OR Enter another name if you want to paste the directory program under another name and press the OK softkey Note Copying files in the same directory You cannot ...

Page 773: ... want to free up space in the NCK memory delete the contents of the TEMP directory ShopMill stores the programs that are created internally for calculating the stock removal processes in this directory Procedure 1 Select the Program manager operating area 2 Choose the desired storage location and position the cursor on the file or directory that you would like to delete 3 Press the and Delete soft...

Page 774: ... on a local drive the access rights are displayed to you only if settings have been executed for these files by the machine manufacturer They cannot be changed via the Properties window Settings for the access rights to directories and files Via a configuration file and MD 51050 access rights of the directories and file types of the NC and user memory local drive can be changed and pre assigned Re...

Page 775: ...s Note You can save changes via the user interface in the NC memory 5 Press the OK softkey to save the changes Managing programs 14 11 Changing file and directory properties Milling Operating Manual 08 2018 6FC5398 7CP41 0BA0 775 ...

Page 776: ...uire the option Additional HMI user memory on CF card of NCU not for SINUMERIK Operate on PCU PC Software option for 828D You will need the Manage network drives option to manage additional drives via Ethernet Note The USB interfaces of the NCU are not available for SINUMERIK Operate and can therefore not be configured for 840D sl 14 12 2 Setting up drives The Set Up Drives window is available in ...

Page 777: ...art pro gram memory User cycles Access to the user cycle directory of the Com pactFlash card Manufacturer cycles Access to the manufacturer cycle directory of the CompactFlash card Drive Windows Access to a local PCU PC directory Specifications for USB Entry Description Device Names of the TCU to which the USB storage medium is connected e g tcu1 The NCU must already know the TCU name Connection F...

Page 778: ...ions for network drives Entry Description Computer name Logical name of the server or the IP address Release name Only for network drives in Windows systems Name under which the network drive was re leased Path Start directory The path is specified relative to the released directory User name Password Enter the user name and the corresponding password for which the directory is enabled on the serv...

Page 779: ...on from external storage EES function Machine manufacturer Please refer to the machine manufacturer s specifications Entry Description Enable drive Only for Drive Windows PCU type The drive is enabled in the network A user name is required The checkbox must be activated if the local drive serves as global part program memory Global part program mem ory Only for local drives net work drives and glo...

Page 780: ...vel 1 manufacturer The particular assigned access level applies to all operating areas Softkey text Two lines are available as labeling text for the softkey n is accepted as a line separator If the first line is too long then a line break is automatically inserted If a space is present it is taken as a line sep arator For language dependent softkey texts the text ID is entered which is used to sea...

Page 781: ... entries are checked A window with the appropriate message opens if the data is incomplete or incorrect Acknowledge the message with OK softkey If you press the Cancel softkey then all of the data that has not been activated is rejected 9 Restart the control in order to activate the configuration and to obtain the softkeys in the Program Manager operating area Entering the default settings for dri...

Page 782: ...ves to be released 5 Press the OK softkey The specifications are transferred as default setting for the Windows re lease If you press the Cancel softkey then all of the data that has not been activated is rejected Managing programs 14 12 Set up drives Milling 782 Operating Manual 08 2018 6FC5398 7CP41 0BA0 ...

Page 783: ...n the status bar The current page as well as the total number of pages of the document are displayed 3 Press the Zoom or Zoom softkey to enlarge of reduce the size of the display 4 Press the Search softkey if you want to search for specific texts in the PDF 5 Press the View softkey to change the representation of the PDF A new vertical softkey bar appears 6 Press the Zoom page width softkey to dis...

Page 784: ...ess the Back softkey to return to the previous window 8 Press the Close softkey to exit the PDF display Managing programs 14 13 Viewing PDF documents Milling 784 Operating Manual 08 2018 6FC5398 7CP41 0BA0 ...

Page 785: ...2700 the correct location of the program is specified in the EXTCALL call itself by means of a fully qualified path that can also point to a subdirectory of the network drive For programs that were generated on external storage media Windows system observe upper and lower case syntax Note Maximum path length for EXTCALL The path length must not exceed 112 characters The path comprises the contents...

Page 786: ...r the local drive the CompactFlash card and the USB front connection you can use the abbreviation LOCAL_DRIVE CF_CARD and USB e g EXTCALL LOCAL_DRIVE spf dir TEST SPF Alternatively you can also use the abbreviations CF_Card and LOCAL_DRIVE Software options To display the Local drive softkey you require option Additional HMI user memory on CF card of the NCU not for SINUMERIK Operate on PCU50 PC NO...

Page 787: ...require the Execution from external storage EES software option Note Not possible to teach in program When an EES program has been selected it is not possible to teach in programs Machine manufacturer Please refer to the machine manufacturer s instructions You have the option of processing the G code programs saved on the configured external drives as usual in the editor When executing the G code ...

Page 788: ...k up several files or directories press the Select soft key Make the selection using the cursor keys or mouse 4 Press the and Archive softkeys 5 Press the Generate archive softkey The Generate Archive Select archiving window opens 6 Position the cursor to the required storage location press the Search softkey enter the required search term in the search dialog and press the OK softkey if you wish ...

Page 789: ...using a preview You can display information about the file such as path name date of creation and change in a Properties window Precondition The access rights depend on the relevant areas and range from protection level 7 key switch position 0 to protection level 2 password Service Storage locations CompactFlash card under user sinumerik data archive or oem sinumerik data archive All configured lo...

Page 790: ...s the Search softkey Enter the required search term in the search dialog and press the OK softkey if you wish to search for a specific directory or subdirectory Note The place holders for any character string and for any character make it easier for you to perform a search 8 Press the Archive and Generate archive softkeys The Generate Archive Select Storage Location window opens The Archive folder...

Page 791: ...er operating area you require the option Additional HMI user memory on CF Card of NCU not for 840D sl SINUMERIK Operate on PCU50 PC Procedure 1 Select the Program Manager operating area 2 Press the Archive and Read in archive softkeys The Read in archive Select archive window opens 3 Select the archive storage location and position the cursor on the required archive Note When the option is not set...

Page 792: ... Searching directories and files Page 766 14 16 4 Read in archive from system data If you want to read in a specific archive you can select this directly from the data tree Procedure 1 Select the Startup operating area 2 Press the System data softkey 3 In the data tree below the Archive directory in the User folder select the file that you wish to read in 4 Press the Read in softkey 5 Press the OK...

Page 793: ...ns and a progress message box appears for the read in process You will then obtain a Read error log for archive in which the skipped or overwritten files are listed 6 Press the Cancel softkey to cancel the read in process Managing programs 14 16 Backing up data Milling Operating Manual 08 2018 6FC5398 7CP41 0BA0 793 ...

Page 794: ... from part programs Setup data from part programs can only be backed up if they have been saved in the Workpieces directory For part programs which are located in the Part programs directory Save setup data is not listed Backing up data Data Setting options Tool data No All used in the program only for ShopMill program and job list with ShopMill programs Complete tool list Tool data for ShopMill p...

Page 795: ...selected program is located File name You have the option of changing the suggested file names Note Magazine assignment You can only read out the magazine assignments if your system provides support for loading and unloading tool data to and from the magazine Procedure 1 Select the Program Manager operating area 2 Position the cursor on the program whose tool and zero point data you wish to back u...

Page 796: ...in select which of the backed up data you require Tool data Magazine assignment Zero points Basic zero point Tool data Depending on which data you have selected the system behaves as follows Complete tool list First all tool management data are deleted and then the saved data are imported All tool data used in the program If at least one of the tools to be read in already exists in the tool manage...

Page 797: ... in which you can assign a loading point to a magazine Procedure 1 Select the Program Manager operating area 2 Position the cursor on the file with the backed up tool and zero point data INI that you wish to re import 3 Press the Cursor right key OR Double click the file The Read in setup data window opens 4 Select the data e g magazine assignment that you wish to read in 5 Press the OK softkey Ma...

Page 798: ...tic parameters UGUD parameters No Yes all channel specific variables of the user Global UGUD parameters No Yes all global variables of the user MGUD parameters No Yes all channel specific variables of the machine manufacturer Global MGUD parameters No Yes all global variables of the machine manufacturer Directory The directory is displayed in which the selected program is located File name Here yo...

Page 799: ...ecified name of the originally selected program in the File name field as required 9 Press the OK softkey The parameters are saved in the same directory in which the se lected program is stored The R parameters RPA and the user variables GUD are saved in separate files Note Program selection If a directory contains a main program as well as an RPA file or a GUD file with the same name initially th...

Page 800: ...Machine manufacturer Please refer to the machine manufacturer s instructions Managing programs 14 18 Backing up parameters Milling 800 Operating Manual 08 2018 6FC5398 7CP41 0BA0 ...

Page 801: ...rage of file slpmconfig ini The template of the file slpmconfig ini for SINUMERIK Operate is stored in the following directory Installation path siemens sinumerik hmi template cfg Copy the file to one of the following directories Installation path user sinumerik hmi cfg Installation path oem sinumerik hmi cfg Note If you want to achieve a better overview of the changes you have made yourself simpl...

Page 802: ...rmat If you wish to externally process an archive then generate this in the punched tape format Procedure 1 Select the Program manager operating area and press the NC or Local drive softkey OR Select the Startup operating area and press the System data softkey Reading out archives 2 Select the directories or the files that you wish to send to V24 3 Press the and Archive softkeys 4 Press the V24 se...

Page 803: ...nected device the cable length and the general electrical conditions 110 19200 default 115200 Archive format Punched tape format default setting Binary format PC format V24 settings details Interface COM1 Parity Parity bits are used for error detection The parity bits are added to the coded characters to make the number of positions set to 1 an uneven number uneven parity or to an even number even...

Page 804: ...ecified number of seconds The time monitoring is controlled by a time generator clock that is star ted with the first character and is reset with each transferred character The time monitoring can be set seconds Procedure 1 Select the Program Manager operating area 2 Press softkey NC or Local Drive 3 Press the and Archive softkeys 4 Select the V24 settings softkey Window Interface V24 is opened 5 ...

Page 805: ...s a single program out of several programs The tool sequence within a program remains unchanged Cycles and subprograms are not opened position patterns are processed as closed units Requirements The individual programs must meet the following requirements Only sequence programs not G code programs Programs must be executable Program for the 1st clamping must have been installed No markers repetiti...

Page 806: ... System type B The clampings are distributed over different rotary axes rotary tables Multiple clamping programs of program type 1 cannot be executed on installations of type B and are therefore not permitted Reason The program header contains the axis name of one clamping Since this axis name is entered in each setting step at a clamping change the assignment to the actual rotary axis of the resp...

Page 807: ... the different programs must be assigned to the work offsets Not all work offsets i e clampings must be assigned to ShopMill programs but at least two 5 Enter the name of the desired ShopMill program directly in the list with the complete path specification The file format mpf is automatically added OR Press the Program selection softkey The program view is displayed 6 Position the desired ShopMil...

Page 808: ...This optimizes the tool changes The global program is then renumbered The number of the current clamping is specified every time the program switches from one clamping to another Apart from the global program XYZ MPF the file XYZ_MCD INI is also set up in which the assignment between work offsets and programs is stored Both programs are stored in the directory that was previously selected in the P...

Page 809: ... acknowledge the alarms in the specified way Failure to observe this warning will place your machine workpiece saved settings and possibly even your own safety at risk Alarm overview You can display all upcoming alarms and acknowledge them The alarm overview contains the following information Date and time Cancel criterion The delete criterion specifies the key or softkey that can be used to ackno...

Page 810: ...r press NCK POWER ON OR If an NC Start alarm is displayed press the NC Start key OR If a RESET alarm is displayed press the RESET key OR OR If a Cancel alarm is displayed press the ALARM CANCEL key or press the Cancel Alarm delete softkey OR If an HMI alarm is displayed press the Delete HMI alarm softkey OR If a dialog alarm of the HMI is displayed press the RECALL key OR If a PLC alarm is display...

Page 811: ...the HMI PLC alarm PLC alarm of the SQ type alarm number from 800000 Safety alarms Machine manufacturer Please refer to the machine manufacturer s instructions Alarm error and system messages 15 1 Displaying alarms Milling Operating Manual 08 2018 6FC5398 7CP41 0BA0 811 ...

Page 812: ... operating area 2 Press the Alarm log softkey The Alarm Log window opens All of the coming and going events that have occurred since the HMI was started are listed 3 Press the Display new softkey to update the list of displayed alarms messages 4 Press the Save Log softkey The log that is currently displayed is stored as text file alarmlog txt in the system data in directory card user sinumerik hmi...

Page 813: ...re usually kept beyond a machining step or until the end of the cycle Overview of messages You can display all issued messages The message overview contains the following information Date Message number is only displayed for PLC messages Message text Procedure 1 Select the Diagnostics operating area 2 Press the Messages softkey The Messages window appears Alarm error and system messages 15 3 Displ...

Page 814: ...to display the requested messages and alarms 3 Press the Sort softkey The list of entries is sorted in descending decreasing order according to date i e the most recent information is at the beginning of the list 4 Press the softkey Ascending to sort the list in the ascending order The most recent event is shown at the end of the list 5 Press the Number softkey if you wish to sort the alarm list o...

Page 815: ... Select the Startup operating area 2 Press the System data softkey 3 Open the folder specified above and select the required screenshots 4 Press the Copy softkey OR Press the Cut softkey 5 Open the required archive directory e g on a USB flash drive and press the Paste softkey Note You can also copy the screenshots using WinSCP to a Windows PC for 840D sl Note If you wish to view the screenshots t...

Page 816: ...played and hidden Format Specify the format in which the variable is to be displayed The format can be specified e g floating point Value Displays the actual value of the NC PLC variables PLC variables Inputs Input bit Ex input byte EBx input word EWx input double word EDx Input bit Ix input byte IBx input word IWx input double word IDx Outputs Output bit Ax output byte ABx output word AWx output ...

Page 817: ...I Example of a field variable Variable Format DBx DBBy number A Inserting variables The start value for Filtering searching of variables differs For example to insert the variable R 0 enter the following start value The start value is 0 if you filter according to System variables The start value is 1 if you filter according to All no filter In this case all signals are displayed and shown in the O...

Page 818: ...iables can only be selected and displayed at Diagnostics Trace Changing and deleting values 1 Select the Diagnostics operating area 2 Press the NC PLC variables softkey The NC PLC Variables window opens 3 Position the cursor in the Variable column and enter the required vari able 4 Press the INPUT key The operand is displayed with the value 5 Press the Details softkey The NC PLC Variables Details ...

Page 819: ...t using the Insert line and Delete line softkeys If you press the softkey a new line inserted before the line marked by the cursor You can only use the Insert line softkey if there is at least one empty line at the end of the variable list The softkey is deactivated if there is no empty line If you press the Delete line softkey the line marked by the cursor is deleted An empty line will be added a...

Page 820: ...Save screen softkey The Save screen Select archiving window opens 4 Position the cursor on the template folder for variable screen forms in which your actual screen form should be saved and press the OK soft key The Save screen Name window opens 5 Enter the name for the file and press the OK softkey A message in the status line informs you that the screen form was saved in the specified folder If ...

Page 821: ...he CF card The version displayed in the Actual version column does not match the version of the CF card You may save the version data Version data saved as text files can be further processed as required or sent to the hotline in the event of an error Procedure 1 Select the Diagnostics operating area 2 Press the Version softkey The Version Data window appears Data of the available components is di...

Page 822: ...u wish to create your own directory 5 Press the OK softkey The directory is created 6 Press the OK softkey again to confirm the storage location The Save version information Name window opens 7 Specify the desired settings Name input field the file name is pre assigned with Machine name no CF card number _config xml or _version txt is automatically attached to the file names Comment input field Yo...

Page 823: ...ing logbook entries Note Deleting logbook entries Up to the 2nd commissioning you have the option to delete all of the entered data up to the time of the first commissioning Output of the logbook You have the possibility of exporting the logbook by generating a file using the Save version function in which the logbook is contained as section See also Save information Page 822 15 8 1 Displaying and...

Page 824: ...tment and a brief description of the measure taken or a description of the fault Note Setting line breaks If you wish to make line breaks in the Fault diagnostics measure field use the key combination ALT INPUT The date and entry number are automatically added Sorting the entries The logbook entries are displayed numbered in the machine logbook window More recent entries are always added at the to...

Page 825: ...ired term in the search form You can make a search ac cording to date time company name department or according to fault di agnostics measure The cursor is positioned on the first entry that corresponds to the search term 4 Press the Continue search softkey if the entry found is not the one that you are looking for Additional search option Press the Go to Beginning softkey to start the search at t...

Page 826: ...emote monitoring Permit remote control Depending on the combination of the settings in the HMI and in the PLC the valid status as to whether access is permitted or not is shown in the Resulting from this line Settings for the confirmation dialog box If the settings made for Specified from the PLC and Selected in the HMI permit access from outside then this is however still dependent on either a ma...

Page 827: ...ed by PLC and Selected in HMI 5 Enter new values in the group Behavior for remote access confirmation if you wish to change the behavior for confirming remote access 6 Press the OK softkey The settings are accepted and saved References A description of the configuration options can be found in the following reference SINUMERIK Operate Commissioning Manual 15 9 2 Permit modem You can permit remote ...

Page 828: ...u obtain a window with the corresponding pre assigned data and values of the ping service If required you can ask your machine manufacturer for this data Data Meaning IP address IP address of the remote PC Port Standard port that is intended for remote diagnostics Send duration Duration of the request in minutes Send interval Cycle in which the message is sent to the remote PC in seconds Ping send...

Page 829: ...nd it is possible that remote monitoring or remote access is active 2 Block the modem access if access via modem is to be blocked OR In the Remote Diagnostics RCS window reset the access rights to Permit no remote access Alarm error and system messages 15 9 Remote diagnostics Milling Operating Manual 08 2018 6FC5398 7CP41 0BA0 829 ...

Page 830: ...Alarm error and system messages 15 9 Remote diagnostics Milling 830 Operating Manual 08 2018 6FC5398 7CP41 0BA0 ...

Page 831: ...esses without writing a program Software options You require the ShopTurn ShopMill option for working with Manual Machine Machine manufacturer Please refer to the machine manufacturer s specifications Main screen After the controller has powered up the following main screen is displayed Figure 16 1 Main screen for milling machine Milling Operating Manual 08 2018 6FC5398 7CP41 0BA0 831 ...

Page 832: ...rning machine as in automatic mode Figure 16 2 Main screen for milling turning machine Machining options You have the following options for machining the workpieces Manual mode Single cycle machining Working with Manual Machine 16 1 Manual Machine Milling 832 Operating Manual 08 2018 6FC5398 7CP41 0BA0 ...

Page 833: ...data see also Section Measure tool Page 100 Procedure 1 Manual Machine is active 2 Press the Meas tool softkey 3 Select the the required measuring function in the vertical softkey bar and press the appropriate softkey Working with Manual Machine 16 2 Measuring the tool Milling Operating Manual 08 2018 6FC5398 7CP41 0BA0 833 ...

Page 834: ...ro either manually or automatically see Section Measuring the workpiece zero Page 113 Procedure 1 Manual Machine is active 2 Press the Workpiece zero softkey 3 Select the the required measuring variant in the vertical softkey bar and press the appropriate softkey Working with Manual Machine 16 3 Measuring the workpiece zero Milling 834 Operating Manual 08 2018 6FC5398 7CP41 0BA0 ...

Page 835: ...ine is active 2 Select the Parameter operating area 2 Press the Work offset and G54 599 softkeys The Work Offset G54 599 window opens 3 Position the cursor on the desired work offset and press the softkey WO selection Now return to the basic screen and enter the selected work offset in the Work offset field Working with Manual Machine 16 4 Setting the zero offset Milling Operating Manual 08 2018 6...

Page 836: ...om JOG mode to the MDA or AUTO mode Machine manufacturer Please refer to the machine manufacturer s specifications Procedure 1 Manual Machine is active 2 Press the Limit stops softkey The Limit Stops window opens 3 Enter the desired position of the limit stop for each axis OR Press the Set limit stop softkey to enter the current position of an axis 4 In the field next to the position specification...

Page 837: ...s and simple traversing movements input the parameters directly into the Manual Machine input fields of the basic screen Tool selection 1 Manual Machine is active Tool selection 2 Select the desired tool in T 3 Enter the feedrate F and the spindle speed S 4 Select the direction of spindle rotation e g clockwise direction of rota tion OR Set the direction of rotation via the machine control panel 5...

Page 838: ...a the axis direction keys or via the cross switching lever In addition an angle α1 can also be entered Procedure 1 Manual Machine is active 2 Press the Angular milling softkey 3 Select the tool spindle and spindle direction and specify the machining feedrate 4 Enter the desired angle α1 Note Selecting deselecting the angular milling and changing the angle α1 is only possible in the reset state Par...

Page 839: ...e is active 2 Press the Straight Circle softkey 3 Select the desired straight machining and press the Straight all axes softkey OR Press the Straight X α softkey OR Press the Straight X α softkey 4 Specify the desired value for the feedrate F OR Press the Rapid traverse softkey The rapid traverse is displayed in field F 5 Enter the target position and if required the angle α for the axis or axes t...

Page 840: ...ular milling You can use this function for a simple circular machining Procedure 1 Manual Machine is active 2 Press the Straight circle softkey 3 Press the Circle softkey 4 Specify the desired value for the feedrate F 5 Select the desired circle input e g End point radius and the direction of rotation 6 Enter the target position as well as the circle center point or radius Using the Graphic view s...

Page 841: ...r of the circle K inc only if circle input via end point and center point Note Incremental dimensions The sign is also evaluated mm I Center of circle I inc only if circle input via end point and center point mm PL Circle plane XY IJ YZ JK ZX KI Working with Manual Machine 16 6 Simple workpiece machining Milling Operating Manual 08 2018 6FC5398 7CP41 0BA0 841 ...

Page 842: ...rn to the parameter screen form at any time to check and correct the inputs Press the Cursor right key to jump back to the input screen form Drilling a position pattern You can drill a position pattern First select the desired function e g Centering via the softkey in Drilling Select the appropriate tool enter the desired values in the parameter screen and press the Accept softkey to confirm the t...

Page 843: ...ling with Manual Machine Functions cycles The same range of technological functions cycles is available as in automatic mode for drilling on the face or peripheral surface of a workpiece Parameter The parameters of the input screen forms correspond to the parameters under Automatic see Section Drilling Page 371 Working with Manual Machine 16 7 More complex machining Milling Operating Manual 08 201...

Page 844: ...s in automatic mode for the milling of simple geometric shapes Parameter The parameters of the input screen forms correspond to the parameters under Automatic see Section Milling Page 420 Working with Manual Machine 16 7 More complex machining Milling 844 Operating Manual 08 2018 6FC5398 7CP41 0BA0 ...

Page 845: ...t screen forms correspond to the parameters under Automatic see Section Contour milling Page 481 16 7 4 Turning with manual machine milling turning machine Functions cycles The same range of technological functions cycles is available as in automatic mode for the turning of simple geometric shapes Working with Manual Machine 16 7 More complex machining Milling Operating Manual 08 2018 6FC5398 7CP4...

Page 846: ... Working with Manual Machine 16 7 More complex machining Milling 846 Operating Manual 08 2018 6FC5398 7CP41 0BA0 ...

Page 847: ...on of the work steps is graphically displayed on the screen during this Software option You require the option Simultaneous recording real time simulation for the simultaneous recording of the work steps Note In Manual Machine you can simulate a work step with an already opened and filled out parameter screen form Working with Manual Machine 16 8 Simulation and simultaneous recording Milling Opera...

Page 848: ...Working with Manual Machine 16 8 Simulation and simultaneous recording Milling 848 Operating Manual 08 2018 6FC5398 7CP41 0BA0 ...

Page 849: ...ake them reproducible The positions you approach are applied In the AUTO teach in mode the selected program is taught In the MDA teach in mode you teach to the MDA buffer External programs which may have been generated offline can therefore be adapted and modified according to your specific requirements Note Not possible to teach in program When an EES program has been selected it is not possible ...

Page 850: ...program block In order for the block to be inserted the cursor must be positioned in an empty line using the cursor key and input key Press the Accept softkey to teach in the modified or new program block Note All defined axes are taught in in the first teach in block In all additional teach in blocks only axes modified by axis traversing or manual input are taught in If you exit teach in mode thi...

Page 851: ... relevant position 6 Press the Teach position softkey A new program block with the current actual position values will be cre ated 17 3 1 Input parameters for teach in blocks Parameters for teach in of position and teach in of G0 G1 and circle end position CIP Parameter Description X Approach position in X direction Y Approach position in Y direction Z Approach position in Z direction F Feedrate m...

Page 852: ...is specific corner rounding G643 Block internal corner rounding G644 Axis dynamics corner rounding Motion types for teach in of position and teach in of G0 and G1 The following motion parameters are offered Parameter Description CP Path synchronous PTP Point to point PTPG0 Only G0 point to point Transition behavior at the beginning and end of the spline curve The following motion parameters are of...

Page 853: ...tkey Precondition AUTO mode The program to be edited is selected Procedure 1 Select the Machine operating area 2 Press the AUTO or MDA key 3 Press the TEACH IN key 4 Press the Teach prog softkey 5 Use the cursor and input keys to position the cursor at the desired point in the program If an empty row is not available insert one 6 Press the softkeys Rap tra G0 Straight line G1 or Circ interm pos CI...

Page 854: ...lect the axes to be included in the teach in block in the Settings window You also specify here whether motion and transition parameters are offered for teach in 17 4 4 Teaching in circle intermediate and circle end point CIP Enter the intermediate and end positions for the circle interpolation CIP You teach in each of these separately in a separate block The order in which you program these two p...

Page 855: ...ng point and specify a transition at the beginning and end You teach in each interpolation point via Teach in of position Software option You require the Spline Interpolation option for A Spline interpolation Note The relevant option bit must be set to enable you to program a spline interpolation Machine manufacturer Please refer to the machine manufacturer s specifications Procedure 1 Select the ...

Page 856: ... A new program block will be inserted at the cursor position OR Press the Cancel softkey to cancel your input Note Selection of axes and parameters for teach in You can select the axes to be included in the teach in block in the Settings window You also specify here whether motion and transition parameters are offered for teach in Teaching in a program 17 4 Teach in via window Milling 856 Operatin...

Page 857: ...cted Procedure 1 Select the Machine operating area 2 Press the AUTO or MDA key 3 Press the TEACH IN key 4 Press the Teach prog softkey 5 Click the program block to be edited 6 Press the relevant softkey Teach position Rap tra G0 Straight line G1 or Circ interm pos CIP and Circ end pos CIP The relevant windows with the input fields are displayed 7 Traverse the axes to the desired position and press...

Page 858: ...utomatically disables program processing You must press reset or select a block to resume the program Requirement The program to be processed is selected Proceed as follows 1 Select the Machine operating area 2 Press the AUTO key 3 Press the TEACH IN key 4 Press the Teach prog softkey 5 Place the cursor on the desired program block 6 Press the Block selection softkey Teaching in a program 17 6 Sel...

Page 859: ...lect the Machine operating area 2 Press the AUTO or MDA key 3 Press the TEACH IN key 4 Press the Teach prog softkey 5 Click the program block to be deleted 6 Press the and Delete block softkeys The program block on which the cursor is positioned is deleted Teaching in a program 17 7 Deleting a block Milling Operating Manual 08 2018 6FC5398 7CP41 0BA0 859 ...

Page 860: ...chine operating area 2 Press the AUTO or MDA key 3 Press the TEACH IN key 4 Press the Teach prog softkey 5 Press the and Settings softkeys The Settings window appears 6 Under Axes to be taught and Parameters to be taught select the check boxes for the relevant settings and press the Accept softkey to confirm the settings Teaching in a program 17 8 Settings for teach in Milling 860 Operating Manual...

Page 861: ... User menu key Handwheel optional Operation The 7 5 TFT color display provides touch operation Membrane keys are featured for traversing the axes numeric input control of the cursor and for machine control panel functions e g start and stop The HT 8 is equipped with an emergency stop button and two 3 stage enabling buttons You can also connect an external keyboard References For more information a...

Page 862: ... buttons You are therefore provided the opportunity of activating the acknowledgement function for operator actions which require approval e g showing the traversing keys with either hand Enabling buttons are available for the following key positions Released no activation Enabling center position enabling for channel 1 and 2 is on the same switch Panic completely pushed through Traversing keys To...

Page 863: ...oftkey is available in the machine control panel menu that can be reached via the user menu key U Operating area switchover You display the operating area menu by touching the display symbol for the active operating area in the status display Handwheel The HT 8 is available with a hand wheel References Information regarding connection can be obtained from the following references Operator Componen...

Page 864: ...ng You can link the showing and hiding of the label to activation of the enabling button for example In this case the traversing keys are displayed when you press the enabling button If you release the enabling button the traversing keys are hidden again Machine manufacturer Please refer to the machine manufacturer s specifications All existing vertical and horizontal softkeys are covered or hidde...

Page 865: ... triggered via the softkeys of the machine control panel menus are edge triggered Showing and hiding The user menu key U displays the CPF softkey bar vertical softkey bar and the user softkey bar horizontal softkey bar Press the menu forward key to extend the horizontal user softkey bar There are 8 additional softkeys available You use the Back softkey to hide the menu bar again HT 8 840D sl only ...

Page 866: ...t 1 n CHANNEL softkey Changing the channel Single Block soft key Switch single block execution on off WCS MCS softkey Switch between WCS and MCS Back softkey Close window Note The window will automatically disappear when changing regions areas with the MENU SELECT key HT 8 840D sl only 18 3 Machine control panel menu Milling 866 Operating Manual 08 2018 6FC5398 7CP41 0BA0 ...

Page 867: ...out and the keyboard layout which corresponds with the actual language set for the respective country Procedure 1 Position the cursor on the desired entry field 2 Click the input field The virtual keyboard is displayed 3 Enter your values via the virtual keyboard 4 Press the INPUT key OR Position the cursor on an another operator element The value is accepted and the virtual keyboard is closed Pos...

Page 868: ...gnment between the English keyboard assignment and the keyboard assignment for the current language setting Area for positioning the virtual keyboard Num key Reduces the virtual keyboard to the number block Number block of the virtual keyboard Press the ABC key to return to the full keyboard HT 8 840D sl only 18 4 Virtual keyboard Milling 868 Operating Manual 08 2018 6FC5398 7CP41 0BA0 ...

Page 869: ... same time to start the TCU service screen 2 Touch the Calibrate TouchPanel button The calibration process will be started 3 Follow the instructions on the screen and touch the three calibration points one after the other The calibration process has terminated 4 Touch the horizontal softkey 1 or the key with the number 1 to close the TCU service screen HT 8 840D sl only 18 5 Calibrating the touch ...

Page 870: ...HT 8 840D sl only 18 5 Calibrating the touch panel Milling 870 Operating Manual 08 2018 6FC5398 7CP41 0BA0 ...

Page 871: ...E Profiles Control of energy saving states of the machine To optimize the energy consumption you have the option of defining energy saving profiles and saving them For instance your machine has a basic and a more sophisticated energy saving mode or under certain conditions automatically switches itself off These defined energy states are saved as profiles At the user interface you have the possibi...

Page 872: ...creen with display of the current energy consumption Display in the Machine operating area The first row of the status display shows the current power status of the machine Display Meaning A red bar indicates that the machine is not operating productively A dark green bar in the positive direction indicates that the machine is operating productively and consuming energy A light green bar in the ne...

Page 873: ...display for the following components Sum of the axes Sum of the units if auxiliary units are configured in the PLC Sentron PAC Sum of the machine Detailed display of the energy usage Further you also have the option of listing the usage values for all drives and where relevant all auxiliary units References Information on the configuration is provided in the following reference System Manual Ctrl ...

Page 874: ... the measurement You specify in which channel the start and stop of the part program should be initiated and how many repetitions you want to measure Save measurements Save the measured consumption values so that you can subsequently compare the data Note Up to 3 data sets are saved The oldest data set is automatically overwritten if there are more than three measurements Measurement duration The ...

Page 875: ...he following reference System Manual Ctrl Energy SINUMERIK 840D sl 828D 19 2 4 Tracking measurements You have the option of graphically displaying the actual and saved measurement curves Precondition You have pressed the Ctrl E analyse softkey and the Ctrl E analyse window has been opened Procedure 1 Press the Graphic softkey The actual measurement is displayed as a blue measurement curve in the C...

Page 876: ...rated energy kWh Shows the regenerated energy of the selected measured component in kilowatts per hour Energy totals kWh Shows the total of all measured drive values or the total of all axes as well as fixed value and Sentron PAC Display in the Ctrl E analysis window Table Precondition 1 You have pressed the Ctrl E analyse softkey and the Ctrl E analyse window has been opened 2 You have already sa...

Page 877: ...e saved 4 Press the Saved measurements softkey again if you only want to see the actual comparison 19 2 7 Long term measurement of the energy consumption The long term measurement of energy consumption is performed in the PLC and saved The values from times in which the HMI is not active are also recorded Measured values The infeed and regenerative power values as well as the sum of the power are ...

Page 878: ...ftkey The SINUMERIK Ctrl Energy Analysis Long term Measurement win dow opens The results of the long term measurement are displayed 3 Press the Back softkey to terminate the long term measurement Ctrl Energy 19 2 Ctrl E analysis Milling 878 Operating Manual 08 2018 6FC5398 7CP41 0BA0 ...

Page 879: ...the energy saving mode has been reached then an appropriate message is displayed in the alarm line Predefined energy saving profiles Energy saving profile Meaning Simple energy saving mode machine standby Machine units that are not required are either throttled or shut down When required the machine is immediately ready to operate again Full energy saving mode NC standby Machine units that are not...

Page 880: ...he required energy saving profile and press the Disable profile softkey if you wish to disable this state The profile is inhibited and does not become active The energy saving profile is grayed out and displayed without any time information The labeling of the Disable profile softkey changes to Enable profile Press the Enable profile softkey in order to withdraw the energy saving profile disable 5...

Page 881: ...r certain events you must be activated as user User logon As registered user you can log on via SMS to inquire about messages Action log You can obtain precise information about incoming and outgoing messages via SMS logs References Information about the GSM modem can be found in the reference PPU SINUMERIK 828D Manual You can find further information on the MODEM MD720 on the Internet at MODEM MD...

Page 882: ...activated with a PIN 2 Enter the PIN repeat the PIN and press the OK softkey 3 If you made an incorrect entry several times enter the PUK code in the PUK Input window and press the OK softkey to activate the PUK code The PIN input window is opened and you can enter the PIN number as usual Activating a new SIM card 1 Press the Easy Msg softkey The SMS Messenger window appears Status shows that the ...

Page 883: ...r which you receive notification Note Selecting alarms You have the option of selecting tool management type or measuring cycles alarms This means that you obtain notification by SMS as soon as alarms are output without having to know the number ranges Requirement The modem is connected Procedure Creating a new user 1 Press the User profiles softkey The User Profiles window appears 2 Press the New...

Page 884: ...pecified telephone number Editing user data and events 1 Select the user whose data you want to edit and press the Edit softkey The input fields can be edited 2 Enter new data and activate the desired settings OR Press the Default softkey to accept the default values Easy Message 828D only 20 3 Creating editing a user profile Milling 884 Operating Manual 08 2018 6FC5398 7CP41 0BA0 ...

Page 885: ... to the Tool Manager Measuring cycle messages for tools An SMS is sent if measuring cycle messages are output that involve tools Measuring cycle messages for workpieces An SMS is sent if measuring cycle messages are output that involve workpieces Sinumerik messages alarms error when executing An SMS is sent if NCK alarms or messages are output that cause the machine to come to a standstill Machine...

Page 886: ...oftkey to remove the alarm number from the list OR Then press the New softkey if you wish to create a new entry The Create new entry window opens Enter the data and press the OK softkey to add the entry to the list Press the Save softkey to save the settings for the result 3 Press the Standard softkey to return to the standard settings for the events Easy Message 828D only 20 4 Setting up events M...

Page 887: ...ep 2 to activate further users OR Send an SMS with the User ID and the activate text to the control e g 12345 activate If the telephone number and the user ID match the stored data the user profile is activated You receive a message of success or failure per SMS 3 Press the User active softkey to log off an activated user OR Send an SMS with the deactivate text e g 12345 deactivate to log off from...

Page 888: ...not been pro cessed e g incorrect user ID or unknown account SMS message sent to a user Message that has not reached the user because of an error Requirement The connection has been established to the modem Procedure 1 Press the SMS log softkey The SMS Log window appears All the messages that have been sent or received by the Messenger are listed 2 Press the Incoming or Outgoing softkey to restric...

Page 889: ...er to zero Requirement The connection has been established to the modem Procedure 1 Press the Settings softkey 2 Enter an arbitrary name for the controller in the Machine name field 3 If you want to limit the number of sent SMS messages then select the Specify limit for SMS counter entry and enter the desired number When the maximum number of messages is reached you obtain a cor responding error m...

Page 890: ...Easy Message 828D only 20 7 Making settings for Easy Message Milling 890 Operating Manual 08 2018 6FC5398 7CP41 0BA0 ...

Page 891: ... via a PLC user program The sequences to be executed for the installation activation deactivation and testing of a device are stored in a statement script Available devices and device states are displayed in a list The view of the available devices can be controlled for users according to their access rights The subsequent chapters are selected for example only and are not available in every state...

Page 892: ... Press the menu forward key and then the Easy Extend softkey A list of the connected devices is displayed 3 Press the Enable function softkey The Enabling of the Devices Option window opens 4 Enter the option code and press the OK softkey A tick appears in the appropriate checkbox in the Function column and the function is enabled Easy Extend 21 2 Enabling a device Milling 892 Operating Manual 08 ...

Page 893: ...evice in the list with the Cursor down or Cursor up keys 3 Position the cursor on the device option for which the function has been unlocked and press the Activate softkey The device is marked as activated and can now be used 4 Select the desired activated device and press the Deactivate softkey to switch the device off again Easy Extend 21 3 Activating and deactivating a device Milling Operating ...

Page 894: ...and then the Easy Extend softkey 3 Press the Start up softkey A new vertical softkey bar appears 4 Press the Comm start up softkey to start the commissioning Before starting a complete data backup is made to which you can resort in an emergency 5 Press the Cancel softkey if you want to abort commissioning prema turely 6 Press the Restore softkey to load the original data 7 Press the Device functio...

Page 895: ...ge the message when a maintenance task has been completed Service Planner Display Meaning Pos Position of the maintenance task in the PLC interface Maintenance task Name of the maintenance task Interval h Maximum time until next servicing in hours Remaining time h Time until the interval expires in hours Status Display of the current status of a maintenance task The maintenance task has been start...

Page 896: ... position the cursor at the appropriate task and press the Servicing performed softkey A message is displayed confirming the acknowledgment and the main tenance interval is restarted Note You can perform the maintenance tasks before the interval expires The maintenance interval is restarted Service Planner 828D only 22 1 Performing and monitoring maintenance tasks Milling 896 Operating Manual 08 2...

Page 897: ...adder diagram Editing ladder diagrams You can edit the ladder diagrams in the Ladder editor This allows you to use all the operations supported by the particular PLC type Some of the functions differ in scope from that described in the manual Machine manufacturer Please observe the information provided by the machine manufacturer References Further information can be found in the Function Manual B...

Page 898: ...e PLC softkey The ladder diagram representation opens and displays the PLC informa tion 23 2 2 Resetting the processing time You can reset the processing time of the PLC user program Procedure 1 The Ladder editor is open 2 Press the Reset proc time softkey The data of the processing time is reset 23 2 3 Loading modified PLC user program Load the project data to the PLC if some changes have been ma...

Page 899: ...peration is continued and the PLC project loaded to the PLC Only those data classes that have actually been changed are loaded i e generally INDIVIDUAL data classes Procedure 1 The Ladder editor is open You have changed project data 2 Press the PLC Stop softkey if the PLC is in the Run state 3 Press the Load to CPU softkey to start the loading operation All data classes are loaded 4 When the PLC p...

Page 900: ...mat in which the variable will be displayed The format can be specified e g floating point Value Displays the actual value of the NC PLC variables PLC variables Inputs Input bit Ex input byte EBx input word EWx input double word EDx Input bit Ix input byte IBx input word IWx input double word IDx Outputs Output bit Ax output byte ABx output word AWx output double word ADx Output bit Qx output byte...

Page 901: ...variable Variable Format DBx DBBy number A Inserting variables The start value for Filter Search of variables differs For example to insert the variable R 0 enter the following start value The start value is 0 if you filter according to System variables The start value is 1 if you filter according to All no filter In this case all signals are displayed and shown in the OPI notation The GUD from th...

Page 902: ...vo variables can only be selected and displayed at Diagnostics Trace Changing and deleting values 1 Select the Diagnostics operating area 2 Press the NC PLC variables softkey OR 1 Select the Startup operating area 2 Press the PLC and NC PLC variab softkeys The NC PLC Variables window opens 3 Position the cursor in the Variable column and enter the required vari able 4 Press the INPUT key The opera...

Page 903: ... Editing a variable list You can edit the variable list using the Insert line and Delete line softkeys When you press the softkey a new line is inserted before the line marked by the cursor You can only use the Insert line softkey if there is at least one empty line at the end of the variable list The softkey is deactivated if there is no empty line When you press the Delete line softkey the line ...

Page 904: ... 6 AA_IM 1 Result AA_IM 2 MB201 Result MB200 Channel Parameter R u1 3 Result Channel Parameter R u1 2 Edit PLC user program 828D only 23 3 Displaying and editing PLC and NC variables Milling 904 Operating Manual 08 2018 6FC5398 7CP41 0BA0 ...

Page 905: ...issioning operating area 2 The Ladder editor is open 3 Press the Status list softkey The Status List window appears 4 Press the Set address softkey The Set Address window appears 5 Activate the desired address type e g DB enter the value and press the Accept softkey The cursor jumps to the specified address 6 Press the Change softkey The RW input field can be edited 7 Enter the desired value and p...

Page 906: ...tion about the program status Symbolic address You select between specification in absolute or symbolic address Zoom You can enlarge or reduce the ladder diagram Search You can use the Search function to go directly to a position in the PLC user program that you wish to edit for example Edit You can insert edit or delete networks Symbol information You can display all symbolic identifiers used in ...

Page 907: ...age LAD LAD Program change exists 3 Name of the active program block Representation Symbolic name absolute name 4 Program status Run Program is running Stop Program is stopped Status of the application area Sym Symbolic representation Abs Absolute representation 5 Display of the active keys INPUT SELECT Edit PLC user program 828D only 23 5 View of the program blocks Milling Operating Manual 08 201...

Page 908: ... Shortcuts The cursor keys move the focus over the PLC user program When the window borders are reached scrolling is performed automatically Shortcuts Action To the first column of the row To the last column of the row Up a screen Down a screen One field to the left right up or down To the first field of the first network OR Edit PLC user program 828D only 23 5 View of the program blocks Milling 9...

Page 909: ... has the Progress status function the status values as well as the information flow are displayed at the time of execution of the operations The status of the local data memory and the accumulators is also displayed The Progress status display is also controlled using the Program stat softkey Colors for displaying the program status In the progress status different colors are used to display infor...

Page 910: ...mbolic address Elements for which there are no symbolic identifiers are automatically displayed with absolute identifiers Procedure 1 The program block view is open 2 Press the Symbol address softkey The list of operands is displayed sorted according to symbolic address 3 To return to the display showing the absolute addresses press the Sym bol address softkey again 23 5 6 Enlarging reducing the l...

Page 911: ...e new program block You can create a new program block Open program block You can display all the logic and graphical information of the program block and you can edit the block Properties You can display the properties of a block and edit them when required Protection You can protect the block with a password Then the block cannot be opened without entering the password Machine manufacturer Pleas...

Page 912: ...igned Procedure 1 The Program Block window is open 3 Press the Local variables softkey The Local Variables window appears and lists the created variables 23 5 7 3 Creating a program block Overview Using the Ladder editor you can perform a PLC diagnosis to find fault causes or program errors If an input or output fails a disturbance in the plant could result making modifications to the PLC user pro...

Page 913: ...he appropriate program note into consideration Machine manufacturer Please observe the information provided by the machine manufacturer Creating a new block You create new program blocks in the Ladder editor Name SBR INT_100 INT_101 INT_0 The number from the selection field Number of subprogram is taken for the name of the INT block Author Maximum 48 characters are permitted Number of subpro gram ...

Page 914: ... press Open The block is displayed in the currently active window 1 or window 2 23 5 7 5 Displaying canceling the access protection You can password protect your program organizational units POUs in the PLC 828 programming tool This prevents other users from accessing this part of the program This means that it is invisible to other users and is encrypted when it is downloaded A lock symbol is use...

Page 915: ...wish to protect all of the user program blocks Note Program blocks that are already password protected are not affected 6 Press the Accept softkey 23 5 7 6 Editing block properties subsequently You can edit the title author and comments of a block Note To insert a line break in comment use the key combination ALT INPUT Note Block names subprogram names and data class assignments cannot be edited P...

Page 916: ...boxes Change operands Delete operations Network Create Create and then edit a new network Edit Subsequently edit networks Delete Delete networks References For information please refer to the Basic Functions Function Manual Chapter P4 PLC for SINUMERIK 828D 23 5 8 2 Editing a program block You can edit program blocks Requirement Before you can edit program blocks the program status must have stopp...

Page 917: ...operation in the list that opens 5 Press the Accept softkey to confirm the respective action The changes will now be saved Note The changes only take effect when the user program is loaded to the CPU Note Save changes If you make changes in the program you must save the project before you change from the PLC area to another operating area You can transfer the project to the PLC using the Load to C...

Page 918: ...ufacturer Please observe the information provided by the machine manufacturer The bit combinations comprise one or several logical operations and the assignment to an output bit memory If the cursor is moved further to the left with the arrow key the type of assignment or a logic operation can be selected A further logic operation cannot be placed to the right of an assignment A network must alway...

Page 919: ...OR Position the cursor on the title of the network that you want to delete and press the Delete network softkey OR Press the DEL key The network including all the logic operations and operands and or the selected operation is deleted 23 5 8 5 Editing network properties You can edit the network properties of a block Network title and network comment The title can have a maximum of 3 lines and 128 c...

Page 920: ... the symbolic identifiers used in the selected network are displayed in the Network Symbol Information Table window The following information is listed Names Absolute addresses Comments The symbol information table remains empty for networks that do not contain any global symbols Procedure 1 The ladder diagram display LAD is open 2 Select the desired network and press the Symbol info softkey The N...

Page 921: ... for each entry Procedure 1 The Ladder editor is open 2 Press the Symbol table and Sym tab selection softkeys The list with the symbol table entries is displayed 3 Select the desired table and press the Open softkey The table is displayed 4 Use the cursor keys to select the desired entry Edit PLC user program 828D only 23 6 Displaying symbol tables Milling Operating Manual 08 2018 6FC5398 7CP41 0B...

Page 922: ...or is open 2 Press the Cross refs softkey The list of cross references opens and the operands are displayed sorted according to absolute address 3 Press the Symbol address softkey The list of operands is displayed sorted according to symbolic address 4 Press the Absolute address softkey to return to the display showing the absolute addresses 5 Select the desired cross reference and press the Open ...

Page 923: ...and entry in the first input field if you are searching for a specific operand and enter the search term in the Find input field 3 Select the search range e g Find all 4 Select the In this program unit or In all program units entry if you are in Window 1 or Window 2 or in the symbol table in order to restrict the search 5 Press the OK softkey to start the search If the operand you are searching fo...

Page 924: ...Edit PLC user program 828D only 23 8 Searching for operands Milling 924 Operating Manual 08 2018 6FC5398 7CP41 0BA0 ...

Page 925: ...Appendix A A 1 840D sl 828D documentation overview Milling Operating Manual 08 2018 6FC5398 7CP41 0BA0 925 ...

Page 926: ...J 0DQXDO ದ 8QLYHUVDO ದ 7XUQLQJ ದ 0LOOLQJ ದ ULQGLQJ 3URJUDPPLQJ 0DQXDO ದ XQGDPHQWDOV ದ RE 3ODQQLQJ ದ 0HDVXULQJ FOHV 3URJUDPPLQJ 0DQXDO ದ 62 7XUQLQJ ದ 62 0LOOLQJ LDJQRVWLFV 0DQXDO ODUPV RPPLVVLRQLQJ 0DQXDO ದ 1 1 3 ULYH ದ DVH VRIWZDUH DQG RSHUDWLQJ VRIWZDUH LVWV 0DQXDO ದ 0DFKLQH GDWD ದ QWHUIDFH VLJQDOV ದ 9DULDEOHV 6 VWHP 0DQXDO XLGHOLQHV IRU FRQILJXULQJ PDFKLQHV TXLSPHQW 0DQXDO RPPLVVLRQLQJ 0DQXDO 6H...

Page 927: ... system data 792 reading in in the Program Manager 791 Auxiliary functions H functions 252 M functions 252 Axes Defined increment 169 Direct positioning 171 Referencing 90 Repositioning 199 Traversing 169 Variable increment 170 B Backing up Data in the Program Manager 788 Data via the system data 789 Parameter 798 Setup data 794 Base offset 145 Basic blocks 195 Binary format 788 Blank Change 343 B...

Page 928: ...erial CYCLE63 Function 506 Parameters 507 Contour spigot residual material CYCLE63 Function 511 Parameters 513 Contour turning Overview 574 Retraction planes 574 Coolant Block search 700 Tool change 700 Coordinate system Switching over 96 transforming 653 Coordinate transformation Calling the functions 653 Functions 653 Mirroring function 656 Mirroring parameter 657 Offset function 654 Offset para...

Page 929: ...ng tool Function 641 Parameter 642 CYCLE800 Swiveling Function 631 Parameter 639 CYCLE801 frame position pattern Function 412 Parameter 414 CYCLE801 grid position pattern Function 412 Parameter 413 CYCLE802 arbitrary positions Function 409 Parameter 411 CYCLE81 centering Function 372 Parameter 373 CYCLE82 drilling Function 374 Input simple 374 Parameter input simple 376 Parameter input complete 37...

Page 930: ...input complete 566 Parameter input simple 567 CYCLE99 Thread turning Function Face thread 534 Function Longitudinal thread 534 Function Tapered thread 534 Input simple 535 Parameter face thread input complete Parameter face thread input simple Parameter longitudinal thread complete input Parameter longitudinal thread simple input Parameter tapered thread input complete Parameter tapered thread inp...

Page 931: ...p radius 231 Specifying a reference point 230 Transferring the drilling position 234 Zero point 230 E Easy Extend Activate deactivate device 893 Additional devices 891 Enabling a device 892 First commissioning of the additional devices 894 Easy Message 881 Commissioning 882 Settings 889 User log on off 887 Edges Managing 704 Editor Calling 214 Settings 222 EES execution from external storage 779 E...

Page 932: ...le position pattern Parameter 416 HOLES2 circle position pattern Function 414 HOLES2 pitch circle position pattern Parameter 417 HOLES2 position pattern pitch circle Function 414 HT 8 Enabling button 862 Overview 861 Touch Panel 869 Traversing keys 864 User menu 865 Virtual keyboard 867 I IME Chinese characters 56 Korean characters 60 Input simple Circular spigot CYCLE77 441 Circumferential slot S...

Page 933: ...escreen 82 Operator controls 36 Machine functions 336 Parameter 336 337 Machine model 679 Machine specific information 822 Machining step program 317 Machining times Delete 225 Display 297 319 Display in block display 47 194 Magazine Deleting tools 722 Loading tools 722 Open 718 Positioning 720 Relocating tools 722 Selecting 707 Unloading tools 722 Magazine management 687 Maintenance tasks Monitor...

Page 934: ...roups 94 Mold making view adapting 259 Changing a graphic 262 Changing the section 263 Editing a program block 260 Programs 257 Searching for program blocks 261 Starting 259 MRD Measuring Result Display 209 Multi channel view 671 Machine operating area 672 OP015 OP019 675 Settings 677 Multi edge CYCLE79 Function 445 Input simple 445 Parameter input complete 447 Parameter input simple 447 Multiple ...

Page 935: ...ding 898 Resetting processing times 898 Search function 923 Shortcuts 908 Symbolic address 910 User interface 907 PLC user programs Editing 915 Plunge turning CYCLE952 Function 617 Input simple 619 Parameter input complete 623 Parameter input simple 623 Plunge turning residual material CYCLE952 Function 627 Parameter 630 POCKET3 rectangular pocket Function 422 Input simple 423 Parameter input comp...

Page 936: ...34 Milling turning machine 330 Multiple clamping 806 Program level 196 Program list 764 Program Manager 747 Displaying HTML documents 783 Displaying PDF documents 783 Searching for directories and files 766 Program runtime 265 Program settings Change 343 Parameters 343 344 Program status 909 Program views G code 296 ShopMill 318 Programmed stop 1 209 Programmed stop 2 209 Programming variables G c...

Page 937: ...ation 188 Measurement result log 143 Multi channel view 677 Teach in 860 Tool lists 735 Setup data Backing up 794 reading in 796 ShopMill program Creating 327 Cutting edge 334 Feedrate 335 Machine functions 336 Program blocks 333 Program header 328 330 Program settings 343 Program structure 323 Radius compensation 334 Spindle speed 335 Straight line Circle 660 Tool 334 ShopTurn program Programming...

Page 938: ...removal residual material CYCLE952 Function 599 Parameter 603 Straight line 662 Manual Machine 839 Polar 667 Straight line Circle 660 Submode REF POINT 93 Subprogram Function 651 Parameters 652 Switching over Coordinate system 96 Swiveling in JOG Function 172 in JOG Parameter 176 Manually 172 Swiveling CYCLE800 Function 631 Parameter 639 Symbol tables 921 Symbolic identifiers displaying in the net...

Page 939: ...g 720 Unloading 705 Tool change Coolant 700 Tool data Actual value window 45 Backing up 794 reading in 796 Tool life 714 Tool list 698 Tool lists Settings 735 Tool management 685 List filtering 731 Sorting lists 730 Tool parameters 691 Tool probe 107 Tool types 688 Tool wear 713 Tool wear list Open 713 Tools Graphic display 728 Touch operator controls Cancel alarms 75 Changing the channel 75 Touch...

Page 940: ... plane 134 Automatic measurement 113 Changing the user interface 136 Corrections after measurement 137 Manual Machine 834 Manual measurement 113 Measurement result log 138 Measuring 152 Measuring a circular spigot 129 Measuring a hole 126 Measuring a rectangular pocket 126 Measuring a rectangular spigot 129 Measuring a right angled corner 123 Measuring any corner 123 Measuring the distance between...

Reviews: