


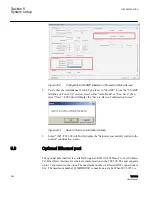


5.9.5
Setting the MODBUS and DNP ports from the HMI
1.
Press the Right Arrow (COMM Hot Button) to wake the unit. The menu will advance
to either "COMMUNICATION" or "Memory Card" (when a Smart Flash SD CARD
is present).
2.
If the "Communication" menu is displayed, then press the Down Arrow pushbutton
once. The unit will display the "Comm Settings" menu. From the "Comm Settings"
or "Memory Card" menu, press the Right or Left Arrow pushbutton as necessary
until "Ethernet" is displayed.
3.
Press the Down arrow pushbutton, as necessary, until the "Enter MODBUS Port"
menu item is displayed.
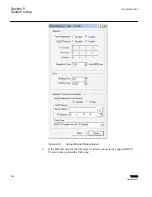
4.
Press the ENT pushbutton. If prompted, enter a valid Level 2 Access Code. The
following will be displayed:
Enter Modbus Port 502 C
5.
Utilizing the arrow pushbuttons enter the desired MODBUS® port address, then
press the ENT pushbutton. The desired MODBUS port address will be displayed.
6.
Press the Down arrow pushbutton once. The following will be displayed.
Enter DNP Port 20000
7.
Press the ENT pushbutton. The following will be displayed.
Enter DNP Port 20000 C
8.
Utilizing the arrow pushbuttons, input the desired DNP Port address, press the ENT
pushbutton, the desired DNP Port address will be displayed.
The control is no w addressable from TCC600® over the network. Ensure that the
MODBUS and DNP Port values are the same as the values manually set when
attempting to communicate with the control from TCC600.
5.9.6
Setting the Ethernet keepalive time from the HMI
1.
Press the Right Arrow (COMM Hot Button) to wake the unit. The menu will advance
to either "COMMUNICATION" or "Memory Card" (when a Smart Flash SD CARD
is present).
2.
If the "Communication" menu is displayed, then press the Down Arrow pushbutton
once. The unit will display the "Comm Settings" menu. From the "Comm Settings"
or "Memory Card" menu, press the Right or Left Arrow pushbutton as necessary
until "Ethernet" is displayed.
3.
Press the Down arrow pushbutton, as necessary, until the "Keepalive time" menu
item is displayed.
4.
Press the ENT pushbutton. If prompted, enter a valid Level 2 Access Code. The
following will be displayed:
Keepalive time 7200 sec C
5.
Utilizing the arrow pushbuttons enter the desired Keepalive Time value, then press
the ENT pushbutton. The desired Keepalive Time value will be displayed.
1VAC388793-MB A
Section 5
System setup
TCC300
297
User Manual
Содержание TCC300
Страница 1: ...Digital Tapchanger Control TCC300 User Manual ...
Страница 2: ......
Страница 3: ...Document ID 1VAC388793 MB Issued 2016 08 10 Revision A Copyright 2016 ABB All rights reserved ...
Страница 22: ...Updating data file remotely 700 Section 16 Glossary 705 Table of contents 16 TCC300 User Manual ...
Страница 26: ...20 ...
Страница 34: ...28 ...
Страница 91: ...1VAC388793 MB A Section 3 Operation TCC300 85 User Manual ...
Страница 126: ...120 ...
Страница 176: ...Section 4 1VAC388793 MB A TCC600 170 TCC300 User Manual ...
Страница 260: ...254 ...
Страница 328: ...322 ...
Страница 494: ...488 ...
Страница 556: ...550 ...
Страница 580: ...574 ...
Страница 600: ...594 ...
Страница 700: ...694 ...
Страница 710: ...704 ...
Страница 712: ...706 ...
Страница 713: ...707 ...
Страница 714: ......
Страница 715: ......