background image

 
Controlling with External Analog & Contact Signals                                                         


------------------------------------------------------------------------------------ 
130


Setting Procedures 
 
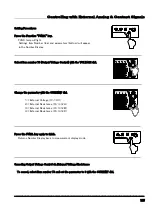
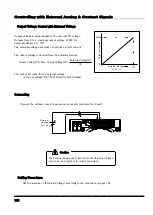
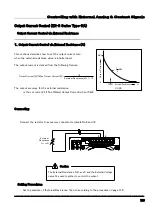
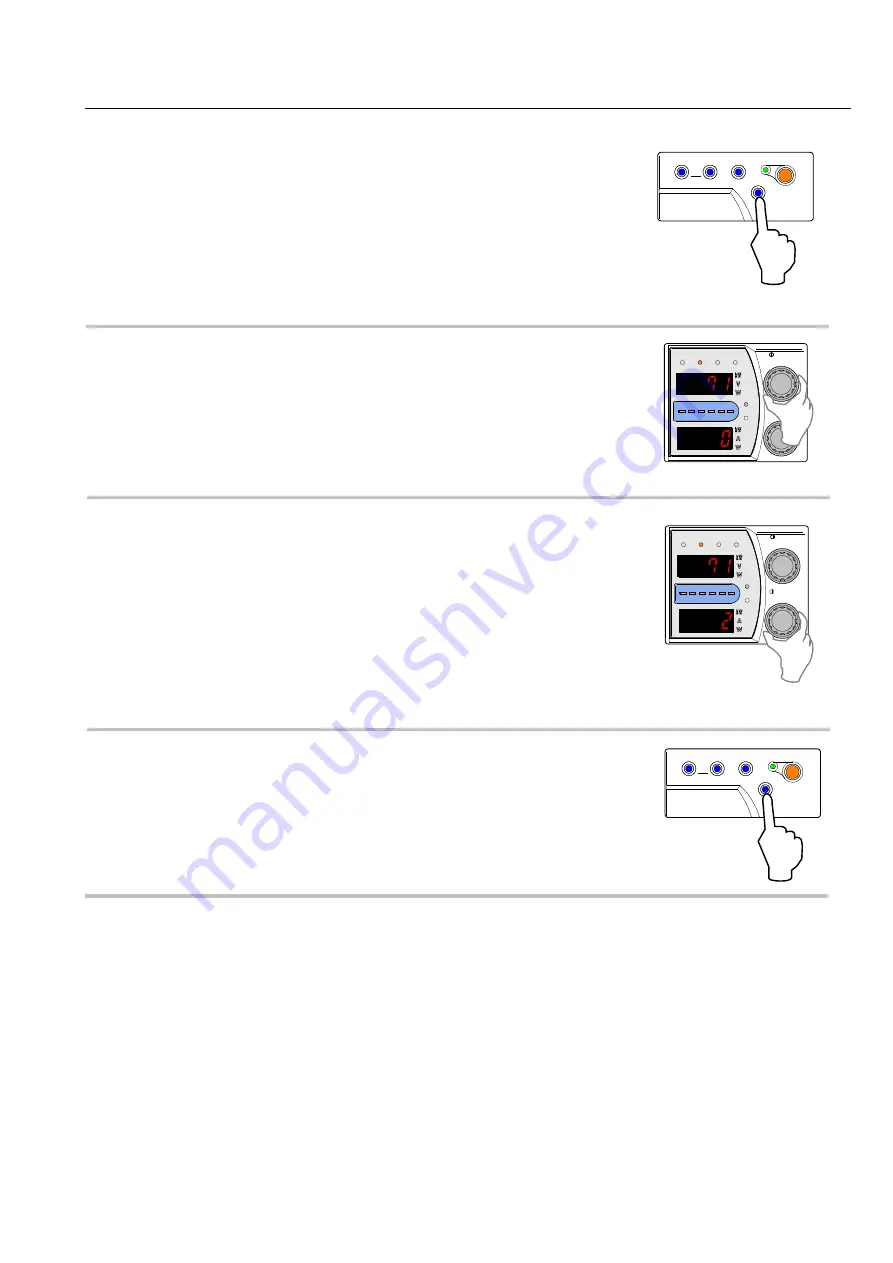
Press The Function “FUNC.” key. 
    FUNC. lamp will light. 
    Settings Item Number (top) and parameters (bottom) will appear   

in the Number Display 


Select Item number 71 with the VOLTAGE dial. 


Change the parameters with the CURRENT dial. 

 
1=External Voltage (0~10V)   
2=External Resistance (0~∞Ω:A)   
3=External Resistance (0~10kΩ:B)   
4=External Resistance (0~10kΩ:C)   


Press the FUNC. key again to finish. 
    Returns the Number Display back to measurement display mode. 


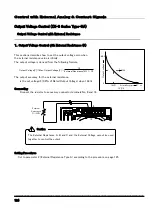
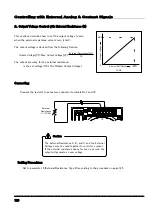
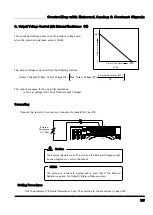
Canceling Output Voltage Current via External Voltage/Resistance   

 
To cancel, select Item number 70 and set the parameter to 0 with the CURRENT dial. 


OUTPUT

PRESET

OVP

OCP

FUNC.

ALARM  RESET

OUTPUT

PRESET

OVP

OCP

FUNC.

ALARM  RESET

CC

CV

OUTPUT  POWER     (%)

STEP

CURRENT

STEP

VOLTAGE

PRESET FUNC. REMOTE LOCK

20

60

100 LMT

40

80

CC

CV

OUTPUT  POWER     (%)

STEP

CURRENT

STEP

VOLTAGE

PRESET FUNC. REMOTE LOCK

20

60

100 LMT

40

80

Summary of Contents for ZX-S-H Series

Page 1: ...Constant Voltage Constant Current DC Power Supply series Instruction Manual ...

Page 2: ...t OCP 30 Setting Canceling Over Current Protection 30 Error Codes 32 Useful Function Memory 34 Saving in Memory 34 Loading from Memory 35 Panel Memory Savable Items List 36 Startup Mode Selection 37 Variable Slew Rate 38 Sequential ON OFF 40 Key Lock 43 Key Lock Settings 43 Canceling Key Lock 43 Variable Internal Resistance ZX S Series Type HA 44 Measurement Display Smoothing 45 Linearity Compensa...

Page 3: ...rging Battery 140 Loads with Reverse Current 141 Pulse Current Loads 142 Maintenance Warranty Period 144 Daily Maintenance Inspection 144 Cleaning Air Filter 145 Cleaning Panels 145 Inspecting Cables Terminals 145 Welded Fuses 145 Replacing Fan Motor 146 Lifespan of Parts 147 Calibration Calibrating Output Settings 148 Offset Full Scale Calibration of Output Voltage Settings 148 Offset Full Scale ...

Page 4: ...g from the outlet Continual use of the product if Continual use of the product if there are abnormal noises or smells Smoke appears Water or foreign objects enters the product may result in fire or electric shock Dismantling or modifications to the product is prohibited Do not open the cover This may result in fire or electric shock For repairs and adjustments please contact your retailer Protecti...

Page 5: ...upply plug from the outlet power immediately and contact Takasago Exporting Please contact Takasago in advance if wishing to export or carry this product outside of Japan Using this product near receivers radios televisions etc may interfere with reception Please do not use this product in any medical nuclear or work involving human life Caution 1 Reproduction of the material contained within this...

Page 6: ...h full digital control also grants settings with superior accurate reproduction Note1 Zoom method is the ability to output a high voltage in areas with low current and high current in areas with low voltage while maintaining the output range for the rated power as shown in the diagram below 0 80 160 240 320 400 480 560 640 720 Output Voltage V Output Current A Rated Output Power Line Circuit Outpu...

Page 7: ...e order outputs are toggled ON OFF through a multi connection cable Protection Functions Guards valuable loads and power supplies with Over Voltage Protection Over Current Protection Over Power Protection Over Heating Protection Excessive Input Current Protection etc External Analog Control ZX S Series Type HA Able to control ON OFF output with external contact points and voltages and currents bas...

Page 8: ...et to ON LOCAL LOCAL Key Switches between LOCAL operated from the panel and REMOTE operated by control via serial data communication This is the front panel of the ZX S 800H LOCK LOCK Key Locks panel from use Below are the 3 types of Lock settings Each function setting key FUNC can be changed Locks everything but the LOCK key Locks everything but the OUTPUT and LOCK key Locks only the Voltage Curr...

Page 9: ... key for 1 second or more to cancel and OVP alarm OCP Over Current Protection OCP Key Sets the trigger point for the OCP circuit Hold down together with OV key for 1 second or more to cancel and OCP alarm PRESET Preset Key Used to set the output voltage and output current Front panel diagram of ZX S 800H OUTPUT PRESET OVP OCP POWER FUNC LOCAL LOCK DISPLAY A B C STORE MEMORY CC CV OUTPUT POWER STEP...

Page 10: ...ransferred to an external computer etc being accessed via serial interface FUNC Function Display Lamp Lights when Function settings are available PRESET Preset Display Lamp Lights when Preset settings are available Number Display Displays the output voltage output current and output power When setting functions with the Function key the item number will be displayed on the top and its parameter wi...

Page 11: ... power cable with any other products SENSE Sensing Terminal Terminal for Remote Sensing SERIAL I F 1 Serial Port Connector Connector for connecting computers etc with serial cables RS 232C SERIAL I F 2 Multi Channel Connectors Connectors for when controlling multiple ZX series units or for controlling RS 485 type serial ports Connect using KXC 300 300mm cable TERMINATION Termination Resistor ON OF...

Page 12: ...erminal Cover 2 items identical shape Support Post for attaching cover 1 item M3 6mm screws 2 items Output Terminal Screws M5 12mm bolts includes Flat washers and Spring washers 2 packages Attached to power supply Dummy Connector Attached to power supply 2 items Instruction Manual 1 copy External Control Connector 1 item ZX S Series Type HA Placement To ensure proper and safe use of this product p...

Page 13: ...n motor If affixing to a rack attach ventilation panels to the rear of the rack to prevent Prohibited exhaust from the power supply from being released inside the rack Using this product near receivers radios televisions etc may interfere with Caution reception OUTPUT PRESET OVP OCP POWER FUNC LOCAL LOCK DISPLAY A B C STORE MEMORY CC CV OUTPUT POWER STEP CURRENT STEP VOLTAGE PRESET FUNC REMOTE LOC...

Page 14: ...to the device to prevent EMI Electromagnetic Interference Due to this even the slightest amount of leaked current may result in electric shock if not Mandatory properly grounded For safety reasons please ground the device Caution Please use input power within ranges of 85V 250V and 45Hz 65Hz single phase Mandatory Nominal Power Supply Voltage is displayed near the rear panel inlet Please connect t...

Page 15: ...l can be minimized smaller than the standard value by connecting the C1 and C2 close to the load terminal Using a small high frequency impedance for C1 and C2 cut the lead wire as short as possible and connect C1 Electrolytic Capacitor 100 1000μ F C2 Film Capacitor 1 10μ F MEMO Please attach the terminal cover after wiring Mandatory M5 Bolt includes spring and flat washers When grounding use a loa...

Page 16: ...ge is being outputted from the power supply Prohibited Caution Use wires with sufficient cross section areas for load currents Mandatory Ex See Appendix Load Current vs Cross section areas Attach crimp style terminals to wires and securely fasten Mandatory If insecurely fastened wires may become deformed or burn out due to the generated heat at connection points ...

Page 17: ... support rod to the remaining terminal cover inserting it into the center part of the cover and affix the rod in place by screwing an M3x6mm into it from the bottom of the cover 3 Hook the terminal cover with attached support post on the lower grooves of the Output Terminal platform then raise and snap the terminal cover in place with the upper half M3 Screw Hole 4 Fasten a M3 6mm screw from above...

Page 18: ...ttings Item 400H 400HA 800H 800HA 1600H 1600HA Constant Voltage Set Value 0 00V 0 00V 0 0V Constant Current Set Value 5 250A 10 50A 21 0A Over Voltage Protection OVP Set Value 704V 704V 704V Over Current Protection OCP Set Value 5 5A 11 0A 22 0A Settings Values in Memory A B C Same with the above CV set values CC set values OVP set values OCP set values Function Settings See page 23 on Default Val...

Page 19: ...eys once the Number Display lights up Backing Up Settings This power supply saves all settings in non volatile memory EEPROM just before the POWER switch is turned off or immdeitely before power is cut off All previous settings will remain the same when power is turned on again No batteries are used There is no need to replace batteries OUTPUT PRESET OVP OCP POWER FUNC LOCAL LOCK DISPLAY A B C STO...

Page 20: ...al to adjust the Constant Voltage Set Value Turn the dial right to raise or left to lower the set value If the parameter for FUNCTION item 50 is set to 0 press the PRESET key again The output voltage will be changed once PRESET mode has been exited If the parameter for FUNCTION item 50 is set to 1 promptly change the set value using the VOLTAGE dial Press the VOLTAGE dial to display the current nu...

Page 21: ... with the set settings The OUTPUT and CV lamps will light If the current limit value is set to a value lower than the required load current current will be restricted and constant current will be used CC lamp lights MEMO While the PRESET lamp is lit all other keys not mentioned in the above setting procedures cannot be used OUTPUT key can be used OUTPUT PRESET OVP OCP FUNC ALARM RESET OUTPUT PRESE...

Page 22: ...djust the Constant Current Set Value Turn the dial right to raise or left to lower the set value If the parameter for FUNCTION item 50 is set to 0 press the PRESET key again The output voltage will be changed once PRESET mode has been exited If the parameter for FUNCTION item 50 is set to 1 promptly change the set value using the VOLTAGE dial Press the CURRENT dial to display the current number po...

Page 23: ...returns to the measurement display Press the OUTPUT key Outputs with the set settings OUTPUT and CV lamp will light OUTPUT PRESET OVP OCP FUNC ALARM RESET While the PRESET lamp is lit all other keys not mentioned in the above setting procedures cannot be used OUTPUT key can be used MEMO OUTPUT PRESET OVP OCP FUNC ALARM RESET If the voltage limit value is set to a value lower than the required load...

Page 24: ... C2 より合わせる Turn POWER switch OFF before wiring to the output terminal Danger While using remote sensing do not switch output lines using switches etc Doing so may lead to damaging the power supply Because the output terminal s voltage is detected by the OVP circuit please set the voltage value of the OVP to include the voltage drop amount round trip of the wires outputting the voltage you wish to ...

Page 25: ...the CURRENT dial Press the FUNC key to finalize settings The top and bottom Number Displays will return to measurement display mode It is possible to continue to change other setting items without pressing the FUNC key In this case press the FUNC key to confirm settings once changes are finished When setting the device address bitrate and parity the POWER switch must be turned OFF and ON after set...

Page 26: ... 6 CC Slew Rate Falling 400H HA 0 01A s 10 00A s 10 00A s 800H HA 0 01A s 20 00A s 20 00A s 1600H HA 0 01A s 40 00A s 40 00A s 7 Serial I F2 0 Serial Data Communication Control Remote Mode 0 Serial Data Communication Control Remote Mode 1 Use for Sequential ON OFF Local Mode 8 ON Delay Time 0 00s 99 99s 0 00s 9 OFF Delay Time 0 00s 99 99s 0 00s 10 Operation during Alarm Can only select 1600H HA pa...

Page 27: ... Offset Not displayed 25 Voltage Measurement Full Scale Not displayed 26 Current Measurement Offset Not displayed 27 Current Measurement Full Scale Not displayed 28 Calibration ZX S Type HA External Analog Input Voltage Setting Offset Not displayed 29 Voltage Setting Full Scale Not displayed 30 Current Setting Offset Not displayed 31 Current Setting Full Scale Not displayed 32 Voltage Monitor Outp...

Page 28: ...ction 1 Double Action 1 Double Action 60 Communication Functions Device Address 1 50 1 61 Bitrate 0 2400bps 1 9600bps 1 9600bps 2 19200bps 3 38400bps 62 Parity 0 No 0 No 1 ODD 2 EVEN 63 Command Form 0 SCPI Standard Conformance 0 SCPI Standard Conformance 1 EX Series Compatible 70 External Control ZX S Type HA CV Control EXT R V PANEL Settings 0 Front Panel 0 Front Panel 1 External Voltage 0 10V 2 ...

Page 29: ...cation 100 Sequential Operation Function Sequential Operaton Mode 0 disable 1 enable Normal Mode 2 enable Continue Mode 0 disable 101 Sequential Operating Number of repetition 0 to 9999times 0 Continuous Operation 0 Continuous Operation 102 Memory A Operating Time h 0 999h Setting Resolution 1h 0h 103 Memory A Operating Time m 0 59m Setting Resolution 1m 0m 104 Memory A Operating Time s 0 59 9sec ...

Page 30: ...2 Sequential Operation Function Sequential Operating OFF Time s 0 59 9s Setting Resolution 0 1s 0 0s 113 Sequential Operating OFF Time s 0 59 9s Setting Resolution 0 1s 0 0s 114 OUTPUT OFF at the end of the limited repetition of Sequential Operation 0 disable 1 enable 1 enable ...

Page 31: ...he bottom Number Display Select Item No 51 with the VOLTAGE dial Set Parameter to 0 or 1 with the CURRENT dial Parameter 0 Output is OFF COLD START after power is turned on Pressing the OUTPUT key will toggle it ON OFF Parameter 1 Output turns ON approximately 2 seconds after power is turned on HOT START Press the FUNC key to finalize settings CC CV OUTPUT POWER STEP CURRENT STEP VOLTAGE PRESET FU...

Page 32: ... Disconnect the load from the power supply Turn the POWER switch ON with the Output ON OFF Toggle mode set to 0 Set the output voltage settings lower than OVP level Turn OUTPUT to ON Gradually increase the Output Voltage with the VOLTAGE dial Verify that the output turns OFF once the OVP set voltage has been reached and that the error code E004 appears in the top Number Display and OUP appears in ...

Page 33: ...d on the slew rate function is set invalid and the voltage is immediately decreased MEMO During serial data communication recovery from alarm status is possible using commands During parallel operation where the Master unit is operating normal if any Slave unit triggers an alarm the error code E006 will be displayed in the Master and functioning Slave units Information concerning the alarm will be...

Page 34: ...ection area wires that can flow rated current Turn the POWER switch ON with the Output ON OFF Toggle mode set to 0 Set the Output Current settings lower than OCP level Turn OUTPUT to ON Gradually increase the Output Current with the CURRENT dial Verify that the output turns OFF once the OCP set current has been reached and that the error code E005 appears in the top Number Display and OCP in the b...

Page 35: ...nction is set invalid and the output current is immediately decreased MEMO During serial data communication recovery from alarm status is possible using commands During parallel operation where the Master unit is the operating normal if any Slave unit triggers an alarm the error code E006 will be displayed in the Master and functioning Slave units Information concerning the alarm will be displayed...

Page 36: ...ower switch OFF Check device s power supply BST_NRDY E008 Slave unit s input voltage is abnormal or POWER switch is OFF Check whether slave unit s power switch is ON Device Detection Failure E009 Cannot detect number of parallel devices Restart power supply Max Device No OVER E010 More than 11 parallel devices are connected Verify No of parallel devices Restart power supply Device No Disagreement ...

Page 37: ...Basic Operations 33 This is blank page ...

Page 38: ...stination by holding down Memory A B C key for more than 1 second Saves current set values The light will blink faster until finished Once saving is complete the display will return to measurement display mode Only the OUTPUT ON OFF and keys mentioned in the setting procedures can be used Values can be saved to memory regardless of OUTPUT ON OFF status MEMO Settings Items that can be saved in memo...

Page 39: ...ou wish to load from The voltage and current values stored in memory will blink in the Number Display Press the same memory key to cancel Pressing a different memory key at this point will display the voltage and current values stored in the pushed key Hold down the memory button you wish to load from for more than 1 second The light will blink faster until finished Once loading is complete the di...

Page 40: ...Savable Parameters PRESET CV Set Value CC Set Value OVP Set Value OCP Set Value FUNC 2 Selection of Startup Mode 3 CV Slew Rate Rising 4 CV Slew Rate Falling 5 CC Slew Rate Rising 6 CC Slew Rate Falling 8 ON Delay Time 9 OFF Delay Time 72 Internal Resistance Settings ...

Page 41: ...current pulse to nonlinear loads such as diodes etc Setting Procedures Press the Function FUNC key FUNC lamp will light Settings Item Number will display on the top Number Display and parameters on the bottom Number Display Select Item Number 2 with the VOLTAGE dial Select either 0 or 1 with the CURRENT dial Set Value 0 CV Priority Mode Set Value1 CC Priority Mode Press the FUNC key again to finis...

Page 42: ...y Mode by setting the parameter to 2 or 3 with the CURRENT dial Set Value 2 CV Priortiy Variable Slew Rate Set Value 3 CC Priority Varialbe Slew Rate The range will vary for the Constant Current CC Slew Rate depending on the number of parallel devices Ex For 400H HA 2 Devices 0 01 20 00A s 7 Devices 0 01 70 00A s 3 Devices 0 01 30 00A s 8 Devices 0 01 80 00A s 4 Devices 0 01 40 00A s 9 Devices 0 0...

Page 43: ...e CURRENT dial Range 1 0V s 1280V s When selecting Constant Current CC Priority Variable Slew Rate mode Item 2 set to 3 Set the Item Number to either 5 or 6 using the VOLTAGE dial Set Value 5 Rising Current Slew Rate Set Value 6 Falling Current Slew Rate Assign the set value using the CURRENT dial Range 400H HA 0 01A s 10 00A s 800H HA 0 01A s 20 00A s 1600H HA 0 01A s 40 00A s If using with maste...

Page 44: ... M S CONTROL SENSE DC OUTPUT SERIAL I F 1 SERIAL I F 2 TERMINATION LINE INPUT OFF ON IN OUT M S CONTROL SENSE DC OUTPUT SERIAL I F 1 SERIAL I F 2 TERMINATION LINE INPUT OFF ON IN OUT M S CONTROL SENSE DC OUTPUT TERMINATION OFF ON TERMINATION OFF ON TERMINATION OFF ON Sequential Slave 2 Sequential Slave n Sequential ON OFF Connections TERMINATION Settings Termination Resistor Set the sequential mas...

Page 45: ...ay time Setting ON Delay Time Select Item Number 8 with the VOLTAGE dial Set ON Delay Time with the CURRENT dial Setting OFF Delay Time Select Item Number 9 with the VOLTAGE dial Set OFF Delay Time with the CURRENT dial It is possible to set the delay time tdon tdoff for the sequential master unit MEMO ZX 1 5V ZX 2 12V ZX n 12V ZX 1の OUTPUT キー で出力をON OFF ON td1 on td1 off td2 off td3 off td3 on td...

Page 46: ... Master and Slave settings with the CURRENT dial Master Unit is Address 1 Set the Slave Unit Address to any value except 1 Press the FUNC key to finish Number Display will return to mesurement display mode CC CV OUTPUT POWER STEP CURRENT STEP VOLTAGE PRESET FUNC REMOTE LOCK 20 60 100 LMT 40 80 OUTPUT PRESET OVP OCP FUNC ALARM RESET ...

Page 47: ...Settings Pressing the LOCK key will restrict key inputs LOCK lamp will light The status of the Lock Key can be selected under the FUNCTION Settings Item Number 53 parameters from the following 3 types below Parameter 0 Only the LOCK key can be used Parameter 1 Only the OUTPUT key and LOCK key can be used Parameter 2 Only the DISPLAY key A B and C memory keys STORE key OUTPUT key and LOCK key can b...

Page 48: ... on the top Number Display and parameters on the bottom Number Display Select Item Number 72 with the VOLTAGE dial Set the Internal Resistance value with the CURRENT dial Range is 0 00Ω 128 0Ω 400H HA 0 00Ω 128 0Ω 800H HA 0 00Ω 64 0Ω 1600H HA 0 00Ω 32 0Ω Factory default is 0 00Ω No Internal Resistance Press the FUNC key again to finish Confirms settings and returns Number Display to measurement di...

Page 49: ... as the Moving Average Method Setting Procedures Press the Function FUNC key FUNC lamp will light Settings Item Number will display on the top Number Display and parameters on the bottom Number Display Select Item Number 12 with the VOLTAGE dial Set the parameter to 1 with the CURRENT dial Press the FUNC to finish Returns Number Display to measurement display mode OUTPUT PRESET OVP OCP FUNC ALARM ...

Page 50: ... on the top Number Display and parameters on the bottom Number Display Select Item Number 13 with the VOLTAGE dial Set Compensation Mode with CURRENT dial 0 Compensation Function is turned OFF 1 Once compensation has concluded the Output is then turned ON the set values are changed and the compensation value is maintained until there is a change in the Output mode CV CC 2 Compensates continually 2...

Page 51: ... is positive enlarged In the event of the previous corrected value is negative enlarged Latest output after setting the Linearity Compensation to OFF Previous correction value Output corrected by the Linearity Compensation Latest output corrected by the Linearity Compensation In case of OUTPUT ON OUTPUT setting change and OUTPUT mode changing Time ms 1200ms In case of OUTPUT ON OUTPUT setting chan...

Page 52: ...9m 0 0 59 9sec Note The accuracy of the sequential operating time is Approx 0 5 and settable Min resolution is 0 1 sec However it may happened to have any influence against rising and falling time of output by programming time and load conditions and falling time Recordable setting for memory function CV CC OVP and OCP setting Selection for rising mode Setting of FUNCTION 2 0 Priority on CV 1 Prio...

Page 53: ...4 For the items and parameters please refer to List of Setting Items ZX S series will be ready for sequence operation after setting 1 or 2 for item 100 and pressing FUNC button 0 Sequential Operation disable 1 Sequential Operation enable Normal Mode 2 Sequential Operation enable Continue Mode CC CV OUTPUT POWER STEP CURRENT STEP VOLTAGE PRESET FUNC REMOTE LOCK 20 60 100 LMT 40 80 OUTPUT PRESET OVP...

Page 54: ...ill be stopped during the sequential operation due to the error and turning off of the ZX S series V A t tC tC tB1 tA tA Operating Time with Memory A tB Operating Time with Memory B tB1 Operated time with Memory B tB2 Remained operation time with Memory B tC Operating Time for Memory C tOff Operating Time for OUTPUT OFF Sequential Operation Start tB2 OUTPUT STOP during the opration Memory B Sequen...

Page 55: ...nction Memory A Memory B Memory C Keep the output of memory C Press Function Key FUNC Set the required parameters for item 114 For the items and parameters please refer to List of Setting Items additional in page 2 0 Disable Keeping the OUTPUT status at the end of the sequential operation 1 Enable OUTPUT OFF at the end of the sequential operation Press Function Key FUNC again to complete the setti...

Page 56: ...NCTION Setting Item 104 23 4 sec 2 The sequential operation will not be executed with the setting of 0 hrs 0 min and 0 0 sec e g 1 There is no OUTPUT with the Memory B if the operation time for the Memory B is set as 0 hrs 0 min 0 0 sec V A t tOff tC tA Sequential Operation Start Memory A Memory C tA Operating Time with Memory A tC Operating Time with Memory C tOff Operating Time for OUTPUT OFF e ...

Page 57: ...tion Memory A Memory B Memory C tA Operating Time with Memory A tB Operating Time with Memory B tC Operating Time with Memory C tOFF Operating Time with OUTPUT OFF 4 It is enable to use slew rate during the sequential operation The time during the change of the slew rate will be considered as the sequential operation time e g 1 The operation in case of achieving the target value by slew rate V A t...

Page 58: ...ion in case of non achieving the target value by slew rate V A t tOff tC tB tA Memory A Memory B Memory C tA Operating Time with Memory A tB Operating Time with Memory B tC Operating Time with Memory C tOff Operating Time with OUTPUT OFF ...

Page 59: ...Useful Function 55 This is blank page ...

Page 60: ...ower supply and thereon Pin placement for the external control connector SERIAL I F 2 is shown in the diagram below SERIAL I F 2 electrical specifications conform to RS 485 standards 本体側 D SUB9ピン オス 5 1 SERIAL IF 1 9 6 Pin No Name IN OUT Pin No Name IN OUT 1 NC 2 RX IN 3 TX OUT 4 DTR OUT 5 GND 6 7 RTS OUT 8 CTS IN 9 NC Power Supply RJ 45 Male SERIAL IF 2 8 1 Pin No Name IN OUT Pin No Name IN OU T ...

Page 61: ...S CONTROL SENSE DC OUTPUT TERMINATION OFF ON TERMINATION OFF ON TERMINATION OFF ON 1 本機を複数台接続する場合は オプションケーブル 別売 KXC 300 300mm またはKXC 600 600mm をご使用下さい パソコン等 ZXシリーズ 1 ZXシリーズ 2 ZXシリーズ 31 KXC 300 RS 232C クロスケ ブル When connecting multiple ZX S Series power supplies the communication terminal computer etc can only connect to the SERIAL I F 1 of only one device Please set the device address for the ZX S...

Page 62: ...t settings Communication cannot be established if settings differ Set the bitrate and parity under FUNCTION Setting Item 61 Bitrate and Item 62 Parity See page 22 Setting changes will take affect from next startup Command Send Interval When sending commands continuously to the ZX S power supply due to there being no flow control function a delay is required on the communication terminal side If re...

Page 63: ... to the front panel from Remote Control Status press the LOCAL key on the front panel The REMOTE LED will turn off and Local control with the front panel will be granted PC RS 232C RS 485 REMOTE LED turns on Commnd send A1 CR LF Command example when EX series compatible Device Address 1 Starting Remote Control OUT PUT PRESE T OVP OCP POWER FUNC LOCAL LOCK DISPLAY A B C ST O RE MEMORY CC CV O UTPUT...

Page 64: ...t to other than 1 T485 M or KXC ST ORE PC Set to 5 5V OUT PUT PRESE T OVP OCP POWER FUNC LOCAL LOCK DISPLAY A B C MEMORY CC CV O UTPUT PO WER ST EP PRESET FUNC REMO TE LO CK AL ARM RESET 20 60 100 LMT 40 80 ZX S 400L VOLT AGE ST EP CURRENT OUT PUT PRESE T OVP OCP POWER FUNC LOCAL LOCK DISPLAY A B C MEMORY CC CV O UTPUT PO WER ST EP PRESET FUNC REMO TE LO CK AL ARM RESET 20 60 100 LMT 40 80 ZX S 40...

Page 65: ...mands and respones are ASCII character strings One character space is required between command words and parameters Ex ADDRess 1 Within text command word stands for command characters such as ADDRess OUTPut etc Further program message stands for a series of send strings such as ALM CONTain CC etc QUERY Command Within commands there are two types SET commands and QUERY commands SET commands are com...

Page 66: ...t Form OUTPu Recognized as illegal command Inputting SCPI Commands SCPI commands use the following hierarchical structure Ex ALM Root Command CLEar Command CONTain Pass Command CC NRf Command Parameters NRf is a number parameter Omit when inputting CV Query Command The program message must begin with the root command with the OPTION command omitted Root commands with an OPTION command are processe...

Page 67: ... pointers also will not be affected by Common Commands Ex ALM CLEAR IDN CONTAIN CC Delimiter Please attach any of the following to the end of the program message CR LF CR LF CR Carriage Return 0x0d LF Line Feed 0x0A Executing Commands Commands will execute in the order in which they appear in the program message Invalid commands are interpreted as errors and will not be executed If valid and inval...

Page 68: ...and Type IDN Requests device information QUERY Only RST Resets set parameters SET Only IDN Identification Query Function Retrieves device information Name of Manufacturer Name of Model Software Version Format IDN Type QUERY command only Response Name of Manufacturer Name of Model Software Version Restrictions Alarm response is returned for normal SET commands in the following conditions Sequence o...

Page 69: ...ice Address Function Assigns the device address for ZX power supplies Format ADDRess NRf Type SET command only Range 0 50 Address 0 is a global address Assign addresses to all multi connected ZX S Series DC power supplies Once the global address is assigned only Output ON OFF Toggle SET command OUTPut STATe is valid Further no Acknowledge Responses will be sent only while the global address is ass...

Page 70: ...ncels generated Over Voltage Over Current alarm Format ALM CLEar Type SET command only No parameters Ex ALM CLE ALM CONTain CC Sets whether to contain CC_STS in LEVEL1_ALM Function Sets whether to contain CC_STS status in LEVEL1_ALM output condition Same settings as FUNCTION Settings Item 75 Format ALM CONTain CC NRf Type SET command QUERY command Parameters 0 Does not include in LEVEL1_ALM 1 Incl...

Page 71: ...attached While operating as parallel operation slave unit Sequence operation in progress Ex ALM CONT CV 0 ALM CONT CV 0 ALM CONTain PL Sets whether to contain PL_STS in LEVEL1_ALM Function Sets whether to contain PL_STS status in LEVEL1_ALM output condition Same settings as FUNCTION Settings Item 76 Format ALM CONTain PL NRf Type SET command QUERY command Parameters 0 Does not include in LEVEL1_AL...

Page 72: ...in PONB NRf Type SET command QUERY command Parameters 0 Does not include in LEVEL1_ALM 1 Includes in LEVEL1_ALM Response Same as parameters Restrictions Alarm response is returned for normal SET commands in the following conditions If analog option is not attached Type which A is not attached to end of name like ZX S 400H While operating as a parallel operation slave unit Sequence operation in pro...

Page 73: ...WER is ON Both MODE Sets Startup Mode Both STATe Sets Output ON OFF Both OUTPut DELay ON Sets Output ON Delay Time Function Sets Output ON Delay Time Same as FUNCTION Settings Item 8 Format OUTPut DELay ON NRf Type SET command QUERY command Parameters 0 00 99 99 Response Same as parameters Restriction Alarm response is returned for normal SET commands in the following conditions While operating as...

Page 74: ... in progress Ex OUTP DEL OFF 56 78 OUTP DEL OFF 56 78 OUTPut EXTernal MODE Sets operation mode for Output Contorl at External Contact Points Function Sets operation mode for Output Control at External Contact Points Same as FUNCTION Settings Item 11 Format OUTPut EXTernal MODE NRf Type SET command QUERY command Paramters 0 Invalid 1 When close Output is ON When open Output is OFF 2 When close norm...

Page 75: ...llowing conditions While operating as a series operation slave unit While operating as a parallel operation slave unit Sequence operation in progress Ex OUTP HOT 1 OUTP HOT 1 OUTPut MODE Sets Startup Mode Function Sets the Output Startup Mode Same settings as FUNCTION Settings Item 2 Format OUTPut MODE NRf Type SET command QUERY command Paramters 0 CV Priority High Speed 1 CC Priority High Speed 2...

Page 76: ...t STATe String Type SET command QUERY command Paramters ON Output ON OFF Output OFF Response Same as parameter Restrictions Alarm response is returned for normal SET commands in the following conditions While operating as series operation slave unit While operating as parallle operation slave unit Ex OUTP ON OUTP ON ...

Page 77: ...ary Command Type MEASure CORRection MODE Sets operation mode for the Linear Compensation Function Both MVAV Sets Moving Average process for measurement values Both SCALar CURRent DC Retrieves current measurement values QUERY only POWer DC Retrieves power measurement values QUERY only VOLTage DC Retrieves voltage measurement values QUERY only ...

Page 78: ...g conditions While operating as a parallel operation slave unit Sequence operation in progress Ex MEAS CORR MODE 0 MEAS CORR MODE 0 MEASure MVAV Sets Moving Average process for Measurement Values Function Sets the Moving Average process for Measurement Values Same settings as FUNCTION Settings Item 12 Format MEASure MVAV NRf Type SET command QUERY command Parameters 0 Moving Average for measured v...

Page 79: ...wer measurement values Format MEASure SCALar POWer DC Type QUERY command only Response Returns same resolution data as the Power Meter Restrictions Alarm response is returned for normal SET commands in the following conditions While operating as a parallel operation slave unit Ex ZX S 400H Idependent Operation MEAS POW 400 0 MEASure SCALar VOLTage DC Retrives Voltage Measurement Values Function Re...

Page 80: ...el Sets OCP Current Both SLEW RISing Sets CC Slew Rate Rising Both FALLing Sets CC Slew Rate Falling Both MEMory RECall Loads from Panel Memory SET only MODE Sets Loading Order for Panel Memory Both STORe Saves to Panel Memory SET only RESistance LEVel IMMediate AMPLitude Sets Internal Resistance Both VOLTage LEVel IMMediate AMPLitude Sets Output Voltage Both PROTection LEVel Sets OVP Voltage Both...

Page 81: ...00H HA 1600H HA 1 Idependent Operation 0 000 5 250 0 00 10 50 0 00 21 00 2 0 00 10 50 0 00 21 00 0 00 42 00 3 0 00 15 75 0 00 31 50 0 00 63 00 4 0 00 21 00 0 00 42 00 0 00 84 00 5 0 00 26 25 0 00 52 50 0 0 105 0 6 0 00 31 50 0 00 63 00 0 0 126 0 7 0 00 36 75 0 00 73 50 0 0 147 0 8 0 0 42 00 0 00 84 00 0 0 168 0 9 0 00 47 25 0 00 94 50 0 0 189 0 10 0 00 52 50 0 0 105 0 0 0 210 0 Restrictions Alarm ...

Page 82: ...HA 800H HA 1600H HA 1 Idependent Operation 0 1 5 5 0 2 11 0 0 4 22 0 2 0 2 11 0 0 4 22 0 0 8 44 0 3 0 3 16 5 0 6 33 0 1 2 66 0 4 0 4 22 0 0 8 44 0 1 6 88 0 5 0 5 27 5 1 0 55 0 2 0 110 0 6 0 6 33 0 1 2 66 0 2 4 132 0 7 0 7 38 5 1 4 77 0 2 8 154 0 8 0 8 44 0 1 6 88 0 3 2 176 0 9 0 9 49 5 1 8 99 0 3 6 198 0 10 1 0 55 0 2 0 110 0 4 0 220 0 Restrictions Alarm response is returned for normal SET command...

Page 83: ... HA 1 Idependent Operation 0 01 10 00 0 01 20 00 0 01 40 00 2 0 01 20 00 0 01 40 00 0 01 80 00 3 0 01 30 00 0 01 60 00 0 1 120 0 4 0 01 40 00 0 01 80 00 0 1 160 0 5 0 01 50 00 0 1 100 0 0 1 200 0 6 0 01 60 00 0 1 120 0 0 1 240 0 7 0 01 70 00 0 1 140 0 0 1 280 0 8 0 01 80 00 0 1 160 0 0 1 320 0 9 0 01 90 00 0 1 180 0 0 1 360 0 10 0 1 100 0 0 1 200 0 0 1 400 0 Restrictions Alarm response is returned...

Page 84: ...eries operation slave unit While operating as a parallel operation slave unit Ex ZX S 400H Idependent Operation CURR SLEW FALL 10 CURR SLEW FALL 10 00 SOURce MEMory RECall Loads from Panel Memory Function Loads from panel memory A B C Format SOURce MEMory RECall String Type SET command only Parameters A Loads from panel memory A and overwrites current settings B Loads from panel memory B and overw...

Page 85: ...g as a series operation slave unit While operating as a parallel operation slave uni Sequence operation in progress Ex MEM REC MODE 1 MEM REC MODE 1 SOURce MEMory STORe Saves to Panel Memory Function Saves to panel memroy A B C Format SOURce MEMory STORe String Type SET command only Parameters A Overwrites current settings to panel memory A B Overwrites current settings to panel memory B C Overwri...

Page 86: ...ion 0 0 128 0 0 0 64 0 0 0 32 0 2 0 0 64 0 0 0 32 0 0 0 16 0 3 0 0 42 7 0 0 21 3 0 0 10 7 4 0 0 32 0 0 0 16 0 0 0 8 0 5 0 0 25 6 0 0 12 8 0 00 6 40 6 0 0 21 3 0 0 10 7 0 00 5 33 7 0 0 18 3 0 00 9 14 0 00 4 57 8 0 0 16 0 0 00 8 00 0 00 4 00 9 0 0 14 2 0 00 7 11 0 00 3 56 10 0 0 12 8 0 00 6 40 0 00 3 20 Restrictions Alarm response is returned for normal SET commands in the following conditions If an...

Page 87: ... While operating as a series operation slave unit While operating as a parallel operation slave unit Sequence operation in progress Ex VOLT 640 VOLT 640 0 SOURce VOLTage PROTection LEVel Sets OVP Voltage Function Sets the OVP voltage Format SOURce VOLTage PROTection LEVel NRf Type SET command QUERY command Parameters 10 704 Response Same as parameters Restrictions Alarm response is returned for no...

Page 88: ... operating as a parallel operation slave unit Sequence operation in progress Ex VOLT SLEW RIS 1280 VOLT SLEW RIS 1280 0 SOURce VOLTage SLEW FALLing Sets CV Slew Rate Falling Function Sets the CV slew rate for falling Same settings as FUNCTION Settings Item 4 Format SOURce VOLTage SLEW FALLing NRf Type SET command QUERY command Parameters 1 0 1280 0 Response Same as parameters Restrictions Alarm re...

Page 89: ...5 OVP_STS OVP Adjustment Status 1 Above OVP level Below OVP level 14 OCP_STS OCP Adjustment Status 1 Above OCP level Below OCP level 13 CP_STS CP Operation Status CP operating Not CP 12 EXT_ON Output ON OFF Input Status at External Contact ON OFF 11 SYS_ALM System error Error Normal 10 DD_ON_STS DC DC Output Status ON OFF 9 MST BST_STS Master Booster Status 2 Booster 2 Master 8 P ON_B_STS P ON Boo...

Page 90: ...at is running as a slave unit under parallel operation Ex STAT MEAS COND 000184 P ON_B P ON_M PL_STS represents state of 1 STATus MEASure PARallel Retrives No of Parallel Connected Devices Function Retrives the number of device connected parallel Total number of Parallel Operation Slave units connected to the Master Format STATus MEASure PARallel Type QUERY command only Response 1 10 Ex STAT MEAS ...

Page 91: ... Both CONTrol CURRent MODE Sets mode for Current Settings Control Method Both VOLTage MODE Sets mode for Voltage Settings Control Method Both ERRor Reads Error Message QUERY only KEYLock MODE Sets LOCK mode Both MONitor MODE Sets Voltmeter Ammeter Display when Output is OFF Both PRESet MODE Sets method to determine PRESET contents Both SERies Sets Master and Slave for Series Operation Both SINK Se...

Page 92: ...le operating as a parallel operation slave unit Sequence operation in progress Ex SYST COMM SER BAUD 3 SYST COMM SER BAUD 38400 SYSTem COMMunicate SERial RECeive PACE Sets Acknowledge Response Function sets the Acknowledge Response Format SYSTem COMMunicate SERial RECeive PACE String Type SET command QUERY command Parameters ACK Returns OK when normal command is received Default Setting OFF Does n...

Page 93: ...whether to add on units to the Query Response Format SYSTem COMMunicate SERial UNIT Nrf Type SET command QUERY command Parameters 0 Do not add units Default Settings 1 Add on units Response Same as parameters Explanation If set to Add on unit the units shown below will be added on to the response V Added to responses for Output Voltage Settings OVP Settings Voltmeter Measurement Query commands A A...

Page 94: ...perating as a parallel operation slave unit Sequence operation in progress Ex SYST CONT CURR MODE 1 SYST CONT CURR MODE 1 SYSTem CONTrol VOLTage MODE Sets Mode for Voltage Setting Control Method Function Sets mode for the method on setting the voltage Same settings as FUNCTION Settings Item 70 Format SYSTem CONTrol VOLTage MODE NRf Type SET command QUERY command Parameters 0 Front Panel Digital Co...

Page 95: ...d instead of numeral in parameter etc 109 Missing parameter Too few parameters 120 Numeric data error Numerical data error Exceeds range etc 140 Character data error Character data error 150 String data error String data error 900 Unmounted analog option board Cannot execute due to analog option board is unmounted 901 Unmounted CP option board Cannot execute due to CP option board is unmounted 902...

Page 96: ...ng as a series operation slave unit While operating as a parallel operation slave unit Sequence operation in progress Ex SYST KEYL MODE 1 SYST KEYL MODE 1 SYSTem MONitor MODE Sets Voltmeter Ammeter Display when Output is OFF Function Sets the displays for the voltmeter and ammeter when output is turned OFF Same settings as FUNCTION Settings Item 52 Format SYSTem MONitor MODE NRf Type SET command Q...

Page 97: ... SYST PRES MODE 0 SYST PRES MODE 0 SYSTem SERies Sets Master and Slave for Series Operation Function Sets the Master and Slave for Series Operation Same settings as FUNCTION Settings Item 73 Format SYSTem SERies NRf Type SET command QUERY command Parameters 0 Master 1 Slave Response Same as parameters Restrictions Alarm response is returned for normal SET commands in the following conditions If an...

Page 98: ...se is returned for normal SET commands in the following conditions While operating as a series operation slave unit While operating as a parallel operation slave unit Sequence operation in progress Ex SYST SINK ON SYST SINK ON SYSTem TRIP Executes TRIP Function Executes input power relay TRIP Format SYSTem TRIP Type SET command only Parameters None Ex SYST TRIP This command can only be used for 16...

Page 99: ...TRIP is detected severe breakdown OVP OCP triggered Restrictions Alarm response is returned for normal SET commands in the following conditions All ZX Series power supplies excluding 1600W models SET command only While operating as a parallel operation slave unit Sequence operation in progress Ex SYST TRIP MODE 1 SYST TRIP MODE 1 Serious failure is defined as when an alarm cannot be canceled via c...

Page 100: ...t Sequence Operating Execution Frequency Finished OUTPUT OFF Both STATus Retrieving Sequence Operating Status QUERY only SEQuence MODE Sets Sequence Operating mode Function Sets the sequence operating mode Same settings as FUNCTION Settings Item 100 Format SEQuence MODE NRf Type SET command QUERY command Parameters 0 Invaild 1 Vaild Normal mode 2 Vaild Continue mode Response Same as parameters Res...

Page 101: ...hile operating as a parallel operation slave unit Sequence operation in progress Ex SEQ COUNt 1 SEQ COUNt 1 SEQuence MEMA Sets Memory A Operating Time Function Sets the memory A operating time Same settings as FUNCTION Settings Item 102 104 Format SEQuence MEMA 1 2 3 Type SET command QUERY command Parameters 1 0 999 h 2 0 59 m 3 0 0 59 9 s Response Same as parameters Restrictions Alarm response is...

Page 102: ...operating as a parallel operation slave unit Sequence operation in progress Ex SEQ MEMB 100 10 10 0 SEQ MEMB 100 10 10 0 SEQuence MEMC Sets Memory C Operating Time Function Sets the memory C operating time Same settings as FUNCTION Settings Item 108 110 Format SEQuence MEMC 1 2 3 Type SET command QUERY command Parameters 1 0 999 h 2 0 59 m 3 0 0 59 9 s Response Same as parameters Restrictions Alar...

Page 103: ...as a parallel operation slave unit Sequence operation in progress Ex SEQ OFF 100 10 10 0 SEQ OFF 100 10 10 0 SEQuence OUTPut Sequence Operating Execution Frequency Finished OUTPUT OFF Function Sets the sequence operating execution frequency finished OUTPUT OFF Same settings as FUNCTION Settings Item 114 Format SEQuence OUTPut NRf Type SET command QUERY command Parameters 0 Invaild 1 vaild Response...

Page 104: ...eving sequence operating status Format SEQuence STATus Type QUERY only Response 1 2 3 1 Sepuence main state 0 Stopped 1 In action 2 Sepuence sub state 0 Waiting 1 Memory A operation 2 Memory A operation 3 Memory A operation 4 OUTPUT OFF 3 Seqence operating number of times 0 Continues action 1 9999 Ex SEQ STAT 1 1 1000 ...

Page 105: ...mand Functions Page No A Assigns device address Page 103 AR Executes alarm reset Page 103 CL Resets set parameters Page 103 LC Sets OCP current Page 104 LV Sets OVP voltage Page 104 MC Sets output current Page 105 MV Sets output voltage Page 105 OT Sets output ON OFF Page 106 TP Executes breaker trip Page 106 Read Back Command List Command Name Read Back Command Functions Page No TK0 Read back set...

Page 106: ...efined command is received When command parameters exceed the range When a character or symbol other than numerals 0 9 and decimal point is sent in parameters When sent with a single parameter containing more than 2 decimal points When sent with spaces between the command and parameter Ex MV_35 Space When a command is sent in lowercase Ex mv35 When a string received at one time until delimiter is ...

Page 107: ...1 to ZX power supply Ex A1 OT1 A2 OT1 Errors due multple address assignment commands AR Executes Alarm Reset Function Executes alarm reset cancels triggered OVP OCP alarms Format AR Set value Set value 1 Resets alarms Values other than 0 and 1 result in parameter errors 0 does nothing Ex A1 AR1 CL Resets Set Parameters Function Resest the set parameters Format CL Set value Set Value 1 Resest to fa...

Page 108: ...H HA 800H HA 1600H HA 1 Idependent Operation 0 1 5 5 0 2 11 0 0 4 22 0 2 0 2 11 0 0 4 22 0 0 8 44 0 3 0 3 16 5 0 6 33 0 1 2 66 0 4 0 4 22 0 0 8 44 0 1 6 88 0 5 0 5 27 5 1 0 55 0 2 0 110 0 6 0 6 33 0 1 2 66 0 2 4 132 0 7 0 7 38 5 1 4 77 0 2 8 154 0 8 0 8 44 0 1 6 88 0 3 2 176 0 9 0 9 49 5 1 8 99 0 3 6 198 0 10 1 0 55 0 2 0 110 0 4 0 220 0 Ex A1 LC5 5 LV Sets OVP Voltage Function Sets the OVP voltag...

Page 109: ... 400H HA 800H HA 1600H HA 1 Idependent Operation 0 00 5 250 0 00 10 50 0 00 21 00 2 0 00 10 50 0 00 21 00 0 00 42 00 3 0 00 15 75 0 00 31 50 0 00 63 00 4 0 00 21 00 0 00 42 00 0 00 84 00 5 0 00 26 25 0 00 52 50 0 0 105 0 6 0 00 31 50 0 00 63 00 0 0 126 0 7 0 00 36 75 0 00 73 50 0 0 147 0 8 0 00 42 00 0 00 84 00 0 0 168 0 9 0 00 47 25 0 00 94 50 0 0 189 0 10 0 00 52 50 0 0 105 0 0 0 210 0 Ex A1 MC4...

Page 110: ...akdown 2 Execute input power relay trip When TRIP is detected severe breakdown OVP OCP triggered Values other than 0 1 or 2 result in parameter errors Ex A1 TP1 Serious failure is defined as when an alarm can be canceled via command or by panel reset holding down the A and C key Restart device with power switch Serious failure Error See page 32 for details on WDT OHP AD OV P_ERR BST ALM Device Det...

Page 111: ...Set Value See page 105 Output Current Ranges for Max no of decimal places 4 OVP Voltage Set Values Max no of decimal places is 2 5 OCP Current Set Value See page 104 OCP Current Ranges for Max no of decimal places 6 Output ON OFF Status Ex A1 TK0 A1 MV80 00 MC5 00 LV704 0 LC5 250 OT0 TK1 Read Back Measurement Data Voltage Current Function Retrives measured voltage current values from the ZX power ...

Page 112: ...as 0 or 1 STAT 6 0 Retrived Status Information List Bit Status Name Summary 1 0 0 P ON M _STS P ON Master Status Main Power Supply ON Main Power Supply OFF 1 OHP_ALM OHP Over Heating Protection Error Error Normal 2 PL_STS Power Delimiter Operation Status Power Delimiter running Normal 3 OCP_ALM OCP Over Current Protection Error Error Normal 4 OVP_ALM OVP Over Voltage Protection Error Error Normal ...

Page 113: ...cified ZX power supply s Output Voltage Measurement Value Max no of decimal places is 2 Ex A1 TK4 10 00V TK5 Read Back Measured Current Data Function Retrives the measured current data from the ZX power supply with the specified device address Format TK5 Read Back Format A Read Back Value Read Back Value Specified ZX power supply s Output Current Measurement Value See page 106 Output Current Range...

Page 114: ...n control functions using multi connecting cables are only usable between ZX S Series power supplies of the same model If wishing to connect other Takasago products which are capable of multi connections please contact our Sales Department for more information ...

Page 115: ...Using via Digital Data Communication 111 This is blank page ...

Page 116: ...T M S CONTROL SENSE DC OUTPUT 100 240 50 60Hz 7A MAX LINE INPUT SERIAL I F 1 SERIAL I F 2 TERMINATION OFF ON IN OUT M S CONTROL SENSE DC OUTPUT 100 240 50 60Hz 7A MAX LINE INPUT 負 荷 より合わせる より合わせる より合わせる M S CONTROL IN Parallel operation is only possible with devices of the same model Connecting different device models will result in breakdown FUNCTION items for when operating in Slave cannot be se...

Page 117: ...isplay with the Display key to display total power values Error Codes 1 Error Codes Display List for Master Unit Place Items No Display Top No Display Bottom Content WDT E001 Malfunction of CPU AD_OV E002 Input voltage error for DC DC block OHP E003 OHP Over Heating Protection triggered OVP E004 OUP Over Voltage Protection triggered OCP E005 OCP Over Current Protection triggered BST E006 Slave err...

Page 118: ...key Select Item 73 with VOLTAGE dial Change the set value to 1 Slave Mode with CURRENT dial Press the FUNC key again to finalize settings An LA type is necessary for the Slave unit Both the L and LA types can be used for the Master Unit Series operation is only possible with models that have the same number indicated in the xxx part of ZX S xxx Connecting different device models will result in bre...

Page 119: ...Series Parallel Operation 115 Turn the POWER switch OFF Device will operate as Slave unit when the POWER switch is turned ON again In so doing the Output lamp will light This feature is not applicable to H type ...

Page 120: ...Operations on how to do this 4 Press the FUNC key and turn the VOLTAGE dial to display Settings Item 37 in the top Number Display 5 Adjust the Slave unit s settings with the Current dial to match the measured Master Unit s output voltage displayed on the digital multimeter FUNC lamp will light and the display in bottom Number Display will disappear MEMO CC CV OUTPUT POWER STEP CURRENT STEP VOLTAGE...

Page 121: ...nit to complete output voltage full scale calibration 12 This completes offset full scale calibration for the output voltage Please return voltage set values back to normal before use CC CV OUTPUT POWER STEP CURRENT STEP VOLTAGE PRESET FUNC REMOTE LOCK 20 60 100 LMT 40 80 OUTPUT PRESET OVP OCP FUNC ALARM RESET OUTPUT PRESET OVP OCP FUNC ALARM RESET CC CV OUTPUT POWER STEP CURRENT STEP VOLTAGE PRES...

Page 122: ...in No 2 and 3 and connect it to M S CONTROL IN as shown in the diagram below Cable connector XG5M 1432 N or XG5M 1435 N OMRON Connector Semi Cover XG5S 0701 OMRON Contact XG5W 0031 N for XG5M 1432 N OMRON XG5W 0034 N for XG5M 1432 N OMRON Crimping XY2B 7006 OMRON Extracting Tool XY2E 0001 OMRON Not suited for power contact such as main contact points for electromagnetic contactors or power relays ...

Page 123: ...OFF key Parameter 2 Allows the output to be toggled from the panel when the external contacts are closed Also sets the Output OFF if the external contact is opened Output can be controlled by panel or remote command when external contacts are closed Sets output to OFF when contact signal is open regardless of remote command or panel operations Press the FUNC key again to finalize settings Returns ...

Page 124: ...ontrol Terminal External Resistance Terminal B C Curve 8 Output Current Control Terminal External Resistance Terminal A Curve 9 Output Current Control Terminal External Resistance Terminal B C Curve 10 NC 11 Status Output LEVEL1_ALM 12 Status Output CV 13 Status Output P ON 14 Input Cut Off Terminal 15 Monitor Terminal For Output Voltage 16 Analog COM 17 Analog COM 18 Output Voltage Control Termin...

Page 125: ...tatus Master Slave Series Operation How to Insert Wire into Connector Push a flat head screwdriver into the square hole Insert the stripped wire as shown in the right diagram in the hole while the screwdriver is inserted Spring Connection No pin is required for connecting the wire Flat Head Screwdriver Dimensions MEMO Wire Specifications Wire Size AWG 28 18 Stripped Length 7mm 0 4mm 2mm 7mm マイナスドラ...

Page 126: ...e used Factory default settings are set to Invailid Connecting Wire the cables to the external control connector accessory terminal s No 1 and 2 The external control connectors can be simply removed by pushing down the lock levers on both sides 14 ツイストペア線 接点 フォトカプラ または 接点開 出力OFF 接点閉 出力ON 外部接点による 出力のON OFF IN OUT 1 2 Setting Procedures See page 119 for setting procedures Not suited for power conta...

Page 127: ...nal control connectors can be simply removed by lowering the lock levers on both sides 14 ツイストペア線 接点 フォトカプラ または 接点閉 入力しゃ断 外部接点による 入力のしゃ断 IN OUT 14 2 Shutdowning with short circuit make of contact b is standard Shutdowning with opening break of contact a by option is also possible Please contact TAKASAGO Not suited for power contacts such as main contacts for electromagnetic contactors or power re...

Page 128: ...age V Max Output Voltage V The output accuracy for the external resistance is the set voltage 0 2 of Rated Output Voltage when 10kΩ Connecting Connect the resistor to accessory connector terminals No 6 and 18 IN OUT 18 6 外部抵抗 0 Ω Setting Procedures Set to parameter 2 External Resistance Type A according to the procedure on page 125 The External Resistance A B and C and the External Voltage cannot ...

Page 129: ...ce 0 Ω A 3 External Resistance 0 Ω B 4 External Resistance 0 Ω C Press the FUNC key again to finish Returns Number Display back to measurement display mode Canceling Output Voltage Control via External Voltage Resistance To cancel select Item number 70 and set the parameter to 0 with the CURRENT dial OUTPUT PRESET OVP OCP FUNC ALARM RESET OUTPUT PRESET OVP OCP FUNC ALARM RESET CC CV OUTPUT POWER S...

Page 130: ...the set voltage 0 1 of Rated Output Voltage Connecting Connect the resistor to accessory connector terminals No 7 and 19 IN OUT 19 7 外部抵抗 0 10kΩ Setting Procedures Set to parameter 3 External Resistance Type B according to the procedure on page 125 MAX 0 外部抵抗 出 力 電 圧 CV_RB 10kΩ The External Resistance A B and C and the External Voltage cannot be used together to control the output If the external ...

Page 131: ...ltage 0 1 of Rated Output Voltage Connecting Connect the resistor to accessory connector terminals No 7 and 19 IN OUT 19 7 外部抵抗 0 10kΩ Setting Procedures Set to parameter 4 External Resistance Type C according to the procedure on page 125 MAX 0 外部抵抗 出 力 電 圧 CV_RC 10kΩ The External Resistance A B and C and the External Voltage cannot be used together to control the output Caution Output voltage Ext...

Page 132: ...mula Output Voltage V Max Output Voltage V The output accuracy for the external voltage is the set voltage 0 1 of Rated Output Voltage Connecting Connect the voltage source to accessory connector terminals No 4 and 5 IN OUT 4 5 外部電圧 0 10V Setting Procedures Set to parameter 1 External Voltage according to the procedure on page 125 The External Resistance A B and C and the External Voltage cannot b...

Page 133: ...rrent A Max Output Current A The output accuracy for the external resistance is the set current 1 of Rated Output Current when 10kΩ Connecting Connect the resistor to accessory connector terminals No 6 and 18 IN OUT 8 6 外部抵抗 0 Ω Setting Procedures Set to parameter 2 External Resistance Type A according to the procedure on page 130 MAX 0 外部抵抗 出 力 電 圧 CV_RA 10kΩ MAX 1 2 The External Resistance A B a...

Page 134: ...nal Resistance 0 10kΩ B 4 External Resistance 0 10kΩ C Press the FUNC key again to finish Returns the Number Display back to measurement display mode Canceling Output Voltage Current via External Voltage Resistance To cancel select Item number 70 and set the parameter to 0 with the CURRENT dial OUTPUT PRESET OVP OCP FUNC ALARM RESET OUTPUT PRESET OVP OCP FUNC ALARM RESET CC CV OUTPUT POWER STEP CU...

Page 135: ...he set current 0 5 of Rated Output Current Connecting Connect the resistor to accessory connector terminals No 9 and 21 IN OUT 21 9 外部抵抗 0 10kΩ Setting Procedures Set to parameter 3 External Resistance Type B according to the procedure on page 130 The External Resistance A B and C and the External Voltage cannot be used together to control the output If the external resistance opens for even a sec...

Page 136: ...current 0 5 of Rated Output Current Connecting Connect the resistor to accessory connector terminals No 9 and 21 IN OUT 21 9 外部抵抗 0 10kΩ Setting Procedures Set to parameter 4 External Resistance Type C according to the procedure on page 130 MAX 0 外部抵抗 出 力 電 流 CC_RC 10kΩ The External Resistance A B and C and the External Voltage cannot be used together to control the output The system is a fail saf...

Page 137: ...produce a 1mA current The output current is derived from the following formula Output Current V Max Output Current V The output accuracy for the external resistance is the set current 0 5 of Rated Output Current Connecting Connect the power supply to accessory connector terminals No 4 and 20 IN OUT 4 20 外部電圧 0 10V Setting Procedures Set to parameter 1 External Voltage according to the procedure on...

Page 138: ...put Voltage Monitor The accuracy for the output voltage monitor is 0 2 2mV Connecting Connect the meter or recorder to accessory connector terminals No 4 and 15 Output Current Monitor The accuracy for the output current monitor is 0 5 2mV Connecting Connect the meter or recorder to accessory connector terminals No 3 and 4 IN OUT 4 15 V IN OUT 4 3 V Output current wave forms cannot be observed by t...

Page 139: ... logic is 1 See the following for details on each terminal s signals Terminal Signal Name Contents 11 LEVEL1_ALM Light failure OVP OCP has occurred 24 LEVEL2_ALM Alarm has occurred Indude Several Alarms 12 CV_STS Running in Constant Voltage Mode 25 CC_STS Running in Constant Current Mode 13 P ON M _STS Internal rectification voltage and power supply for control circuits is normal 26 S COM Status C...

Page 140: ...ey FUNC lamp will light Settings Item Number top and parameters bottom will appear in the Number Display Select the Item number with the VOLTAGE dial Item 74 CV_STS Item 75 CC_STS Item 76 PL_STS Change the parameters with the CURRENT dial 0 Not include in LEVEL_ALM 1 Included in LEVEL_ALM Press the FUNC key again to finalize settings Returns the Number Display to measurement display mode OUTPUT PR...

Page 141: ...Controlling with External Analog Contact Signals 137 This is blank page ...

Page 142: ...neral when charge current is above 2A it is necessary to cool D1 by attaching an appropriate radiator to it Connection for Battery Charging Set the OUTPUT key settings to TOGGLE when the input power switch is turned ON Factory default settings Press The Function FUNC key FUNC lamp will light Settings Item Number top and parameters bottom will appear in the Number Display Select Item number 51 with...

Page 143: ...nstant Current Power Supply on how page 19 Set the charge terminal voltage with the VOLTAGE dial Set only the forward voltage to D1 high 0 6V 0 8V When finished press the FUNC key again to finalize settings Press the OUTPUT key to begin testing As charging with the constant current progresses switch to constant voltage with the charge terminal voltage CC CV OUTPUT POWER STEP CURRENT STEP VOLTAGE P...

Page 144: ...charge current with the CURRENT dial See Operating as a Constant Current Power Supply on how Set the maximum voltage with the VOLTAGE dial Deriving the maximum output voltage VMAX VMAX open circuit voltage of battery discharge terminal voltage V When finished press the FUNC key again to finalize settings Close S1 and press the OUTPUT key to begin testing When the discharge terminal voltage is reac...

Page 145: ...tput voltage Please use specialized break units etc to suppress the generation of over voltage when there is regenerative reverse current in the motor inverter load Reverse Current IR Power Supply VO Dummy Resistor RS Load When R I Vo Rs Caution The ZX S Series power supply does not possess any function which will stabilize the output voltage against the reverse current generated from the load If ...

Page 146: ... current is in a pulsing state This cannot be determined by this device s ammeter alone due that it only displays the average output current value If the constant current circuit power limit circuit is triggered intermittently by the peak current the CC lamp or LIMIT lamp will appear dimly lit or blinking For this type of load stability can be improved by connecting high capacity capacitors to the...

Page 147: ...Special Loads 143 This is blank page 守 ...

Page 148: ...e other entity other than Takasago shall impose a fee Requests When making repair requests please include the device s product number 12 digit number at base of product and firmware version number See page 15 Daily Maintenance and Inspection Please perform periodic inspections of the device to maintain product performance and prevent unforeseen accidents In particular due to the easy accumulation ...

Page 149: ...an air gun or vacuum cleaner If accumulation is severe wipe the area with a synthetic detergent diluted in water and allow it to dry before attaching the panel To remove the panel Example with ZX S 400H Cleaning Panels Using a synthetic detergent diluted in water wipe the panels lightly using a cloth and then wipe with a dry cloth Do not use solvents such as paint thinner or benzene Inspecting Cab...

Page 150: ...Replacing Fan Motor Remove the four M3 screws attached to the fan motor Pull out the fan motor Disconnect the power wire connector black attached to the circuit board Connect the new fan motor s connector Insert the fan motor while being careful not to pinch the wire between the fan motor and rear panel and screw in the four screws Connect to the input power supply and turn the POWER switch ON Ver...

Page 151: ...l lifespan of parts It is recommend changing parts after 5 and 10 years to ensure prolong use Please be careful not to place this product in high temperature and humidity environments areas with corrosive gases dust or oils Doing so will shorten the lifespan of parts Caution Year 0 1 2 3 4 5 6 7 8 9 10 11 12 Remarks Fan Relay Aluminum Electrolytic Capacitor Initial Malfunction Part ...

Page 152: ...A with the CURRENT dial See Operating as Constant Voltage Power Supply under Basic Operations on how 3 Press the PRESET key again and then press the OUTPUT key to set output to ON 5 Adjust so that the digital multimeter used for output voltage measurement displays 0 100V with the CURRENT dial 6 Press the FUNC key to complete offset calibration of the output voltage settings FUNC lamp will light an...

Page 153: ...ut Voltage Settings Please return the voltage current set values back to normal before use FUNC lamp will light and the display on the bottom Number Display will light out MEMO OUTPUT PRESET OVP OCP FUNC ALARM RESET CC CV OUTPUT POWER STEP CURRENT STEP VOLTAGE PRESET FUNC REMOTE LOCK 20 60 100 LMT 40 80 CC CV OUTPUT POWER STEP CURRENT STEP VOLTAGE PRESET FUNC REMOTE LOCK 20 60 100 LMT 40 80 OUTPUT...

Page 154: ...plays to 0 010mV For 400H use 10mA with the CURRENT dial For 800H HA use 0 005mV equivalent to 10mA For 1600H HA use 0 025mV equivalent to 100mA Set FUNCTION Settings Item 1 Sink Function to 1 1 ON and Settings Item 13 Linearity compensation Function to 0 0 OFF beforehand Caution FUNC lamp will light and the display on the bottom Number Display will light out MEMO CC CV OUTPUT POWER STEP CURRENT S...

Page 155: ...he FUNC key to complete full scale calibration of the output current settings 1 2 This completes offset full scale calibration of Output Current Settings Please return the voltage current set values back to normal before use CC CV OUTPUT POWER STEP CURRENT STEP VOLTAGE PRESET FUNC REMOTE LOCK 20 60 100 LMT 40 80 CC CV OUTPUT POWER STEP CURRENT STEP VOLTAGE PRESET FUNC REMOTE LOCK 20 60 100 LMT 40 ...

Page 156: ...tings 5 Press the OVP key Set to 704 0V with the VOLTAGE dial 6 Input an external voltage of 0 00V 7 Press the OUTPUT key to set output to ON Calibration Circuit Digital Multimeter CC CV OUTPUT POWER STEP CURRENT STEP VOLTAGE PRESET FUNC REMOTE LOCK 20 60 100 LMT 40 80 CC CV OUTPUT POWER STEP CURRENT STEP VOLTAGE PRESET FUNC REMOTE LOCK 20 60 100 LMT 40 80 OUTPUT PRESET OVP OCP FUNC ALARM RESET V ...

Page 157: ...asurement displays to 640 0V with the CURRENT dial 14 Press the FUNC key to complete full scale calibration of output voltage control with external voltage 15 This completes offset full scale calibration of output voltage control with external voltage OUTPUT PRESET OVP OCP FUNC ALARM RESET CC CV OUTPUT POWER STEP CURRENT STEP VOLTAGE PRESET FUNC REMOTE LOCK 20 60 100 LMT 40 80 CC CV OUTPUT POWER S...

Page 158: ...ternal resistance to infinity open 7 Press OUTPUT key to set the output to ON Calibration Circuit Digital Multimeter CC CV OUTPUT POWER STEP CURRENT STEP VOLTAGE PRESET FUNC REMOTE LOCK 20 60 100 LMT 40 80 CC CV OUTPUT POWER STEP CURRENT STEP VOLTAGE PRESET FUNC REMOTE LOCK 20 60 100 LMT 40 80 OUTPUT PRESET OVP OCP FUNC ALARM RESET V Power Supply OUTPUT PRESET OVP OCP FUNC ALARM RESET IN OUT 18 6 ...

Page 159: ...surement displays to 640 0V with the CURRENT dial 14 Press the FUNC key to complete full scale calibration of output voltage control with external resistance A 15 This completes offset full scale calibration of output voltage control with external resistance A CC CV OUTPUT POWER STEP CURRENT STEP VOLTAGE PRESET FUNC REMOTE LOCK 20 60 100 LMT 40 80 CC CV OUTPUT POWER STEP CURRENT STEP VOLTAGE PRESE...

Page 160: ... to 0Ω short 7 Press the PRESET key and then the OUTPUT key to set the output to ON Calibration Circuit Digital Multimeter CC CV OUTPUT POWER STEP CURRENT STEP VOLTAGE PRESET FUNC REMOTE LOCK 20 60 100 LMT 40 80 CC CV OUTPUT POWER STEP CURRENT STEP VOLTAGE PRESET FUNC REMOTE LOCK 20 60 100 LMT 40 80 OUTPUT PRESET OVP OCP FUNC ALARM RESET V Power Supply OUTPUT PRESET OVP OCP FUNC ALARM RESET IN OUT...

Page 161: ...ment displays to 640 0V with the CURRENT dial 14 Press the FUNC key to complete full scale calibration of output voltage control with external resistance B 15 This completes offset full scale calibration of output voltage control with external resistance B CC CV OUTPUT POWER STEP CURRENT STEP VOLTAGE PRESET FUNC REMOTE LOCK 20 60 100 LMT 40 80 CC CV OUTPUT POWER STEP CURRENT STEP VOLTAGE PRESET FU...

Page 162: ...al resistance to 10kΩ IN OUT 19 7 外部抵抗 0 10kΩ 7 Press the OUTPUT key to set the output to ON Calibration Circuit Digital Multimeter CC CV OUTPUT POWER STEP CURRENT STEP VOLTAGE PRESET FUNC REMOTE LOCK 20 60 100 LMT 40 80 CC CV OUTPUT POWER STEP CURRENT STEP VOLTAGE PRESET FUNC REMOTE LOCK 20 60 100 LMT 40 80 OUTPUT PRESET OVP OCP FUNC ALARM RESET V Power Supply OUTPUT PRESET OVP OCP FUNC ALARM RES...

Page 163: ...or output voltage measurement displays to 640 0V with the CURRENT dial 14 Press the FUNC key to complete full scale calibration of output voltage control with external resistance C 15 This completes offset full scale calibration of output voltage control with external resistance C CC CV OUTPUT POWER STEP CURRENT STEP VOLTAGE PRESET FUNC REMOTE LOCK 20 60 100 LMT 40 80 CC CV OUTPUT POWER STEP CURRE...

Page 164: ...t to 11 00A For 1600H HA set to 22 00A 6 Input an external voltage of 0 10V IN OUT 4 20 外部電圧 0 10V 7 Press the OUTPUT key to set the output to ON CC CV OUTPUT POWER STEP CURRENT STEP VOLTAGE PRESET FUNC REMOTE LOCK 20 60 100 LMT 40 80 CC CV OUTPUT POWER STEP CURRENT STEP VOLTAGE PRESET FUNC REMOTE LOCK 20 60 100 LMT 40 80 OUTPUT PRESET OVP OCP FUNC ALARM RESET Note Current is 5A for 400H HA 800H H...

Page 165: ...d for output current measurement displays the set value with the CURRENT dial For deriving the set value see Output Current Control with External Voltage 14 Press the FUNC key to complete full scale calibration of output current control with external voltage 15 This completes offset full scale calibration of output current control with external voltage CC CV OUTPUT POWER STEP CURRENT STEP VOLTAGE ...

Page 166: ...Set external resistance to 500kΩ IN OUT 8 6 外部抵抗 0 Ω 7 Press t the OUTPUT key to set the output to ON CC CV OUTPUT POWER STEP CURRENT STEP VOLTAGE PRESET FUNC REMOTE LOCK 20 60 100 LMT 40 80 CC CV OUTPUT POWER STEP CURRENT STEP VOLTAGE PRESET FUNC REMOTE LOCK 20 60 100 LMT 40 80 OUTPUT PRESET OVP OCP FUNC ALARM RESET Note Current is 5A for 400H HA 800H HA is 10A 1600H HA is 20A Use wires which wil...

Page 167: ...for output current measurement displays the set value with the CURRENT dial For deriving the set value see Output Current Control with External Resistance 14 Press the FUNC key to complete full scale calibration of output current control with external resistance A 15 This completes offset full scale calibration of output current control with external resistance A CC CV OUTPUT POWER STEP CURRENT ST...

Page 168: ...00A 6 Set external resistance to 100Ω IN OUT 21 9 外部抵抗 0 10kΩ 7 Press the OUTPUT key to set the output to ON CC CV OUTPUT POWER STEP CURRENT STEP VOLTAGE PRESET FUNC REMOTE LOCK 20 60 100 LMT 40 80 CC CV OUTPUT POWER STEP CURRENT STEP VOLTAGE PRESET FUNC REMOTE LOCK 20 60 100 LMT 40 80 OUTPUT PRESET OVP OCP FUNC ALARM RESET Note current is 5A for 400H HA 800H HA is 10A 1600H HA is 20A Use wires wh...

Page 169: ...r output current measurement displays the set value with the CURRENT dial For deriving the set value see Output Current Control with External Resistance 14 Press the FUNC key to complete full scale calibration of output current control with external resistance B 15 This completes offset full scale calibration of output current control with external resistance B CC CV OUTPUT POWER STEP CURRENT STEP...

Page 170: ... an external resistance to 10kΩ IN OUT 21 9 外部抵抗 0 10kΩ 7 Press the OUTPUT key to set the output to ON Calibration Circuit CC CV OUTPUT POWER STEP CURRENT STEP VOLTAGE PRESET FUNC REMOTE LOCK 20 60 100 LMT 40 80 CC CV OUTPUT POWER STEP CURRENT STEP VOLTAGE PRESET FUNC REMOTE LOCK 20 60 100 LMT 40 80 OUTPUT PRESET OVP OCP FUNC ALARM RESET Digital Multimeter Power Supply V Shunt OUTPUT PRESET OVP OC...

Page 171: ...or output current measurement displays the set value with the CURRENT dial For deriving the set value see Output Current Control via External Resistance 14 Press the FUNC key to complete full scale calibration of output current control with external resistance C 15 This completes offset full scale calibration of output current control with external resistance C CC CV OUTPUT POWER STEP CURRENT STEP...

Page 172: ...nd change the top Number Display to Settings Item 24 with the VOLTAGE dial to display the voltage measurement value at the bottom 5 Adjust the measurement value displayed in the bottom Number Display to the same value as displayed on the digital multimeter used for output voltage measurement with the CURRENT dial CC CV OUTPUT POWER STEP CURRENT STEP VOLTAGE PRESET FUNC REMOTE LOCK 20 60 100 LMT 40...

Page 173: ... display the voltage measurement value at the bottom 10 Adjust the measurement value displayed in the bottom Number Display to the same value as displayed on digital multimeter used for output voltage measurement with the CURRENT dial 11 Press the FUNC key to complete voltmeter full scale calibration 12 This completes voltmeter calibration Please return the CV set values back to normal before use ...

Page 174: ...rrent measurement with the CURRENT dial 6 Press the FUNC key to complete full scale calibration of the ammeter Set FUNCTION Settings Item 1 Sink Function to 1 1 ON and Settings Item 13 Linearity compensation Function to 0 0 OFF beforehand Caution Note Current is 54A for 400H HA 800H HA is 10A 1600H HA is 20A Use wires which will not produce a voltage drop below 0 8V Calibration Circuit CC CV OUTPU...

Page 175: ...s displayed in the digital multimeter mV used for output current measurement with the CURRENT dial 11 Press the FUNC key to complete ammeter full scale calibration 12 This completes ammeter calibration Please return the CC and CV set values back to normal before use OUTPUT PRESET OVP OCP FUNC ALARM RESET CC CV OUTPUT POWER STEP CURRENT STEP VOLTAGE PRESET FUNC REMOTE LOCK 20 60 100 LMT 40 80 OUTPU...

Page 176: ...gain to finalize settings 5 Press the PRESET key again and set to 0 00V with the VOLTAGE dial 6 Press the PRESET key and then the OUTPUT key to set the output to ON Calibration Circuit Digital Multimeter No 1 CC CV OUTPUT POWER STEP CURRENT STEP VOLTAGE PRESET FUNC REMOTE LOCK 20 60 100 LMT 40 80 CC CV OUTPUT POWER STEP CURRENT STEP VOLTAGE PRESET FUNC REMOTE LOCK 20 60 100 LMT 40 80 OUTPUT PRESET...

Page 177: ...or measurement displays Output Voltage Digital Multimeter No 1 8 with the CURRENT dial 1 2 Press the FUNC key to complete full scale calibration of output voltage monitor 13 This completes offset full scale calibration of output voltage monitor CC CV OUTPUT POWER STEP CURRENT STEP VOLTAGE PRESET FUNC REMOTE LOCK 20 60 100 LMT 40 80 CC CV OUTPUT POWER STEP CURRENT STEP VOLTAGE PRESET FUNC REMOTE LO...

Page 178: ...ress the PRESET key and set to 1 00V with the VOLTAGE dial and 5 000A 20 0A with the CURRENT dial For 400H HA set to 5 000A For 800H HA set to 10 00A For 1600H HA set to 20 0A 6 Press the PRESET key 7 Set the load switch S1 to OPEN CC CV OUTPUT POWER STEP CURRENT STEP VOLTAGE PRESET FUNC REMOTE LOCK 20 60 100 LMT 40 80 CC CV OUTPUT POWER STEP CURRENT STEP VOLTAGE PRESET FUNC REMOTE LOCK 20 60 100 ...

Page 179: ...nitor measurement displays Output Current 2 with the CURRENT dial For 400H HA derives from Output Current 2 For 800H HA derives from Output Current 1 For 1600H HA derives from Output Current 2 15 Press the FUNC key to complete full scale calibration of output current monitor 16 This completes offset full scale calibration of output current monitor CC CV OUTPUT POWER STEP CURRENT STEP VOLTAGE PRESE...

Page 180: ...1600HA Power Source AC85V 250V Single Phase 45Hz 65Hz Input Current 1 AC100V Input 6A 12 5A 24A AC200V Input 3A 6A 12A Input Power Factor 2 Above 0 99 Power Efficiency 3 0 74 Rush Current Peak Value AC100V Input 10A 20A 40A AC200V Input 20A 40A 80A AC264V Input 25A 50A 100A Note 1 With rated output power and rated output current 2 With AC100V input rated output power and rated output current 3 Wit...

Page 181: ...set value Resolution 1mA 10mA 10mA Load Regulation 10 Below 0 03 3mA of rated output current Line Regulation 5 Below 0 03 2mA of rated output current Ripple Effective Value 6 2 5mA 5mA 10mA Temperature Coefficient Typical Value 100ppm Note 4 Measurement at sensing point for 0 100 change in rated load current Static Load Change 5 For 10 change in input voltage Static input Change 6 At measurement f...

Page 182: ...ure Accuracy 13 21 0 5 of reading 4digit 4mA 0 5 of reading 1digit 10mA 0 5 of reading 1digit 10mA Temperature Coefficient Typical Value 21 100ppm Power Meter 4 Digit Digital Meter Maximum Display 21 999 9W 999 9W 9999W Accuracy 21 Displays the multiplication value of the voltage measurement value and current measurement value Values under 0 1W are displayed rounded off Power Display Bar Graph Dis...

Page 183: ...vers once values return within ratings Over Heating Protection Circuit Stops switching shuts off output and displays alarms if the temperature of the radiating section heat exceeds 85 1600L LA 95 due to stopped fan motor etc Welds temperature fuses built in the Inrush Limiting Resistors at 135 Excessive Input Current Protection Fuse 10A Fuse 20A Protected by 20A Fuse unit 14 Input switch cut off t...

Page 184: ...roducts with one master unit Master Slave Series Operation 15 Output ON OFF Toggle Control Can be controlled at external contact or photocoupler Monitor Output Output 16 Current 17 15 Master Slave Series Operation is not supported 16 DC10V Output non isolated for rated output voltage Accuracy 0 2 2mV 17 DC10V Output non isolated for rated output current Accuracy 0 5 2mV External Control Specificat...

Page 185: ...is Withstanding Voltage AC 1 5kV 1 minute Between each input and output input and chassis Relative Ground Voltage At peak voltage value within 1000V between Output and Ground Includes output voltage Cooling Specification Models 400H 400HA 800H 800HA 1600H 1600HA Cooling Method Cooling is regulated in response to the output Operational Environment Specification Models 400H 400HA 800H 800HA 1600H 16...

Page 186: ... 130 H 405 D 429 5 W 130 H 405 D Max Dimensions mm 19 107 W 147 H 505 D 214 5 W 147 H 513 D 436 W 139 H 543 D Weight 4 9kg 5 0kg 7 9kg 8 0kg 15 0kg 15 1kg Output Terminal Bar Terminal M5 Screws Input Terminal M4 Screw Terminal Block Note 18 Does not include protruding sections 19 Includes dial rubber legs output terminal cover and carrying belt ...

Page 187: ...er 1 Item M3 6mm screws 2 Items Output Terminal Screws M5 12mm bolts includes flat washers spring wasters 2 Packages Attached to power supply Front Terminal Cover 1 Package Dummy Connector Attached to power supply 2 Items Instruction Manual 1 Item External Control Connector only for 800HA 1 Item 1600H 1600HA Input Power Cable 3 core VCT cable 5 5mm2 1 Item Output Terminal Cover 1 Package Output Te...

Page 188: ... 184 付録 External Diagrams ZX S 400H 400HA 4 M3 ...

Page 189: ...Appendix 185 ZX S 800H 800HA ...

Page 190: ...Appendix 186 ZX S 1600H 1600HA ...

Page 191: ... 400sq 500sq 1 25sq AWG6 0 AWG5 0 AWG4 0 AWG3 0 AWG2 0 AWG1 0 AWG1 AWG2 AWG3 AWG4 AWG5 AWG6 AWG7 AWG8 AWG9 AWG10 AWG11 AWG12 AWG13 AWG14 AWG15 AWG16 AWG17 1A 10A 100A 1000A 1 10 100 1000 推奨導体断面積 mm2 負荷電流 Appendix Load current vs Cross section area Load current Cross section area 𝒎𝒎𝟐 ...

Page 192: ...Copyright 2017 Takasago LTD Address 1 24 16 Mizonokuchi Takatsu ku Kawasaki shi Kanagawa 213 8558 Japan ZX S H HAseries Instruction Manual 2018 3 Rev2 0 DOC 1908 02 ...

Reviews: