156
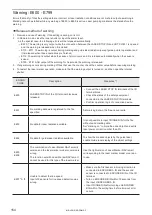
ERROR
CODE
Description
Measures *1
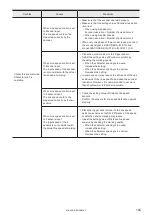
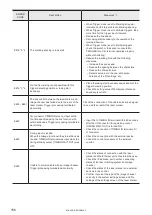
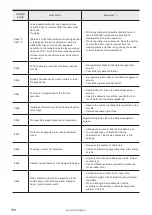
E618 *3, *4
The marking spacing is too small.
• When Trigger mode is set to Marking at regular
intervals, set the larger value to Marking spacing.
• When Trigger mode is set to Multiple triggers, take
more time for the trigger input intervals.
• Decrease the line speed.
• Set Lasing start boundary to the upward of the
moving direction.
• When Trigger mode is set to Multiple triggers,
check the switch or the sensor connected to
TRIGGER IN of I/O terminal operates properly
without chattering.
• Reduce the marking time with the following
measures.
• Increase the scan speed.
• Reduce the spacing between the characters.
• Reduce the character size.
• Set smaller value to the one-shot pulse
duration of the I/O settings, etc.
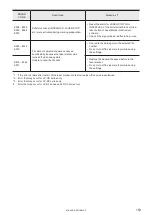
E619 *3, *4
On-the-fly marking is not possible with this
trigger detecting position or lasing start
boundary.
• Place the lasing start boundary downstream of the
trigger detecting position.
• Check the setting value of Workpiece reference
boundary is correct.
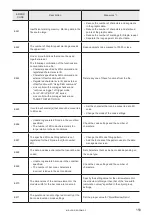
E620 - E621
The link control between the laser marker and
image checker has failed due to the error of the
laser marker. Trigger processing terminated
abnormally.
Check the connection of the cable and various signal
lines, and then restart the laser marker.
E622
I/O connector TIMING IN was not input within
the time specified using the link function with
external devices. Trigger processing terminated
abnormally.
• Input this to TIMING IN terminal within 60 seconds
after the I/O connector timing waiting output
(TIMING WAIT OUT) is turned ON.
• Check the connection of TIMING IN terminal of I/
O connector.
• Check the connection with the external device.
• Check the control procedure of the external
control.
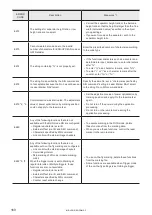
E623
Timing input is invalid.
When the linkage function with external devices
is used, TIMING IN terminal was input while the
timing standby output (TIMING WAIT OUT) was
OFF.
E624
Unable to communicate with an image checker.
Trigger processing terminated abnormally.
• Check the status of connection with the laser
marker and the Ethernet ports of external devices.
• Check the IP address, port number, connecting
status of the laser marking system and image
checker.
• Check the status of the laser marker and external
devices in link control.
• Confirm if you set the type of the image checker
correctly in the system settings screen and file
settings of the settings screen of the laser marker.
ME-LP-GS-SR-COMP-3
Summary of Contents for LP-GS Series
Page 11: ...1 Preparation of Command Control ME LP GS SR COMP 3...
Page 26: ...2 Communication Control Basics ME LP GS SR COMP 3...
Page 50: ...3 Data Format for Each Command ME LP GS SR COMP 3...
Page 136: ...136 MEMO ME LP GS SR COMP 3...
Page 137: ...Troubleshooting ME LP GS SR COMP 3...
Page 163: ...Character Code Table ME LP GS SR COMP 3...
Page 176: ...Index ME LP GS SR COMP 3...
Page 178: ...178 W Warning 154 ME LP GS SR COMP 3...
Page 179: ......
Page 180: ...Panasonic Industrial Devices SUNX Co Ltd 2014 2019 April 2019...


