Chapter 2
2-21
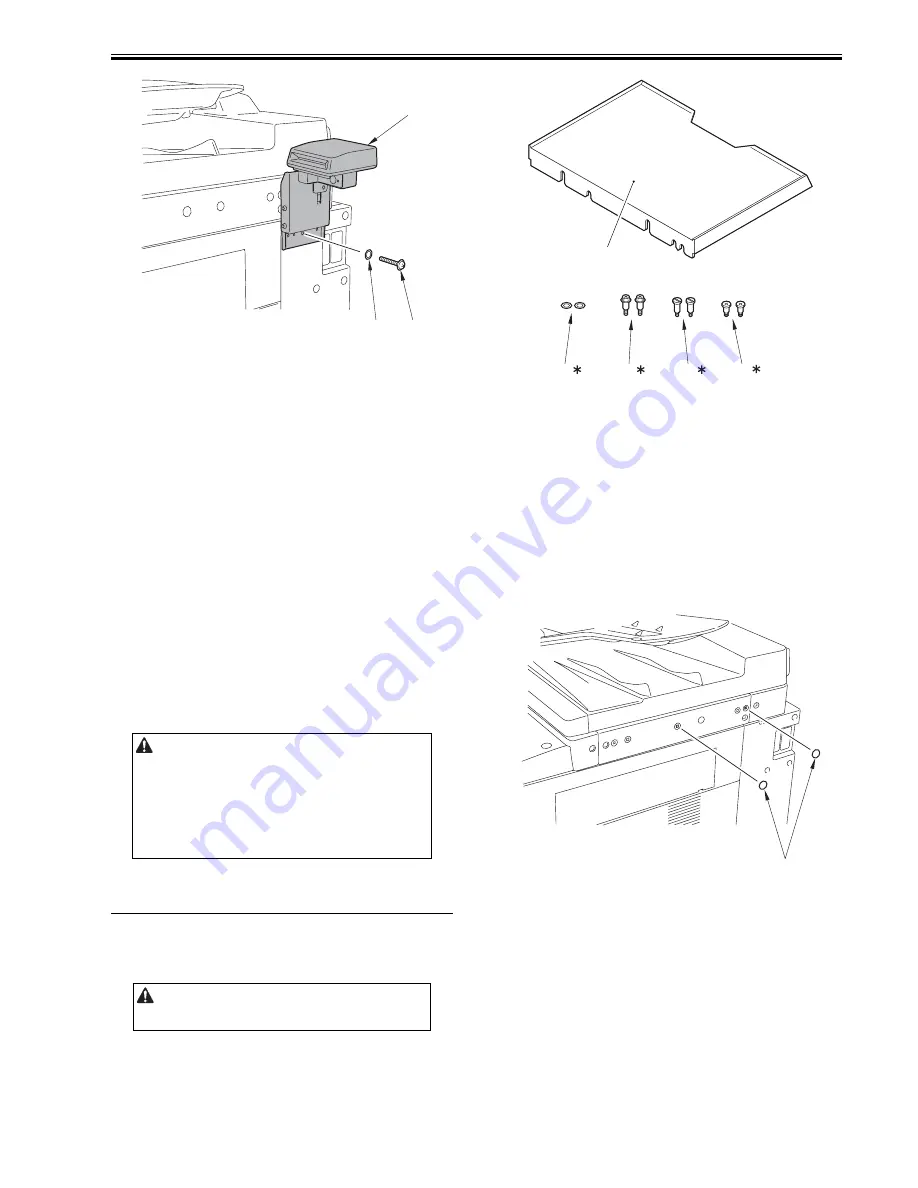
F-2-82
12) Insert the power plug into the outlet.
13) Turn ON the main power switch.
14) Get in Service Mode (COPIER > FUNCTION > INSTALL > CARD)
and enter the card number to use (1 to 2000).
- Enter the smallest card number of the cards used by the user.
- From the entered number, up to 1000 cards can be used.
15) Follow the instructions on the shutdown sequence screen to turn OFF and
then ON the main power switch.
16) Insert the card with registered valid number to check it's at standby state.
2.6.5 Installation Procedure in the imageWARE
Accounting Manager (hereinafter referred to iWAM)
Environment
0019-9964
iR3225 / iR3225N / iR3235 / iR3235N / iR3245 / iR3245N
1) Check to see that 'ID00000001 to ID00001000' have been created in '[Ad-
ditional Functions] > [System Settings] > [Dept. ID Management] >
[Register Dept.ID/Password] / [Page Totals]' (In the case of entering '1' as
the first number in 'Service Mode > COPIER > FUNCTION > INSTALL
> CARD')
2) Press [Reset] to exit from [Additional Functions].
3) Select [Additional Functions] > [System Settings] > [Network Settings]
> [TCP/IP Settings] > [IP Address Settings], and then make the setting of
[IP Address], [Gateway Address], [Subnet Mask] according to the user
environment.
4) Press [Reset] to exit from [Additional Functions].
5) Turn OFF the power supply following the shutdown sequence.
6) Turn on the main power switch.
7) [Additional Functions] > [System Settings] > [System Manager Settings],
and then input any number into [System Manager ID] and [System Pass-
word].
8) Press [Reset] to exit from [Additional Functions].
2.7 Installing the Original Holder
2.7.1 Notice At Installation
0019-8446
iR3225 / iR3225N / iR3235 / iR3235N / iR3245 / iR3245N
2.7.2 Checking Components
0018-8091
iR3225 / iR3225N / iR3235 / iR3235N / iR3245 / iR3245N
<Document Tray-J1>
F-2-83
2.7.3 Installation Procedure
0018-8203
iR3225 / iR3225N / iR3235 / iR3235N / iR3245 / iR3245N
A: If the card reader is not equipped to the host machine
1) Remove the 2 face cover seals [1]. (Do not use the removed face cover
seals.)
F-2-84
2) Install the 2 stepped screw (M4X10.8) [1] with the reader right cover.
[Additional Functions] > [System Settings] > [System Manager Settings] is
selected and [System Manager ID] and [System Password] are registered,
'Registration of card to the device' is impossible to execute in the setting of
iWAM.
See "Combination Table of Accessories" when installing this equipment.
[1]
[2]
[3]
[1]
Document tray
1pc.
[2]*1
Washer
2pc.
[3]*1
Stepped screw (RS tightening; M4X18)
2pc.
[4]*1
Stepped screw (M4X17.6)
2pc.
[5]*2
Stepped screw (M4X10.8)
2pc.
*1 Not used with this machine.
*2 Only the head of a screw is painted in white.
[3]
[5]
[2]
[4]
[1]
1
1
1
2
[1]
Summary of Contents for iR3245
Page 1: ...Jul 3 2008 Service Manual iR3245 3235 3230 3225 Series...
Page 2: ......
Page 6: ......
Page 25: ...Chapter 1 Introduction...
Page 26: ......
Page 28: ......
Page 64: ......
Page 65: ...Chapter 2 Installation...
Page 66: ......
Page 120: ......
Page 121: ...Chapter 3 Basic Operation...
Page 122: ......
Page 124: ......
Page 128: ......
Page 129: ...Chapter 4 Main Controller...
Page 130: ......
Page 132: ......
Page 134: ...Chapter 4 4 2 F 4 1 1 5 8 9 11 14 12 3 4 10 2 13 7 15 16 17...
Page 152: ......
Page 153: ...Chapter 5 Original Exposure System...
Page 154: ......
Page 184: ......
Page 185: ...Chapter 6 Laser Exposure...
Page 186: ......
Page 188: ......
Page 197: ...Chapter 7 Image Formation...
Page 198: ......
Page 227: ...Chapter 8 Pickup Feeding System...
Page 228: ......
Page 232: ......
Page 244: ...Chapter 8 8 12 For iR3245 3235 3230 F 8 14 1 2 3 4...
Page 261: ...Chapter 8 8 29 10 11 12 13 14 3 1 2 4 5 4 4 1 2 3 5 4 1 2 3 5 5 4 1 2 3 5 4 1 2 3 5...
Page 278: ......
Page 279: ...Chapter 9 Fixing System...
Page 280: ......
Page 282: ......
Page 297: ...Chapter 10 External and Controls...
Page 298: ......
Page 302: ......
Page 315: ...Chapter 10 10 13 2 Uncheck SNMP Status Enabled F 10 11...
Page 342: ......
Page 343: ...Chapter 11 MEAP...
Page 344: ......
Page 346: ......
Page 397: ...Chapter 12 e maintenance imageWARE Remote...
Page 398: ......
Page 400: ......
Page 408: ......
Page 409: ...Chapter 13 Maintenance and Inspection...
Page 410: ......
Page 412: ......
Page 424: ...Chapter 13 13 12...
Page 425: ...Chapter 14 Standards and Adjustments...
Page 426: ......
Page 428: ......
Page 436: ......
Page 437: ...Chapter 15 Correcting Faulty Images...
Page 438: ......
Page 440: ......
Page 465: ...Chapter 16 Self Diagnosis...
Page 466: ......
Page 468: ......
Page 493: ...Chapter 17 Service Mode...
Page 494: ......
Page 498: ......
Page 690: ......
Page 691: ...Chapter 18 Upgrading...
Page 692: ......
Page 694: ......
Page 738: ...Chapter 18 18 44...
Page 739: ...Chapter 19 Service Tools...
Page 740: ......
Page 742: ......
Page 744: ......
Page 745: ...Jul 3 2008...
Page 746: ......


