Chapter 14
14-2
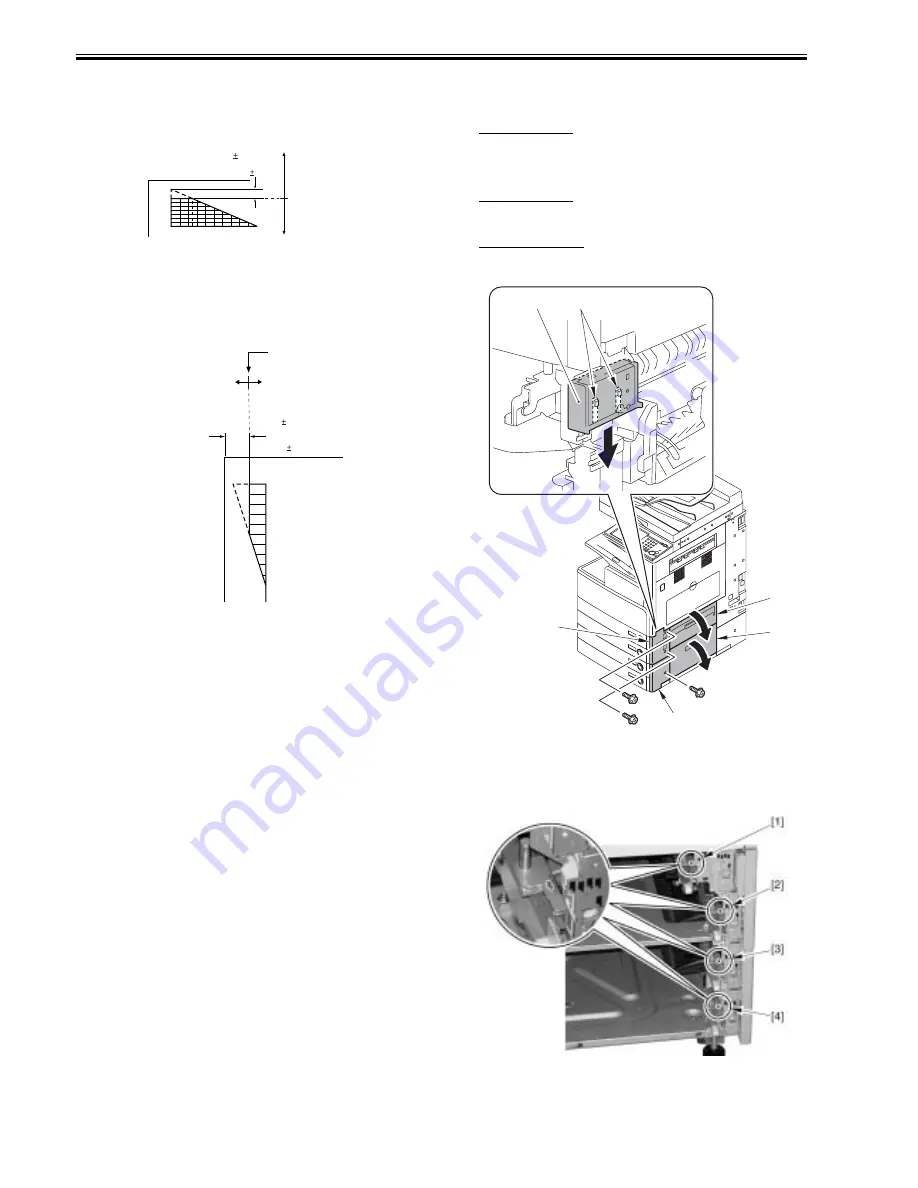
4. Adjusting the Leading Edge Non-Image Width
Use service mode to make adjustments:
COPIER> ADJUST> ADJ-XY> ADJ-X
F-14-4
5. Adjusting the Left Non-Image Width
Use service mode to make adjustments:
COPIER> ADJUST> ADJ-XY> ADJ-Y
F-14-5
14.1.3 Left End Margin Adjustment (each pickup position
basis)
0019-0519
iR3225 / iR3225N / iR3235 / iR3235N / iR3245 / iR3245N
A. In case of cassette pickup (cassette 1 to 4)
Cassette 3, 4 applies when the cassette pedestal (option) is installed.
1) Pull out the corresponding cassette for adjustment.
2) Remove the cover. Corresponding cover is dependent on the cassette lev-
el.
In case of cassette 1:
2-1) Open the cassette upper right cover [1] and the cassette lower
right cover [2], then remove the right cover (lower front) [3].
- 2 screws
2-2) Remove the grip [5].
- 2 craws [4]
In case of cassette 2:
2-1) Open the cassette upper right cover [1] and the cassette lower
right cover [2], then remove the right cover (lower front) [3].
- 2 screws
In case of cassette 3, 4:
2-1) Remove the pedestal front right cover [6].
- 1 screw
F-14-6
3) Check the scale position of the adjustment plate.
[1] For cassette 1
[2] For cassette 2
[3] For cassette 3
[4] For cassette 4
F-14-7
Image leading
edge
Decrease the ADJ-X setting.
(a decrease of '10' will decrease
the non-image width by 1 mm)
Increase the ADJ-X setting.
(an increase of '10' will
increase the non-image
width by 1 mm)
2
5
4 6 8 10 12 14 1618 20
0
1st side : 2.5 1.5mm
(2nd side of double-sided copy
: 2.5 1.5mm)
Image edge
Increase the ADJ-Y setting.
(an increase of '10' will
increase the non-image
width by 1 mm)
Decrease the value of ADJ-Y.
(a decrease of '10' will
decrease the non-image
width by 1 mm)
10
8
6
5
4
2
0
2.5 1.5mm
(2nd side of
double-sided copy
: 2.5 1.5mm)
[4]
[5]
[1]
[2]
[3]
[6]
Summary of Contents for iR3245
Page 1: ...Jul 3 2008 Service Manual iR3245 3235 3230 3225 Series...
Page 2: ......
Page 6: ......
Page 25: ...Chapter 1 Introduction...
Page 26: ......
Page 28: ......
Page 64: ......
Page 65: ...Chapter 2 Installation...
Page 66: ......
Page 120: ......
Page 121: ...Chapter 3 Basic Operation...
Page 122: ......
Page 124: ......
Page 128: ......
Page 129: ...Chapter 4 Main Controller...
Page 130: ......
Page 132: ......
Page 134: ...Chapter 4 4 2 F 4 1 1 5 8 9 11 14 12 3 4 10 2 13 7 15 16 17...
Page 152: ......
Page 153: ...Chapter 5 Original Exposure System...
Page 154: ......
Page 184: ......
Page 185: ...Chapter 6 Laser Exposure...
Page 186: ......
Page 188: ......
Page 197: ...Chapter 7 Image Formation...
Page 198: ......
Page 227: ...Chapter 8 Pickup Feeding System...
Page 228: ......
Page 232: ......
Page 244: ...Chapter 8 8 12 For iR3245 3235 3230 F 8 14 1 2 3 4...
Page 261: ...Chapter 8 8 29 10 11 12 13 14 3 1 2 4 5 4 4 1 2 3 5 4 1 2 3 5 5 4 1 2 3 5 4 1 2 3 5...
Page 278: ......
Page 279: ...Chapter 9 Fixing System...
Page 280: ......
Page 282: ......
Page 297: ...Chapter 10 External and Controls...
Page 298: ......
Page 302: ......
Page 315: ...Chapter 10 10 13 2 Uncheck SNMP Status Enabled F 10 11...
Page 342: ......
Page 343: ...Chapter 11 MEAP...
Page 344: ......
Page 346: ......
Page 397: ...Chapter 12 e maintenance imageWARE Remote...
Page 398: ......
Page 400: ......
Page 408: ......
Page 409: ...Chapter 13 Maintenance and Inspection...
Page 410: ......
Page 412: ......
Page 424: ...Chapter 13 13 12...
Page 425: ...Chapter 14 Standards and Adjustments...
Page 426: ......
Page 428: ......
Page 436: ......
Page 437: ...Chapter 15 Correcting Faulty Images...
Page 438: ......
Page 440: ......
Page 465: ...Chapter 16 Self Diagnosis...
Page 466: ......
Page 468: ......
Page 493: ...Chapter 17 Service Mode...
Page 494: ......
Page 498: ......
Page 690: ......
Page 691: ...Chapter 18 Upgrading...
Page 692: ......
Page 694: ......
Page 738: ...Chapter 18 18 44...
Page 739: ...Chapter 19 Service Tools...
Page 740: ......
Page 742: ......
Page 744: ......
Page 745: ...Jul 3 2008...
Page 746: ......


