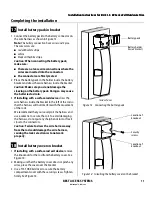
Installation Instructions for B.A.S.I.S. EX Series Exit Hardware Trim
BEST ACCESS SYSTEMS
Indianapolis, Indiana
Preparing the door
4
5
Drill holes and mortise door surface
Caution:
Check for the correct lock function, hand,
and bevel before drilling.
1
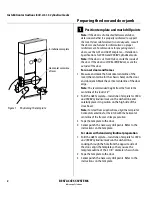
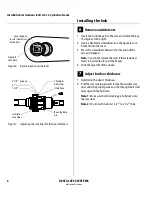
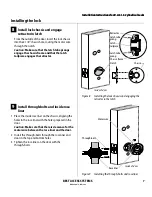
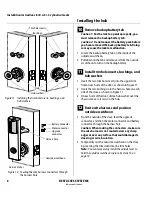
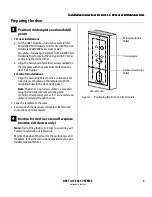
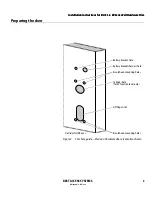
Drill the trim holes listed below; follow the instructions
on the trim template. See Figure 2 or Figure 3, and
Figure 4.
■
battery bracket hole
—
7/16
″
diameter
—
through door
■
battery bracket/harness hole
—
7/8
″
diameter
—
through door
■
escutcheon mounting holes
—
7/16
″
diameter
—
through door
■
optional cylinder hole
—
1 3/8
″
diameter for use with Precision Hardware
exit devices;
2
″
diameter for use with Von Duprin exit devices
—
for rim and vertical rod exit devices, through
door; for mortise exit devices, from outside into
mortise cavity
—
drill for EV function only
■
lift finger slot
—
for Precision Hardware exit devices,
1 1/8
″
diameter slot
—
for Von Duprin exit devices, 3/4
″
diameter slot
—
through door
Note 1:
To locate the center of a hole on the opposite
side of the door, drill a pilot hole through the door.
Note 2:
For holes through the door, drill halfway from
each side of the door to keep the door from splintering.
2
For new installations
, drill the exit hardware holes
and mortise the inside surface of the door according to
the instructions provided by the exit hardware
manufacturer.
Note:
The B.A.S.I.S. outside escutcheon is mounted using
the four lock stile case mounting holes, labeled ‘A’ on the
exit hardware template.
Figure 2
Drilling the trim holes for use with
Precision Hardware exit hardware
Outside of RHRB door
Outside of LHRB door
Figure 3
Drilling the trim holes for use with
Von Duprin exit hardware
Outside of RHRB door
Outside of LHRB door
Summary of Contents for B.A.S.I.S. V
Page 1: ...SERVICE MANUAL SERVICE MANUAL ...
Page 16: ...Figures xvi B A S I S V Service Manual ...
Page 48: ...Standard Functions and Parts 2 24 B A S I S V Service Manual ...
Page 66: ...Exit Hardware Trim Functions and Parts 3 18 B A S I S V Service Manual ...
Page 78: ...Shared Standard and Exit Hardware Trim Parts 4 12 B A S I S V Service Manual ...
Page 114: ...Servicing Standard Mortise Case Parts 6 20 B A S I S V Service Manual ...
Page 206: ...Servicing Exit Hardware Trim Escutcheon Parts 10 32 B A S I S V Service Manual ...
Page 238: ...Troubleshooting 12 12 B A S I S V Service Manual ...
Page 242: ...Lock History Event Types A 4 B A S I S V Service Manual ...
Page 244: ...Installation Instructions B 2 B A S I S V Service Manual ...

