Installation Instructions for B.A.S.I.S. EX Series Exit Hardware Trim
BEST ACCESS SYSTEMS
Indianapolis, Indiana
7
Installation Instructions for B.A.S.I.S. EX Series Exit Hardware Trim
Installing the exit hardware and trim
9
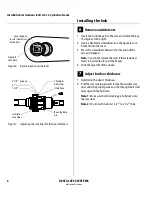
Route wire harnesses and position
B.A.S.I.S. escutcheon
1
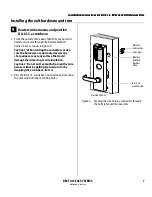
From the outside of the door, feed the com port and
battery connector through the battery bracket/
harness hole as shown in Figure 6.
Caution 1:
When routing the connectors, make
sure the harnesses are not routed across any
sharp edges or over any surface that could
damage their sleeving or wire insulation.
Caution 2:
Do not put too much strain on the wire
harness either by pulling too hard on it or by
dangling the escutcheon from it.
2
Rest the B.A.S.I.S. escutcheon on the door by inserting
the trim studs into the mounting holes.
Figure 6
Feeding the wire harness connectors through
the battery bracket/harness hole
Com port
B.A.S.I.S.
escutcheon
Outside of door
Battery
connector
Battery
bracket/
harness
hole
Summary of Contents for B.A.S.I.S. V
Page 1: ...SERVICE MANUAL SERVICE MANUAL ...
Page 16: ...Figures xvi B A S I S V Service Manual ...
Page 48: ...Standard Functions and Parts 2 24 B A S I S V Service Manual ...
Page 66: ...Exit Hardware Trim Functions and Parts 3 18 B A S I S V Service Manual ...
Page 78: ...Shared Standard and Exit Hardware Trim Parts 4 12 B A S I S V Service Manual ...
Page 114: ...Servicing Standard Mortise Case Parts 6 20 B A S I S V Service Manual ...
Page 206: ...Servicing Exit Hardware Trim Escutcheon Parts 10 32 B A S I S V Service Manual ...
Page 238: ...Troubleshooting 12 12 B A S I S V Service Manual ...
Page 242: ...Lock History Event Types A 4 B A S I S V Service Manual ...
Page 244: ...Installation Instructions B 2 B A S I S V Service Manual ...


