Troubleshooting
12–10
B.A.S.I.S. V Service Manual
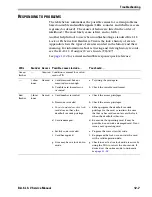
The table below summarizes the possible causes for certain problems.
The causes of failure are listed in the order of likelihood. (The most
likely cause is first, and so forth.)
Green or
Red
flashes
–––
Denied
Smart card flex cable is hitting
against the LED.
Install protective tape on the flex cable.
For standard locks, see
page 9–22
. For exit
hardware trim, see
page 10–14
.
Red &
green
flashes
repeating
–––
Denied
Door failed a diagnostic self-test.
Replace the control electronics.
For standard locks, see
page 9–10
. For exit
hardware trim, see
page 10–10
.
LEDs
Sounder Access Possible causes include…
You should…
You notice…
Possible causes include…
You should…
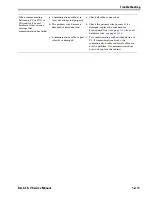
Door is always unlocked.
a. Door may be in a unlocked
mode or passage mode. Setting
the door mode to “Unlocked”
means that anyone can access
the door in this condition.
a. Use the PDA to check the online mode. If
desired, change the online mode.
See
page 11–18
.
b. Door may be in a door unlock
timezone.
b. Use the PDA to check whether the online
mode is “Automatic” (timezone control). See
page 11–18
. Use B.A.S.I.S. to check the
reader configuration for the door.
For exit hardware trim,
the lever is dangling.
a. Shear pin has been broken.
a. Replace the shear pin. See
page 10–28
.
b. Lever is not properly installed. b. Reinstall the lever. See
page 10–26
.
Cannot plug the PDA
connector into the door’s
communications port.
a. Foreign object is jammed into
the communications port.
a. Remove the object from the communications
port.
b. Communications port is
damaged.
b. Replace the primary wire harness. For
standard locks, see
page 9–7
. For exit
hardware trim, see
page 10–9
.
c. Programming cable is
damaged.
c. Replace the programming cable.
See
page 9–5
.
Cannot swipe a card.
Foreign object is jammed in the
card reader.
Push the object down through the card reader if
possible. Unless the object is preventing the
card from being swiped, there is no reason to
remove the trim.
If the object will not push through the card
reader, remove the trim and remove the foreign
object, and/or replace the reader.
For standard locks, see
page 9–19
. For exit
hardware trim, see
page 10–13
.
Note:
Use a valid card to verify that the card
reader head is not damaged.
Summary of Contents for B.A.S.I.S. V
Page 1: ...SERVICE MANUAL SERVICE MANUAL ...
Page 16: ...Figures xvi B A S I S V Service Manual ...
Page 48: ...Standard Functions and Parts 2 24 B A S I S V Service Manual ...
Page 66: ...Exit Hardware Trim Functions and Parts 3 18 B A S I S V Service Manual ...
Page 78: ...Shared Standard and Exit Hardware Trim Parts 4 12 B A S I S V Service Manual ...
Page 114: ...Servicing Standard Mortise Case Parts 6 20 B A S I S V Service Manual ...
Page 206: ...Servicing Exit Hardware Trim Escutcheon Parts 10 32 B A S I S V Service Manual ...
Page 238: ...Troubleshooting 12 12 B A S I S V Service Manual ...
Page 242: ...Lock History Event Types A 4 B A S I S V Service Manual ...
Page 244: ...Installation Instructions B 2 B A S I S V Service Manual ...

