Servicing Exit Hardware Trim Escutcheon Parts
B.A.S.I.S. V Service Manual
10–17
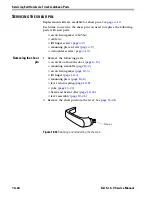
3. Using a screwdriver, pry the sounder off the escutcheon.
4. Using a 3/32
″
hex driver, remove the socket head screw and spacer.
Remove the motor assembly from the escutcheon.
Reinstalling the
motor assembly
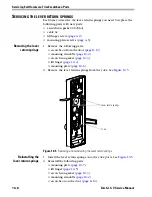
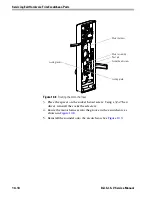
1. Rotate the gear on the motor assembly until the locking lever is as
close to the screw hole as possible, as shown in
Figure 10.7
.
Note:
If the locking lever does not move freely as you turn the gear,
gently move the locking lever into position.
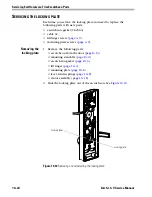
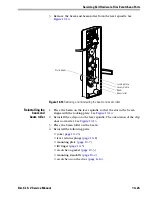
2. Position the motor assembly in the escutcheon as shown in
Figure 10.8
. Make sure that:
■
the locking lever is inserted through the locking plate.
■
the motor assembly pivot pin is seated in the recess in the
escutcheon
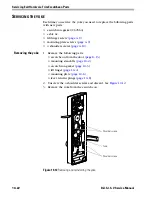
Figure 10.7
Rotating the motor assembly gear
Pivot pin
Gear
Locking lever
Socket head screw hole
Summary of Contents for B.A.S.I.S. V
Page 1: ...SERVICE MANUAL SERVICE MANUAL ...
Page 16: ...Figures xvi B A S I S V Service Manual ...
Page 48: ...Standard Functions and Parts 2 24 B A S I S V Service Manual ...
Page 66: ...Exit Hardware Trim Functions and Parts 3 18 B A S I S V Service Manual ...
Page 78: ...Shared Standard and Exit Hardware Trim Parts 4 12 B A S I S V Service Manual ...
Page 114: ...Servicing Standard Mortise Case Parts 6 20 B A S I S V Service Manual ...
Page 206: ...Servicing Exit Hardware Trim Escutcheon Parts 10 32 B A S I S V Service Manual ...
Page 238: ...Troubleshooting 12 12 B A S I S V Service Manual ...
Page 242: ...Lock History Event Types A 4 B A S I S V Service Manual ...
Page 244: ...Installation Instructions B 2 B A S I S V Service Manual ...

