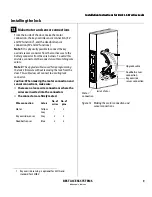
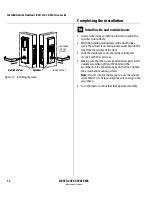
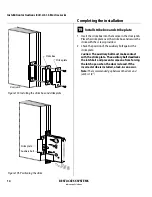
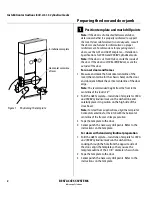
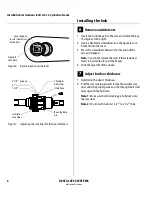
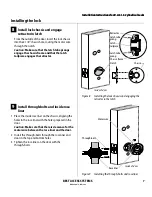
background image

Installation Instructions for B.A.S.I.S. Mortise Locks

BEST ACCESS SYSTEMS

Indianapolis, Indiana

Installing the lock

10

14

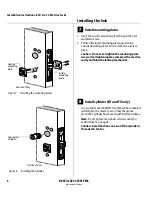
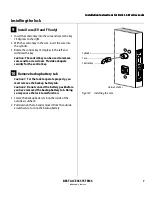
Secure escutcheons

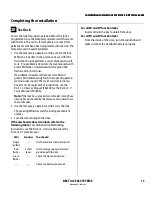
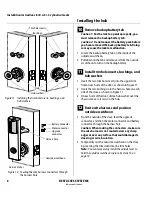
1  Position the inside and outside escutcheons on the 

door.

Making sure that the escutcheons do not pinch 
the wires

, secure the escutcheons to the door. Do not 

tighten the screws completely. Use the combination 
mounting screw in the upper trim hole and the 
standard mounting screw in the lower trim hole.

 Figure 14 Securing the escutcheons

Combination
mounting screw

Standard
mounting screw

Inside of door

Inside escutcheon

Summary of Contents for B.A.S.I.S. V

Page 1: ...SERVICE MANUAL SERVICE MANUAL ...

Page 2: ...rmation storage and retrieval systems for any purpose without the express written permission of Best Access Systems This document is distributed as is without warranty of any kind either express or implied respecting the contents of this book including but not limited to implied warranties for the publication s quality performance merchantability or fitness for any particular purpose Neither Best ...

Page 3: ... S V Locks 1 5 Mortise locks 1 5 Cylindrical locks 1 5 Exit hardware trim 1 5 Documentation package 1 6 Technical support 1 8 Support services 1 8 Telephone technical support 1 8 STANDARD FUNCTIONS AND PARTS 2 1 Function descriptions 2 2 Mortise functions 2 2 Cylindrical function 2 4 Trim components 2 5 Magnetic stripe reader and trim 2 5 Smart card reader and trim 2 8 Dual validation reader and t...

Page 4: ...4 2 Converting to a smart card reader 4 2 Converting to a dual validation reader 4 2 Converting to an HID or a Motorola proximity reader 4 2 Tasks to perform for converting 4 2 Field replacement kits 4 4 Reader kits 4 4 Control electronics kits 4 5 Battery kits 4 5 Lens cover kit 4 6 Cable and harness kits for standard B A S I S Locks 4 6 Screw kits 4 7 Shared internal screw kits 4 7 Upper escutch...

Page 5: ...inder 5 16 Removing the cylinder 5 16 Reinstalling the cylinder 5 16 SERVICING STANDARD MORTISE CASE PARTS 6 1 Servicing the mortise case 6 2 Removing and opening the mortise case 6 2 Closing and reinstalling the mortise case 6 2 Changing the hand and bevel 6 3 Changing hand and bevel quick reference 6 3 Changing the hand only 6 5 Changing the bevel only 6 5 Changing the hand and bevel 6 5 Tasks f...

Page 6: ...talling the levers 7 4 Servicing the inside and outside escutcheons 7 5 Removing the inside and outside escutcheons 7 5 Reinstalling the inside and outside escutcheons 7 8 Servicing the rose liners 7 15 Removing the rose liners 7 15 Reinstalling the rose liners 7 16 Servicing the cylindrical chassis 7 18 Removing the cylindrical chassis 7 18 Reinstalling the cylindrical chassis 7 18 SERVICING EXIT...

Page 7: ...Servicing the upgrade cable 9 5 Removing the upgrade cable 9 5 Reinstalling the upgrade cable 9 5 Servicing the sensor harness 9 6 Removing the sensor harness 9 6 Reinstalling the sensor harness 9 6 Servicing the primary harness 9 7 Removing the primary harness 9 7 Reinstalling the primary harness 9 8 Servicing the control electronics boards 9 10 Removing the magnetic stripe control electronics bo...

Page 8: ...talling the lens covers 10 9 Servicing the primary harness 10 9 Removing the primary harness 10 10 Reinstalling the primary harness 10 10 Servicing the control electronics boards 10 10 Removing the magnetic stripe control electronics board 10 10 Reinstalling the magnetic stripe control electronics board 10 11 Removing the smart card control electronics board 10 11 Reinstalling the smart card contr...

Page 9: ...1 Replacing the backup battery 11 2 Removing the backup battery 11 2 Reinstalling the backup battery 11 3 Replacing or upgrading the battery pack 11 4 Removing the battery pack for a standard lock 11 4 Reinstalling the battery pack for a standard lock 11 6 Removing the battery pack for exit hardware trim 11 8 Reinstalling the battery pack for exit hardware trim 11 9 Adding key override sensing to ...

Page 10: ...Contents x B A S I S V Service Manual LOCK HISTORY EVENT TYPES A 1 INSTALLATION INSTRUCTIONS B 1 INDEX C 1 ...

Page 11: ...RDWARE TRIM FUNCTIONS AND PARTS Mortise cylinder and related components diagram 3 15 Rim cylinder and related components diagram 3 16 Levers diagram 3 17 SHARED STANDARD AND EXIT HARDWARE TRIM PARTS Other system components diagram 4 11 SERVICING STANDARD MORTISE TRIM PARTS Removing and reinstalling the levers 5 2 Removing the battery door four cell door shown 5 3 Removing the battery pack four cel...

Page 12: ...lt 6 8 Latchbolt with anti friction latch lever in position 6 9 Removing and reinstalling the motor module 6 14 Positioning the turn knob hub and deadbolt spring 6 18 Removing and reinstalling the cylinder clamp plate 6 19 SERVICING CYLINDRICAL PARTS Removing the core and throw member 7 2 Reinstalling the core and throw member 7 2 Removing the keyed lever 7 3 Removing the plain lever 7 3 Reinstall...

Page 13: ...ing the harness clamp smart card reader shown 9 4 Removing and reinstalling the upgrade cable smart card reader shown 9 5 Removing and reinstalling the sensor harness smart card reader shown 9 6 Removing and reinstalling the primary harness from the electronics board smart card reader shown 9 7 Disconnecting the sounder and com port from the outside escutcheon 9 8 Connecting the sounder and com po...

Page 14: ... return springs 10 8 Removing the motor assembly 10 16 Rotating the motor assembly gear 10 17 Routing the motor harness 10 18 Reinstalling the motor assembly 10 19 Removing and reinstalling the locking plate 10 20 Reinstalling the locking plate 10 21 Removing and reinstalling the yoke 10 22 Removing and reinstalling the c clip 10 24 Removing and reinstalling the beam and beam roller 10 25 Removing...

Page 15: ...agnostics Codes window 11 13 Connecting the PDA to a standard lock 11 15 Locating the communication port for exit hardware trim 11 15 Starting B A S I S Transport 11 16 Disconnecting the programming cable from the lock 11 17 TROUBLESHOOTING Enabling communications with the password override button escutcheon for standard mortise lock shown 12 4 Connecting the programming cable to the lock 12 6 ...

Page 16: ...Figures xvi B A S I S V Service Manual ...

Page 17: ...s Exit Hardware Trim refers to EXBV Exit Hardware Trim B A S I S EX Series Exit Hardware Trim is available for use with the following types of exit devices manufactured by Precision Hardware 1000 Series and 2000 Series and Von Duprin 98 99 Series rim mortise surface vertical rod concealed vertical rod Standard B A S I S V Locks and EX Series Exit Hardware Trim are available with the following type...

Page 18: ...e lock that uses proximity cards and controls access to a door Exit hardware trim not shown B A S I S escutcheon assembly including B A S I S reader and control electronics and external battery compartment used with mortise rim concealed vertical rod and surface vertical rod exit hardware panic devices PDA running B A S I S Transport software Device that lets you transfer reader configurations fro...

Page 19: ... I S 2002 software Access card Magnetic stripe card encoder Mortise magnetic stripe electronic lock Programming cable Serial cable Not shown Cylindrical magnetic stripe electronic lock Mortise and cylindrical smart card electronic locks Mortise and cylindrical proximity electronic locks Mortise and cylindrical dual validation electronic locks Exit hardware trim Smart card encoder ...

Page 20: ...ortise Lock indicating their orientation to the door Cylindrical lock overview The diagram below shows an exploded view of the components of the B A S I S V Cylindrical Lock indicating their orientation to the door Figure 1 2 Mortise lock overview diagram Outside trim Inside trim Figure 1 3 Cylindrical lock overview diagram Outside trim Inside trim ...

Page 21: ...rdware Manufacturers Association Directory The 14 and 15 lever handles conform to California Administrative Code Title 19 and Title 24 Cylindrical locks The 9K locks comply with ANSI A156 2 Series 4000 Grade 1 standards The chassis conforms to ANSI A115 2 The strike fits the standard door frame cutout as specified in ANSI A115 2 The 14 and 15 lever handles conform to California Administrative Code...

Page 22: ...02 Installation Instructions for B A S I S EX Series Exit Hardware Trim T61828 Instructions for Upgrading B A S I S Locks with Zinc Escutcheons to Brass Escutcheons T61854 Instructions for Upgrading V Series Locks to B A S I S Locks T61837 Document Title Doc No G01 Template Installation Specifications for 93KG 93KBV Cylindrical Locks with Small Strike T63305 G02 Template Installation Specification...

Page 23: ...XG EXBV Exit Hardware Trim for Use with Von Duprin 98 99 Series Devices T61826 G10 Installation Specification for EXG EXBV Exit Hardware Trim for Use with Precision Hardware 1000 2000 Series Devices T61827 Document Title Doc No H Series Service Manual T61964 9K Series Service Manual T56082 8K Series Service Manual T56081 B A S I S G Service Manual T63300 Document Title Doc No B A S I S Transport U...

Page 24: ...available in your area whenever you need help Before you call however please make sure that the product is in your immediate vicinity and that you are prepared to give the following information what happened and what you were doing when the problem arose what you have done so far to correct the problem Best Access Systems Representatives provide telephone technical support for all B A S I S V prod...

Page 25: ...llowing pages contain function descriptions for all standard B A S I S V Locks This chapter also includes exploded diagrams that show all field serviceable mechanical parts diagrams of trim and other miscellaneous parts as well as trim and reader conversion information ...

Page 26: ...d by time activated electronic signal or by valid card PIN Outside lever unlocked by internal motor drive mechanism operated by time activated electronic signal or by valid card PIN Inside lever is always unlocked Latchbolt operated by outside key outside lever unless locked by internal motor drive mechanism inside lever Latchbolt deadlocked by auxiliary latch Deadbolt operated by outside key insi...

Page 27: ...de lever retracts only Outside lever locked and unlocked by internal motor drive mechanism operated by time activated electronic signal or by valid card PIN if deadbolt is thrown deadbolt override privilege is required Inside lever is always unlocked Latchbolt operated by outside lever unless locked by internal motor drive mechanism inside lever Outside lever locked by internal motor drive mechani...

Page 28: ...on drawing DV Latchbolt with key override Latchbolt operated by outside key outside lever unless locked by internal motor drive mechanism inside lever Outside lever locked by internal motor drive mechanism operated by time activated electronic signal or by valid card PIN Outside lever unlocked by internal motor drive mechanism operated by time activated electronic signal or by valid card PIN Insid...

Page 29: ... A S I S V Service Manual 2 5 TRIM COMPONENTS MAGNETIC STRIPE READER AND TRIM EXPLODED DIAGRAM Figure 2 3 Magnetic stripe reader and trim exploded diagram mortise shown 4 3 2 6 9 10 12 11 13 14 15 18 19 21 23 1 16 20 24 7 22 5 8 17 ...

Page 30: ...V zinc outside escutcheon with key EV and FV functions or not shown C60406 1 35HBV zinc outside escutcheon for use with non BEST cores EV and FV functions or not shown C60446 1 35HBV zinc outside escutcheon without key LV and NV functions or not shown C60449 1 9KBV zinc outside escutcheon assembly DV function 5 See lens cover kit page 4 6 2 Lens cover 6 See screw kits page 4 7 4 Reader assembly mo...

Page 31: ...eon screw 21 See screw kits page 4 7 1 Upper escutcheon screw 22 A35454 1 15 inside lever assemblya mortise locks or not shown B55169 1 15 plain lever handleb cylindrical locks 23 B62128 1 Battery door for brass escutcheons or not shown C61410 1 Battery door for zinc escutcheons or not shown B62101 1 Eight cell battery door for brass escutcheonsd or not shown C62100 1 Eight cell battery door for z...

Page 32: ...s and Parts 2 8 B A S I S V Service Manual SMART CARD READER AND TRIM EXPLODED DIAGRAM Figure 2 4 Smart card reader and trim exploded diagram mortise shown 4 3 2 6 9 10 12 11 13 14 15 18 19 21 23 1 16 20 24 7 22 5 8 17 ...

Page 33: ...inc outside escutcheon with key EV and FV functions or not shown C60406 1 35HBV zinc outside escutcheon for use with non BEST cores EV and FV functions or not shown C60446 1 35HBV zinc outside escutcheon without key LV and NV functions or not shown C60449 1 9KBV zinc outside escutcheon assembly DV function 5 See lens cover kit page 4 6 2 Lens cover 6 See screw kits page 4 7 4 Reader assembly mount...

Page 34: ...eon screw 21 See screw kits page 4 7 1 Upper escutcheon screw 22 A35454 1 15 inside lever assemblya mortise locks or not shown B55169 1 15 plain lever handleb cylindrical locks 23 B62128 1 Battery door for brass escutcheons or not shown C61410 1 Battery door for zinc escutcheons or not shown B62101 1 Eight cell battery door for brass escutcheonsd or not shown C62100 1 Eight cell battery door for z...

Page 35: ... Parts B A S I S V Service Manual 2 11 DUAL VALIDATION READER AND TRIM EXPLODED DIAGRAM Figure 2 5 Dual validation reader and trim exploded diagram mortise shown 4 3 2 6 9 10 12 11 13 14 15 18 19 21 23 1 16 20 24 7 22 5 8 17 ...

Page 36: ...ion or not shown C60445 1 35HBV zinc outside escutcheon with key EV and FV functions or not shown C60406 1 35HBV zinc outside escutcheon for use with non BEST cores EV and FV functions or not shown C60446 1 35HBV zinc outside escutcheon without key LV and NV functions or not shown C60449 1 9KBV zinc outside escutcheon assembly DV function 5 See lens cover kit page 4 6 2 Lens cover 6 See screw kits...

Page 37: ... kits page 4 7 1 Lower escutcheon screw 21 See screw kits page 4 7 1 Upper escutcheon screw 22 A35454 1 15 inside lever assemblya mortise locks or not shown B55169 1 15 plain lever handleb cylindrical locks 23 B62128 1 Battery door for brass escutcheons or not shown C61410 1 Battery door for zinc escutcheons or not shown B62101 1 Eight cell battery door for brass escutcheonsd or not shown C62100 1...

Page 38: ...ts 2 14 B A S I S V Service Manual PROXIMITY READER AND TRIM EXPLODED DIAGRAM Figure 2 6 Proximity reader and trim exploded diagram Precision Hardware rim type shown 4 3 2 6 9 10 12 11 13 14 15 18 19 21 23 1 16 20 24 7 22 5 8 17 ...

Page 39: ...mbly DV function or not shown C60445 1 35HBV zinc outside escutcheon with key EV and FV functions or not shown C60406 1 35HBV zinc outside escutcheon for use with non BEST cores EV and FV functions or not shown C60446 1 35HBV zinc outside escutcheon without key LV and NV functions or not shown C60449 1 9KBV zinc outside escutcheon assembly DV function 5 See lens cover kit page 4 6 2 Lens cover 6 S...

Page 40: ...not shown B60749 1 9KBV zinc inside escutcheon DV function 20 See screw kits page 4 7 1 Lower escutcheon screw 21 See screw kits page 4 7 1 Upper escutcheon screw 22 A35454 1 15 inside lever assemblya mortise locks or not shown B55169 1 15 plain lever handleb cylindrical locks 23 B62128 1 Battery door for brass escutcheons or not shown C61410 1 Battery door for zinc escutcheons or not shown B62101...

Page 41: ... B A S I S V Service Manual 2 17 MORTISE COMPONENTS Mortise case exploded diagram Figure 2 7 FV function mortise case exploded diagram LH case shown 27 7 24 5 11 4 3 20 2 1 8 6 9 10 14 13 15 16 16 17 18 19 22 23 21 25 26 28 29 12 ...

Page 42: ...ions 6 B34032 1 Turn knob hub spacer FV and LV functions 7 A35257 1 Cylinder clamp plate EV and FV functions 8 B61302 1 Case assembly 9 C34053 1 Armored front 10 A34450 1 Case mounting screw 11 B34092 1 Auxiliary bolt 12 A60346 1 Mortise case spacer 13 B60493 1 Motor module 14 A34236 1 Wire strain relief 15 A34065 1 Lower auxiliary spring 16 B34020 2 Auxiliary return levers 17 A34066 1 Upper auxil...

Page 43: ...Standard Functions and Parts B A S I S V Service Manual 2 19 Other mortise components diagram Figure 2 8 Other mortise components 1 4 2 3 9 8 6 7 5 10 11 11 8 ...

Page 44: ...r for 2 3 4 3 thick doors for brass escutcheons EV or FV functions not shown B61307 1 Cylinder for 1 3 4 2 thick doors for zinc escutcheons EV or FV functions not shown B61308 1 Cylinder for 2 1 4 2 1 2 thick doors for zinc escutcheons EV or FV functions not shown B61309 1 Cylinder for 2 3 4 3 thick doors for zinc escutcheons EV or FV functions 5 B34380 1 Strike box 6 C29517 1 Strike plate for LH ...

Page 45: ...Standard Functions and Parts B A S I S V Service Manual 2 21 CYLINDRICAL COMPONENTS CYLINDRICAL CHASSIS DIAGRAM Figure 2 9 Cylindrical chassis diagram Outside Inside ...

Page 46: ...22 B A S I S V Service Manual Cylindrical chassis parts list Refer to Figure 2 9 and the table below to find the part you need Chassis type Part no Standard chassis D60464 Chassis for non BEST cores D60332 Free motion chassis D56025 ...

Page 47: ...re 2 10 Other cylindrical lock components 1 2 3 4 5 7 6 8 9 Item Part no Qty Description 1 B34380 1 Strike box 2 B25641 1 Strike plate 3 A18724 2 Strike screw 4 not shown not shown C54680 C51682 C54684 1 1 1 Latch for 2 3 4 backset Latch for 3 3 4 backset Latch for 5 backset 5 A25359 2 Latch screw 6 B55603 1 Small outside rose liner 7 C55556 1 Small inside rose liner 8 B55557 2 Through bolt screw ...

Page 48: ...Standard Functions and Parts 2 24 B A S I S V Service Manual ...

Page 49: ... EXIT HARDWARE TRIM FUNCTIONS AND PARTS The following pages contain function descriptions for B A S I S V EX Series Exit Hardware Trim This chapter also includes exploded diagrams showing all field serviceable exit hardware trim parts ...

Page 50: ...motor drive mechanism operated by time activated electronic signal or by valid card PIN Outside lever unlocked by internal motor drive mechanism operated by time activated electronic signal or by valid card PIN Inside trim is always unlocked Latchbolt operated by outside lever unless locked by internal motor drive mechanism inside lever Outside lever locked by internal motor drive mechanism operat...

Page 51: ...e Manual 3 3 TRIM COMPONENTS MAGNETIC STRIPE READER AND TRIM EXPLODED DIAGRAM Figure 3 1 Magnetic stripe reader and trim exploded diagram Precision Hardware rim type shown 19 2 4 8 9 13 22 10 21 25 20 15 12 17 6 5 16 23 24 26 27 28 29 31 1 14 18 3 7 11 32 30 ...

Page 52: ...ver return spring 12 C64552 1 Yoke 13 See screw kits page 4 7 4 Shoulder screw 14 See magnetic stripe control electronics kit page 4 5 1 Magnetic stripe control electronics board assembly with backup battery 15 B64562 1 Locking plate 16 See backup battery kit page 4 5 1 Backup battery 17 See primary harness kit page 4 10 1 Tape for mounting the sounder 18 See screw kits page 4 7 2 Electronics boar...

Page 53: ...Hardware installations not shown D64634 1 Mounting plate for Von Duprin installations 25 See screw kits page 4 7 5 Mounting plate screw 26 See screw kits page 4 7 6 Mounting standoff 27 C64564 1 Escutcheon gasket 28 C64560 1 Battery bracket 29 B60726 1 Battery pack 30 See screw kits page 4 7 2 Battery bracket screw 31 C64559 1 Battery cover 32 See screw kits page 4 7 1 Battery cover screw TORX wit...

Page 54: ... A S I S V Service Manual SMART CARD READER AND TRIM EXPLODED DIAGRAM Figure 3 2 Smart card reader and trim exploded diagram Precision Hardware rim type shown 19 6 5 16 23 24 26 27 28 29 31 1 14 18 2 4 3 8 9 7 11 13 22 10 21 25 20 15 12 17 32 30 ...

Page 55: ... return spring 12 C64552 1 Yoke 13 See screw kits page 4 7 4 Shoulder screw 14 See smart card control electronics kit page 4 5 1 Smart card control electronics board assembly with backup battery 15 B64562 1 Locking plate 16 See backup battery kit page 4 5 1 Backup battery 17 See primary harness kit page 4 10 1 Tape for mounting the sounder 18 See screw kits page 4 7 2 Electronics board mounting sc...

Page 56: ...Hardware installations not shown D64634 1 Mounting plate for Von Duprin installations 25 See screw kits page 4 7 5 Mounting plate screw 26 See screw kits page 4 7 6 Mounting standoff 27 C64564 1 Escutcheon gasket 28 C64560 1 Battery bracket 29 B60726 1 Battery pack 30 See screw kits page 4 7 2 Battery bracket screw 31 C64559 1 Battery cover 32 See screw kits page 4 7 1 Battery cover screw TORX wit...

Page 57: ...V Service Manual 3 9 DUAL VALIDATION READER AND TRIM EXPLODED DIAGRAM Figure 3 3 Dual validation reader and trim exploded diagram Precision Hardware rim type shown 19 6 5 16 23 24 26 27 28 29 31 1 14 18 2 4 3 8 9 7 11 13 22 10 21 25 20 15 12 17 32 30 ...

Page 58: ...ver return spring 12 C64552 1 Yoke 13 See screw kits page 4 7 4 Shoulder screw 14 See dual validation control electronics kit page 4 5 1 Dual validation control electronics board assembly with backup battery 15 B64562 1 Locking plate 16 See backup battery kit page 4 5 1 Backup battery 17 See primary harness kit page 4 10 1 Tape for mounting the sounder 18 See screw kits page 4 7 2 Electronics boar...

Page 59: ... Hardware installations not shown D64634 1 Mounting plate for Von Duprin installations 25 See screw kits page 4 7 5 Mounting plate screw 26 See screw kits page 4 7 6 Mounting standoff 27 C64564 1 Escutcheon gasket 28 C64560 1 Battery bracket 29 B60726 1 Battery pack 30 See screw kits page 4 7 2 Battery bracket screw 31 C64559 1 Battery cover 32 See screw kits page 4 7 1 Battery cover screw TORX wi...

Page 60: ... B A S I S V Service Manual PROXIMITY READER AND TRIM EXPLODED DIAGRAM Figure 3 4 Proximity reader and trim exploded diagram Precision Hardware rim type shown 19 6 5 16 23 24 26 27 28 29 31 1 14 18 2 4 3 8 9 7 11 13 22 10 21 25 20 15 12 17 32 30 ...

Page 61: ...der assembly mounting screw 8 B64557 1 Beam 9 A64571 1 Beam roller 10 A64609 1 C clip 11 A64610 2 Lever return spring 12 C64552 1 Yoke 13 See screw kits page 4 7 4 Shoulder screw 14 See HID proximity control electronics kit page 4 5 1 HID proximity control electronics board assembly with backup battery not shown See Motorola proximity control electronics kit page 4 5 1 Motorola proximity control e...

Page 62: ...4607 1 Washer 22 See screw kits page 4 7 1 Lift finger screw 23 See primary harness kit page 4 10 1 Primary harness 24 D64551 1 Mounting plate for Precision Hardware installations not shown D64634 1 Mounting plate for Von Duprin installations 25 See screw kits page 4 7 5 Mounting plate screw 26 See screw kits page 4 7 6 Mounting standoff 27 C64564 1 Escutcheon gasket 28 C64560 1 Battery bracket 29...

Page 63: ...se cylinder and related components diagram Mortise cylinder and related components parts list Refer to Figure 3 5 and the table below to find the part you need Figure 3 5 Mortise cylinder and related components diagram 1 2 Item Part no Qty Description 1 B35173 1 7 pin cylinder assembly 2 A06280 1 Cylinder ring ...

Page 64: ...mponents parts list Refer to Figure 3 6 and the table below to find the part you need Figure 3 6 Rim cylinder and related components diagram 1 2 3 Item Part no Qty Description 1 B00689 1 7 pin cylinder assembly 2 C13910 1 Clamp plate 3 A14533 2 Mounting screws not shown A64635 1 Mounting sleevea a For Von Duprin rim and rod applications only ...

Page 65: ...I S V Service Manual 3 17 LEVERS Levers diagram Levers parts list Refer to Figure 3 7 and the table below to find the part you need Figure 3 7 Levers diagram 1 2 Item Part no Qty Description 1 B64572 1 14 round lever 2 B64577 1 15 contoured lever ...

Page 66: ...Exit Hardware Trim Functions and Parts 3 18 B A S I S V Service Manual ...

Page 67: ...1 4 SHARED STANDARD AND EXIT HARDWARE TRIM PARTS This chapter includes reader conversion information for standard B A S I S V Locks and EX Series Exit Hardware Trim It also includes parts lists for shared kits and system components ...

Page 68: ... S V Smart Card Control Electronics Kit 1833602 Converting to a dual validation reader Since the reader gasket is extremely difficult to remove from the escutcheon in the field BEST does not recommend conversion to or from a dual validation reader by replacing the reader Contact your BEST Representative to obtain a complete outside escutcheon assembly Converting to an HID or a Motorola proximity r...

Page 69: ...l electronics board To replace the magnetic stripe control electronics board see page 9 10 for standard B A S I S Locks or page 10 10 for EX Series Exit Hardware Trim To replace the smart card control electronics board see page 9 12 for standard B A S I S Locks or page 10 11 for EX Series Exit Hardware Trim To replace the proximity control electronics board see page 9 16 for standard B A S I S Loc...

Page 70: ...etic stripe reader assembly track 3 Smart card reader assembly Dual validation reader assembly track 1 Dual validation reader assembly track 2 Dual validation reader assembly track 3 HID proximity reader assembly Motorola proximity reader assembly Escutcheon gaskets Mounting plate screw Lift finger screw Magnetic Stripe Reader Track 1 Kit 1837869 5 Magnetic Stripe Reader Track 2 Kit 1833445 5 Magn...

Page 71: ...oard ABA Jumper Backup battery Pull tab for backup battery Temporary operator card Escutcheon gaskets Mounting plate screw Lift finger screw B A S I S V Magnetic Stripe Control Electronics Kit 1833487 5 B A S I S V Smart Card Control Electronics Kit 1833602 5 B A S I S V Dual Validation Control Electronics Kit 1838108 5 B A S I S V HID Proximity Control Electronics Kit 1838422 5 B A S I S V Motoro...

Page 72: ...rness Kit for EX Series Exit Hardware Trim see page 4 10 Component Kit name Part number Lens cover with retaining ring Escutcheon gaskets Mounting plate screw Lift finger screw Lens Cover Kit 1838580 4 10 2 Kit includes one escutcheon gasket for standard B A S I S Locks and one escutcheon gasket for EX Series Exit Hardware Trim Components Kit name Part number Primary harness Tape for mounting the ...

Page 73: ...s for all standard B A S I S Locks Components Kit name Part number Reader assembly mounting screw Electronics board mounting screw Reader Assembly Mounting Screw Kit 1838621 25 Electronics Board Mounting Screw Kit 1839300 25 Components Kit name Part number Upper escutcheon screw for 1 3 4 thick doors Upper escutcheon screw for 2 thick doors Upper escutcheon screw for 2 1 4 thick doors Upper escutc...

Page 74: ...Screw for 2 1 4 Thick Doors Kit 1876557 10 Lower Escutcheon Screw for 2 1 2 Thick Doors Kit 1876599 10 Lower Escutcheon Screw for 2 3 4 Thick Doors Kit 1876630 10 Lower Escutcheon Screw for 3 Thick Doors Kit 1876672 10 Components Kit name Part number Lower escutcheon screw for 1 3 4 thick doors Lower escutcheon screw for 2 thick doors Lower escutcheon screw for 2 1 4 thick doors Lower escutcheon s...

Page 75: ... Door Screw Kit 1839489 10 TORX Battery Door Screw Kit 1839447 25 Components Kit name Part number TORX battery cover screw 1 1 4 battery bracket screw 1 3 4 battery bracket screw Mounting standoff Mounting plate screw Lever return spring Shoulder screw for yoke Lift finger screw Motor mounting screw Motor stop spacer TORX Battery Cover Screw Kit 1879139 10 Battery Bracket Screw Kit for Doors Less ...

Page 76: ...mbly Socket head screw Spacer Shear pin Shoulder screw Mounting plate screw Lift finger screw Escutcheon gasket Primary Harness Kit 1878931 5 Motor Assembly Kit 1878973 5 Shear Pin Kit 1879013 4 5 Components Kit name Part number Sensor module with deadbolt key override Sensor module with key override Sensor module with deadbolt Sensor Module with Deadbolt Key Override Kit 1833885 Sensor Module wit...

Page 77: ...ts parts list Refer to Figure 4 1 and the table below to find the part you need Figure 4 1 Other system components diagram 1 2 3 Item Part no Qty Description 1 1825277 1 Magnetic stripe card encoder with power supply not shown 1825235 1 Smart card encoder 2 1820876 2 Programming cable 3 VPA PVC Contact your BEST Representative for more details 1 PVC cards box of 500 not shown VPA POLYa 1 Polyester...

Page 78: ...Shared Standard and Exit Hardware Trim Parts 4 12 B A S I S V Service Manual ...

Page 79: ...all of the trim parts onto the door perform all of the steps for reinstalling parts in each section of this chapter Begin with the cylinder page 5 16 To service an individual part see the section for that part The instructions refer to other sections as necessary Note When servicing parts always test that the lock works properly when you re finished If you need to service See Levers page 5 2 Insid...

Page 80: ... the door hinges insert the outside lever and spindles assembly into the lock from the outside of the door 3 Slide the inside lever onto the inside spindle and secure it with the set screw 4 If you removed the escutcheons from the door make sure that the core is positioned properly in the outside escutcheon EV and FV only the escutcheons are aligned properly on the door and tighten the escutcheon ...

Page 81: ...emoving the inside and outside escutcheons 1 Remove the levers See page 5 2 2 Remove the battery door a Use a T15 TORX bit driver to remove the security screw from the battery door b Open the battery door and remove it from the escutcheon Figure 5 2 Removing the battery door four cell door shown Security screw Tabs ...

Page 82: ...pack from the battery connector on the wire harness 4 Remove the escutcheons a From the inside of the door remove the upper and lower escutcheon screws Figure 5 3 Removing the battery pack four cell pack shown Battery pack Inside of door Inside escutcheon Figure 5 4 Removing the inside escutcheon Upper escutcheon screw Lower escutcheon screw Inside of door Inside escutcheon ...

Page 83: ...deadbolt sensor connector FV and LV functions Note For a description of lock functions see page 2 2 d Remove the bushings and trim hole inserts for locks with brass escutcheons from each side of the door Figure 5 5 Disconnecting the motor connector and sensor connector Motor connection Key override sensor connector Inside of door Deadbolt sensor connector Figure 5 6 Removing the bushings and trim ...

Page 84: ...ns 1 Activate the backup battery If you are reinstalling the outside escutcheon go to Step 2 If you are installing a new outside escutcheon perform these steps a Locate the backup battery tab on the inside of the outside escutcheon b Pull down on the tab and remove it from the outside escutcheon to turn on the backup battery Caution For the lock to operate properly you must remove the backup batte...

Page 85: ...nserts and bushings a For locks with brass escutcheons insert the two trim hole inserts into the upper trim hole on each side of the door b Insert the two bushings into the harness hole on each side of the door Figure 5 8 Reinstalling the trim hole inserts and bushings Trim hole inserts Bushings ...

Page 86: ...harness Caution When routing the connectors make sure the harnesses are not routed across any sharp edges or over any surface that could damage their sleeving or wire insulation 4 Rest the outside escutcheon on the door by inserting the trim studs into the trim holes Note You can temporarily install the outside lever to hold the outside escutcheon in place See Reinstalling the levers page 5 2 Figu...

Page 87: ...or upgrading the lock without removing the lock from the door This cable does not connect to a mating lock connector Note 3 For a description of lock functions see page 2 2 Caution When making the motor connection and sensor connections make sure there are no loose wire connections where the wires are inserted into the connectors the connectors are firmly mated The following table describes the mo...

Page 88: ...nch the wires secure the escutcheons to the door Do not tighten the screws completely Use the combination mounting screw in the upper trim hole and the standard mounting screw in the lower trim hole 7 Reinstall the levers and tighten the escutcheon mounting screws See page 5 2 Figure 5 11 Securing the escutcheons Combination mounting screw Standard mounting screw Inside of door Inside escutcheon ...

Page 89: ... make sure there are no loose wire connections where the wires are inserted into the connectors the connectors are firmly mated b Place the battery pack inside the battery compartment Note For the four cell battery pack position the battery so that the foam will face the battery door Caution When routing the battery wires make sure the wires are not routed across any sharp edges or over any surfac...

Page 90: ... the battery door does not pinch any wires insert the tabs of the battery door into its mating slots and swing the door closed b Use a T15 TORX bit driver to secure the battery door with the security screw Tighten firmly Figure 5 13 Reinstalling the battery door four cell door shown Security screw Tabs Inside of door ...

Page 91: ...Reinstalling the mounting plates 1 Insert the outside mounting plate through the door and mortise case 2 Position the inside mounting plate opposite the outside mounting plate and screw them securely in place Caution Do not overtighten the mounting plate screws Overtightening may compress the mortise cavity and bind the locking mechanism 3 Reinstall the following parts inside and outside escutcheo...

Page 92: ...cylinder Reinstalling the core 1 Insert the control key into the core and rotate the key 15 degrees to the right 2 With the control key in the core insert the core into the cylinder 3 Rotate the control key 15 degrees to the left and withdraw the key Caution The control key can be used to remove cores and to access doors Provide adequate security for the control key 4 Reinstall the following parts...

Page 93: ...crews and remove the mortise case faceplate from the lock Save the screws Reinstalling the mortise case faceplate 1 Secure the mortise case faceplate to the mortise case with the faceplate mounting screws 2 Check the lock for proper operation Figure 5 16 Removing and reinstalling the mortise case faceplate Outside of door Mortise case faceplate Faceplate mounting screws ...

Page 94: ...ench ED211 to turn the cylinder counterclockwise until you can remove it Reinstalling the cylinder 1 Use a cylinder wrench to thread the cylinder into the mortise case so that the groove around the cylinder head is even with the door surface Note Do not tighten the cylinder set screw until you reinstall the outside escutcheon Caution A malfunction can occur if the cylinder is threaded in too far 2...

Page 95: ...ard B A S I S V mortise case parts Note When replacing parts always test that the lock works properly when you re finished If you need to See Remove the mortise case from the door and open the case page 6 2 Change the hand or bevel page 6 3 Perform function conversion page 6 10 Service parts inside the mortise case page 6 14 ...

Page 96: ...r case cover screws 3 Install the mortise case spacer and the case cover screw 4 Insert the mortise case into the mortise cavity while feeding the sensor and motor wires into the mortise cavity and out the sensor motor wire hole to the inside of the door Note If the armored front of the mortise case is not flush with the door edge remove the case and loosen the screws at the top and bottom of the ...

Page 97: ... and or bevel and detailed instructions for each task Each outline references the detailed instructions for each task found in Tasks for changing the hand and bevel which begins on page 6 6 Changing hand and bevel quick reference Review the diagram below to understand the hand and bevel of the door Figure 6 2 Explanation of the hand and bevel of the door Outside Outside Left hand LH Right hand RH ...

Page 98: ... the section that follows for instructions B represents the latchbolt and auxiliary bolt H represents the hubs C represents the cylinder clamp plate assembly Figure 6 3 Overview of changing the hand and bevel FV function LH case shown Outside hub Inside hub Latchbolt Cylinder clamp plate Auxiliary bolt LH RH LHRB RHRB LH B H C B H C RH B H C H C B LHRB B H C B H C RHRB H C B B H C ...

Page 99: ...g over the latchbolt page 6 9 6 Close and reinstall the mortise case page 6 2 Changing the bevel only Refer to the detailed instructions for each task that follows 1 Remove and open the mortise case page 6 2 2 Perform the steps in Turning over the auxiliary bolt page 6 8 3 Perform the steps in Turning over the latchbolt page 6 9 4 Close and reinstall the mortise case page 6 2 Changing the hand and...

Page 100: ...e Maintain the hub s orientation 4 Turn over the hubs 5 Push the hub lever toward the side of the case and slide the now bottom hub under the auxiliary levers 6 Insert the now top hub onto the bottom hub Note The inside hub is silver colored It is always on the side of the case that faces the inside of the door The outside hub is gold colored It is always on the side of the case that faces the out...

Page 101: ...e in the case The locking bar fits into the slot on the outside hub The two feet on the bottom of the locking bar fit into the bottom of the case Turning over the cylinder clamp plate Turn over the cylinder clamp plate and insert it in the case See Figure 6 4 Note The screw must be on the same side of the case as the cylinder Figure 6 5 Motor module and locking bar in place Outside hub Locking bar...

Page 102: ... top of the auxiliary bolt spring The center of both spring coils should rest around the hollow post 5 Position the long straight shank of the auxiliary bolt spring so it rests between the solid post on the deadlocking lever and the hubs Position the short straight shank of the deadlocking spring against the U shaped latchbolt rod support 6 While holding the springs on the post grasp the bent shan...

Page 103: ...grommet on the latchbolt away from the U shaped latchbolt rod support Rest the latchbolt rod into the U shaped support Release the grommet It should snap into place Note 1 If you can pull the square shaped tail out of the rod support the latchbolt is not placed properly Reposition the latchbolt Note 2 The bevel of the latchbolt must match the bevel of the auxiliary bolt 5 Reinstall the latch lever...

Page 104: ...se case page 6 2 b Remove the clamp plate from the mortise case page 6 19 c Close and reinstall the mortise case page 6 2 3 Remove all of the parts from the old outside escutcheon by performing all of the steps for removing parts in each section of Chapter 9 Begin with the escutcheon gasket page 9 2 4 Install all of the parts from the old outside escutcheon into the new outside escutcheon by perfo...

Page 105: ... all of the steps for removing parts in each section of Chapter 5 Begin with the levers page 5 2 2 Remove and open the mortise case page 6 2 3 For LV to FV conversions remove the sensor module page 6 16 4 Install the following parts in the mortise case sensor module page 6 16 clamp plate page 6 19 5 Remove all of the parts from the old outside escutcheon by performing all of the steps for removing...

Page 106: ...parts in the mortise case sensor module page 6 16 deadbolt page 6 18 turn knob hub assembly page 6 18 4 For NV to LV conversions install the sensor harness kit in the outside escutcheon 5 Close and reinstall the mortise case page 6 2 6 Reinstall all of the trim parts onto the door including the new inside escutcheon and faceplate by performing all of the steps for reinstalling parts in each sectio...

Page 107: ...onversions install the new sensor module in the mortise case 5 For LV to NV conversions remove the sensor harness from the outside escutcheon page 9 6 6 Close and reinstall the mortise case page 6 2 7 Reinstall all of the trim parts onto the door including the new inside escutcheon and faceplate by performing all of the steps for reinstalling parts in each section of Chapter 5 Begin with the cylin...

Page 108: ...njure you Removing the motor module 1 Remove and open the mortise case page 6 2 2 Rotate the locking bar and motor module Remove the locking bar from the case See Figure 6 9 3 Use a pair of needle nosed pliers to carefully remove the upper auxiliary spring from the case 4 Remove the wire strain relief and motor module from the case 5 Open the wire strain relief and remove the wires Figure 6 9 Remo...

Page 109: ... pulled so tightly that there is strain on the connection to the motor and the wires are not pulled so loosely that they will interfere with the operation of the auxiliary springs 4 Clamp the wires in the strain relief Slide the strain relief into position on the case It should lock into place 5 Install the upper auxiliary spring on the post so the short shank rests against the auxiliary return le...

Page 110: ...d open the mortise case page 6 2 2 Remove the latch lever 3 Remove the sensor module Reinstalling the sensor module 1 Position the sensor module in the case and route the cables as shown in Figure 6 10 2 Reinstall the latch lever 3 Close and reinstall the mortise case page 6 2 Figure 6 10 Removing and reinstalling the sensor module FV function LH case shown Sensor module Latch lever Sensormodule c...

Page 111: ...emove the latch lever See Figure 6 10 3 Pull the deadbolt spring away from the turn knob hub and remove the turn knob hub from the case See Figure 6 11 4 Grasp the deadbolt by the post and remove the deadbolt from the case 5 Remove the turn knob hub spacer from the case Figure 6 11 Removing the deadbolt turn knob hub and spacer FV function LH case shown Deadbolt Turn knob hub Turn knob hub spacer ...

Page 112: ...s though the opening in the armored front 3 Insert the turn knob hub into the turn knob hub spacer so that the tail of the turn knob hub is positioned against the deadbolt as shown in Figure 6 12 4 Position the spring on the deadbolt against the turn knob hub as shown in Figure 6 12 5 Reinstall the latch lever 6 Close and reinstall the mortise case page 6 2 Figure 6 12 Positioning the turn knob hu...

Page 113: ...e mortise case page 6 2 2 Remove the cylinder clamp plate from the case Reinstalling the cylinder clamp plate 1 Insert the cylinder clamp plate into the case so the screw is on the same side of the case as the concealed cylinder 2 Close and reinstall the mortise case page 6 2 Figure 6 13 Removing and reinstalling the cylinder clamp plate Cylinder clamp plate ...

Page 114: ...Servicing Standard Mortise Case Parts 6 20 B A S I S V Service Manual ...

Page 115: ... all of the trim parts onto the door perform all of the steps for reinstalling parts in each section of this chapter Begin with the rose liners page 7 16 To service an individual part see the section for that part The instructions refer to other sections as necessary Note When replacing parts always test that the lock works properly when you re finished If you need to service See Core and throw me...

Page 116: ...hrow member 1 Install the blocking plate onto the throw member Caution You must use the blocking plate to prevent unauthorized access 2 Insert the control key into the core and rotate the key 15 degrees to the right 3 Insert the throw member into the core 4 Insert the core and throw member into the lever with the control key 5 Rotate the control key 15 degrees to the left and withdraw the key Caut...

Page 117: ...e arrow shown in Figure 7 3 Note You will not be able to remove the lever if the screwdriver blade is inserted too far past the keeper 4 Slide the lever off of the sleeve Removing the plain lever Insert the protrusion on the spanner wrench into the hole on the shaft of the lever as shown in Figure 7 4 Slide the lever off of the sleeve Figure 7 3 Removing the keyed lever Figure 8 core hole Insert s...

Page 118: ...s position a lever on the outside sleeve and push firmly on the lever until it is seated Repeat placing the other lever on the inside sleeve 2 Tighten the escutcheon mounting screws 3 Turn the levers to check that they operate smoothly 4 Reinstall the core and throw member page 7 2 Figure 7 5 Reinstalling the levers Outside of door ...

Page 119: ...side escutcheons 1 Remove the following parts core and throw member page 7 2 levers page 7 3 2 Remove the battery door a Use a T15 TORX bit driver to remove the security screw from the battery door b Open the access door and remove it from the escutcheon Figure 7 6 Removing the battery door four cell door shown Tabs Security screw ...

Page 120: ...pack from the battery connector on the wire harness 4 Remove the escutcheons a Remove the combination mounting screw and standard mounting screw from the inside escutcheon Figure 7 7 Removing the battery pack four cell pack shown Inside escutcheon Battery pack Figure 7 8 Removing the escutcheon Combination mounting screw Standard escutcheon screw Inside escutcheon ...

Page 121: ... mating connector on the wire harness d Remove the bushings trim hole inserts and hub washers from each side of the door Note Trim hole inserts and hub washers are used only for locks with brass escutcheons Figure 7 9 Disconnecting the motor connector Inside of door Motor connector Figure 7 10 Removing the bushings trim hole inserts and hub washers Trim hole inserts Bushings Hub washers ...

Page 122: ... backup battery If you are reinstalling the outside escutcheon go to Step 2 If you are installing a new outside escutcheon perform these steps a Locate the backup battery tab on the inside of the outside escutcheon b Pull down on the tab and remove it from the outside escutcheon to turn on the backup battery Caution For the lock to operate properly you must remove the backup battery tab Caution Do...

Page 123: ...hole on each side of the door b For locks with brass escutcheons insert the two bushings into the harness hole on each side of the door c For locks with brass escutcheons on each side of the door slide a hub washer over the chassis sleeve so it rests on the hub Figure 7 12 Reinstalling the bushings trim hole inserts and hub washers Trim hole inserts Bushings Hub washers ...

Page 124: ...ectors make sure the wire harness is not routed across any sharp edges or over any surface that could damage its sleeving or wire insulation c Temporarily rest the outside escutcheon on the door by inserting the trim studs into the trim holes Note You can temporarily install the outside lever to hold the outside escutcheon in place See Reinstalling the levers page 7 4 Figure 7 13 Feeding the wire ...

Page 125: ...ading the lock without removing the lock from the door This cable does not connect to a mating lock connector Caution When connecting the motor connector make sure there are no loose wire connections where the wires are inserted into the connectors the connectors are firmly mated Wire connection Colors No of wires No of pins Motor Yellow Gray 2 2 Figure 7 14 Connecting the motor connector Inside o...

Page 126: ...e door b Making sure that the escutcheons do not pinch the wires secure the escutcheons to the door but do not tighten Use the combination mounting screw at the upper trim hole and the standard mounting screw at the lower trim hole Figure 7 15 Securing the escutcheons Combination mounting screw Standard mounting screw Inside escutcheon ...

Page 127: ...ck make sure there are no loose wire connections where the wires are inserted into the connectors the connectors are firmly mated b Place the battery pack inside the battery compartment Note For the four cell battery pack position the battery so that the foam will face the battery door Caution When routing the battery wires make sure the wires are not routed across any sharp edges or over any surf...

Page 128: ...wires insert the tabs of the battery door into its mating slots and swing the door closed b Use a T15 TORX bit driver to secure the battery door with the security screw Tighten firmly 8 Reinstall the following parts levers page 7 4 core and throw member page 7 2 Figure 7 17 Reinstalling the battery door four cell door shown Tabs Security screw ...

Page 129: ...ottom holes in the rose liner 3 Slide the inside rose liner off of the door 4 Slide the chassis assembly out of the door 5 Retract the rose locking pin and rotate the outside rose liner until it is free from the hub 6 Remove the rose and liner assembly from the sleeve E Figure 7 18 Removing the inside rose liner Through bolt Motor wire Inside of door Rose liner Figure 7 19 Removing the outside ros...

Page 130: ...ssis hole routing the motor wire through the notch Caution Make sure that the latch tube prongs engage the chassis frame and that the latch tailpiece engages the retractor 4 Place the inside rose liner on the chassis aligning the holes in the rose liner with the holes prepared in the door Caution Make sure that there is clearance for the motor wire between the rose liner and the door 5 Install the...

Page 131: ...7 6 Tighten the rose liner on the door with the through bolts 7 Reinstall the following parts escutcheons page 7 8 levers page 7 4 core and throw member page 7 2 E Figure 7 21 Reinstalling the inside rose liner Through bolt Motor wire Inside of door Rose liner ...

Page 132: ... the following part numbers when ordering a new cylindrical chassis Removing the cylindrical chassis 1 Remove the following parts core and throw member page 7 2 levers page 7 3 escutcheons page 7 5 rose liners page 7 15 Reinstalling the cylindrical chassis 2 Reinstall the following parts rose liners page 7 16 escutcheons page 7 8 levers page 7 4 core and throw member page 7 2 Chassis type Part no ...

Page 133: ... the door perform all of the steps for reinstalling parts in each section of this chapter Begin with the B A S I S escutcheon page 8 14 To service an individual part see the section for that part The instructions refer to other sections as necessary Note When servicing parts always test that the lock works properly when you re finished If you need to service See Battery cover page 8 2 Battery pack...

Page 134: ...ving the battery cover 1 Use a T15 TORX driver to remove the security screws from the battery cover 2 Remove the battery cover from the battery bracket Figure 8 1 Removing and reinstalling the battery cover on the battery bracket Security screws Locationof knockout Inside of door Locationof knockout ...

Page 135: ...y cover with a surface rod exit device remove the knockouts for the rod from the battery cover See Figure 8 1 2 Making sure that the battery cover does not pinch any wires place the cover over the bracket 3 Use a T15 TORX bit driver to secure the battery compartment cover with the security screws Tighten firmly See Figure 8 1 ...

Page 136: ...Remove the battery pack from the holder inside the battery bracket Note You might need to cut a cable tie if one was used to dress the wire harness inside the battery bracket 3 Disconnect the battery pack from the battery connector on the wire harness Figure 8 2 Removing and reinstalling the battery pack Battery pack Inside of door Battery holder inside bracket ...

Page 137: ...nnectors and the connectors are firmly mated 2 Place the battery pack in the holder inside the battery bracket and dress the wire harness inside the bracket Caution Make sure you do not damage the sleeving on the battery pack Doing so may cause the batteries to be drained 3 If reinstalling with a surface rod device dress the wire harness inside the bracket to the left of the rod so that the harnes...

Page 138: ...8 4 2 Remove the two battery bracket mounting screws See Figure 8 3 3 Loosen the nut securing the com port to the bracket and slide the com port out of the bracket See Figure 8 4 Figure 8 3 Removing and reinstalling the battery bracket on the door Figure 8 4 Removing and reinstalling the com port in the battery bracket Mounting screws Inside of door Battery bracket Battery bracket Com port Nut ...

Page 139: ...ket 3 Position the battery bracket on the inside of the door as shown in Figure 8 3 Note If reinstalling with a surface rod exit device the battery bracket is mounted over the upper rod 4 Secure the battery bracket to the door using the two mounting screws Note Doors less than 2 in thickness use 1 1 4 screws Doors 2 or greater use 1 3 4 screws Caution When routing the wire harness make sure the wi...

Page 140: ...is secured on the outside of the door by the screws used to mount the lock stile case on the inside of the door Reinstalling the exit hardware 1 Reinstall the exit hardware lock stile case case cover touch bar assembly and related hardware follow the instructions provided by the exit hardware manufacturer Note Make any adjustments to the exit hardware necessary for compatibility with lever functio...

Page 141: ...the core from the cylinder Reinstalling the core 1 Insert the control key into the core and rotate the key 15 degrees to the right 2 With the control key in the core insert the core into the cylinder as shown in Figure 8 5 3 Rotate the control key 15 degrees to the left and withdraw the key Caution The control key can be used to remove cores and to access doors Provide adequate security for the co...

Page 142: ...nder 1 For doors less than 2 in thickness place the cylinder ring provided on the cylinder 2 Rotate the cylinder cam to the 12 o clock position as shown in Figure 8 6 3 Using a cylinder wrench ED211 insert the cylinder through the cylinder opening in the B A S I S escutcheon and screw the cylinder into the mortise case Make sure that the cylinder is oriented as shown in Figure 8 6 Caution Do not s...

Page 143: ...ecision Hardware installations 1 If installing a new cylinder break off the new spindle to match the length of the old spindle 2 Insert the cylinder through the cylinder opening in the B A S I S escutcheon and into the door as shown in Figure 8 8 3 Orient the cylinder and clamp plate as shown in Figure 8 8 From the inside of the door secure the cylinder using the clamp plate and mounting screws 4 ...

Page 144: ...ak off the spindle on the new cylinder to match the length of the old spindle 2 From the front of the B A S I S escutcheon insert the cylinder into the cylinder opening 3 Holding the cylinder in position in the escutcheon insert the cylinder mounting sleeve through the back of the escutcheon over the cylinder 4 Orient the cylinder and clamp plate as shown in Figure 8 9 From the back of the escutch...

Page 145: ...Hardware rim or rod exit device installation or page 8 10 for a mortise exit device installation Note If removing the escutcheon for a Von Duprin EV function rim or rod exit device installation you cannot remove the cylinder from the escutcheon until you have removed the escutcheon from the door See page 8 12 2 Remove the escutcheon from the door feeding the battery connector and com port out the ...

Page 146: ...ck before you have removed the backup battery tab Doing so may cause the lock to malfunction 3 From the outside of the door feed the com port and battery connector through the harness hole as shown in Figure 8 10 Caution When routing the connectors make sure the harnesses are not routed across any sharp edges or over any surface that could damage their sleeving or wire insulation 4 Rest the B A S ...

Page 147: ...To reinstall all of the parts in the outside escutcheon perform all of the steps for reinstalling parts in each section of this chapter Begin with the reader assembly page 9 18 To service an individual part see the section for that part The instructions refer to other sections as necessary Note When servicing components always test that the lock works properly when you re finished If you need to s...

Page 148: ...side and outside escutcheons from the door For mortise lock instructions see page 5 3 For cylindrical lock instructions see page 7 5 2 Remove the escutcheon gasket from the escutcheon and discard the gasket Reinstalling the escutcheon gasket 1 Peel away the protective backing from the edge of the escutcheon gasket and slide the gasket onto the upper escutcheon post Press the gasket into place on t...

Page 149: ...covers off the top of the outside escutcheon Reinstalling the lens covers 1 Insert the lens covers into the holes in the top of the outside escutcheon 2 On the inside of the escutcheon slide the retaining rings up and around the ends of the lens covers 3 Reinstall the following parts escutcheon gasket inside and outside escutcheons For mortise lock instructions see page 5 6 For cylindrical lock in...

Page 150: ...rness clamp under the loosened electronics board mounting screw 2 Position the primary harness sensor harness EV FV and LV function mortise locks and upgrade cable under the clamp as shown in Figure 9 3 Note For a description of lock functions see page 2 2 3 Tighten the screw 4 Reinstall the following parts escutcheon gasket page 9 2 inside and outside escutcheons For mortise lock instructions see...

Page 151: ...instructions see page 7 5 escutcheon gasket page 9 2 harness clamp page 9 4 2 Disconnect the upgrade cable from the electronics board Reinstalling the upgrade cable 1 Connect the upgrade cable to the J1 connector on the electronics board 2 Reinstall the following parts harness clamp page 9 4 escutcheon gasket page 9 2 inside and outside escutcheons For mortise lock instructions see page 5 6 For cy...

Page 152: ... instructions see page 5 3 For cylindrical lock instructions see page 7 5 escutcheon gasket page 9 2 harness clamp page 9 4 2 Disconnect the sensor harness from the electronics board Reinstalling the sensor harness 1 Connect the sensor harness to the J4 connector on the electronics board 2 Reinstall the following parts harness clamp page 9 4 escutcheon gasket page 9 2 inside and outside escutcheon...

Page 153: ... mortise lock instructions see page 5 3 For cylindrical lock instructions see page 7 5 escutcheon gasket page 9 2 harness clamp page 9 4 2 Disconnect the primary harness from the electronics board 3 Insert a flat blade screwdriver under the sounder and turn it to remove the sounder from the outside escutcheon Figure 9 6 Removing and reinstalling the primary harness from the electronics board smart...

Page 154: ...alling the primary harness 1 Connect the primary wire harness to the J3 connector on the electronics board 2 Remove the backing from the adhesive tape and apply the tape to the escutcheon 3 Press the sounder in place on the tape Figure 9 7 Disconnecting the sounder and com port from the outside escutcheon Sounder Outside escutcheon Nut Com port ...

Page 155: ...l the following parts harness clamp page 9 4 escutcheon gasket page 9 2 inside and outside escutcheons For mortise lock instructions see page 5 6 For cylindrical lock instructions see page 7 8 Figure 9 8 Connecting the sounder and com port to the outside escutcheon Sounder Com port Nut Spacer Close up of the bottom edge of the escutcheon showing the com port in position ...

Page 156: ...ing parts inside and outside escutcheons For mortise lock instructions see page 5 3 For cylindrical lock instructions see page 7 5 escutcheon gasket page 9 2 harness clamp page 9 4 upgrade cable page 9 5 sensor harness page 9 6 primary harness page 9 7 step 2 2 Remove and save the electronics board mounting screws See Figure 9 9 3 Disconnect the reader harness from the electronics board Set aside ...

Page 157: ...he reader harness to the connector on the upper left corner of the electronics board The connector should snap into place See Figure 9 9 3 Route the reader harness so it fits to the side of the green LED 4 Position the electronics board in the escutcheon so the LEDs fit into the retaining rings 5 Install the two electronics board mounting screws but do not tighten the screw for the harness clamp 6...

Page 158: ... escutcheon gasket page 9 2 harness clamp page 9 4 upgrade cable page 9 5 sensor harness page 9 6 primary harness step 2 page 9 7 2 Remove and save the electronics board mounting screws See Figure 9 10 3 Flip up the control electronics board Figure 9 10 Removing and reinstalling the smart card control electronics board Retaining ring Retaining ring Electronics board Outside escutcheon Electronics ...

Page 159: ...it from the outside escutcheon to turn on the backup battery Caution For the lock to operate properly you must remove the backup battery tab Caution Do not connect the battery pack before you have removed the backup battery tab Doing so may cause the lock to malfunction 2 Insert the flex cable into the connector on the back of the electronics board See Figure 9 12 3 Slide closed the flex cable con...

Page 160: ...he harness clamp 6 Reinstall the following parts primary harness page 9 8 step 1 sensor harness page 9 6 upgrade cable page 9 5 harness clamp and tighten the electronics board mounting screw page 9 4 escutcheon gasket page 9 2 inside and outside escutcheons For mortise lock instructions see page 5 6 For cylindrical lock instructions see page 7 8 Figure 9 12 Connecting the flex cable to the smart c...

Page 161: ...electronics board Set aside the electronics board Reinstalling the dual validation control electronics board 1 If you are installing a new control electronics board pull down on the backup battery tab and remove it from the outside escutcheon to turn on the backup battery Caution For the lock to operate properly you must remove the backup battery tab Caution Do not connect the battery pack before ...

Page 162: ... Reinstall the following parts primary harness page 9 8 step 1 sensor harness page 9 6 upgrade cable page 9 5 harness clamp and tighten the electronics board mounting screw page 9 4 escutcheon gasket page 9 2 inside and outside escutcheons For mortise lock instructions see page 5 6 For cylindrical lock instructions see page 7 8 Removing the proximity control electronics board 1 Remove the followin...

Page 163: ...with the reader pins Press the board into place 3 Install the two electronics board mounting screws but do not tighten the screw for the harness clamp Note The jumper shown in Figure 9 14 must be installed in order to use an ABA card format with a proximity card reader This jumper must be removed to use a Weigand card format 4 Reinstall the following parts primary harness page 9 8 step 1 sensor ha...

Page 164: ...d outside escutcheons For mortise lock instructions see page 5 3 For cylindrical lock instructions see page 7 5 escutcheon gasket page 9 2 harness clamp page 9 4 upgrade cable page 9 5 sensor harness page 9 6 primary harness step 2 page 9 7 electronics board page 9 12 2 Remove and save the four reader assembly mounting screws See Figure 9 15 Figure 9 15 Removing and reinstalling the screws for the...

Page 165: ...To determine the read head track position for ordering a magnetic stripe reader replacement kit look at the back of the reader for the label that states This reader was factory set to read magstripe track no 1 2 The track number is circled If there is no label the track number is 3 Figure 9 16 Removing the magnetic stripe reader assembly from the outside escutcheon Reader harness Magnetic stripe r...

Page 166: ...nstall the four reader assembly mounting screws See Figure 9 15 3 Reinstall the following parts electronics board page 9 13 primary harness page 9 8 step 1 sensor harness page 9 6 upgrade cable page 9 5 harness clamp page 9 4 escutcheon gasket page 9 2 inside and outside escutcheons For mortise lock instructions see page 5 6 For cylindrical lock instructions see page 7 8 Figure 9 17 Positioning th...

Page 167: ... see page 5 3 For cylindrical lock instructions see page 7 5 escutcheon gasket page 9 2 harness clamp page 9 4 upgrade cable page 9 5 sensor harness page 9 6 primary harness step 2 page 9 7 electronics board page 9 12 2 Remove and save the four reader assembly mounting screws See Figure 9 18 Figure 9 18 Removing and reinstalling the screws for the smart card reader assembly Reader assembly mountin...

Page 168: ...3 Remove the smart card reader assembly from the outside escutcheon sliding the flex cable through the slot in the escutcheon See Figure 9 19 Figure 9 19 Removing the smart card reader assembly from the outside escutcheon Flex cable Smart card reader assembly Outside escutcheon ...

Page 169: ...nstall the four reader assembly mounting screws See Figure 9 18 3 Reinstall the following parts electronics board page 9 13 primary harness step 1 page 9 8 sensor harness page 9 6 upgrade cable page 9 5 harness clamp page 9 4 escutcheon gasket page 9 2 inside and outside escutcheons For mortise lock instructions see page 5 6 For cylindrical lock instructions see page 7 8 Figure 9 20 Positioning th...

Page 170: ... see page 5 3 For cylindrical lock instructions see page 7 5 escutcheon gasket page 9 2 harness clamp page 9 4 upgrade cable page 9 5 sensor harness page 9 6 primary harness step 2 page 9 7 electronics board page 9 15 2 Remove and save the four reader assembly mounting screws See Figure 9 21 Figure 9 21 Removing and reinstalling the screws for the dual validation reader assembly Reader assembly mo...

Page 171: ...determine the read head track position for ordering a dual validation reader replacement kit look at the back of the reader for the label that states This reader was factory set to read dual validation track no 1 2 The track number is circled If there is no label the track number is 3 Figure 9 22 Removing the dual validation reader assembly from the outside escutcheon Reader cable Dual validation ...

Page 172: ...nstall the four reader assembly mounting screws See Figure 9 21 3 Reinstall the following parts electronics board page 9 15 primary harness page 9 8 step 1 sensor harness page 9 6 upgrade cable page 9 5 harness clamp page 9 4 escutcheon gasket page 9 2 inside and outside escutcheons For mortise lock instructions see page 5 6 For cylindrical lock instructions see page 7 8 Figure 9 23 Positioning th...

Page 173: ...ck instructions see page 7 5 escutcheon gasket page 9 2 harness clamp page 9 4 upgrade cable page 9 5 sensor harness page 9 6 primary harness step 2 page 9 7 electronics board page 9 16 2 Remove and save the four reader assembly mounting screws See Figure 9 24 3 Remove the proximity reader assembly from the outside escutcheon Figure 9 24 Removing the proximity reader assembly from the outside escu...

Page 174: ... the four reader assembly mounting screws See Figure 9 24 3 Reinstall the following parts electronics board page 9 17 primary harness page 9 8 step 1 sensor harness page 9 6 upgrade cable page 9 5 harness clamp page 9 4 escutcheon gasket page 9 2 inside and outside escutcheons For mortise lock instructions see page 5 6 For cylindrical lock instructions see page 7 8 Figure 9 25 Positioning the prox...

Page 175: ...ter Begin with the mounting standoffs page 10 2 To reinstall all of the parts in the B A S I S escutcheon perform all of the steps for reinstalling parts in each section of this chapter Begin with the shear pin page 10 29 To change the handing for the B A S I S escutcheon see page 10 30 To service an individual part see the section for that part The instructions refer to other sections as necessar...

Page 176: ...offs from the mounting plate Reinstalling the mounting standoffs 1 Screw the 6 mounting standoffs onto the mounting plate 2 Reinstall the escutcheon on the door See page 8 14 Control electronics board page 10 10 Reader assembly page 10 13 Motor assembly page 10 16 Locking plate page 10 20 Yoke page 10 22 Beam and beam roller page 10 24 Lever assembly page 10 26 Shear pin page 10 28 If you need to ...

Page 177: ...Peel the gasket off the escutcheon and discard See Figure 10 2 Note You may need to scrape remnants of the gasket from the escutcheon Reinstalling the escutcheon gasket 1 Starting at the bottom of the gasket peel away the protective backing a small amount at a time while unrolling the gasket into position on the escutcheon 2 Press the gasket into place on the escutcheon See Figure 10 2 3 Reinstall...

Page 178: ...lift finger screw page 4 9 Removing the lift finger 1 Remove the following parts escutcheon from the door page 8 13 mounting standoffs page 10 2 escutcheon gasket page 10 3 2 Note the orientation of the lift finger See Figure 10 3 3 Remove the lift finger screw and discard 4 Remove the washer and lift finger Figure 10 3 Removing and reinstalling the lift finger Precision Hardware rim configuration...

Page 179: ...nger on the escutcheon in the orientation noted in step 2 on page 10 4 2 Position the washer on the lift finger screw Tightly secure the lift finger with the lift finger screw 25 30 lbs torque See Figure 10 3 3 Reinstall the following parts escutcheon gasket page 10 3 mounting standoffs page 10 2 escutcheon on the door page 8 14 ...

Page 180: ...ng the mounting plate 1 Remove the following parts escutcheon from the door page 8 13 mounting standoffs page 10 2 escutcheon gasket page 10 3 lift finger page 10 4 2 Cut the cable tie off the mounting plate post and discard the cable tie See Figure 10 4 3 Remove the 5 mounting plate screws and discard 4 Carefully remove the mounting plate from the escutcheon Figure 10 4 Removing and reinstalling ...

Page 181: ... lever return springs slide the mounting plate into the escutcheon See Figure Figure 10 5 Make sure that the locking plate fits into the slot in the mounting plate See Figure 10 4 2 Install the 5 new mounting plate screws 3 Route the primary harness against the mounting plate post and secure the harness to the post with a cable tie See Figure 10 4 4 Reinstall the following parts lift finger page 1...

Page 182: ...s escutcheon from the door page 8 13 mounting standoffs page 10 2 escutcheon gasket page 10 3 lift finger page 10 4 mounting plate page 10 6 2 Remove the lever return springs from the yoke See Figure 10 5 Reinstalling the lever return springs 1 Install the lever return springs onto the yoke posts See Figure 10 5 2 Reinstall the following parts mounting plate page 10 7 lift finger page 10 5 escutch...

Page 183: ...3 2 Reinstall the following parts mounting plate page 10 7 escutcheon gasket page 10 3 lift finger page 10 5 mounting standoffs page 10 2 escutcheon on the door page 8 14 SERVICING THE PRIMARY HARNESS A replacement kit is available for the primary harness See page 4 10 Each time you service the primary harness you need to replace the following parts with new parts escutcheon gasket C64564 cable ti...

Page 184: ...CONTROL ELECTRONICS BOARDS Replacement kits are available for control electronics boards See page 4 5 Each time you service the control electronics board you need to replace the following parts with new parts escutcheon gasket C64564 cable tie lift finger screw page 4 9 mounting plate screws page 4 9 Note To determine whether a lock has a B A S I S G or B A S I S V control electronics board look a...

Page 185: ...n gasket page 10 3 lift finger page 10 4 mounting plate page 10 6 primary harness page 10 10 2 Perform steps 2 through 4 starting on page 9 12 Reinstalling the smart card control electronics board 1 Perform steps 1 through 5 starting on page 9 13 2 Reinstall the following parts primary harness page 10 10 mounting plate page 10 7 lift finger page 10 5 escutcheon gasket page 10 3 mounting standoffs ...

Page 186: ... the dual validation control electronics board 1 Perform steps 1 through 5 starting on page 9 15 2 Reinstall the following parts primary harness page 10 10 mounting plate page 10 7 lift finger page 10 5 escutcheon gasket page 10 3 mounting standoffs page 10 2 escutcheon on the door page 8 14 ...

Page 187: ...late page 10 7 lift finger page 10 5 escutcheon gasket page 10 3 mounting standoffs page 10 2 escutcheon on the door page 8 14 SERVICING THE READER ASSEMBLIES Replacement kits are available for the reader assemblies See page 4 4 Each time you service the reader assembly you need to replace the following parts with new parts escutcheon gasket C64564 cable tie lift finger screw page 4 9 mounting pla...

Page 188: ...ger page 10 4 mounting plate page 10 6 primary harness page 10 10 electronics board page 10 11 2 Perform steps 2 and 3 starting on page 9 22 Reinstalling the smart card reader assembly 1 Perform steps 1 and 2 on page 9 24 2 Reinstall the following parts electronics board page 10 11 primary harness page 10 10 mounting plate page 10 7 lift finger page 10 5 escutcheon gasket page 10 3 mounting stando...

Page 189: ...ng the proximity reader assembly 1 Remove the following parts escutcheon from the door page 8 13 mounting standoffs page 10 2 escutcheon gasket page 10 3 lift finger page 10 4 mounting plate page 10 6 primary harness page 10 10 electronics board page 10 13 2 Perform steps 2 and 3 on page 9 28 Reinstalling the proximity reader assembly 1 Perform steps 1 and 2 on page 9 29 2 Reinstall the following ...

Page 190: ...ble tie lift finger screw page 4 9 mounting plate screws page 4 9 tape for mounting the sounder Removing the motor assembly 1 Remove the following components escutcheon from the door page 8 13 mounting standoffs page 10 2 escutcheon gasket page 10 3 lift finger page 10 4 mounting plate page 10 6 lever return springs page 10 8 2 Disconnect the motor connector from the primary harness See Figure 10 ...

Page 191: ...mbly until the locking lever is as close to the screw hole as possible as shown in Figure 10 7 Note If the locking lever does not move freely as you turn the gear gently move the locking lever into position 2 Position the motor assembly in the escutcheon as shown in Figure 10 8 Make sure that the locking lever is inserted through the locking plate the motor assembly pivot pin is seated in the rece...

Page 192: ...w Using a 3 32 hex driver reinstall the socket head screw 4 Route the motor harness into the groove in the escutcheon as shown in Figure 10 8 5 Reinstall the sounder onto the escutcheon See Figure 10 9 Figure 10 8 Routing the motor harness Locking plate Locking lever Pivot pin Socket head screw Motor harness Motor assembly ...

Page 193: ...arness to the primary harness 7 Reinstall the following components lever return springs page 10 8 mounting plate page 10 7 lift finger page 10 5 escutcheon gasket page 10 3 mounting standoffs page 10 2 escutcheon on the door page 8 14 Figure 10 9 Reinstalling the motor assembly Sounder Motor connector ...

Page 194: ...r screw page 4 9 mounting plate screws page 4 9 Removing the locking plate 1 Remove the following parts escutcheon from the door page 8 13 mounting standoffs page 10 2 escutcheon gasket page 10 3 lift finger page 10 4 mounting plate page 10 6 lever return springs page 10 8 motor assembly page 10 16 2 Slide the locking plate out of the escutcheon See Figure 10 10 Figure 10 10 Removing and reinstall...

Page 195: ...re that the locking lever of the motor assembly is inserted through the locking plate 2 Reinstall the following parts motor assembly page 10 17 lever return springs page 10 8 mounting plate page 10 7 lift finger page 10 5 escutcheon gasket page 10 3 mounting standoffs page 10 2 escutcheon on the door page 8 14 Figure 10 11 Reinstalling the locking plate Locking plate Locking lever ...

Page 196: ...ng plate screws page 4 9 4 shoulder screws page 4 10 Removing the yoke 1 Remove the following parts escutcheon from the door page 8 13 mounting standoffs page 10 2 escutcheon gasket page 10 3 lift finger page 10 4 mounting plate page 10 6 lever return springs page 10 8 2 Unscrew the 4 shoulder screws and discard See Figure 10 12 3 Remove the yoke from the escutcheon Figure 10 12 Removing and reins...

Page 197: ... grease or an equivalent quality petroleum around the slots on the face of the yoke 3 Tightly secure the yoke to the escutcheon using the 4 new shoulder screws 20 25 lbs torque See Figure 10 12 4 Reinstall the following parts lever return springs page 10 8 mounting plate page 10 7 lift finger page 10 5 escutcheon gasket page 10 3 mounting standoffs page 10 2 escutcheon on the door page 8 14 ...

Page 198: ...nger screw page 4 9 mounting plate screws page 4 9 4 shoulder screws page 4 10 Removing the beam and beam roller 1 Remove the following parts escutcheon from the door page 8 13 mounting standoffs page 10 2 escutcheon gasket page 10 3 lift finger page 10 4 mounting plate page 10 6 lever return springs page 10 8 yoke page 10 22 2 Remove the c clip from the lever spindle See Figure 10 13 Figure 10 13...

Page 199: ...Figure 10 14 2 Reinstall the c clip onto the lever spindle The orientation of the clip does not matter See Figure 10 13 3 Place the beam roller on the beam 4 Reinstall the following parts yoke page 10 23 lever return springs page 10 8 mounting plate page 10 7 lift finger page 10 5 escutcheon gasket page 10 3 mounting standoffs page 10 2 escutcheon on the door page 8 14 Figure 10 14 Removing and re...

Page 200: ... mounting plate screws page 4 9 4 shoulder screws page 4 10 Removing the lever assembly 1 Remove the following parts escutcheon from the door page 8 13 mounting standoffs page 10 2 escutcheon gasket page 10 3 lift finger page 10 4 mounting plate page 10 6 lever return spring page 10 8 yoke page 10 22 beam and beam roller page 10 24 2 Remove the lever from the front of the escutcheon See Figure 10 ...

Page 201: ...rection of the lever handle See Figure 10 16 2 Insert the lever through the escutcheon positioning the lever so its handle will point toward the door hinges See Figure 10 15 3 Reinstall the following parts beam and beam roller page 10 25 yoke page 10 23 lever return spring page 10 8 mounting plate page 10 7 lift finger page 10 5 escutcheon gasket page 10 3 mounting standoffs page 10 2 escutcheon p...

Page 202: ...ft finger screw page 4 9 mounting plate screws page 4 9 4 shoulder screws page 4 10 Removing the shear pin 1 Remove the following parts escutcheon from the door page 8 13 mounting standoffs page 10 2 escutcheon gasket page 10 3 lift finger page 10 4 mounting plate page 10 6 lever return spring page 10 8 yoke page 10 22 beam and beam roller page 10 24 lever assembly page 10 26 2 Remove the shear pi...

Page 203: ...positioned in the lever so that the head faces the opposite direction of the lever handle See Figure 10 16 2 Reinstall the following parts lever assembly page 10 27 beam and beam roller page 10 25 yoke page 10 23 lever return spring page 10 8 mounting plate page 10 7 lift finger page 10 5 escutcheon gasket page 10 3 mounting standoffs page 10 2 escutcheon in the door page 8 14 ...

Page 204: ...he handing for Precision Hardware mortise applications you must replace the lift finger with the correct lift finger for the desired handing To order the left hand lift finger use part number C64576 To order the right hand lift finger use part number C64568 1 Remove the following parts escutcheon from the door page 8 13 mounting standoffs page 10 2 escutcheon gasket page 10 3 lift finger page 10 4...

Page 205: ... lever through the escutcheon positioning the lever so its handle will point toward the door hinges See Figure 10 17 3 Reinstall the following parts beam and beam roller page 10 25 yoke page 10 23 lever return springs page 10 8 mounting plate page 10 7 lift finger page 10 5 escutcheon gasket page 10 3 mounting standoffs page 10 2 escutcheon on the door page 8 14 Figure 10 17 Changing the handing S...

Page 206: ...Servicing Exit Hardware Trim Escutcheon Parts 10 32 B A S I S V Service Manual ...

Page 207: ...ardware Trim Note When servicing components always test that the lock works properly when you re finished If you need to See Replace the backup battery page 11 2 Replace or upgrade the battery pack page 11 4 Add key override sensing to standard B A S I S Mortise Locks and B A S I S Locks with V Series mortise cases page 11 10 Perform diagnostics using a PDA page 11 13 ...

Page 208: ... I S escutcheon from the door See page 8 13 2 For standard locks remove the gasket from the outside escutcheon to expose the control electronics board and discard the gasket For exit hardware trim remove the following parts from the escutcheon to expose the control electronics board mounting standoffs page 10 2 escutcheon gasket page 10 3 lift finger page 10 4 mounting plate page 10 6 3 Remove the...

Page 209: ...trim reinstall the following parts in the escutcheon mounting plate page 10 7 lift finger page 10 5 escutcheon gasket page 10 3 mounting standoffs page 10 2 3 For standard locks reinstall the inside and outside escutcheons on the door For mortise lock instructions see page 5 6 For cylindrical lock instructions see page 7 8 For exit hardware trim reinstall the escutcheon on the door See page 8 14 F...

Page 210: ...101 An upgrade kit is available to upgrade a standard lock with a four cell battery pack and brass escutcheons to an eight cell battery pack See page 4 5 Removing the battery pack for a standard lock 1 Use a T15 TORX bit driver to remove the security screw from the battery door See Figure 11 3 2 Open the battery door and remove it from the escutcheon 3 Remove the battery pack from the battery comp...

Page 211: ...Maintenance B A S I S V Service Manual 11 5 Figure 11 4 Removing the battery pack four cell pack shown Battery pack Inside escutcheon ...

Page 212: ...ires are inserted into the connectors the connectors are firmly mated 2 Place the battery pack inside the battery compartment Note For the four cell battery pack position the battery so that the foam will face the battery door Caution When routing the battery wires make sure the wires are not routed across any sharp edges or over any surface that could damage their sleeving or wire insulation 3 Ma...

Page 213: ...e B A S I S V Service Manual 11 7 4 Use a T15 TORX bit driver to secure the battery door with the security screw Tighten firmly Figure 11 6 Reinstalling the battery door eight cell door shown Security screw Tabs ...

Page 214: ...om the holder inside the battery bracket See Figure 11 8 Note You might need to cut a cable tie if one was used to dress the wire harness inside the battery bracket 4 Disconnect the battery pack from the battery connector on the wire harness Figure 11 7 Removing and reinstalling the battery cover on the battery bracket Security screws Inside of door Figure 11 8 Removing and reinstalling the batter...

Page 215: ...nside the battery bracket and dress the wire harness inside the bracket Caution Make sure you do not damage the sleeving on the battery pack Doing so may cause the batteries to be drained 3 If reinstalling with a surface rod device dress the wire harness inside the bracket to the left of the rod so that the harness will not interfere with the movement of the rods We recommend that you loosely coil...

Page 216: ...1833728 sensor module with deadbolt and key override kit FV function part number 1833885 or sensor module with key override kit EV function part number 1833927 1 Remove the inside and outside trim from the door page 5 3 2 If the lock has a sensor harness remove it See Figure 11 9 For complete instructions see page 9 6 3 Connect the new sensor harness For complete instructions see page 9 6 4 Remove...

Page 217: ...as a sensor module remove it For complete instructions see page 6 16 For V Series mortise cases loosen the two mounting screws on the sensor switch assembly Remove the assembly See Figure 11 10 Figure 11 10 Removing the V Series sensor switch assembly Mounting screw V Series sensor switch assembly ...

Page 218: ...r complete instructions see page 6 16 8 Reinstall the latch lever 9 Close and reinstall the mortise case page 6 2 10 Reinstall the inside and outside escutcheons on the door page 5 6 Figure 11 11 Positioning the sensor module in the mortise case FV function LH case shown Sensor module Latch lever ...

Page 219: ...this information The B A S I S G firmware ID is BAGLKS The B A S I S V firmware ID is BA_LKS Version Version number of the lock s firmware Technical support personnel may ask you to provide this information Diagnostics Code Hexadecimal number indicating firmware conditions such as firmware resets that have occurred at the lock since the diagnostics code was last cleared The code 0x00 means no cond...

Page 220: ...ne control Automatic or set to a specific mode such as Locked or Unlocked For more information see Changing a lock s online mode on page 11 18 Use Count Number of times access was granted since the use count was last reset To reset the use count see page 11 19 Main Battery Current power level of the lock s battery pack No shading in the status bar indicates an Alarm condition The batteries are dea...

Page 221: ...ervice Manual 11 15 Figure 11 13 Connecting the PDA to a standard lock Figure 11 14 Locating the communication port for exit hardware trim Serial cable Programming cable Communication port PDA Inside of door Communication port ...

Page 222: ...ield For instructions to use the PDA s virtual keyboard see the documentation provided with the PDA Note The password for a lock is the password programmed for the reader configuration s access control panel You must enter the password exactly as it was entered in the Password field on the Offline Lock form in the Access Panels folder Capitalization must be the same 6 Tap OK A message appears stat...

Page 223: ...e on page 11 20 8 When you have finished using diagnostics features tap Diagnostics then Disconnect The PDA closes communications with the lock 9 To return to the Main window tap View then Main 10 To disconnect the PDA from the lock press the button on the programming cable connector and unplug the programming cable from the lock s communication port See Figure 11 16 Figure 11 16 Disconnecting the...

Page 224: ...ne control The following online modes are available Automatic The lock is under timezone control Card Any valid card in the lock s database can access the lock Card and PIN Any valid card and PIN combination programmed in the lock s database can access the lock Card or PIN Any valid card or PIN programmed in the lock s database can be used to access the lock Facility Code Any card or PIN with a va...

Page 225: ...ult duration programmed for the lock letting you open the door 4 When you have finished using diagnostics features perform step 8 through step 10 on page 11 17 Resetting the use count Every B A S I S Lock keeps a count of times access is granted to a card or PIN since the use count was last reset You can use this count to track how often a lock is used during a selected time frame To reset the use...

Page 226: ...If you are already viewing diagnostics information for the lock go to step 2 If you are not viewing diagnostics information for the lock perform step 1 through step 7 on page 11 14 2 From the B A S I S Transport Diagnostics window on the PDA Figure 11 12 on page 11 13 tap Diagnostics then Reset then Diagnostics Code A confirmation message appears asking Reset diagnostics code 3 Select OK The diagn...

Page 227: ...d EX Series Exit Hardware Trim Note When servicing components always test that the lock works properly when you re finished If you need to See Understand the visual and audible responses page 12 2 Enable communications without a card or PIN page 12 3 Open a standard B A S I S Lock with dead batteries page 12 6 Respond to common problems page 12 7 ...

Page 228: ...a second card and or PIN during two card and or PIN control 3 flashes Access is granted 3 slow flashes Passage mode is granted 3 slow flashes 3 long tones Battery is low warning Stays on Door is in communication mode 3 flashes 3 short tones Access is denied Stays on PIN programming mode is active or the lock is busy after communication mode has ended 3 flashes 3 flashes 3 short tones Battery is ve...

Page 229: ...or For mortise lock instructions see page 5 3 For cylindrical lock instructions see page 7 5 For exit hardware trim remove the B A S I S escutcheon from the door See page 8 13 2 For standard locks peel back the lower edge of the gasket from the outside escutcheon to expose the lower portion of the control electronics board For exit hardware trim remove the following parts from the escutcheon to ex...

Page 230: ...e 5 Using B A S I S Transport select the communications activity you want to perform 6 When you see the login window press the password override button on the electronics board 7 When you have finished performing communications activities disconnect the PDA from the lock Press the button on the programming cable connector and unplug the programming cable from the lock s communication port Figure 1...

Page 231: ...e following parts in the escutcheon mounting plate page 10 7 lift finger page 10 5 escutcheon gasket page 10 3 mounting standoffs page 10 2 9 For standard locks reinstall the inside and outside escutcheons on the door For mortise lock instructions see page 5 6 For cylindrical lock instructions see page 7 8 For exit hardware trim reinstall the escutcheon on the door See page 8 14 ...

Page 232: ...place the battery pack 1 To provide temporary power to the lock connect the programming cable with an external battery pack connected to the lock s communication port Although the serial cable and PDA do not need to be connected to the programming cable it will not cause a problem if they are connected 2 To unlock the lock use a valid operating card for the lock 3 Replace the lock s battery pack S...

Page 233: ...r a valid card or PIN 3 short tones Denied a Card was used but not removed soon enough a Try using the card again b Variable card format error occurred b Check the variable card format Red flashes 3 short tones Denied a Card number is invalid a Check the access privileges b Timezone is invalid b Check the access privileges c For a standard mortise lock card does not have the deadbolt override priv...

Page 234: ...locks see page 9 24 For exit hardware trim see page 10 14 h For smart card readers conformal coating has been applied to the flex cable connector h Remove the flex cable from the connector and apply electrical contact cleaner onto the connector Reinstall the flex cable For standard locks see page 9 24 For exit hardware trim see page 10 14 i Firmware is out of date or faulty i Update the firmware C...

Page 235: ...ed Communication card was used Wait 1 minute for the communications mode to automatically expire or use any card again to turn off communications Red flashes Denied a Sounder is damaged a Replace the reader For standard locks see page 9 19 For exit hardware trim see page 10 13 b Control electronics board is malfunctioning b Replace the control electronics board For standard locks see page 9 10 For...

Page 236: ...to check whether the online mode is Automatic timezone control See page 11 18 Use B A S I S to check the reader configuration for the door For exit hardware trim the lever is dangling a Shear pin has been broken a Replace the shear pin See page 10 28 b Lever is not properly installed b Reinstall the lever See page 10 26 Cannot plug the PDA connector into the door s communications port a Foreign ob...

Page 237: ...e connections b The primary wire harness is damaged or disconnected b Check the primary wire harness If it s damaged replace the wire harness For standard locks see page 9 10 For exit hardware trim see page 10 10 c Communications cable or port is faulty or damaged c Try communicating with another device or PC If communications works the communication cable and serial cables are not the problem If ...

Page 238: ...Troubleshooting 12 12 B A S I S V Service Manual ...

Page 239: ...B A S I S V Service Manual A 1 A LOCK HISTORY EVENT TYPES The following table describes in alphabetical order each history event that can be recorded at a B A S I S Lock ...

Page 240: ...ccess to the card because the card s facility code was incorrect DENIED INACTIVE TOKEN The lock denied access to the indicated card or PIN because the card or PIN is not active in the database DENIED USE LIMIT EXCEEDED The lock denied access to the indicated card because the card exceeded the programmed use limit DENIED INVALID ACCESS LEVEL The lock denied access to the indicated card because the ...

Page 241: ...ride TRANSFER PDA TO LOCK Using B A S I S Transport settings were transferred from the PDA to the lock TRANSFER HISTORY Using B A S I S Transport the lock s history records were retrieved from the lock to the PDA TRANSFER DIAGNOSTICS Using B A S I S Transport the lock s diagnostics infor mation was retrieved from the lock to the PDA Event Description ...

Page 242: ...Lock History Event Types A 4 B A S I S V Service Manual ...

Page 243: ...ollowing pages contain the Installation Instructions for B A S I S Mortise Locks with brass escutcheons the Installation Instructions for B A S I S Cylindrical Locks with brass escutcheons and the Installation Instructions for B A S I S EX Series Exit Hardware Trim ...

Page 244: ...Installation Instructions B 2 B A S I S V Service Manual ...

Page 245: ...ndard for 35HBV Side of door Range Inside 66 F to 74 F 19 C to 23 C Outside 31 F to 151 F 35 C to 66 C This product meets the following Full Indoor test requirements for ANSI BHMA 156 25 Components checklist Use the following checklist to make sure that you have the items necessary to install your B A S I S Mortise Lock Components provided in the box Mortise case assembly Mortise case faceplate In...

Page 246: ...door 2 On the door s edge and door jamb mark the vertical centerline of the lock 3 Measure and mark the backset 2 3 4 standard from the vertical centerline on the door s edge On both sides of the door mark the vertical centerline of the lock 4 On the door jamb mark the horizontal centerline of the strike 3 8 above the horizontal centerline of the lock 2 Position template and mark drill points 1 Cu...

Page 247: ...e and faceplate 1 Mortise the edge of the door for the lock case Note The mortise cavity depth of 4 5 8 includes clearance for wiring behind the mortise case 2 Insert the lock in the mortise cavity 3 Mark the outline of the lock faceplate 4 Remove the lock Mortise to fit the faceplate Figure 3 Mortising for the lock case and faceplate Door Lock faceplate mortise Lock case mortise Lock faceplate Lo...

Page 248: ...or lever hole 7 8 diameter through door sensor motor wire hole 3 4 diameter from inside into mortise cavity approximately 1 deep Note 1 To locate the center of a hole on the opposite side of the door drill a pilot hole completely through the door Note 2 For holes through the door it is best to drill halfway from each side of the door to prevent the door from splintering 125 Figure 4a Drilling the ...

Page 249: ...mounting screws 3 Insert the mortise case into the mortise cavity while feeding the sensor and motor wires into the mortise cavity and out the sensor motor wire hole to the inside of the door Note If thearmoredfrontof themortisecaseisnotflush with the door edge remove the case and loosen the screws at the top and bottom of the case Adjust the bevel of the armored front of the mortise case to match...

Page 250: ...ighteningmaycompressthemortise cavity and bind the locking mechanism 8 Install cylinder EV and FV only Use a cylinder wrench ED211 to thread the concealed cylinder into the mortise case so that the groove around the cylinder head is even with the door surface Note Do not tighten the cylinder set screw until you perform task 12 on page 8 Caution A malfunction can occur if the cylinder is threaded i...

Page 251: ...draw the key Caution The control key can be used to remove cores and to access doors Provide adequate security for the control key 10 Remove backup battery tab Caution 1 For the lock to operate properly you must remove the backup battery tab Caution2 Do not connect the battery pack before you have removed the backup battery tab Doing so may cause the lock to malfunction 1 Locate the backup battery...

Page 252: ...ges or over any surfacethat could damagetheir sleeving or wire insulation 3 For EV and FV function locks perform these steps a Firmly press the outside escutcheon in position on the door The core should be flush with the outer surface of the escutcheon a If necessary adjust the cylinder depth plus or minus one turn so that the core is flush with the outer surface of the escutcheon b Secure the cyl...

Page 253: ...onlytheconnectorswithmatchingwire colors Note 2 The upgrade cable is used for reprogramming the lock s firmware without removing the lock from the door This cable does not connect to a mating lock connector Caution When making the motor connection and sensor connections make sure there are no loose wire connections where the wires are inserted into the connectors the connectors are firmly mated Ke...

Page 254: ...cheons on the door 2 Making sure that the escutcheons do not pinch the wires secure the escutcheons to the door Do not tighten the screws completely Use the combination mounting screw in the upper trim hole and the standard mounting screw in the lower trim hole Figure 14 Securing the escutcheons Combination mounting screw Standard mounting screw Inside of door Inside escutcheon ...

Page 255: ... white stripe white black with white stripe Caution When connectingthe batterypack make sure there are no loose wire connections where the wires are inserted into the connectors the connectors are firmly mated 2 Place the battery pack inside the battery compartment so that the foam will face the battery compartment door Caution When routing the battery wires make sure the wires are not routed acro...

Page 256: ... of the door 3 Slide the inside lever onto the inside spindle and secure it with the set screw 4 Making sure that the core is positioned properly in the outside escutcheon EV and FV only and the escutcheons are aligned properly on the door tighten the escutcheon mounting screws Note If a core is not available you can use the cylinder wrench ED211 to help youalignthe core openingin the escutcheon 5...

Page 257: ...ry compartment door into its mating slots and swing the door closed 2 Use a T15 TORX bit driver to secure the battery compartment door with the security screw Tighten firmly 18 Install mortise case faceplate 1 Secure the mortise case faceplate to the mortise case with the faceplate mounting screws 2 Check the lock for proper operation Figure 17 Installing the battery compartment door Security scre...

Page 258: ...Check the position of the auxiliary bolt against the strike plate Caution The auxiliary bolt must make contact with the strike plate The auxiliary bolt deadlocks the latchbolt and prevents someone from forcing the latch open when the door is closed If the incorrect strike is installed a lock in can occur Note The recommended gap between the door and jamb is 1 8 Figure 19a Installing the strike box...

Page 259: ...d no tones sound The lock s control electronics board must be replaced For instructions see the B A S I S G Service Manual T63300 or the B A S I S V Service Manual T61805 Note If thelockhas aproximitycardreader itmayhave already been activated by the presence of an object near the card reader 2 Use the temporary operator card to access the lock The green light flashes and the locking mechanism unl...

Page 260: ...Installation Instructions for B A S I S Mortise Locks BEST ACCESS SYSTEMS Indianapolis Indiana 16 2002 Best Lock Corporation dba Best Access Systems T61836 Rev 1854161 ER 7991 12 February 2002 ...

Page 261: ... I S are registered trademarks of Best Lock Corporation Side of door Range Inside 66 F to 74 F 19 C to 23 C Outside 31 F to 151 F 35 C to 66 C Side of door Range Inside and outside 32 F to 120 F 0 C to 42 C Components checklist Use the following checklist tomake surethatyouhave the items necessary to install your B A S I S Cylindrical Lock Components provided in the box Chassis with outside lever ...

Page 262: ...of the door edge Note The recommended height from the floor to the centerline of the lock is 38 2 Fold the G05Template Installation Template for 93KG and 93KBV Cylindrical Locks on the dashed line and carefully place it in position on the high side of the door bevel Note For steel frame applications align the template s horizontal centerline for the latch with the horizontal centerline of the fram...

Page 263: ...ng chassis hole chassis hole 2 1 8 diameter through door after drilling motor wire hole latch hole 1 diameter meets chassis hole Note 1 To locate the center of a hole on the opposite side of the door drill a pilot hole completely through the door Note 2 For holes through the door it is best to drill halfway from each side of the door to prevent the door from splintering 2 Mortise the edge of the d...

Page 264: ...g it with the latch tube prongs see the close up in Figure 4 Make sure the front edge of the jig is parallel with the door edge 2 Drill the through bolt holes 5 16 diameter halfway into the door 3 Turn over the drilljig and repeatsteps 1and 2 from the opposite side of the door Note Replace the drill jig after 10 door preparations Figure 3 Installing the latch in the door Latch Location of latch tu...

Page 265: ... the strike box and strike plate 3 Insert the strike box and secure the strike with the two screws provided 4 Check the position of the deadlocking plunger against the strike plate Caution Thedeadlocking plunger of thelatchbolt must makecontact withthestrike plate asshown in Figure 5b The plunger deadlocks the latchbolt and prevents someone from forcing the latch open when the door is closed Figur...

Page 266: ...ade is inserted too far past the keeper 4 Slide the lever off of the sleeve 7 Adjust for door thickness 1 Determine the door s thickness 2 Pull the rose locking pin and rotate the outside rose liner until the proper groove on the through bolt stud lines up with the hub face Note 1 Make sure that the locking pin fully locks into the rose liner Note 2 The lockset fits doors 1 3 4 to 2 1 4 thick Figu...

Page 267: ...ll through bolts and inside rose liner 1 Place the inside rose liner on the chassis aligning the holes in the rose liner with the holes prepared in the door Caution Make sure that there is clearance for the motor wire between the rose liner and the door 2 Install the through bolts through the rose liner and door in the top and bottom holes 3 Tighten the rose liner on the door with the through bolt...

Page 268: ... shown in Figure 11 3 On each side of the door slide a hub washer over the chassis sleeve so it rests on the hub 12 Route wire harness and position outside escutcheon 1 From the outside of the door feed the upgrade connector and then the motor connector and battery connector through the harness hole Caution When routing the connectors make sure the wire harness is not routed across any sharp edges...

Page 269: ...es and 2 pins The wire colors are yellow and gray Caution When making the motor connection make sure there are no loose wire connections where the wires are inserted into the connectors the connectors are firmly mated 14 Secure escutcheons 1 Position the inside and outside escutcheons on the door 2 Making sure that the escutcheons do not pinch the wires secure the escutcheons to the door but do no...

Page 270: ...or Caution When routing the battery wires make sure the wires are not routed across any sharp edges or over any surfacethat could damagetheir sleeving or wire insulation 16 Install inside and outside levers Note To use a core and throw member from a manufacturer other than BEST with a B A S I S Lock see the Installation Instructions for 9K Non interchangeable Cores Throw Members T56093 Skip task 1...

Page 271: ...trol key 5 Rotate the control key 15 degrees to the left and withdraw the key Caution The control key can be used to remove cores and to access doors Provide adequate security for the control key 18 Install battery compartment door 1 Making sure that the battery compartment door does not pinch any wires insert the tabs of the battery compartment door into its mating slots and swing the door closed...

Page 272: ...ones sound The lock s control electronics board must be replaced For instructions see the B A S I S G Service Manual T63300 or the B A S I S V Service Manual T61805 Note If thelockhas aproximitycardreader itmayhave already been activated by the presence of an object near the card reader 2 Use the temporary operator card to access the lock The green light flashes and the locking mechanism unlocks 3...

Page 273: ...ckness inches 1 3 4 to 2 1 4 The Best Access Systems logo and B A S I S are registered trademarks of Best Lock Corporation rim surface vertical rod mortise concealed vertical rod Von Duprin is a registered trademark of Von Duprin Inc Components checklist Use the following checklist to make sure that you have the items necessary to install your B A S I S Exit Hardware Trim Components provided in th...

Page 274: ...oor s edge and on the door frame if required for strike installation mark the horizontal centerline of the lock 2 On both sides of the door on the door s edge and on the door frame if required for strike installation mark the vertical centerline of the lock stile case as specified by the exit hardware manufacturer Note The vertical centerline for the B A S I S trim on the outside of the door shoul...

Page 275: ...ations Align the mounting holes for the escutcheon and lock stile case marked on the template with the mounting holes in the door See Figure 1 Note The B A S I S outside escutcheon is mounted using the four lock stile case mounting holes A holes these holes must be7 16 in diameter and drilled completely through the door 2 Tape the template to the door 3 Center punch the necessary drill points Refe...

Page 276: ...side into mortise cavity drill for EV function only lift finger slot for Precision Hardware exit devices 1 1 8 diameter slot for Von Duprin exit devices 3 4 diameter slot through door Note 1 To locate the center of a hole on the opposite side of the door drill a pilot hole through the door Note 2 For holes through the door drill halfway from each side of the door to keep the door from splintering ...

Page 277: ...n Instructions for B A S I S EX Series Exit Hardware Trim Preparing the door Figure 4 Trim hole guide Precision Hardware door preparation shown Outside of LHRB door Battery bracket hole Battery bracket harness hole Escutcheon mounting holes Cylinder hole for EV function locks only Lift finger slot Escutcheon mounting holes ...

Page 278: ...ning 3 Holding the cylinder in position in the escutcheon insert the cylinder mounting sleeve through the back of the escutcheon over the cylinder 4 Orient the cylinder and clamp plate as shown in Figure 5 From the back of the escutcheon secure the cylinder and mounting sleeve using the clamp plate and mounting screws 8 Remove backup battery tab Caution 1 For the lock to operate properly you must ...

Page 279: ...shown in Figure 6 Caution 1 When routing the connectors make sure the harnesses are not routed across any sharp edges or over any surface that could damage their sleeving or wire insulation Caution 2 Do not put too much strain on the wire harness either by pulling too hard on it or by dangling the escutcheon from it 2 Rest the B A S I S escutcheon on the door by inserting the trim studs into the m...

Page 280: ...te as shown in Figure 8 From the inside of the door secure the cylinder using the clamp plate and mounting screws For all mortise exit device installations 1 For doors less than 2 in thickness place the cylinder ring provided on the cylinder 2 Rotate the cylinder cam to the 12 o clock position as shown in Figure 9 3 Using a cylinder wrench ED211 insert the cylinder through the cylinder opening in ...

Page 281: ...door by the screws used to mount the lock stile case on the inside of the door Caution When securing the escutcheon make sure that it does not pinch the wire harness 12 Install core EV function only 1 Insert the control key into the core and rotate the key 15 degrees to the right 2 With the control key in the core insert the core into the cylinder as shown in Figure 10 3 Rotate the control key 15 ...

Page 282: ... used when programming the control electronics for the lock 2 Tighten the nut to secure the com port to the bracket 16 Install battery bracket on door 1 Position the battery bracket on the inside of the door as shown in Figure 12 Note If installing with a surface rod exit device the battery bracket is mounted over the upper rod 2 Secure the battery bracketto the door using two of the mounting scre...

Page 283: ...ing with a surface rod device dress the wire harness inside the bracket to the left of the rod so that the harness will not interfere with the movement of the rods We recommend that you loosely coil the harness and use a cable tie to secure the coil To avoid damaging the harness do not put any sharp bends in it or flex it close to the connectors Caution Failure to dress the wire harness away from ...

Page 284: ...onics board must be replaced For instructions see the B A S I S G Service Manual T63300 or the B A S I S V Service Manual T61805 Note Ifthelockhas aproximitycardreader itmayhave already been activated by the presence of an object near the card reader 2 Use the temporary operator card to access the lock The green light flashes and the locking mechanism unlocks 3 Turn the lever and open the door If ...

Page 285: ... for 3 3 part numbers for 3 5 removing and reinstalling 8 6 battery bracket screws part drawings for 3 3 part numbers for 4 9 battery cover part drawings for 3 3 part numbers for 3 5 removing and reinstalling 8 2 battery cover screws part drawings for 3 3 part numbers for 4 9 battery door part drawings for 2 5 part numbers for 2 7 battery door screw part drawings for 2 5 part numbers for 4 9 batte...

Page 286: ...gs for 3 9 part numbers for 4 4 dual validation reader for standard B A S I S Locks part drawings for 2 11 part numbers for 4 4 dual validation reader trim for EX trim part drawings for 3 9 part numbers for 3 10 dual validation reader trim for standard B A S I S Locks part drawings for 2 11 part numbers for 2 12 DV function cylindrical lock function description 2 4 E electronics board mounting scr...

Page 287: ...iption 2 3 M magnetic stripe card reader for EX trim part drawings for 3 3 part numbers for 4 4 magnetic stripe card reader for standard B A S I S Locks part drawings for 2 5 part numbers for 4 4 magnetic stripe card reader trim for EX trim part drawings for 3 3 part numbers for 3 4 magnetic stripe card reader trim for standard B A S I S Locks part drawings for 2 5 part numbers for 2 6 mortise cas...

Page 288: ...sket for EX trim part drawings for 3 3 part numbers for 3 4 reader gasket for standard B A S I S Locks part drawings for 2 5 part numbers for 2 6 removing and reinstalling EX trim parts backup battery 11 2 battery bracket 8 6 battery cover 8 2 battery pack 8 4 beam and beam roller 10 24 control electronics boards 10 10 core 8 9 cylinder mortise 8 10 cylinder rim 8 11 escutcheon 8 13 escutcheon gas...

Page 289: ...pe for mounting the sounder for standard B A S I S Locks part drawings for 2 5 part numbers for 4 6 technical documentation package 1 6 technical support 1 8 through bolt screw 2 23 throw member 7 2 trim hole inserts part drawings for 2 5 part numbers for 2 7 troubleshooting 12 7 turn knob hub part drawings for 2 17 part numbers for 2 18 removing and reinstalling 6 17 turn knob hub spacer part dra...

Page 290: ...Index C 6 B A S I S V Service Manual ...
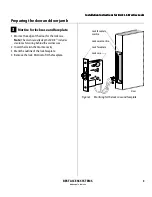
Reviews: