Servicing Standard Mortise Case Parts
6–18
B.A.S.I.S. V Service Manual
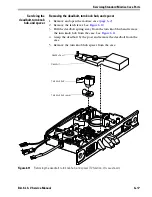
Reinstalling the deadbolt, turn knob hub, and spacer
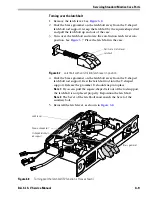
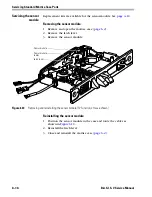
1. Position the turn knob hub spacer so that the tail fits under the case
support. See
Figure 6.12
.
2. Insert the deadbolt into the case, spring side up, so the bolt fits
though the opening in the armored front.
3. Insert the turn knob hub into the turn knob hub spacer so that the
tail of the turn knob hub is positioned against the deadbolt, as
shown in
Figure 6.12
.
4. Position the spring on the deadbolt against the turn knob hub, as
shown in
Figure 6.12
.
5. Reinstall the latch lever.
6. Close and reinstall the mortise case (
page 6–2
).
Figure 6.12
Positioning the turn knob hub and deadbolt spring
Turn knob hub spacer
Case support
Turn knob hub
Deadbolt spring
Summary of Contents for B.A.S.I.S. V
Page 1: ...SERVICE MANUAL SERVICE MANUAL ...
Page 16: ...Figures xvi B A S I S V Service Manual ...
Page 48: ...Standard Functions and Parts 2 24 B A S I S V Service Manual ...
Page 66: ...Exit Hardware Trim Functions and Parts 3 18 B A S I S V Service Manual ...
Page 78: ...Shared Standard and Exit Hardware Trim Parts 4 12 B A S I S V Service Manual ...
Page 114: ...Servicing Standard Mortise Case Parts 6 20 B A S I S V Service Manual ...
Page 206: ...Servicing Exit Hardware Trim Escutcheon Parts 10 32 B A S I S V Service Manual ...
Page 238: ...Troubleshooting 12 12 B A S I S V Service Manual ...
Page 242: ...Lock History Event Types A 4 B A S I S V Service Manual ...
Page 244: ...Installation Instructions B 2 B A S I S V Service Manual ...


