Installation Instructions for B.A.S.I.S. EX Series Exit Hardware Trim
BEST ACCESS SYSTEMS
Indianapolis, Indiana
Completing the installation
10
14
Install strike(s)
Note:
If retrofitting the B.A.S.I.S. trim to an existing exit
hardware installation, skip this task.
1
Install the strike(s) in the door frame or door stop;
follow the instructions provided by the exit hardware
manufacturer.
2
Check the lock for proper alignment between the
strike(s) and latch(es).
15
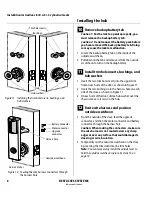
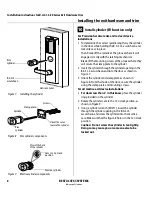
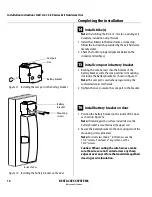
Install com port in battery bracket
1
Routing the wire harness into the bottom of the
battery bracket, slide the com port into its mounting
slot inside the battery bracket as shown in
Figure 11.
Note:
The com port is used when programming the
control electronics for the lock.
2
Tighten the nut to secure the com port to the bracket.
16
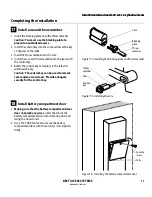
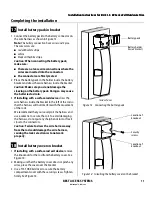
Install battery bracket on door
1
Position the battery bracket on the inside of the door
as shown in
Figure 12.
Note:
If installing with a surface rod exit device, the
battery bracket is mounted over the upper rod.
2
Secure the battery bracket to the door using two of the
mounting screws provided.
Note:
For doors less than 2
″
in thickness, use the
1 1/4
″
screws. For doors 2
″
or greater, use the
1 3/4
″
screws.
Caution:
When routing the wire harness, make
sure the wires are not routed across any sharp
edges or over any surface that could damage their
sleeving or wire insulation.
Figure 11 Installing the com port in the battery bracket
Battery bracket
Com port
Nut
Figure 12 Installing the battery bracket on the door
Mounting
screws
Inside of door
Battery
bracket
Summary of Contents for B.A.S.I.S. V
Page 1: ...SERVICE MANUAL SERVICE MANUAL ...
Page 16: ...Figures xvi B A S I S V Service Manual ...
Page 48: ...Standard Functions and Parts 2 24 B A S I S V Service Manual ...
Page 66: ...Exit Hardware Trim Functions and Parts 3 18 B A S I S V Service Manual ...
Page 78: ...Shared Standard and Exit Hardware Trim Parts 4 12 B A S I S V Service Manual ...
Page 114: ...Servicing Standard Mortise Case Parts 6 20 B A S I S V Service Manual ...
Page 206: ...Servicing Exit Hardware Trim Escutcheon Parts 10 32 B A S I S V Service Manual ...
Page 238: ...Troubleshooting 12 12 B A S I S V Service Manual ...
Page 242: ...Lock History Event Types A 4 B A S I S V Service Manual ...
Page 244: ...Installation Instructions B 2 B A S I S V Service Manual ...

