


1-39
BEFORE USING THE MACHINE
Contents
PLACING THE ORIGINAL ON THE DOCUMENT GLASS
This section explains how to place the original on the document glass.
Allowed original sizes
When the original is a non-standard size, see the
appropriate explanation below for the mode you are
using.
☞
2. COPIER "
SPECIFYING THE ORIGINAL SIZE
"
(page 2-30)
☞
4. FACSIMILE "
IMAGE SETTINGS
" (page 4-44)
☞
5. SCANNER / INTERNET FAX "
IMAGE
SETTINGS
" (page 5-52)
Maximum original size
Standard sizes
8-1/2" (height) x 11" (width)
A4: 210 mm (height) x 297 mm (width)
Non-standard sizes
8-1/2" (height) x 11-11/16" (width)
216 mm (height) x 297 mm (width)
1
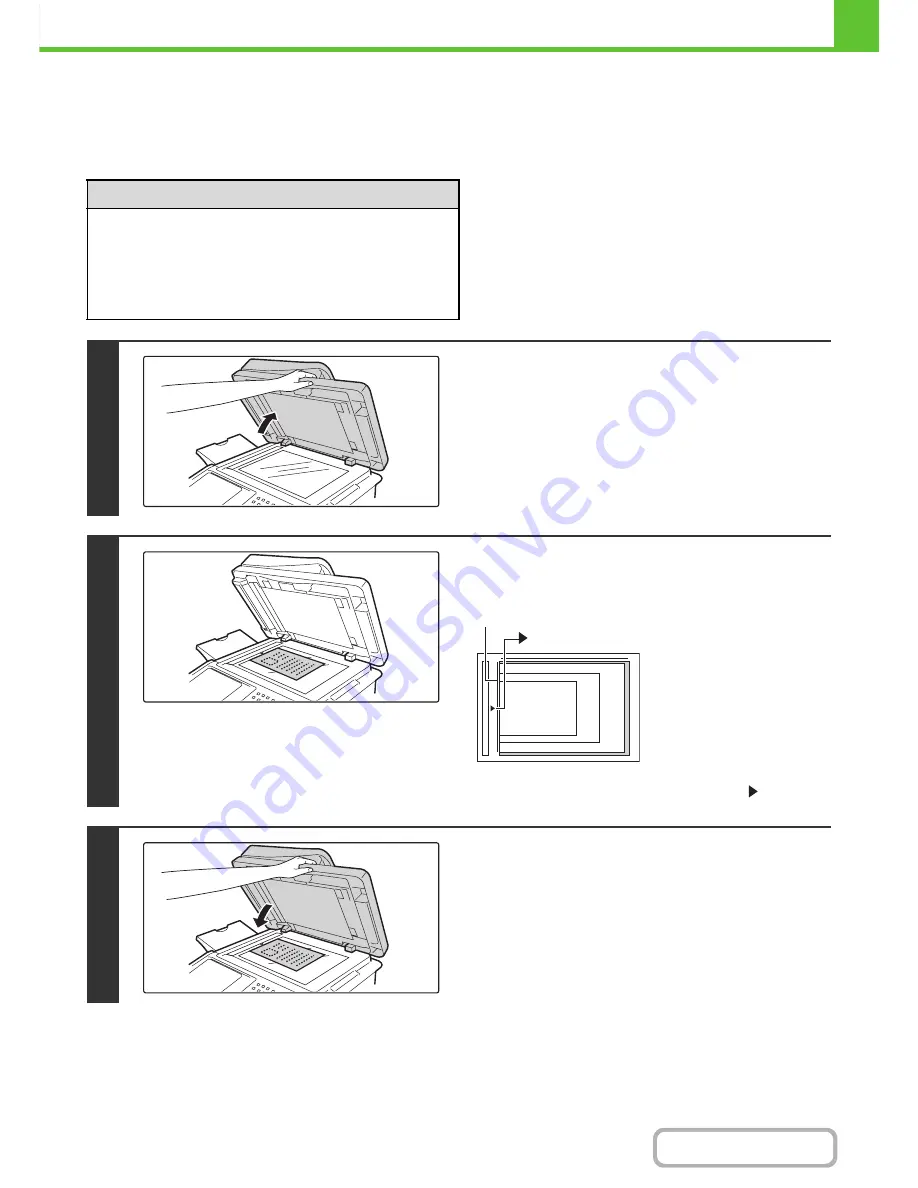
Open the automatic document feeder.
2
Place the original.
Place the original face down in the left center position of the
document glass.
All originals should be placed in the left center position.
Align the middle of the original with the tip of the
mark.
3
Close the automatic document feeder.
After placing the original, be sure to close the automatic
document feeder. If left open, parts outside of the original will
be copied black, causing excessive use of toner.
5-1/2" x 8-1/2"
(A5)
8-1/2" x 11" (A4)
B5
mark
Document glass scale
Содержание MX-C402SC
Страница 4: ...Reduce copy mistakes Print one set of copies for proofing ...
Страница 6: ...Make a copy on this type of paper Envelopes and other special media Transparency film ...
Страница 11: ...Conserve Print on both sides of the paper Print multiple pages on one side of the paper ...
Страница 34: ...Search for a file abc Search for a file using a keyword Search by checking the contents of files ...
Страница 35: ...Organize my files Delete a file Delete all files Periodically delete files Change the folder ...
Страница 243: ...2 86 COPIER Contents To cancel an RGB adjust setting Touch the Cancel key in the screen of step 3 ...
Страница 245: ...2 88 COPIER Contents To cancel the sharpness setting Touch the Cancel key in the screen of step 3 ...
Страница 252: ...2 95 COPIER Contents To cancel an intensity setting Touch the Cancel key in the screen of step 3 ...
Страница 295: ...3 19 PRINTER Contents 4 Click the Print button Printing begins ...