


1-6
BEFORE USING THE MACHINE
Contents
(23) Right side cover release lever
To remove a paper misfeed, pull and hold this lever up to
open the right side cover.
☞
8. TROUBLESHOOTING "
REMOVING MISFEEDS
"
(page 8-10)
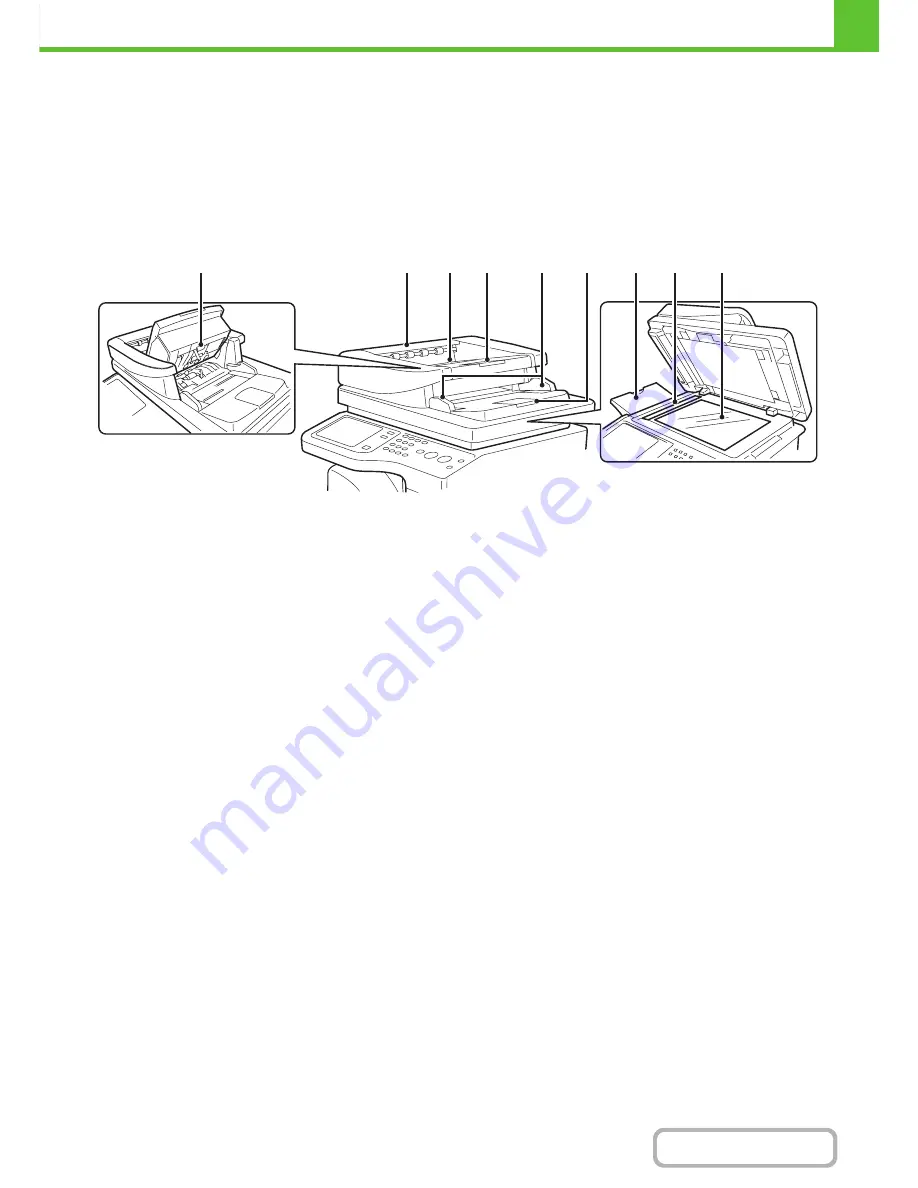
AUTOMATIC DOCUMENT FEEDER AND DOCUMENT
GLASS
(1)
Paper feed roller
This roller rotates to automatically feed the original.
(2)
Document exit area cover
Open this cover to remove an original misfeed.
(3)
Original exit tray 1
Originals are delivered to this tray after scanning.
(4)
Document feeding area cover
Open this cover to remove an original misfeed or clean
the paper feed roller.
☞
8. TROUBLESHOOTING "
REMOVING MISFEEDS
"
(page 8-10)
(5)
Original guides
These help ensure that the original is scanned correctly.
Adjust the guides to the width of the original.
☞
PLACING THE ORIGINAL
(page 1-36)
(6)
Document feeder tray
Place originals in this tray. 1-sided originals must be
placed face up.
☞
PLACING THE ORIGINAL
(page 1-36)
(7)
Original exit tray 2
If originals are not be delivered to original exit tray 1 after
scanning, they are delivered to this tray.
(8)
Scanning area
Originals placed in the document feeder tray are scanned
here.
(9)
Document glass
Use this to scan a book or other thick original that cannot
be fed through the automatic document feeder.
☞
PLACING THE ORIGINAL ON THE DOCUMENT
GLASS
(page 1-39)
(2)
(3)
(4)
(8)
(7)
(9)
(5)
(6)
(1)
Содержание MX-C402SC
Страница 4: ...Reduce copy mistakes Print one set of copies for proofing ...
Страница 6: ...Make a copy on this type of paper Envelopes and other special media Transparency film ...
Страница 11: ...Conserve Print on both sides of the paper Print multiple pages on one side of the paper ...
Страница 34: ...Search for a file abc Search for a file using a keyword Search by checking the contents of files ...
Страница 35: ...Organize my files Delete a file Delete all files Periodically delete files Change the folder ...
Страница 243: ...2 86 COPIER Contents To cancel an RGB adjust setting Touch the Cancel key in the screen of step 3 ...
Страница 245: ...2 88 COPIER Contents To cancel the sharpness setting Touch the Cancel key in the screen of step 3 ...
Страница 252: ...2 95 COPIER Contents To cancel an intensity setting Touch the Cancel key in the screen of step 3 ...
Страница 295: ...3 19 PRINTER Contents 4 Click the Print button Printing begins ...