


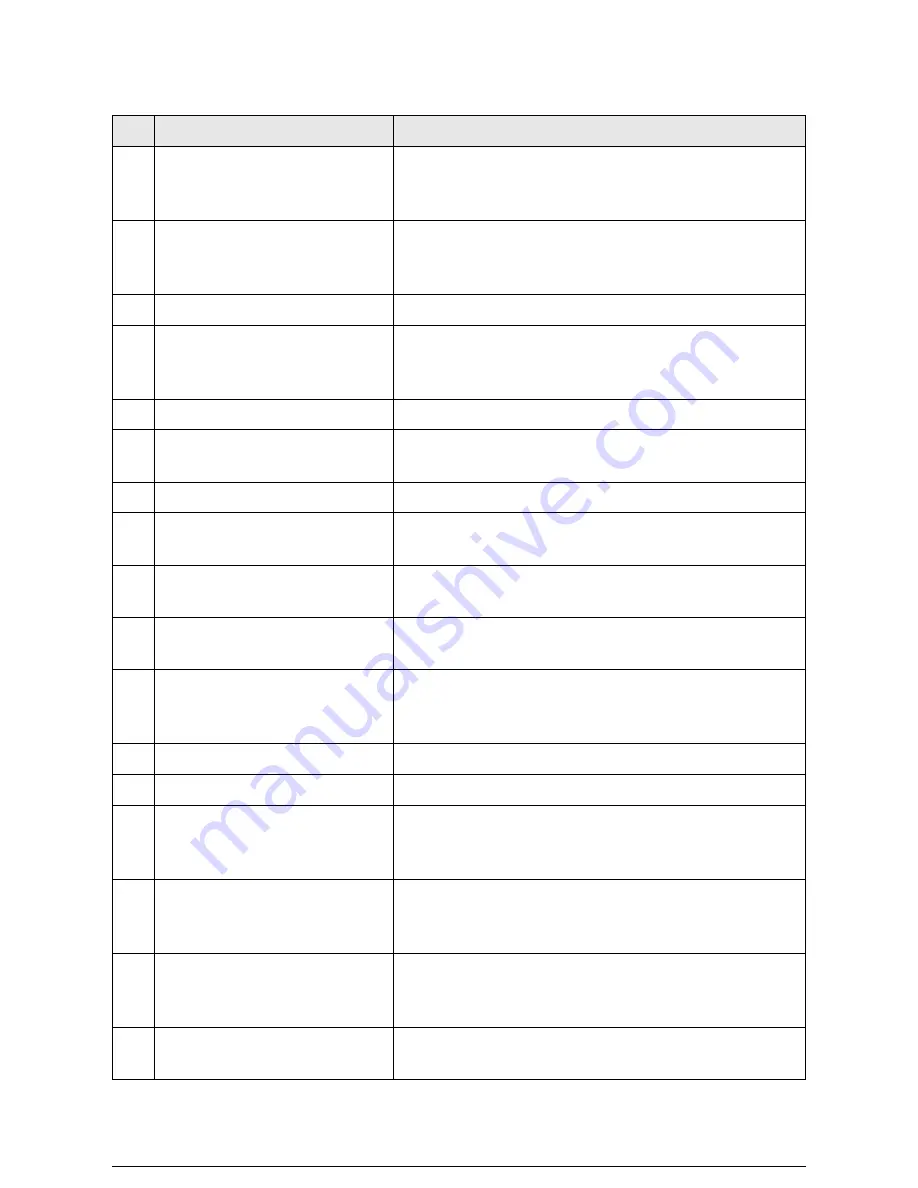
No.
Name
Function
1
Menu Screen or (Setup Screen)
Used to set up copy jobs, map original sizes to the media,
display messages and procedures, and provide troubleshooting
help, e.g., for jam clearance.
2
[Job in Memory] lamp
Illuminates for a preset period while the previous copy job is
retained in memory. Enables the user to reprint the previous
copy job without rescanning the original(s).
3
Screen Contrast Dial
Adjusts the contrast of the touch screen.
4
<Custom Presets/Meter
Check> key
Provides access to the machine’s default settings. Also
enables the user to view the billing meters, software versions,
machine configuration, etc.
5
<Power Saver> key
Switches the machine into and out of the low power mode.
6
Keypad (0 to 9, C)
Enables the user to enter the copy quantity and setting values.
Pressing the <C> key clears all entered values.
7
<Menu> key
Currently not supported.
8
<Stored Job> key
Saves copy job settings in memory so they can be recalled and
the stored jobs run again.
9
<Copy From Memory> key
Reprints the most recent copy job. The lamp illuminates when
copies are printed from memory.
10
<Clear All> key
Cancels the current job settings and returns them to the default
values.
11
<Interrupt> key
Enables the user to interrupt a copy job to perform a higher
priority job. The lamp on the left side illuminates during
interruption copying.
12
<Stop Copy> key
Ejects all copies currently in process and stops the machine.
13
<Stop Document> key
Immediately stops document feed.
14
<Low Speed Scanning> key
Used to prevent damage to fragile originals. Press this key to
enter the low-speed scan mode. The lamp on the left side will
illuminate during low-speed scanning.
15
<Start> key
Starts document scanning when the scanner is set to the
manual start mode, when copying from memory, and when
making sample copies.
16
<Sample Copy> key
Enables the user to try out different copy settings to determine
which provide the best copy quality. The lamp on the left side
illuminates during sample copying.
17
<Media Cut Mode> keys
Selects the method for cutting media. The lamp on the left side
of the selected cut mode will illuminate.
Summary of Contents for Wide Format 6030
Page 1: ...Version 3 0 January 2006 Xerox 6030 6050 Wide Format Copier Printer User Guide 701P45100 ...
Page 28: ......
Page 29: ...ChapterChapter 0 1 Product Overview Chapter 1 ...
Page 31: ......
Page 52: ...3 The scanned original will eject to the document output tray Remove the original ...
Page 60: ...5 Gently but firmly close the media tray ...
Page 65: ...9 Close the media tray ...
Page 74: ......
Page 75: ...Chapter Chapter 0 2 Copy Chapter 2 ...
Page 93: ...ChapterChapter 0 3 Copy Features Chapter 3 ...
Page 98: ......
Page 140: ......
Page 141: ...ChapterChapter 0 4 Stored Jobs Chapter 4 ...
Page 151: ...ChapterChapter 0 5 Custom Presets Meter Check Chapter 5 ...
Page 186: ......
Page 187: ...ChapterChapter 0 6 Scanner Functions Chapter 6 ...
Page 191: ...Chapter Chapter 0 7 Printer Overview Chapter 7 ...
Page 214: ......
Page 215: ...ChapterChapter 0 8 Printer Setup Chapter 8 ...
Page 252: ...An example of the configuration list settings printout is shown below ...
Page 257: ...ChapterChapter 0 9 Logical Printer Setup and Operation Chapter 9 ...
Page 344: ......
Page 345: ...ChapterChapter 0 10 Additional Operations from the Printer Menu Chapter 10 ...
Page 367: ...ChapterChapter 0 11 Ethernet Print Service for UNIX Chapter 11 ...
Page 391: ...ChapterChapter 0 12 Maintenance Chapter 12 ...
Page 396: ......
Page 397: ...ChapterChapter 0 13 Problem Solving Chapter 13 ...
Page 413: ...ChapterChapter 0 14 Specifications Chapter 14 ...
Page 423: ...Appendixes ...
Page 439: ......
Page 440: ......
Page 441: ......
Page 442: ......


